When starting a renovation, the first thing you need to do is prepare the room by dismantling the old finishes and unreliable, destructive structures.
When replacing floor coverings, it is often necessary to dismantle a dilapidated screed that has lost its operational properties.
Despite the complexity and labor-intensiveness of this work, you can do it yourself, using special devices, mechanisms and knowing the features of the structures being disassembled.
Figure 1. Dismantling the screed.
What is a screed? Its functions
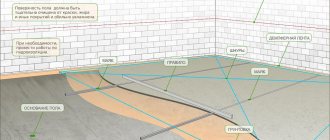
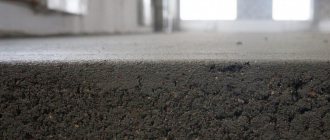
Floor screed is an intermediate layer between the ceiling and the final finishing coating.
It is arranged to level the base, create the necessary slopes, accept and redistribute loads from furniture, equipment and household appliances.
Increases the rigidity and strength of foundations, improves the sound and heat insulation properties of floors.
Allows you to raise the floor level to the desired height, hide utility lines, cable wiring, and underfloor heating systems underneath it.
Types of screeds
There are several types of leveling screeds, the main ones:
- wet;
- semi-dry;
- dry;
- self-leveling.
The choice of technology depends on the purpose of the premises, operating conditions, scope of work and financial capabilities.
So, dry screed is not suitable for rooms where leaks and flooding are possible.
Semi-dry is not economically profitable when performing small volumes, as it requires the use of special equipment and mechanisms.
Self-leveling mixture is ineffective in the presence of large differences and unevenness.
Wet screed
The screed mortar is made from cement and sand in a ratio of 1:3, with the addition of plasticizers and water.
The mixture is thoroughly mixed in a mortar mixer or a hammer drill with an attachment until it reaches a homogeneous creamy consistency.
Important! A screed made using wet technology is subject to shrinkage and cracking, so it must be reinforced with a steel masonry mesh with 100x100 cells.
In order for the reinforcement, after pouring the concrete, to be in the mass of the screed, you need to place special plastic clamps or improvised devices under the mesh: wooden blocks, plywood scraps, lumps of mortar.
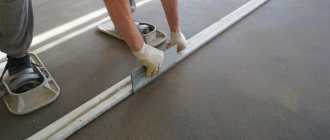
The solution is poured onto the prepared floor and stretched using the beacon rule.
Figure 2. Pouring cement-sand screed using the wet method.
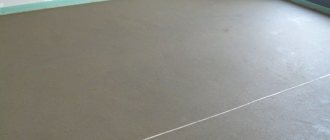
Cement-sand screed creates a durable, reliable coating that is ready for subsequent finishing after 28-40 days.
Semi-dry screed
It is made from a mixture of grade 400 or 500 cement, fine river sand, fiberglass and modifying additives that increase the ease of installation and improve the performance properties of the coating. Water is added to the solution in minimal quantities, only to hydrate the cement.
Fiber fibers act as reinforcement in such a screed.
It is advisable to arrange a semi-dry screed for significant volumes.
To manufacture it, special equipment is required:
- a pneumatic blower that performs the function of a mortar mixer and a pump that supplies the mortar to the installation site;
- damper in the form of a funnel, for distributing the mixture over the surface, dampening the speed of the semi-dry composition arriving under pressure.
- trowel - for compacting and creating a perfectly even, smooth layer.
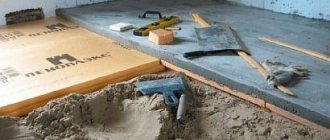
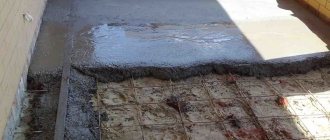
The solution is placed on the base and leveled using a straightener. Immediately after installation is completed, it is processed with a trowel.
After a day, the screed is ready for use. You can begin finishing after three to four days, depending on the humidity and temperature in the room.
Due to the minimal amount of water, a dense and durable layer is created that is not subject to shrinkage and cracking.
Figure 3. Semi-dry screed device.
Dry floor screed
This screed is laid in dry, heated rooms and consists of a layer of insulation and a coating of rigid sheet materials: gypsum plasterboard, gypsum plasterboard, plywood or special two-layer gypsum fiber floor boards from Knauf.
Expanded clay mixture, Penoplex or hard mineral slabs are suitable as insulation.
The most common is dry screed with expanded clay insulation, as it has excellent sound insulation and high thermal properties, low weight and ease of installation.
Important! Use expanded clay of different fractions when backfilling to create a denser layer.
Figure 4. Dry screed device.
Self-leveling screed
Self-leveling screed is used if it is necessary to level bases with minor defects and unevenness.
For its production we use dry construction mixtures or ready-to-use polymer compositions.
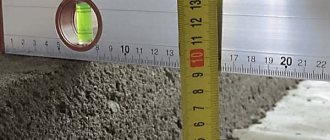
Dilute the dry mixture and mix according to the instructions on the package. In this case, the thinner the layer, the more liquid the consistency of the solution should be.
The thickness of the self-leveling layer should not exceed 15-20 millimeters.
Pour the finished composition onto the surface, spread it over the surface with a comb spatula and roll it with a needle roller to remove air bubbles.
The liquid plastic mixture, spreading over the surface, fills all irregularities, cracks and pores. Creates a perfectly flat, smooth, durable base, ready for finishing in 5-7 days.
You can walk on this surface the very next day.
Figure 5. Self-leveling screed device.
Possible consequences
Talk to your neighbors in advance and tell them about the renovation work. Dismantling an old screed is a very lengthy and noisy process. When drawing up estimates, be guided by GESN (State Elementary Estimate Norms). In addition, removing the screed is associated with the presence of construction dust and debris. Dismantling a floor screed without outside help is a labor-intensive job that takes a lot of time and effort. You need to approach this process correctly, because you will not only gain valuable experience, but also save your family budget.
You will see how to dismantle the floor screed in the following video.
Home Other materials
A concrete or cement screed is used to level the surface of a concrete subfloor before laying the finishing floor covering. How to remove a screed from the floor when it becomes unusable or the time comes for major repairs, this question affects many during repairs. The choice of method and the overall complexity of the operation depend on the type of screed, its thickness and the area of the dismantled coating.
Reasons for dismantling
Screed is an important element in floor construction. The quality and durability of the finished floor covering depends on its strength and reliability.
Dismantling the screed is necessary in the following cases:
- the old foundation was deformed and destroyed;
- cracks appeared on the surface;
- it is necessary to install underfloor heating systems;
- repairs or laying of utility lines under the screed is required;
- it is necessary to lower or raise the floor level;
- It is necessary to replace the tile cladding due to deformation and cracking.
If the screed has become unusable, there is no point in repairing it. It is necessary to disassemble it, clean and repair the ceiling, and create a flat, strong and reliable base.
Evaluation of old surface
An old cement-sand screed may have cracks, chips or voids with detachment from the concrete floor. First, the screed area must be inspected for visible damage. Then you need to take a thick metal rod and lightly tap the entire surface of the floor screed. If there are peeling or empty areas, the sound from tapping in those places will be dull, different from the sound of a good screed. If large areas are damaged, occupying more than a third of the floor surface, it is better to remove the old cement-sand layer and replace it with a new one. If we are talking about minor damage in small areas, it can be repaired.
You can entrust the preparation of the concrete floor surface for further coating to specialists, but you can do this work yourself. It should be borne in mind that repairing a floor screed with your own hands is a difficult and time-consuming process. To create a durable concrete layer, it is necessary to take into account the physical and chemical properties of old and fresh mortar.
Tools and protective equipment
Dismantling the screed is a labor-intensive and dusty job.
Before you begin, you need to stock up on tools that will make this process easier. Purchase products that will protect your respiratory tract, eyes and hands from mechanical damage and dust.
Figure 6. Dismantling the screed with a jackhammer.
Required tools:
- perforator, jackhammer - to destroy the screed using the impact method;
- gasoline or electric joint cutters with diamond discs for cutting reinforced screeds;
- grinder for cutting screeds and reinforcement;
- crowbar, chisels, sledgehammer and hammer for manual destruction of screeds, for small amounts of work.
The following will be useful as protective devices and equipment:
- masks and respirators to protect the respiratory tract;
- hearing protection headphones;
- gloves, overalls, helmets.
Figure 7. Protective equipment and devices.
To clean up construction waste after dismantling the screed, you will need shovels, stretchers, wheelbarrows, and large and durable garbage bags. A vacuum cleaner is useful for removing fine dust.
Advice from experienced professionals
- Carrying out dismantling work that requires the use of impact devices is a very expensive service, since these devices negatively affect human health.
- Dismantling work is always accompanied by the appearance of dust and debris. Therefore, you need to worry about transport for waste disposal in advance.
- It is not recommended to carry out dismantling work yourself without special skills and knowledge, as you can not only harm the entire structure of the structure, but also your health.
- During work, do not neglect protective equipment. Be sure to wear a helmet, respiratory mask, special glasses, and headphones. Because the work ahead is dusty, noisy, and quite dangerous.
Perhaps the main condition for successful repairs, especially replacing floor coverings, is preliminary preparation of the surface. Whatever finishing coating you choose, it should be placed exclusively on a leveled and clean surface.
It is also not recommended to install a new floor covering on top of an existing one, this will further affect the strength, appearance and other parameters, which means it is important to have enough knowledge to dismantle the “used” floor, and also be able to do it competently
For a qualified builder, dismantling various floor coverings will not be difficult, but for those who have not previously encountered this type of repair work, it is better to familiarize themselves with certain conditions and stock up on the necessary tools.
Features of dismantling
The dismantling technology is selected depending on the thickness, material of the screed, and the presence of reinforcement.
This can be either manual disassembly using a hammer and chisel, or diamond cutting or crushing using a compressor and jackhammer.
Noisy work must be carried out during the daytime and agreed with the management company and neighbors.
When disassembling the screed, work should be carried out with extreme caution so as not to damage the floor slabs.
If there are utility lines under the screed, you need to disconnect them and turn off the water.
Reinforced concrete screeds are considered the most difficult to dismantle. Polymer and semi-dry ones are less labor-intensive; they are removed by cutting. A dry screed is easier to disassemble. It is worth removing the fasteners or cutting the covering sheets using a grinder and removing the insulation layer.
Stages of work
The standard method of dismantling a screed is to destroy it with a percussion tool. The choice of a manual or electric unit depends on the thickness and strength of the subfloor. If there is reinforcement mesh in the subfloor, it will have to be cut and removed in sections.
Cement and concrete screeds are considered the strongest and most labor-intensive to dismantle. Anhydride and magnesite are more delicate and are much easier to remove. A self-leveling polymer floor can create a difficulty; first you need to partially cut the floor using a joint cutter.
The simplest dismantling process is dismantling the prefabricated screed-leveling structure. It is enough to remove the hardware and remove the sheets. If they are glued together, then you can simply cut them at a certain distance and remove the screed.
Dismantling a monolithic screed is more complicated and is carried out in several stages.
Preparatory work
First you need to determine the composition, thickness and design of the subfloor. It’s good if there are communication diagrams (pipes, wires, cables) laid in the thickness of the screed.
If there is no such plan, you will have to act using the “scientific poke” method. To do this, a fragment is cut out with a grinder or other cutting tool and the height of the subfloor and its composition are determined.
Professional teams servicing industrial facilities use special devices - ultrasonic flaw detectors - to determine the structure and thickness of the subfloor.
Protection of enclosing structures and elements
Preventive measures are being taken: it is necessary to protect walls, windows and doors from possible damage from fragments, cut off power to wires and cables, and shut off the flow of water through pipelines.
Working with a percussion instrument
It is recommended to start dismantling work from the far corner, moving gradually towards the exit. The broken pieces are collected in bags after completion of work or as the site passes.
Dismantling the screed is a process that requires a significant investment of time and effort. It’s cheaper to do it yourself, but in difficult cases it’s better to turn to specialists. This will save your time and nerves.
Dismantling methods
There are several ways to dismantle the screed:
- Impact is the most common method based on the destruction of concrete. The main dismantling tools are a hammer drill, a jackhammer, and a sledgehammer. The screed is broken into pieces of various sizes, which are then removed.
- Cutting _ This method is most often used for partial dismantling of the screed.
Figure 8. Cutting a screed with a grinder.
The concrete layer is cut into pieces using a grinder or a joint cutting device. This method allows you to carefully cut the screed into pieces and remove it without damaging the ceiling.
- Diamond cutting is used to remove strong and thick ties reinforced with steel rods of various diameters.
This method is suitable for dismantling concrete coatings in industrial buildings and garages.
Figure 9. Diamond cutting of concrete.
- Robotic machines are used mainly at complex industrial facilities, for dismantling large volumes of concrete foundations with a thickness of at least 100 millimeters. The machines are controlled remotely and are highly productive.
Figure 10. Robotic machine for crushing concrete.
Where to begin?
Repairing an apartment or private house begins with various rough work. It is necessary to tear off the old wallpaper, replace the windows and doors with new ones, and most importantly, replace the screed on the floor of the room. The screed is dismantled in cases where it was poured more than a year ago, and it has managed to significantly lose its heat and sound insulation properties. The dismantling process is a very labor-intensive and painstaking work, however, if you try and make every effort, you can do it yourself. Many people want to do this without mistakes, while maintaining their family budget.
Before starting a renovation, you need to take all factors into account. You need advice from a specialist in renovating apartments and houses; he will give you answers to many of your questions.
Screed dismantling sequence
First, we examine the existing screed and determine the need for all or partial disassembly. In some cases, it is enough to repair cracks or make partial repairs by cutting out and sealing individual sections.
We determine the thickness of the screed, composition, presence of reinforcement and utilities by cutting out a fragment using a grinder or opening a small area with a hammer drill.
Depending on the screed material, we determine the dismantling method.
Before you start working with impact tools, it is necessary to protect the windows from accidental contact with screed fragments.
We begin dismantling the screed from the far corner, gradually moving towards the exit.
Important! It is necessary to work with a jackhammer carefully so as not to damage the ceiling.
We place the disassembled pieces of screed into thick bags and take them to the storage location.
To minimize dust formation, regularly wet the floor with water during operation.
After removing construction debris from dismantling the screed, the floor should be dust-free and primed with penetrating primers to secure the concrete coating.
Partial dismantling of the screed.
Sometimes there is no need to completely dismantle the screed. This happens when the floor level is slightly reduced.
We proceed as follows:
- Using a grinder, cut parallel strips of equal depth on the surface of the screed.
- Using a hammer drill with a spatula attachment, knock down the solution in a continuous layer to the cut depth.
- We remove the fragments of the screed and vacuum the base.
- We treat the surface with a penetrating primer to secure the remaining layer of screed.
Figure 11. Partial dismantling of the screed.
Dismantling the concrete covering
There are many ways to dismantle a concrete coating, the most popular and most effective are: impact, concrete removal with slabs and cutting. We will tell you a little further about the features of the impact method, but now you will find out by what principle all concrete dismantling occurs.
The process can be divided into the following stages:
- Beginning - at this stage it is necessary to make an initial hole, from which further dismantling will take place. To do this, you can use any of the possible methods.
- After the beginning has been made, the entire screed is divided into individual elements by impact or by cutting.
- Finally, large parts are torn off from the supporting base and taken out of the room.
If the old screed is laid on a layer of crushed stone, then it must be removed together with the layer of crushed stone, this will make it much easier for you to tear it off from the base. Most often, broken concrete is collected with a shovel, and placing a shovel through the rubble will be very difficult. It is much easier to do this by sliding along the base.
Features of various methods
This option involves an impact force that is applied to the concrete surface, due to which the concrete begins to crack and break into small pieces, which can then be easily collected and thrown away or used for other purposes. Dismantling a self-leveling floor or concrete with a topping layer is best done using this method, since it is best suited for high-strength coatings and helps to easily clean more areas.
The power of electric jackhammers must be correctly calculated and selected depending on the thickness of the layer to be removed.
Next, we will tell you how to do the work correctly using:
- Impact devices: hammer drill and jackhammer.
- Cut concrete using a diamond blade.
- Dismantling the screed - drilling with a diamond drill.
Working with impact devices
We start from the door or any corner convenient for you. First, punch a hole all the way to the base and clean it completely. After this, you begin to chip five to ten centimeters from the edge, gradually expanding the hole and moving across the entire area. It is better to carry out the work in sections of three to five square meters. They crushed the intended area, cleared it and continued work.
Dismantling, during which the mortar is removed from concrete and cement, regardless of the method in which it is done, consists of breaking the floor into pieces.
A jackhammer is best suited for such purposes, since it is designed for this type of work. Many craftsmen use a simple hammer drill, equipped with a special pick or chisel. In this case, the drilling mode must be turned off and only the impact function must be left.
Cutting concrete
Dismantling concrete with a simple circle on metal is impossible. You will need to purchase a special diamond-coated wheel that is designed for concrete and stone.
When working with a circular saw, determine the level to the base so as not to touch it when cutting. This is about 10 cm, on the first floors it can be up to 25 cm.
The entire area is cut into small sections of half a square meter, then they are carefully undermined and removed entirely. In this case, it is necessary to work in safety glasses and a respirator, as there will be an incredible amount of fragments and dust, it is better to open all the windows and create a strong draft.
Working with a drill
If your hammer drill cannot dismantle a concrete floor, you can make the task easier. To do this, take a diamond drill and make a large number of holes in the concrete. After that, we use a lance to beat off the areas that are drilled on all sides. Try to maintain a right angle when drilling, as the drill can easily break.
If the work is progressing too slowly due to the constant overheating of the tool, try to find or purchase another hammer drill. Then, in the intervals when one cools down, you can safely use the second. Also, in order to crush the screed continuously and not be distracted by cleaning, you can find an assistant who will clean the area behind you.
- How to make a concrete floor screed with your own hands
- How and with what to level the floor in an apartment
- How to choose the right self-leveling floor mixture
- Stages of polishing and grinding a concrete floor
- We competently fill the water heated floor