Creating a strong, reliable structure is the result of carefully and competently done work, the basis for which will certainly be a high-quality and durable foundation. The laying of this element of the future building is of great importance. During the construction process, you should rely on a large number of features. This process requires builders to take into account a huge number of conditions.
The strength of the mixture for the foundation is determined not only by the quality of the concrete itself, but also by the technology of its construction, as well as by the weather conditions in which the installation is carried out. It is precisely the temperature at which concrete is poured that can affect the strength and durability of the future structure. Therefore, it is very important to know at what minimum temperature concrete can be poured.
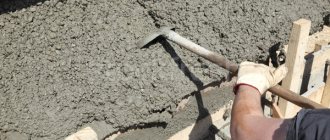
Working with a warm mixture
Climate conditions in the room
The screed work itself must be carried out indoors at a minimum air temperature of +5 degrees, and it must also be maintained for 10 days after completion. It is important to close possible sources of cold entry - windows, doors, the perimeter of collapsible structures. If there is no city heating in the room and the heating is provided by a heater, then it is necessary to ensure its reliability and stable operation.
It is extremely important to completely prepare the room for floor screed: coordinating the levels of the “finished floor” in height, laying electrical and heating networks, pressing floors, if required by the project, installing noise, hydro and heat insulating layers. This is necessary to ensure that there is no downtime during screeding in winter.
To insure against freezing of the screed during periods of heating with heaters, special frost-resistant additives are used in cement. With average statistics, 50 kg of cement requires the following amount of frost-resistant additive:
- 200 grams if t = from +5 to 0 degrees
- 300 grams if t = from 0 to -5 degrees
- 400 grams if t = -5 to -10 degrees
Step-by-step instructions for pouring a polyurethane floor
The simplest way to fill a polyurethane self-leveling floor is to apply the mixture to a cement base. That is, the cheapest option is to fill the surface with concrete, after which self-leveling polyurethane material is used to increase the protection of the insufficiently durable cement-sand coating. A layer of polyurethane mixture can be applied to concrete and wood garage floor substrates. It is very important that the base surface is smooth and dry.
The process of pouring a polymer garage floor with your own hands is as follows.
- Level the base on which a layer of polymer material will be applied. The base surface is cleaned of dirt and dust, all cracks and defects are carefully sealed, then what?
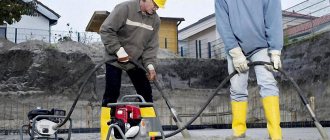
A range of products to facilitate winter mechanized floor screeding
In accordance with production conditions, specialists use:
- sand warming rods
- inflatable warmers
- frost-resistant additives
Sometimes the number of links is increased to speed up the process.
The least expensive method, often used in large areas (shops, offices), is to use several sets of equipment and a large number of units at once. Then the work happens quickly, the sand is consumed at such a speed that it does not have time to freeze. Triggers at temperatures not lower than -10.
Sand is delivered to the construction site in the back of a heated heavy-duty truck; small batches - 20 cubic meters each. or based on the full consumption of this volume in 2 hours in the cold. In two hours you can process 20 cubic meters. sand using three links.
Is it possible to do foundation work in cold weather?
Just recently, frost could cause construction delays, but the use of modern technologies has made it possible to carry out construction work even in winter.
When working in cold weather, you must follow the requirements specified in the instructions for winter filling:
- Digging a pit or trench;
- Installation of formwork;
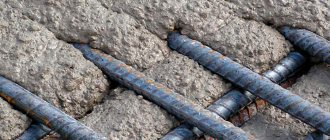
- Installation of a reinforced frame;
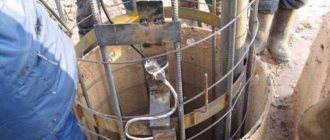
- Provide heating for the structure into which concrete will be poured;
Note! It is especially important to heat the formwork and the poured mass during the first 48 hours, just at the time when setting occurs.
Preparation in pouring
- Preparation of waterproofing, which covers the poured solution;
- After the first two days, heating can be reduced.
- After the mass has hardened, the formwork should be removed and the structure should be left to gain strength.
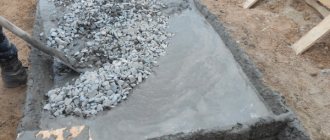
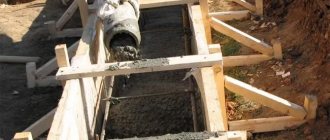
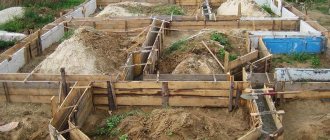
The photo shows the filling of the structure
Recommendations for working in sub-zero temperatures
Pouring concrete at low temperatures to construct the base of a building is the most responsible and important process, which requires the developer to know some of its features:
- Before pouring in winter, you should be sure that it is possible to create conditions conducive to the fact that the foundation will have a standard level of strength without microcracks and damage. It should also be understood that the price of construction work in winter will be slightly higher;
Note! Mixing the solution entails some chemical reactions, accompanied by the release of heat, so that the mixture can warm up on its own when pouring.
- In order for more heat to be generated, a fine-grained solution should be used, because it begins to interact with water many times faster;
- The thicker the concrete layer, the more heat will be released, and, accordingly, the slower the monolith will cool;
- If it is necessary to increase the temperature of the solution, only the water or additives should be heated. Cement should not be heated under any circumstances, because this will lead to the loss of the binding properties of this component of the building mass.
Operating at lower temperatures
To carry out mechanized floor screeding in frosts from -15 to -25, a step-by-step method is used. The process uses inflatable hangars, which makes it possible to warm up the prepared sand and prevent it from freezing before use.
At the same time, the final cost of work increases slightly. The material is delivered to the site in the evening, unloaded, a portable hangar is placed on top of it, and a heat gun or heater is mounted inside. The sand thaws and by morning it becomes suitable for work.
The influence of temperature on concrete hardening
Concrete is a mixture of fillers - sand and crushed stone, bonded together with hardened cement laitance. When it reacts with water, it hydrates, then it hardens with the simultaneous evaporation of water. Critical strength at normal temperatures is achieved within one or one and a half days, depending on the humidity of the surrounding air.
The optimal temperature for the reaction to occur is about 20⁰C; the solution gains design strength within 28 days. To prevent water from evaporating too quickly in the first days, the concrete is covered with waterproofing.
At 5⁰C, the solidification of the composition slows down by 2 times, and at zero temperature, hydration stops. If the critical strength of concrete has been reached before this, nothing will happen to it; it will gain strength after warming. If critical strength has not been gained before freezing, the material will not gain the required indicators and will crumble after defrosting. In this case, it is impossible to pour any brand of concrete at sub-zero temperatures.
Is it possible to do semi-dry screed in winter?
Reading time: 3 minutes Don't have time?
The link to the article has been successfully sent!
We will send the material to you by e-mail
The main components of a semi-dry floor screed are cement, sand and fibers for reinforcement. The use of this technology allows you to create a flat surface without a lot of time and money.
The peculiarity of this type of screed is the relatively short time it takes to acquire the necessary physical properties. If screeds made using “wet” technology allow work to be done after two to four weeks, then with semi-dry screeds you can work in four days.
As a result, the consumer receives a monolithic base for making the floor, which is practically impossible to change the configuration.
Floor layout using semi-dry screed technology
Advantages of semi-dry floor screed
Experts attribute the following factors to the main advantages of tension layers made using the technology in question:
- To make a semi-dry screed, a minimum amount of water is required. This allows you to minimize the drying time of the tightening layer, and also provides the opportunity to quickly carry out work on leveling the surface to be mounted;
- The use of “semi-dry” technology for manufacturing the tightening layer makes it possible to obtain an almost perfectly flat surface. As a rule, the use of self-leveling fluids is not required for final leveling.
The use of semi-dry screed technology allows you to obtain an almost perfectly flat surface
- The constituent components of “semi-dry” mixtures make it possible to obtain a surface that practically does not shrink during the drying process, and is also not prone to cracks;
- Due to the presence of reinforced fibers, semi-dry floor screed, the pros and cons of which allow it to be used to create floor coverings in buildings for various purposes, is laid on the surface in a minimal layer, which does not affect the strength, resistance to mechanical stress and the ability to withstand mechanical impacts of a certain intensity;
- The use of reinforcing components in the composition of the type under consideration can significantly reduce its weight. The use of such a technological solution can significantly reduce the level of load on the load-bearing structures of the building. Tension layers made of sand and cement do not allow such possibilities.
The main advantages of semi-dry floor screed
It is also necessary to note the fact that during the manufacturing process of the viewing contracting layer, one should not be afraid of the leakage of moisture contained in the prepared mixture into the rooms located below. A semi-dry floor screed is laid, the pros and cons of which must be taken into account by the master, in most cases using special mechanical means that facilitate the entire complex of work, as well as contribute to the production of a high-quality surface.
Special trowelling machine to create an even, smooth surface
Semi-dry screed can be laid on wooden floors (in buildings of older projects), concrete surfaces, well-compacted sand or sand with added gravel. To give the type of screed in question greater strength, reinforcement with a metal mesh or the addition of fiber fiber to the mixture is often used.
Disadvantages of semi-dry floor screed
Along with the undoubted advantages, the tightening layer made using semi-dry technology also has its disadvantages. Among them, experts include:
- Reduced fluidity of the working mass. In this regard, the use of special tools is required to mix the mixture;
- Making semi-dry screed by hand is not easy. The high-quality implementation of measures for laying the mixture depends not so much on the high grade of the composition used, but on the stipulated and unconditional compliance with the requirements for its production and installation. Practice shows that the desire to produce a solution that will be more liquid and fluid by adding an excess amount of water to it leads to undesirable consequences in the form of poor-quality floor covering and additional material costs;
- A laid semi-dry floor screed, the pros and cons of which contribute to its widespread use, is sensitive to moisture. If water gets on the surface of a semi-dry type tightening layer, in which the hydration process is not completely completed, due to lack of moisture, then this contributes to further swelling of the cement and the appearance of cracks.
If moisture gets in, cracks may appear in the screed.
- Sometimes it is impossible to achieve the necessary compaction of the semi-dry screed layer, which results in its partial destruction under the manufactured floor covering, or noise appears in the installed wooden floorboards.
Semi-dry screed for warm water floors
The installation of water-type heated floors using a semi-dry tightening layer is a significantly safe and practical method of arranging premises, compared to electric heated floors.
Warm water floor scheme
The use of a semi-dry screed allows you to reliably cover pipes with coolant, as well as protect them from external influences. To this should also be added the resistance of the contracting semi-dry layer to significant temperature changes, as well as the possibility of expansion when the surface is heated. After final installation and first start-up, the semi-dry screed for a warm water floor can be heated, maintaining its original physical characteristics, strength and resistance to external mechanical loads and damage.
Semi-dry screed for heated floors
The main condition for the high-quality formation of a water-type heated floor is the correct calculation of the required thickness of the screed, which can be from three to five centimeters, based on the quality of the base, the load-bearing capacity of the building and the structural features of the structure.
A compression layer of three centimeters allows you to obtain a durable surface, which is very difficult to achieve when forming a semi-dry type screed, the thickness of which is five centimeters or more.
To increase the strength of the semi-dry tightening layer, experts recommend adding a certain amount of expanded clay to the prepared solution, due to which the composition not only gains high strength, but also reduces its weight.
Taking into account the above, it should be noted that the use of semi-dry tightening mixtures can significantly reduce the time required to install floor coverings and obtain a high-quality, durable surface at a relatively low cost. At the same time, laying semi-dry mixtures will require certain special equipment and some skills.
Heating technology
Many novice craftsmen do not know at what temperature concrete should be heated. It is important to take into account one rule: if the thermometer drops below + 5 ˚С, then the hardening process slows down. To avoid this, heating must begin when the ambient temperature drops below this mark. You can do this as follows:
- pass current through the concrete using an electrode;
- pass current through a wire pre-laid inside the material.
The first method is cheaper, since metal rods can act as electrodes. If you follow the rules, you will need special equipment for these purposes. However, some craftsmen connect a welding machine to the reinforcing electrodes, passing current through the solution and heating it. Reinforced concrete is heated at a voltage of up to 127 V. Without metal reinforcement, voltages of up to 380 V should be used.
The second method involves additional costs for the heating cable. It is laid with a reinforcement frame. Current is connected to it through substations. This method is more expensive, but is more effective compared to heating using electrodes.
The main disadvantage of the above method can be called financial costs. In addition, when heating, you need to constantly monitor the temperature. If it rises excessively, this will cause the material to dry out and may compromise the strength of the structure. If frosts are severe, the formwork should be additionally insulated. Now you know at what temperature you need to heat concrete.
What needs to be done after pouring the rough screed?
As mentioned above, the surface on which we will place the insulation must be free of debris. The first thing we do after pouring and hardening the rough screed - before laying the insulation - is to sweep away the debris and remove stuck pieces of mortar, if any.
Next, we attach the damper tape around the perimeter of the room: the damper tape is needed as a compensator for the thermal expansion of the screed.
(since the article is only about how to make a screed for a heated floor, here I will not talk about how to lay a “pie” of a heated floor, and about the layout of the pipe)
Expansion joints when pouring screed
Expansion joints are needed only in the final screed and only if the room is large (if the screed area is more than 40 m2; but it is better to play it safe and do it on a smaller area, for example, every 20 m2 of area). Expansion joints are needed to prevent cracking of the screed due to thermal expansion when heated. It is clear that the rough screed does not heat up, because between it and the heated floor pipe there is insulation, and therefore expansion joints in the rough screed are useless...
How to make an expansion joint?
This is illustrated by the following photo:
The pipe passes through the seam material (in fact, this is the same damper tape, only not along the perimeter of the room, but somewhere in the middle). At the passage point, the pipes are enclosed in corrugation. There is a corrugation with an internal diameter of 16 mm, but it can be difficult to fit onto the 16th pipe; so it’s better to take one size larger with a small margin in diameter.
The diagram shows the correct and incorrect location of the expansion joint:
Using additives in cold weather
Today, the use of antifreeze additives and special chemical accelerators for concrete hardening is very common. Most often, these additives are sodium nitrite, chloride salts, calcium carbonate and others. Additives significantly lower the freezing point of water and activate the hydration of cement (thus increasing the pour point of concrete).
By adding additives to the mixture, the need for heating can be avoided. Some additives can increase the resistance of concrete to frost so much that the question of whether concrete can be poured at subzero temperatures is not worth it at all: hydration takes place even at an ambient temperature of -20 degrees.
But, despite all the advantages, additives also have some disadvantages.
What you need to remember when introducing additives into concrete:
- They have a detrimental effect on the reinforcement - the corrosion process can begin, so it is important to introduce additives only into unreinforced concrete.
- Additives allow the concrete to gain strength equal to a maximum of 30% of the design value, and then when the mixture thaws (at positive temperatures), the process of strength gain continues. In this regard, according to SNiP, additives cannot be introduced into concrete operating under dynamic loads (hammers, vibrating machines, etc.).
Main types of antifreeze additives:
- Sulfates actively release heat, accompanying the hydration process. They bind strongly to poorly soluble compounds; they cannot be used to lower the freezing point of the mixture.
- Antifreeze - reduces the crystallization temperature of the liquid, increases the rate of setting of the solution, does not affect the rate of formation of structures.
- Accelerators - increase the solubility of silicate components of cement, they react with hydration products, create basic and double salts, which lower the freezing point of the liquid in the solution.
The most common antifreeze additives:
- Calcium carbonate (potash) is a crystalline substance, an antifreeze component that accelerates setting and hardening. Reduces the strength of a concrete monolith by 20-30%, so it is usually combined with sulfide-yeast mash (sodium tetraborate) at a concentration of a maximum of 30%.
- Sodium tetraborate (sulfate-yeast mash) is a mixture of calcium, sodium, ammonium salts or lignosulfonic acids. The additive is used as an admixture to potash and prevents concrete from losing strength.
- Sodium nitrite is a crystalline powder, a toxic, fire-hazardous substance, used in the construction of multi-story buildings, it dissolves easily, does not destroy reinforcement, and increases the hardening rate by 1.5 times.
- Calcium or sodium formate - used with plasticizers in a volume of no more than 2-6% by weight of the solution. Added during the kneading process.
- Ammonia water is a solution of ammonia in a concentration of 10-12%, does not provoke metal corrosion, and does not cause efflorescence.
The process of strengthening concrete structures
To determine to what temperature concrete can be poured, it is necessary to first, at least superficially, consider the features of the process of gaining strength by a monolith. The reaction begins to occur between cement/water at the moment of mixing. In the first hours, the concrete is still fluid and can be worked with, but after several hours it begins to harden, becoming first thicker and then completely hard.
The process of interaction between water and cement is called hydration. Hydration takes place in two stages: first the mixture sets, then hardens. Aluminates are involved in setting, and needle-shaped crystals appear, interconnected. After 6-10 hours, these crystals become a kind of frame, skeleton. The concrete begins to harden.
The entire setting process can take from 20 minutes to 20 hours, which directly depends on the ambient temperature. The process takes the longest in the cold season - when it’s about 0 outside, the concrete begins to set in 6-10 hours, the stage lasts 15-20 hours.
During the hardening process, clinker minerals react with the water in solution, and a silicate structure is gradually formed. The reaction provokes the appearance of small crystals, which combine into a unique finely porous structure. This is concrete, which within 28 days already gains brand strength and durability without changing its shape and structure.
The optimal temperature value for the hardening stage is also +20 degrees, humidity – up to 100%.
Deviations from the parameters significantly affect the strength: complete maturation of the monolith lasts several years (but the set of design strength must be completed 28 days after pouring), the hardening rate changes over time.
Warming during hardening
It is allowed to use conventional insulation methods. This is true if the ambient temperature is not lower than 5 degrees Celsius. Most often, the formwork (if any) is insulated, as well as visible parts of the concrete. For this purpose, you can use all kinds of materials, such as sawdust or polystyrene foam.
One of the most popular ways is to create a tent around the object. Heating guns can be installed inside such a structure. This method has the disadvantage that the concrete must be at a predetermined temperature when supplied. In addition, conventional insulation without additional heating will be ineffective if there is severe frost outside.