The circumstances of a person's life change over a long period of time. They built a small, cozy house, but the family has grown, and the cramped space is already a discomfort. The only way to expand the living space is to add an extension to the house. At the same time, the question arises: how to complete the foundation of an extension to a house so that it is a reliable foundation for the attached premises and does not violate the strength and integrity of the old foundation? Extension to a house on screw piles – an excellent option for such situations. They provide stability to the old foundation and provide a solid foundation for the new space.
What are screw piles
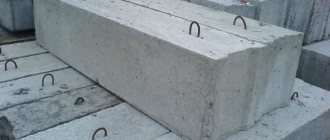
A screw pile is a support that is driven into the ground by screwing and pressing at the same time. Consists of a cylindrical pipe (trunk) and blades. Manufactured by welding or casting.
The first screw piles served as supports for piers. Then the technology was used in the construction of lighthouses, stabilization of unstable soil along the coast, and strengthening of piers. In the mid-twentieth century, scientists and engineers of the USSR theoretically substantiated its use. Helical fence posts are the basis of modern fencing construction. They are also widely used in the construction of military facilities, especially on heaving, deeply frozen soils. It was then that the advantages of the technology were appreciated.
There are several types of screw piles. Each group is intended for specific conditions. The characteristics are calculated for a specific load on the foundation and for a certain type of soil.
Where to begin installing an extension to a brick house with your own hands.
First, you definitely need to check your foundation for strength. If it is already old, then perhaps you are better off spending all the money from the extension on strengthening and restoring it. If everything is in order, follow a simple rule - it is better to do everything as if it were part of the house in the past.
So you want to use the same pad, the same foundation, the same materials if possible. Next, you must definitely draw up a work plan on paper, and then check all your drawings on the ground. Measure how much space you need, what your extension will roughly look like on the ground, etc.
The most important thing at the very early stage of work, planning, is to think about how all the communications will be laid out, how to include this building in the residential premises of the BTI at the legislative level, etc. Perhaps you will lose the desire to create an additional room, and you will consider quickly constructing a summer kitchen, or an outbuilding.
Advantages of a foundation on screw piles
The construction of a pile foundation has a number of undeniable advantages:
- high speed of work;
- low cost;
- small amount of land work;
- no need for special equipment when deepening supports up to 2-3 meters;
- possibility of construction at any temperature;
- unsteady, heaving, water-logged soils do not reduce the reliability of the foundation;
- convenient to use for areas with complex landscapes, where there is not enough space or where slopes and elevation changes prevail.
Hard connection
This method is used in the following cases:
- on non-heaving and slightly heaving soils;
- if there is a shallow strip foundation, the base part of which forms a single whole with it;
- when the shrinkage of the building is predictable;
- when building an extension of several floors under one roof with the main house.
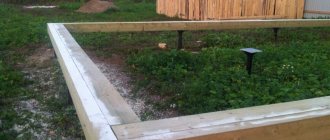
Where to start connecting tape samples:
- A ditch is dug to the required size. A layer of sand is poured onto the bottom to ensure stability.
- Holes are drilled in the foundation. Each next row is drilled offset from the previous one.
- Metal rods with a longitudinal slot at the end are driven into the holes, into which wedging wooden inserts are inserted.
- Using protruding sections of reinforcement, the foundation for the extension is formed.
- After the frame is ready, concrete is poured.
- Further work can continue only after the structure has settled. This standard is observed for all filling options.
A slab foundation is connected in this way only if its thickness is more than 400 mm. The possibility remains the same when the slab protrudes beyond the base of the house. The protrusion must be more than 300 mm. The reinforcement is stripped and welded to the metal frame of the base of the extension. Such protrusions are often found in buildings made of foam blocks.
Construction
First of all, you need to evaluate the foundation under the house and find out what condition it is in. If a concrete strip foundation, rather than a pile foundation, is built under the house, then an expansion joint is provided. Construction begins with a design. If this is not possible, then planning and design calculations are carried out independently, periodically consulting with specialists.
Possible mistakes
Completing and redesigning an existing structure is always more difficult than building from scratch, so it is worth once again paying attention to possible errors in the process of constructing a frame extension. The first and main thing is that many inexperienced builders rely on factory processing of all lumber
However, this is incorrect; before assembly, all frame elements must be thoroughly dried and treated with fire-retardant impregnations. Window frames and doors must be installed strictly level and secured to already installed vertical posts, that is, the dimensions of all openings must be specified
In what cases is a pile-grillage foundation necessary?
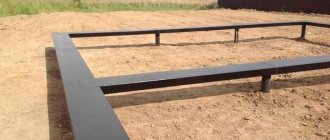
If the heads of the supports are tied with an additional horizontal beam or grillage, such a foundation is called a pile-grillage foundation. It is made from rolled metal, wood, and reinforced concrete. Its purpose is to evenly distribute the weight of the building across all supports. It complicates and increases the cost of building a foundation, but makes it more reliable and durable.
A grillage is justified when building an extension on screw piles to a brick house, especially if the extension is also planned to be made of brick.
Sergey Yurievich
Construction of houses, extensions, terraces and verandas.
Ask a Question
The technology for constructing frame houses provides for uniform distribution of the mass of the structure on the foundation, so the construction of a grillage is not necessary. Wooden houses and log houses have a similar scheme.
Adviсe
Many owners of summer cottages and private houses who have encountered the process of doing a frame extension with their own hands leave their reviews, share secrets and give useful advice.
Pay attention to the correspondence of materials with the overall structure. If the house is wooden, then it is advisable to also construct the extension from wood
If the house is brick, then when finishing it is better to make brick cladding. Thus, the building will look harmonious. Consult with professionals or summer residents with extensive experience in construction to calculate the future extension. Don't skimp on materials.
From all of the above, it is clear that the construction of a frame extension is possible with your own hands without the involvement of specialists. The main thing is to have basic carpentry skills and a great desire to build.
Drawing up a plan and calculating the foundation
The construction of a pile foundation begins with the calculation of the foundation, selection of supporting screw piles, and planning of work.
- Draw a plan for the extension linked to the house on a scale where the locations of the centers of the piles are marked. They are installed in the corners, under load-bearing partitions, then intermediate supports are built in increments of 1.5-2 m.
- Depending on the depth of soil freezing, groundwater level, weight of the entire structure, and soil conditions, the standard size of the piles is selected. When assessing the weight of an extension, the weight of all materials, roofing with snow, furniture, and people who will be in the extension are taken into account. The total supporting area is determined by dividing the total weight of the structure by the bearing capacity of the soil. In the calculations, a safety factor of 1.4 should be taken into account. The total support area is divided by the number of planned supports.
- Then, according to GOST, the standard size of the pile with the nearest larger supporting area is selected. It is worth increasing the number of supports if there is a large difference between the calculated and standard support area. An unreasonably large area of all supports will lead to an inflated cost of the foundation.
How to make a foundation for an extension to a house - step-by-step diagram
Step 1: Selecting a Base
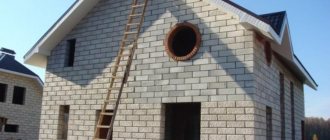
The new foundation must fully correspond to the type of the previous foundation. In addition, the load and soil type are taken into account. For example, if we are talking about a massive extension to a brick house, then it is necessary to lay a strip or make a pile foundation. But if the additional room is adjacent to a wooden dwelling, then it is possible to get by with a cheaper columnar option.
Step 2: Calculations
Regardless of whether you choose a rigid connection type or a separate foundation, the depth and width, as well as the dimensions of the foundation pillars, if any, should be the same as those of the foundation of the house. Determining these parameters is quite simple. It is necessary to dig a hole next to the wall of the house and measure the dimensions of the base.
If there should be no questions about how to measure the depth of the structure, then to measure the width, you should take a rod, bend one of its edges 90° and insert it in a horizontal position under the foundation. Then we turn the rod until its bent part rests on the reverse side. After this, you need to make a mark on the rod and pull it out. By measuring the distance from the hook to the mark, we know the width.
Step 3: Preparatory work
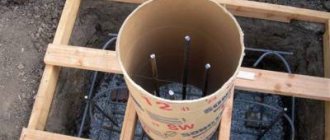
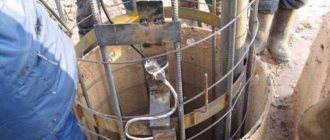
Before pouring the foundation for the extension, it is necessary to carry out preparatory work. If you decide to give preference to a rigid connection, then we dig a trench of the given dimensions and drill holes in the existing base. Moreover, their diameter must exceed the thickness of the reinforcement.
Metal rods should also be prepared. It is necessary to make a longitudinal slot at their end and insert a special wedging insert into it.
Step 4: Frame Formation
We drive the reinforcement with wedges into the prepared holes. The number of rods is taken at the rate of 20 pieces per square. In this way, the frame of the future foundation is formed. To ensure a reliable connection of the following parts, it is necessary to leave the edges of the reinforcement about 300 mm long, which will subsequently need to be welded.
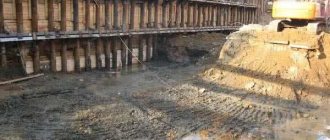
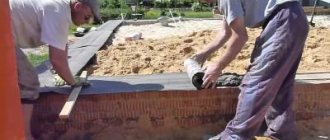
Step 5: Installation of formwork
Now you will need wide wooden boards. We form the formwork of the given dimensions. We securely fix its walls with supports, earth, cinder blocks, etc. You can cover the inside of the formwork with polyethylene. The latter is especially true if you are pouring only part of the foundation and you will have to reuse these boards.
Step 6: Pouring the Mortar
We prepare a mixture of cement, sand, crushed stone and water
It is very important to keep the proportions correctly. For example, for M300 you can take 10 kg of cement, 30 kg of sand, 40 kg of crushed stone, mix everything well and fill with 40 liters of water
If the concrete is too dense, you should dilute it with liquid, but only add it in small parts so as not to spoil the solution. We pour concrete into the formwork and wait several days until it completely hardens. We moisten it periodically, otherwise cracks may appear.
Step 7: Formation of a columnar foundation
Making such a foundation is important when a lightweight extension is adjacent to a wooden house. We drill holes so that they are below the freezing level of the soil. We form a sand cushion and install fiberglass reinforcement.
This material has excellent properties and does not require additional treatment with waterproofing compounds. Formwork of specified dimensions is also formed and filled with concrete. This foundation for an extension is the easiest to implement, and everyone can create it with their own hands.
Step 8: Construction of a separate foundation
But when the number of storeys of the main and adjacent housing is different, then a separate foundation should be made in close proximity to the previous one. The distance between the two bases is from 2 to 5 cm, depending on the number of floors of the new room. The higher it is, the wider the seam is selected.
We fill this gap with heat-insulating materials or tow. Then a special decorative overlay is attached to the wall of the home
It is very important to correctly mark the base. To do this, we pull the cord onto the pegs around the perimeter of the future site and check whether the diagonals are equal
If a heaving type of soil predominates on the site, then the floor of the extension must be made so that it is not lower than the flooring of the main housing by the amount of possible deformations.
Work on the ground
They are conducted in the following sequence:
- Clear the area under the foundation of vegetation and debris.
- Remove the top layer of soil.
- Using pegs and a cord, mark the locations of the supports, moving them from the plan. They start with the corners. At the same time, the accuracy of the location of the lines and the equality of the diagonals are checked.
- It takes two people to screw in the pile. A pipe is passed through the hole in the upper part to form a lever. When diving, control verticality. If the support is difficult to move, the lever arm is increased: long pieces of larger diameter pipes are put on the ends of the pipe, or a longer pipe is inserted into the hole at the top of the pile.
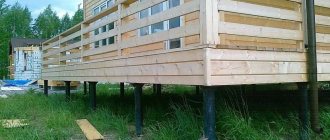
- The piles protrude 15 cm above the ground surface. The protruding parts of the supports are aligned so that they form a horizontal plane. They are cut according to preliminary marks.
- Metal rods are lowered into the pipes for reinforcement and filled with concrete. The fittings protrude above the surface of the pipes for connection with the fittings of the grillage or walls.
- Install a grillage if it is planned.
An extension to a house on screw piles is a great way to expand the landscaped space and increase the level of comfort. This is how living rooms are completed, verandas, recreation areas, and utility rooms are equipped. Such construction does not require a lot of time and money. The technology for constructing foundations on screw piles is suitable for lightweight low-rise extensions on waterlogged, heaving, deeply frozen soils and in areas with complex landscapes.
Roof
The roofing material is selected based on the financial capabilities of the homeowner. The optimal raw materials today are corrugated sheets or metal tiles. The cheapest material is slate sheets or roofing felt, but these materials are used only in non-residential premises
It is worth paying attention to the roofing material with which the general roof of the house is laid, so that there is no inconsistency, and in general, have a beautiful aesthetic appearance of the building
Construction begins with the installation of rafters, one end of which rests on a horizontal beam attached to the wall, and the other on the top frame. It is advisable to think about the angle of inclination at the design stage. The rafter legs must protrude beyond the wall by at least 30 cm.
How to strengthen the structure?
Strengthening may be needed in the following cases:
- construction technology was violated;
- there were errors in engineering calculations at the foundation design stage;
- it is planned to increase loads (adding floors, attics, etc.);
- the service life of the existing foundation has decreased.
Effective methods for strengthening a pile foundation:
- Adding power elements.
- Replacement of failed supports.
- New strapping on old poles.
Before strengthening, it is necessary to reconsider and recalculate the project.
Installation technology for other types of supports
In addition to screw piles, bored and driven supports can be used . The distance between adjacent load-bearing elements is selected based on the required number of piles, which, in turn, depends on the total loads and bearing capacity of the foundation.
The step between the pillars should not exceed 3 m. To install driven piles, it is necessary to use special equipment.
As a rule, wooden or metal supports are installed under frame houses. Reinforced concrete driving posts of small diameter are used only for buildings with several floors. After pressing in the power elements, their height is leveled at the same level.
Installation of bored piles can be done manually, following the sequence of technological steps:
- Drilling of the wells.
- Sand cushion installation.
- Installation of formwork.
- Reinforcement.
- Pouring concrete.
- Installation of headers.
For drilled technology, the concrete grade, reinforcement steel class, diameter of the load-bearing elements and other parameters are selected based on the total loads and soil characteristics.
Open area around the pool
A terrace in a private house is often located next to or around the pool. This is especially useful for pools made from large, prefabricated fiberglass tanks. In this case, the terrace performs two functions at once - it provides a comfortable place to relax near the water and hides unaesthetic details (the side of the container, pipes for supplying and draining water, aeration, cleaning devices, and so on).
The principles of arranging the structure are the same as in previous cases: screw piles as a foundation, a cellular frame as a support for the flooring. In this case, the frame is made of metal; wooden elements near water require too serious and expensive protection from moisture
The installation process is discussed in more detail in the video below, but there are some nuances that are worth paying attention to:
- such large containers must be concreted, and the first row of piles (located closest to the side of the pool) may not be screw, but ordinary - installed in concrete;
- the metal frame is necessarily protected from corrosion, galvanized screw piles and stainless steel fasteners are used;
- the frame is positioned so that the flooring hangs over the water and at the same time it is possible to line the vertical fragments of the platform;
- For flooring, a special material is used - the so-called deck board (decking). It can be natural wood with special processing (usually larch), a composite material or pure polymer. A special feature of the board is its increased resistance to moisture and textured surface;
- Built-in lighting fixtures can be mounted flush with the sheathing in the decking.
It is also possible to install a deck below the edge of the pool, if this edge is properly designed.
For bowls of complex shape, the flooring is also usually made with a curved contour.
If the pool bowl is not completely buried in the ground, the terrace flooring is elevated, creating a kind of podium.
Peculiarities
The difficulty when adding additional premises is the presence of a ready-made old building, which has already undergone shrinkage and has certain defects and design features. All these points should be taken into account when designing an extension. It is necessary not only to build a room that is durable and harmoniously suited to the rest of the ensemble, but also not to harm the finished house or contribute to its deformation or destruction. Errors and miscalculations in the design and arrangement of the foundation are unacceptable; they lead to serious consequences and problems for the entire building.
There are two ways to connect bases.
- The expansion joint is simple to make, suitable for all types of foundations, and less expensive. In this case, both foundations are independent of each other under shrinkage or deformation loads. A layer of waterproofing and thermal insulation is laid between the main structure and the attached one, and an expansion joint is formed. The roof of the extension with this method must be separate.
- Rigid reinforcement is more reliable and durable; it is used for old buildings that have completely undergone shrinkage, over 15 years old, in the presence of a high-quality foundation. The connection is made using metal reinforcement. If a new and already finished building is planned to be combined under one common roof, then the connection must be made rigid. The only obstacle to using this method is heaving soils.
Disadvantages of a pile extension
An extension on stilts has some disadvantages:
- Susceptibility to the occurrence of corrosion processes in metal supports;
- The impossibility of installing them on rocky foundations and in soils with large inclusions of stones;
- The need to install an insulated base to protect the ground parts of the supports.
When purchasing piles, check the quality of the anti-corrosion coating. Reliable galvanization looks like star patterns on the metal.
Walling
Walls, unlike the floor, are an optional attribute of attached verandas. Instead, it is quite possible to build a regular fence in the form of a railing. The veranda may not have any fencing at all - some projects for adding a veranda to the house involve the use of plants and hedges as a fence. If you plan to make full-fledged railings, walls and roofing, the next stage after the formation of the floor will be the construction of the frame.
A lightweight wooden frame is made like this.
- Along the perimeter of the floor, beams are laid, connected to each other with a direct lock. Grooves should be made on them for attaching the racks in increments of about 50 cm.
- The racks are fixed in the grooves using metal brackets.
- The top of the racks is tied with timber.
- We make rafters for the roof.
A lightweight metal frame is erected in a similar way. If the foundation allows, the frame can be made of concrete or brick. The thickness of the load-bearing structural elements may differ from the characteristics of the walls of the main house. Roof supports must be at least 1.5 bricks thick, fence posts must be 125 mm thick.
Terrace walls can be finished using a variety of materials:
- wooden or plastic lining;
- metal siding;
- beam;
- decorative brick and much more.
The main thing is that the design of the terrace decoration matches the appearance of the house.
The walls of the veranda must be connected to the wall of the house in the same way as the foundations of the structures. For this purpose, steel embedded elements are used. They are fixed in the main wall using deep holes, and in the wall structures of the terrace they are laid at the construction stage and secured with cement-sand mortar.
If the veranda is made open, railings are erected instead of walls. They can also be made from wood, metal, WPC, brick or concrete. This type of fence consists of posts, balusters and railings.