Why do you need to concrete the fence supports?
In order for the fence to last for many years, it is necessary not only to bury the support pillars, but to concrete them. The need to use concrete mortar is determined by the increased service life of the fence:
- poles reinforced with a concrete base will have long service life and good weather resistance characteristics.
- when concreting support pillars intended for fixing a fence made of universal corrugated sheets, it is created to protect against corrosion if the base is located directly in the ground.
- The disadvantage of using concrete is the incorrect dilution of the solution, which leads to cracking of the surface.
If the proportions of the composition based on sand, cement and water are observed, accurate calculations are made and the correct operating technology is selected, the operation of the structure will last up to 50 years.
To prevent the fence from falling
Precise installation and durable concreting of support posts for a country fence is a guarantee that the fence will last for many years without distortions or falls. However, first you need to determine what material the supports are made of and what requirements they must meet:
- Nobody changes the fences every year. Therefore, the columns must be made reliable with the expectation of long-term operation with minimal maintenance costs.
- The supports should easily, with a certain margin of safety, bear the load from spans, wind influences, snow drifts, and other dynamic influences. This is especially true for fencing those areas that are located in open areas not protected by forest.
In addition, the posts, as an important part of the fence, should look attractive and fit well into the overall concept of not only the fence, but the entire site. They are made of wood, metal, reinforced concrete, asbestos cement. They are built from bricks and blocks. Each option has its advantages and disadvantages, but all have a common requirement - reliable installation of fence supports.
Spot installation method
The hole is dug in the same way as the previous method. Cover the bottom with a layer of crushed stone and sand mixture. Weld a heel on one side of the post to increase its stability. The support can be a flat sheet, wider in diameter than the pillars, or a lattice of reinforcing bars.
Lower the structure all the way into the hole, level it and fill it with concrete solution to the top. Compact with a steel rod as you go.
If the humidity of the area is high, the base of the post should be sealed (for example, with roofing felt). Twist the roofing material into a ring, 18-20 cm larger than the depth of the hole. This way, water will not get into the concrete when pouring. Cover one edge of the “glass” with a plastic bag and insulate with tape. Place the structure in the hole and follow the usual pole installation scheme.
The video shows this type of concreting of pillars in more detail:
Butting with crushed stone
The use of this method is quite justified when the site has heavy soil. This operation is also called “dry concreting”.
- A hole is drilled;
- The support is installed;
- The remaining space is filled with crushed stone;
- The surface is compacted, for which a vibrating plate is used.
As a result, the liquid will freely go into the soil, seeping through the crushed stone. The stability of the pillar increases significantly due to the fact that water in winter does not linger inside the pit, but seeps through the crushed stone layer. It goes away completely, the supports remain in place and the liquid does not push them out.
Pros and cons of each option
Before choosing a concreting method, you should familiarize yourself with all the options, study the advantages and disadvantages of each of them.
Hammering the pillars
It has the following advantages:
- The post will not be pushed out when the soil freezes if it is dug deep enough into the ground.
- The work is cost-effective due to the fact that there is no need to purchase concrete mortar or mix it yourself.
When hammering in pillars, you should also consider the disadvantages:
- If the pole is installed at an angle, it will be almost impossible to correct it.
- In the spring-autumn period, the soil is oversaturated with moisture, so the support may tilt or even fall under the influence of strong winds.
Tips and tricks
When you have decided what exactly you want, you need to plan the work, which will help you understand whether you need an assistant in the form of hired labor.
If you are building a fence yourself, first of all prepare yourself with information so that you know what to do and in what sequence. Only after this, collect all the necessary equipment that may be useful in your work, and only then proceed to the work process.
If you choose a wooden fence, then it is better to use acacia, ash, pine, oak, mulberry and larch wood. And the worst wood in this case will be beech, linden, alder, maple, aspen, and birch. Ease of installation puts fences made of this material in first place. In addition, every year you can change the color of the paint on the gate, gate and the fence itself, creating a good mood for yourself and everyone around.
Metal produces a good quality fence in a short time, but it is quite expensive.
To install the fence, you can use asbestos-cement pipes or concrete pillars. Their disadvantages include considerable weight and lack of versatility, because not every material can be attached to such a support. In addition, if moisture gets into such a pipe and fills it, and then freezes, then under certain conditions the support will crack. If it is impossible to choose another option, you need to put an iron cap on top of the support.
If we talk about brick fences, they are beautiful and durable, but it is difficult to build them alone; most often, this requires a specialist
Marking and purpose of concrete
To understand what proportions you need for pouring concrete, decide on the brand. Concrete of different grades is used for different purposes. The designation indicates the calculated compressive strength. This can be an indicator from M-75 to M-1000. The higher the number, the higher the strength.
- M-100 and 150 are used for pillows under the foundation,
- M-200 is used for pouring foundations, floors, paths, etc.
- M-350 is suitable for monolithic foundations, load-bearing structures, and roads.
- M-400 and 450 are suitable for the construction of hydraulic structures.
- M-500 and higher are intended for special objects (metro, dams, etc.).
Accordingly, to calculate the proportions for pouring the foundation, floor, pillars or yard, focus on the most popular brand of concrete M-200.
Which brand of cement should I choose?
In practice, several methods of installing fence posts are used. The technology, which involves concreting fence posts, allows you to build a reliable foundation on any soil.
It’s not that difficult to make a mixture for fence posts yourself—you just need to know the recipe and choose a brand of cement. To prepare the mixture, as a rule, the M-400 brand is more often used. The choice of brand is recommended based on the operating conditions of the fence. Since the fence is subject to such loads - the weight of the fence, wind pressure, the binder must be of high quality.
When choosing a brand of binder, you need to take into account the purposes for which it will be used.
When constructing a fence, concrete is used for the following purposes:
- production of solid fence posts;
- construction of a foundation for a fence;
- performing brick laying.
The marking of the binder includes two parameters required to produce concrete:
- ability to withstand a given load;
- composition of the material.
The ability of the mixture to withstand a given load is designated by beech M. M400 is capable of withstanding a load that lies within 400 kg/cm. The presence of the letter D indicates that this substance contains additives, that is, the D20 marking tells the user that the binder contains up to 20% of the volume of additives. These substances are responsible for the plasticity and strength of the mixture.
Some people believe that the numbers on the label indicate how much sand needs to be added to the composition. But this is far from true. These figures are the result of numerous studies and tests carried out in factory laboratories.
To conduct research in the laboratory, a cube measuring 100*100*100 mm is made. The cube is destroyed using power machines. If it collapses under a pressure of 400 kg/cm, then the M400 grade is assigned to this product.
The brand, volume of additives and other technical parameters are indicated on the label of the cement bag. As a rule, such data is placed on the front of the bag.
- The first brand is resistant to frost and moisture. And suitable for constructing foundations for fence posts.
- For brickwork, a second grade of cement is used. In addition to the fact that this cement resists frost and moisture, M500/D20 cement resists rusting.
Concrete for pillars from a reliable manufacturer
For many years we have been manufacturing concrete, constantly improving our skills and updating equipment to improve the quality of our products. You can buy concrete for pillars from us, which meets the requirements of the modern buyer:
- durable - withstands the declared loads, which are specified in the regulations;
- durable - concrete is resistant to temperature changes and has moderate water absorption;
- inexpensive - the cost of the material is low, which makes the product accessible to every client.
Basic qualities of a concrete pillar
Gate and fence posts made of concrete have many advantages:
- durability;
- easy installation;
- low price;
- the ability to use any decorative finish.
Scheme of spot concreting of a pillar.
You can decorate a concrete base with various materials: natural and artificial stone, plaster, plastic, paint, and so on. Unlike wooden or metal structures, concrete can last more than 50 years. The only drawback is the need for a foundation, since without it the structure may soon deform.
How to concrete pillars yourself? To get started, you will need the following tools and materials:
- hammer;
- plywood sheets or wood boards;
- various screws;
- polyethylene film;
- reinforced iron rod;
- welding apparatus.
Accordingly, additional materials may be required as needed.
First stage of concreting
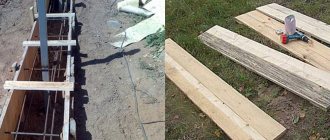
In order for the support to be strong and level, it is necessary to make the correct formwork. To do this, you need to make a box structure from ordinary boards or plywood. The end side and 3 other sides must be fastened together, and the 4th side is left open so that the filling can be done.
To prevent leakage of the concrete mixture, it is necessary to lay a plastic film. Some experts recommend sheathing the structure with plastic, which will protect the base from deformation and swelling. The box is assembled using screws to make it easier to disassemble in the future. The cement mortar should only be of high quality, that is, the ratio of cement and sand should be 1:2.
Methods for installing pillars: 1 - driving in, 2 - combined, 3 - concreting, 4 - crushed stone filling.
To assemble a metal frame of gate posts, you must have a welding machine, which can be used to weld a grid of 4 rods located along several transverse short rods. The walking distance should be 5-15 cm.
When the base, that is, the foundation, has been prepared, you can begin mixing the solution. To do this, you need to take a part of cement, a couple of parts of sand and a large amount of water. All this needs to be mixed in a concrete mixer or electric drill in a large container. After thorough mixing, in order to concrete the fence posts, you need to pour the mixture correctly. To do this, crushed stone is placed on the bottom and a solution is poured.
Here it is necessary to ensure that air does not occur in the poured solution. You can use a regular hammer drill with a specific attachment, or, in the absence of a hammer drill, use a regular crowbar or shovel.
Useful recommendations from experts
In order to concrete fence posts correctly, it is necessary to make an even pour.
You can make the base round. In this case, there is no need to make formwork. To do this, take a metal pipe, which will serve as the base. These pipes are buried in the ground, after which concrete solution is poured into them. After the solution has completely dried, a longitudinal cut is made in the pipe and a gusset with holes for the bolts is welded. In this case, it is necessary to check the vertical level with a special device. This method allows you to make smooth and decorative pillars.
Whatever method you choose, try to carry out each stage with special care, because the quality of your fence depends on it.
Components
Any concrete, regardless of its brand, consists of the following components:
All these components must have the necessary characteristics, taking into account which they must be selected. Cement is the main ingredient in a concrete mixture because it is a binder. It is produced by cement factories. Cement is divided by grade and by the number of various additives it contains. The most popular Portland cement, it contains many special additives to improve the properties of the material. When pouring the foundation of a house, experts recommend that private developers use cement M 400 or PC 400.
You need to keep in mind, like many building mixtures, the shelf life of cement is limited. After a year of storage in packaging, it significantly loses its activity, which determines the properties and brand of the material.
Sand is one of the aggregates in concrete mixtures. To obtain a high-quality solution, you need to take its choice seriously. It is worth noting that at the moment the choice of sand on the construction market is huge. If you wish, you can even purchase sand from the seabed, but not every sand material is suitable for concrete.
Thus, experts do not recommend using sand with clay admixtures for this purpose. Because of this, concrete is less durable and frost-resistant. But with river sand you can prepare a solution that is ideal in condition. It is often of very high quality and consists of homogeneous fractions.
Crushed stone and gravel , as well as sand in the solution, act as fillers. Thanks to them, the solution “shrinks” less, which makes the concrete structure stronger and more durable. When choosing crushed stone, you should pay attention to its shape. Because the convenience of pouring concrete mortar depends on it.
Flat and angular crushed stone is usually not used for mixing concrete. Because it requires more consumption of other components, which affects the strength of the structure. The best option for pouring the foundation is the use of crushed gravel. It consists of particles ranging in size from 3 to 70 mm. In addition, it is affordable for private developers.
Water. This component can have any characteristics, the main thing is that the water is clean without any impurities. Having all the above components and knowing the proportions of concrete for the foundation, you can prepare a solution of any required brand.
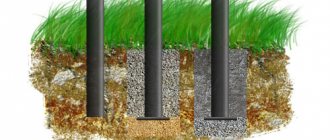
Concreting methods
Types of concreting pillars
Concreting fence posts is the main installation method. Hammering of pillars is used, as a rule, only when installing temporary fences. There are several concreting methods:
- dry;
- point;
- partial;
- complete.
Dry concreting
The dry method of installing pillars (boiling) is carried out as follows:
- Wells are drilled in the ground, the diameter of which is twice the diameter (section) of the support.
- A waterproofing material, for example, roofing felt, rolled into a tube, is placed in the prepared well.
- A support is inserted into the middle of the rolled tube.
- The free space between the waterproofing material and the surface of the support is filled with sand-crushed stone or sand-gravel mixture.
- The poured mixture is constantly watered with water and compacted thoroughly.
When filling a well with rubble mixture, it is necessary to constantly monitor the vertical position of the column.
Spot concreting
Spot concreting
Spot concreting is used when the maximum freezing depth of the soil reaches 1.3 m, and the groundwater level is 1.5 m. A well is drilled in the soil with a depth of 1.4 m; it is advisable to use a drill that allows expansion of the well in its bottom part (anchor expansion ). At the bottom of the well, a sand cushion with a thickness of at least 0.3 m is installed and a protective sleeve made of roofing material is inserted. Then a pole is driven into this sleeve and, using a level, is set vertically. At the final stage, concrete mixed with broken bricks and crushed stone is poured into the well.
Partial concreting
The partial concreting method differs from the dry method in that the prepared well is filled up to half with rubble mixture or excavated soil. After the mixture is well compacted, the rest of the well is filled with concrete to ground level.
Full concreting
When fully concreting, a waterproof cushion made of a mixture of sand, crushed stone and gravel is laid at the bottom of the prepared well. Then a pole is installed on it, after which the well is completely filled with concrete.
Installation options and their features
There are several ways to install poles, but it is difficult to say which is the best. The choice depends not only on the terrain conditions, but also on the requirements that the owner of the site places on the fence. Each option has its own advantages and disadvantages. Reinforced concrete fencing is considered the most durable; poles made from this material will last a long time.
Installation methods
The basis for any fence are pillars that perform a supporting function.
There are several installation methods:
- clogging supports;
- dry concreting;
- classic installation method.
Concreting pillars in the traditional way is the most common option. It is used in almost all regions of the country in sandy and clay areas. It is often used during construction in Moscow; such fences can be installed in a few days. First a hole is dug. A pillar is placed in it, and then the concrete solution is poured. It provides a secure fit.
Driving supports mechanically is an installation method that is used in areas with hard soil. This technology does not require digging holes, preparing and pouring mortar. There are 2 options for this method: manual and using special equipment. If the soil is dense, you should not choose the manual method because it is labor intensive. On light soils, you can drive the supports yourself.
Driving pillars into the ground.
This construction method does not require much time, but it is mainly used for the construction of low-height fences made of lightweight building materials.
Dry concreting is different in that a dry cement-gravel mixture is used. Otherwise, the stages of work are the same: digging holes up to 120 cm deep, installing supports, waterproofing and backfilling with dry compound. This technology is not used on heaving soils.
Spot installation method
The hole is dug in the same way as the previous method. Cover the bottom with a layer of crushed stone and sand mixture. Weld a heel on one side of the post to increase its stability. The support can be a flat sheet, wider in diameter than the pillars, or a lattice of reinforcing bars.
Lower the structure all the way into the hole, level it and fill it with concrete solution to the top. Compact with a steel rod as you go.
If the humidity of the area is high, the base of the post should be sealed (for example, with roofing felt). Twist the roofing material into a ring, 18-20 cm larger than the depth of the hole. This way, water will not get into the concrete when pouring. Cover one edge of the “glass” with a plastic bag and insulate with tape. Place the structure in the hole and follow the usual pole installation scheme.
The video shows this type of concreting of pillars in more detail:
Factors affecting the installation depth of racks
Correctly determining the depth of the fence support posts means maintaining its integrity under unfavorable operating conditions. When performing calculations, the following factors should be taken into account:
- design features of the structure and its functional tasks;
- the magnitude of the maximum load taking into account external influences;
- characteristics and topography of the soil in a given area;
- level of occurrence and possible rise of groundwater;
- the degree of greatest soil freezing in a particular area.
To ensure better operating conditions and structural strength, fence posts must be buried below the freezing point of the soil.
In addition to determining the depth of the racks, it is equally important to secure them correctly. Depending on the operating conditions, there are several ways
Today we will talk about how to properly concrete pillars.
But this option is not always justified. If the site for the construction of a fence is located on soils with a high level of soil moisture, then when freezing, the water expands and can literally squeeze the concrete post upward. Thereby compromising the integrity of the overall structure. In this case, it is better to use the method of driving pillars, following the example of working with piles.
Pillars on stilts
On subsiding soils, swamps and peat bogs, screw piles are used as fence posts. The screwing depth reaches 3-3.5 m depending on the soil characteristics.
The piles are mounted using a manual lever device or mechanized equipment. The design can be in the form of a whole or collapsible rod. In the latter case, the lower part is first installed - the pile itself, and then the fence post is bolted to its head. At the same time, achieving strict verticality is much easier than when installing a whole long pipe, and deformations that arise over time can be easily corrected by adjusting the bolts.
Important. The advantage of this method is high speed. It only takes a few minutes to install one pile. There is no need to wait for the concrete to harden; you can immediately begin installing the infill.
Preparation of the solution
To fill the supports you will need a concrete solution. It consists of simple and easily accessible components:
- Portland cement grade not lower than 400;
- sand;
- gravel;
- water.
All these ingredients can be mixed in various proportions. The following composition has proven itself best:
- cement – 1 part;
- sand – 2-3 parts;
- gravel - 3-4 parts;
- water – 0.5-1 parts.
https://youtube.com/watch?v=mlTi0MEBUwA
First, the bulk components are evenly mixed manually or using a concrete mixer, then water is added little by little with constant stirring.
In order to properly prepare a solution that allows high-quality concreting of fence posts, all ingredients must meet certain requirements:
- The shelf life of the cement should not be expired;
- the cement must be dry; the presence of dense caked pieces is extremely undesirable;
- the sand must be clean and sifted; inclusions of clay, fertile soil, plant residues, and debris are not allowed;
- gravel must be of a uniform fractional composition;
- It is highly advisable to wash the gravel with water to remove small particles of soil and debris.
Proportions and mixing
When making a cement composition for pouring fence posts, you yourself need to maintain the ratio between the components of the mixture for concreting the posts.
The proportions look like this:
- Cement grade M400 - 1 part.
- Gravel or crushed stone - 4 parts.
- Sifted sand - 2 parts.
- Water - 0.5 parts.
It should be noted right away that the recipe given is approximate.
Concrete for pouring fence posts can be obtained in two ways - manually and using mechanization. To make a concrete mixture yourself, you will need a shovel and a sheet of metal.
Dry ingredients in the indicated proportions are mixed on a sheet and after obtaining a uniform dry mass, begin to add water while stirring the mixture. When using mechanization means - concrete mixers, it does not matter whether it is manual or electric. The components of the composition are poured into the ladle, the drum is turned until a homogeneous mixture is obtained, then water is poured.
The finished solution is never liquid or too dry. Sometimes the finished solution is compared to thick sour cream.
When performing work in winter, additives are added to the solution, which increase the frost resistance of the solution.
Technological features of installing poles
Pole installation technology and base concreting
Before starting work, it is necessary to conduct a soil study, since this determines which type to choose and whether the pillars need to be concreted. If you have a land plot passport, then this is not necessary, since all the information should be indicated there.
Installation features depend on the type of fence itself.
If it is made of profiled sheets, then metal, brick or concrete pillars will be suitable. The weight of such a structure is small, but it easily succumbs to strong gusts of wind (bends). The last option is considered the most optimal - a concrete support.
To increase the strength of such a fence structure, it is better to insert the sheet into a metal frame from a corner.
The situation is completely different when a chain-link mesh is used. Here it is necessary to install concrete supports along the edges, and it is better to place a round metal pipe between them. It can be concreted or driven into the ground.
For a brick fence, it is advisable to make the posts from the same material, using a good foundation, as well as masonry with appropriate dressing of the seams.
Concrete fences require good support that can support the heavy weight of the structure. These can be concrete fence posts or large diameter metal ones.
Regardless of the type of construction chosen, the installation technology does not differ significantly.
Before starting work, many people ask themselves the question: Should fence posts be hammered or concreted? It is difficult to give a definite answer. It all depends on the specific situation.
There are several installation methods:
- driving into the ground;
- backfilling with crushed stone;
- partial concreting;
- full concreting.
Choice
The foundation is the load-bearing part of any building. To make it resistant to various loads, you need to choose the right composition of concrete for pouring it. In this case, its resistance to compression loads will be sufficient, which means it will be able to withstand the pressure of the entire house. Various grades of concrete are produced, so there are several composition options. Which one to choose for pouring the foundation? This question must be answered taking into account two factors:
- Features of the structure (number of floors, weight, size of the basement).
- Features of the soil on the site.
The choice of composition taking into account the first factor is made as follows:
- M 150 is used for pouring foundations for frame and panel buildings.
- For light houses made of logs and timber, M 200 is selected.
- M 300 for block and brick buildings.
The dependence on the characteristics of the site is as follows. The more complex the soil on the site, the higher the grade of concrete you need to choose. So, for rocky soil it is enough to prepare a solution of M 150. For loamy soil, the composition M 200 is suitable.
DIY fence foundation
For many people, the foundation is associated exclusively with the house. However, any building, including fences, needs a foundation: it provides durability and reliability to the fence marking the boundary of the owner’s property.
A solid foundation for fencing around the perimeter of the site will allow the fence to last longer and make it better quality: a solid foundation will not allow the fence to sag over time or under the influence of soil movement. If installed without a foundation, the fence will require repairs every year. This necessitates the need to create a solid foundation for the fence around the site.
In addition to the need to strengthen the fence, a foundation is also required when using certain building materials: brick, concrete, corrugated board, stones. If you decide to make a foundation for a fence with your own hands, we recommend that you read this article.
Planning and calculation of fencing
Before constructing the foundation itself, you need to carefully plan the construction of the entire fence. After all, the depth of the base and the design of the base itself largely depend on the building material chosen for the fence.
Planning a fence begins with marking the boundary of the site. Here you need to be precise: not to capture part of the territory of another site, and at the same time not to go too deep into your own territory. The markings are made using pegs and rope. Pegs are driven into the corners of the border, a rope is pulled over them, after which the symbolic fence must be measured using a tape measure. If the measurement is carried out by specialists, then measuring instruments such as theodolite and level will be used.
Direct construction of the foundation. Before you carry out any actions to prepare the soil for installing the base of the fence, you need to select the type of foundation that is suitable for the building material used for the fence. This:
What the foundation for the fence will look like depends on what building material will be used for its construction. Any fence has supporting points - pillars. Brick pillars, iron pipes, wooden beams, and stone pillars can be used as load-bearing points.
Such supports need a reliable foundation - they will bear the weight of the fence located along the perimeter of the site. This means that the base of the pillars should be buried 50-80 cm. If the fence is a single panel located between the supports and has a lot of weight, then it needs to rest on a solid foundation.
The following types of foundations have become the most popular for fencing: strip, columnar and combined, combining both strip and columnar types.
Stages of work
- The construction of a strip foundation begins with digging a trench of the required width and depth. The average values are 40-50 cm and 70-80 cm. A sand and gravel cushion 10-15 cm high is laid at the bottom of the trench. Reinforcement is placed in the prepared trench - at a short distance from the bottom (5-8 cm) and in the middle from the walls of the trench . The formwork is assembled and installed, after which the concrete mixture is poured. It is possible to build a strip foundation yourself - the main thing is to ensure the correct placement of the reinforcement and formwork to obtain a level and strong base for the fence.
- A columnar foundation will require the preparation of separate holes in the ground, where iron pillars or reinforcement with formwork can be placed. Typically a hand drill is used for this. A sand and gravel cushion is also placed at the bottom of the hole; a metal pipe is placed (if it will be used as a support). The main thing to remember is that the pipe must be positioned strictly vertically! After the support is installed correctly, you need to fill the voids around it with gravel and compact it. The cavity in the metal product is filled one-third with concrete, and reinforcement is placed there if necessary. Then the pipe is finally poured with concrete.
- The combined base for the fence is erected using both previous methods. The locations of the supports are marked separately, and the holes for them are connected to each other by trenches for the strip foundation. In this case, the depth of the holes for the pillars should be almost twice as large as the depth of the trench: 1.5 m and 0.7 - 0.8 m. The columnar foundation is first installed (until the pillars are vertically positioned and reinforced), after which the preparation and reinforcement of the trench for the main fence. The final pouring of concrete takes place in the same order.
Component proportions
The correct ratio of components in a concrete solution is the key to obtaining high-quality material. The optimal composition of concrete for the foundation for the construction of a private house is considered to be one part cement powder to four parts crushed stone (1/4). And in the proportion of cement and sand, the ratio is 13, that is, for 1 part of cement (M 400) there are 3 parts of sand. In general, the weight of cement in the cement mortar should be 14 of the total mass.
But concrete still needs water to harden. An important characteristic of concrete is the proportion of water and cement (the so-called water-cement ratio). The strength of concrete depends on this ratio: the lower its value, the stronger the material. For a concrete mixture used for concreting foundations, the maximum water-cement value is 0.75.
For private developers, for a small amount of work, it is easier to mix the mortar on the construction site. One batch of foundation mortar is made in a concrete mixer in approximately the following proportion:
- 300 kg of cement powder.
- 600 kg of sand.
- 1300 kg of crushed stone.
But the developer does not have the ability to weigh bulk materials when he is at the construction site. A completely reasonable question arises: how to make a foundation mortar correctly. To do this, you need to know the proportions of concrete for the foundation in buckets. Since all components have approximately the same bulk density, you can measure them and then the composition of the concrete for the foundation, the proportions in buckets will be something like this:
- Cement 25 buckets.
- Sand 43 buckets.
- Crushed stone 90 buckets.
When determining the amount of water, they are guided by the measure of cement: for one bucket of cement powder you need to add an incomplete bucket of water. This volume may vary depending on the situation. For example, if the formwork is reinforced, then the concrete is mixed with more plasticity so that it penetrates more easily into the frame.
Without reinforcement, it is more practical to make it rigid, this will speed up hardening. In both cases, you need to add enough water so that there are no puddles in the finished solution. To obtain one cube of concrete of different grades, the optimal ratio of components in volumetric terms is presented in the table.
| concrete grade | cement M 400 | sand | crushed stone |
| M 150 | 1 bucket | 3 buckets | 5 buckets |
| M 200 | 1 bucket | 2.5 buckets | 4 buckets |
| M 300 | 1 bucket | 1.7 buckets | 3 buckets |
In these volumetric indicators, the bucket can be replaced by any volume measure, provided that the proportion is maintained.
When deciding how to prepare concrete for the foundation, you need to keep in mind that in addition to the proportions, you need to know in what sequence to lay the components. First, water is poured into the concrete mixer, slightly less than normal. Then half a portion of crushed stone is poured. And only then, cement with sand and again all components are thoroughly mixed.
At the very end, the remaining crushed stone is poured. After this, you need to give the concrete mixer a little time so that it thoroughly mixes all the components. And finally, having assessed the thickness of the solution, depending on the situation, add the rest of the water or leave it as is and mix everything thoroughly again.
How to choose the optimal cross-section of fence posts
A qualified approach to solving problems in choosing the cross-sectional dimensions of support columns determines the strength of the load-bearing posts and the stability of the mounted fence.
The profile dimensions of fence posts depend on the building material used for their manufacture:
- wooden beams made from coniferous wood are made with a square or rectangular cross-section. To ensure the stability of the fence, the cross-sectional dimensions of the wooden support are 10x10 cm or 8x10 cm. Round cross-section posts with a diameter of 100-150 mm are also used. The use of logs or untreated round timber of increased diameter is advisable when the weight of the fence sections is increased. The use of stands made of wood with a high concentration of resins increases the durability of the supports and their resistance to moisture;
- metal profiles used for the manufacture of supporting structures are presented in an expanded assortment and have different cross-sectional dimensions. The profile shape of the supporting elements, the length of the posts, and the size of the wall are determined by the height of the fence and the weight of the fence section. Rectangular steel pipes are widely used as fence supports. Profile dimensions of 40x60 mm with a rectangular pipe height of 2.5 m are suitable for fences made of metal or wood. As the height of the support decreases, the size of the profile changes, which can be 40x40 mm. Pipes with a round cross-section with a diameter of 60 mm or more are also used.
Foundation for a fence - DIY construction technology
A fence is not only to protect a site from uninvited guests, it is often also an element of landscape design. Fences and enclosures are made from various materials - metal rods, corrugated sheets, wooden picket fences, bricks. You can often find combined fences. For the stability of a fence made of any material, a foundation is required, and its design directly depends on the selected type of fence and supporting elements, as well as on the presence of an entrance gate and gate. You can build the foundation for the fence with your own hands, saving on labor costs for builders.
Construction of a foundation for a fence
Choosing a foundation type
The foundation must withstand the applied load of the fence itself, as well as the load applied to it when opening the gate, in strong winds and heaving of the soil. That is why it is necessary to choose the right type of foundation for the fence.
When installing a heavy brick or block fence, it is necessary to construct a strip foundation along the entire perimeter of the site. Under heavy columns or gate supports, foundation expansion or piling can be installed.
When making a light fence from corrugated sheets, it is enough to make a pile foundation in the places where the supports are installed. At the same time, the depth of the piles with the supports cemented in them must be sufficient to withstand the wind load without the fence tipping over or tilting. Gate and gate supports must also be buried in the ground to a depth of at least 1.5 meters.
DIY strip foundation for a fence
A strip foundation is necessary for massive high brick fences, as well as for combined fences with a concrete base.
- Perform markings along the perimeter of the site. To do this, drive pegs into one of the corners and use a stretched string to mark the location of the foundation. They dig a trench to a depth of 0.5 meters, and under massive columns - to a depth of 1 meter. The width of the trench should not be less than the thickness of the fence. Whenever possible, the walls of the trench are made vertical, but on loose soils it is permissible to make them at an angle. When preparing a trench, it is necessary to monitor the level of the site: it is better to start work from the lowest place so that the depth of the foundation does not turn out to be less than the calculated one. The bottom of the trench is covered with a layer of crushed stone or sand and compacted thoroughly.
Diagram of a dug trench for the foundation
Formwork for pouring the foundation for a fence
Hardening of the concrete lasts 1-2 weeks; during this time, it is better to cover the foundation for the fence with film or covering material. After hardening, you can remove the formwork. Concrete will gain full strength after 30 days; during this time it is not recommended to load it.
The process of hardening the concrete of a strip foundation for a fence
Pile foundation for a corrugated fence
For a lightweight fence, it is not necessary to build a solid foundation - this will entail an unjustified increase in its cost. It is enough to make a pile foundation using fence supports as reinforcement.
Pile foundation for a corrugated fence
- Mark the area, defining the line for installing the fence. At an equal distance, not exceeding 4 meters, wells are made with a depth of 0.8 meters for fence supports and 1.5 meters for gate and wicket supports. The diameter of the wells is approximately 20 cm.
- Crushed stone is poured into the prepared wells in a layer of 10-15 cm, after which supports pre-treated with bitumen mastic are installed in them. It is convenient to use round or square metal pipes as supports.
The supports are leveled, securing them with supports, after which the well is filled with concrete from the outside. They wait for the concrete to set, after which the concrete is poured inside the pipe to the level of the soil surface. After the concrete has completely hardened, the supports are removed and construction of the fence continues.
Construction of a foundation for a fence made of corrugated sheets
The fence must be equipped with gates and a wicket. You can also make gates from corrugated sheets yourself.
Foundation arrangement
If artificial or natural stone is used to construct a fence, you cannot do without a foundation, usually strip or columnar, with rare exceptions (other options are pile and combined). The fence needs to be filled with concrete. And here you should take into account how materials from artificial or natural stone are used; the composition of concrete depends on this. There are two main use cases:
- facing and installation of support columns, installation of the base, in this case the load on the base is insignificant, the grade of concrete for the fence can be used in the range from M100 (B7.5) to M200 (B15);
- erection of a fence, that is, a wall is erected from brick, natural stone or a combination of materials, in this case the load on the base increases and the concrete grades are correspondingly higher, ranging from M150 (B10 or B12.5) to M250 (B20).
And one more small BUT. When choosing concrete for the foundation of a fence, consider the level of groundwater, soil type and freezing depth. It may be necessary to pour concrete with increased moisture resistance or a higher grade. Still don’t know what concrete to choose for a fence? Contact us! Megalit specialists will provide professional advice and help determine the best option. The main thing is to choose concrete, the grade of which will provide guaranteed structural strength, the required operational and technical characteristics of the fences
An increasing number of people, in addition to an apartment in the city, want to have a country house, a small cottage or just a dacha in order to be able to relax and relieve stress. For many, the process of building a country house or cottage turns into a kind of hobby. I would like to do something with my own hands, because this not only allows you to gain additional experience and knowledge, but also then independently maintain the household in order.
Often the stumbling block is the construction of a fence around the site and the need to mix the concrete for the fence posts yourself. If you can order construction equipment to erect a fence from the street side, then inside the yard everything is much more complicated, some sections can only be strengthened manually, and even more so if we are talking about repairing an old fence, when beds have already been laid out around a country house, a garden has been planted or standing outbuildings.
The most convenient and cheapest option for installing a fence between cottages is a chain-link mesh stretched over posts. It lets in plenty of sun, and it’s quite easy to put it on. We advise you to prepare concrete yourself to cast fence posts. This will eliminate the need to buy several products from the factory and pay for their delivery.
Preparation of concrete solution
The foundation for the fence is poured using concrete solutions that compensate for temperature changes, ensuring the stability of the enclosing structure regardless of the soil characteristics and groundwater level.
The base of the fence is, by and large, an ordinary strip foundation made in various forms
Before preparing the solution, it is necessary to determine the need for concrete for the strip base. To do this, multiply the length, width and height of the tape base. The resulting cubic capacity corresponds to the volume of concrete that needs to be prepared for pouring into the formwork. To prepare a concrete solution, you need to prepare the following ingredients:
- Portland cement grade M300-M400.
- Fine quarry or river sand.
- Crushed stone of medium fraction used as filler.
- Water required when mixing components.
- Special additives if work is carried out in winter, at high humidity, or if it is necessary to ensure accelerated hardening.
You will need the following equipment and tools:
- electric concrete mixer necessary for mixing the components;
- a sieve for removing large impurities from sand;
- shovels for feeding components onto a sieve and into a concrete mixer container;
- buckets that allow ready-mixed concrete to be supplied to the pouring area.
If you don’t have a concrete mixer and only small volumes of pouring are required, you can use a container of the appropriate size instead of a mixer, manually mixing the components of the solution. For increased volumes of concreting, it is advisable to order a mixer with ready-made mortar.
For pouring you will need concrete grade B15 (M200) and higher, formwork material (wooden panels knocked down from 25 mm thick boards or laminated plywood), formwork materials, coarse sand and reinforcement
To independently prepare M300 concrete, you will need Portland cement, sand and crushed stone in a ratio of 1:3:5. The introduction of water during the mixing process is carried out until the required consistency of the concrete solution is achieved. Increasing the grade of cement used has a positive effect on increasing the strength characteristics of the base.
Composition of mortar mixture for fence posts
The mortar for fence posts consists not only of cement, sand and water are also added to it. In some cases, for example, to prepare a mortar that is used to build brick fence posts, any brand of detergent is also added to it. According to experts, this increases the elasticity of the finished solution.
For the mortar, use only high-quality components, so you will be confident in the reliability and strength of the finished product: be it a foundation, a pillar itself made of concrete or brick.
Sand without clay impurities is used for the solution. The fact is that clay greatly reduces the quality of the finished solution, since it is gradually washed out under the influence of precipitation. Such fence posts will not last long.
You can determine the presence or absence of clay in sand visually: clay impurities make the sand richly yellow. Such sand must first be cleaned. To do this, it is thoroughly washed, removing clay and small stones.
The water should also be free of impurities: do not take it from nearby bodies of water, use water from the tap. In reservoirs, it may also contain sand, clay, small stones and other impurities that reduce the quality of the solution. If there is no other option than water from a lake or river, then at least filter it.
There are no special requirements for the detergent - it can be anything: for dishes, regular shampoo or washing powder, etc. The only condition: the detergent must dissolve completely in water
In this regard, it is not recommended to use expensive brands of washing powder with multi-colored granules (blue, pink, etc.): such granules dissolve well only in boiling water.
If you want to make pillars from concrete that is not the standard gray color, you can add dyes to the solution. The material will turn out to be a darker, contrasting shade. Color the solution with soot or graphite. But keep in mind that these additives will affect the quality of the finished mixture: the concrete will be brittle after hardening.
The second way to make the solution dark is to use more cement, and there are also special dark grades of material.
Application for foundations and pillars
A columnar foundation for a fence is a budget-friendly and simple option that can be poured with your own hands. The support pillars need to be buried in the ground and filled with mixture at the base. At the next stage of construction, they will be sheathed with finishing material.
Scheme of creation methods
If a chain-link mesh, wood or corrugated sheeting is used to construct the fabric of the future fence, then the use of such a foundation is recommended. Its depth depends on the weight and height of the future fence. If you do not take soil samples and make accurate calculations before building the foundation, then the entire structure may collapse in the future.
Construction scheme
The use of a strip foundation for a fence is more common. With its help, the weight of the fence is evenly distributed, which increases its stability. Pouring this type of foundation can be done with your own hands. But this procedure requires certain knowledge, skills and abilities.
Filling instructions
The strip foundation for a fence is universal, as it is installed when constructing fences made of stone, brick, corrugated board and other types of fences. This type of foundation is more expensive than pouring under pillars, as it requires the use of more materials.
Device idea diagramSpecifics of using concrete mixtures
Concrete mixtures are widely used in the construction of enclosing structures. Three directions:
- the first is the creation of elements of enclosing structures from precast concrete;
- second – concreting the supports (pillars);
- third - creating a foundation for the foundation.
Let's focus on the last two. To create structural elements of fences you need molds, premises, special tools and skills. This is a topic for a separate article. But in this case, concrete grades from M250 to M350 are used.
So, the grade of concrete for fence posts can be minimal. M100 (B7.5) is ideal for backfilling; it is a light mixture and one of the most affordable offers on the market. As a rule, these are fences made of forged metal and wooden structures, corrugated sheets, and archaic asbestos-cement slate is also often found. The calculation of concrete for fence posts directly depends on the material chosen for the fence; the lighter it is, the shallower the installation depth of the posts, the lower the consumption of concrete solution.
Filling and maturing of the solution
After the pillars have been installed and leveled, you can begin pouring the solution.
Reinforcement
To increase the service life and strength of the entire structure, before concreting fence posts, you can perform two fairly simple operations:
- install a reinforcing structure made of steel rods inside the pit;
- roll up a small roll of roofing felt and insert it inside the hole.
In the first case, the reinforcement will provide additional mechanical strength. In the second, the roofing material will act as a boundary between concrete and soil. With repeated cycles of thawing and freezing, the forces of frost heaving acting on the support are significantly reduced. The soil will actually slide along the surface of the roofing material, unable to push it out.
Concrete is poured into the prepared pit directly from the container in which it was prepared. It is advisable to concrete the entire volume at one time.
Removing air
To obtain a durable, homogeneous monolith, it is necessary to remove the air that inevitably forms during the preparation of the solution. In the simplest case, this operation can be performed with your own hands using a piece of reinforcement. The so-called bayoneting. Sharp vertical movements throughout the entire depth and slightly inclined movements with slight rocking are used to cover the entire volume of pouring.
Structure care
After all the air has been removed from the volume, it is necessary to maintain a certain period of time for the solution to fully mature and harden. This usually takes 3 – 4 weeks depending on the volume.
During this period, it is recommended to periodically moisten the exposed concrete surface. This will prevent drying out and cracking. If the weather is hot and dry, then simply moisturizing may not be enough. In this case, the surface will have to be covered with wet burlap and plastic film.
Preparation of concrete M-200
- cement grade 400 and higher,
- dry sand,
- crushed stone (lime, gravel or granite fractions from 2 to 20),
- water,
- plasticizer
The proportions of concrete for pouring the yard, floor or foundation will be approximately as follows:
- 1 part cement,
- 2.8 parts sand,
- 4.8 parts of crushed stone,
- water - 20% of the total volume of the mixture.
The proportions of concrete for pouring pillars allow the use of 3 parts of crushed stone. But don’t forget: crushed stone adds strength and reduces the risk of deformation, so you shouldn’t neglect it.
In kilograms, the proportions of concrete for pouring a floor or foundation will look like this:
- 265 kg of cement,
- 860 kg of sand,
- 1050 kg of crushed stone,
- 180 liters of water,
- 4.8 kg plasticizer.
As a result, with 10 liters of cement you will get approximately 54 liters of concrete.
Materials and tools
Before starting work, you need to prepare the equipment and the site itself. Excess debris, tree rhizomes, bushes, grass and other obstacles that may interfere with work must be removed from the area.
The following tools will be useful:
- wheelbarrow for garbage disposal;
- bags;
- roulette;
- level;
- extension;
- scrap;
- Boer;
- shovel;
- drill;
- concrete mixer;
- Bulgarian.
And you need to purchase the following materials: water, cement, sand, crushed stone. Good cement is marked M 500 or M 400; it is better not to take anything lower. The sand must be clean and free of clay and black soil. Crushed stone is suitable for small and medium fractions.
How to carry out work
The Finnish technology for installing supports is most often used. If you use this method, the fence will last a long time.
Materials and tools
Before starting work, you should prepare the necessary materials and tools.
To mix concrete mortar:
- Cement with high strength indicators: grade M500 or M400. When purchasing, you must not only check the expiration date, but also make sure that it has not compacted in the bag.
- Construction sand. It is necessary to ensure that there are no large particles of clay and chernozem in its composition.
- Crushed stone. To ensure the required strength of the solution, it is preferable to use material with a fine grinding fraction. It is permissible to use the middle fraction.
Proportions of mortar for pouring fence posts.
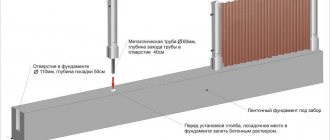
For the manufacture of supports use:
- profile metal pipe having a cross-section of 50×50 mm with a wall thickness of 3 mm;
- sewer pipe with a diameter of 110 mm, made of high-quality plastic.
To make each support, you need 1 piece of sewer pipe about 75 cm long. The easiest option is to purchase meter-long pipes and cut them to the required size.
Tools that will be required for basic work:
The fence will be level if, during the concreting process, each post stands strictly along one line. The easiest way is to use a construction cord stretched between the two outer posts as a guide. They are put out first.
Installation process
Construction begins with the preparation of the columns. After this, use a drill to make a hole and mix the concrete solution. A support is installed in the hole and leveled. After this, the concrete solution is poured into the hole, making sure that it is distributed evenly. If necessary, install temporary supports around the support. They allow you to securely fix it in place.