A gazebo is a traditional decoration of any urban or suburban area. Therefore, when planning a territory, a place is usually determined for it immediately after the site has been allocated for the construction of the house itself.
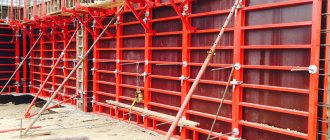
Column formwork for gazebo
The most comfortable corner of the site is usually allocated for the gazebo, since it hosts free leisure hours, during which it is pleasant to sit in the fresh air, at a set table with friends or family members. In addition, the gazebo is one of the key elements of landscape design. Therefore, it is worth carefully considering in advance what material it will be built from. Depending on this choice, the design of the foundation for this building is determined, as well as the formwork for pouring it.
Gazebos are usually not overly massive, so there is little point in pouring a continuous strip or monolithic slab under them. The most common foundation option in this case is a columnar foundation. And column formwork for the gazebo will help to build it.
Types of formwork for columns
Formwork for columns is selected depending on the project. Columns differ in configuration and size, so each type requires its own formwork. There are different types of formwork for columns:
- round;
- cylindrical;
- square;
- rectangular;
- curly.
Depending on the method of use, there are two types:
- disposable;
- reusable.
The following materials are used for the manufacture of formwork systems:
- wood;
- plywood;
- plastic;
- cardboard;
- polyurethane foam.
The most modern solution is plastic formwork, as well as disposable formwork for columns made of cardboard. In addition, there are systems that are made from a combination of materials. Let's look at the features of different types, and also figure out what the rules are for installing column formwork with your own hands.
Fixed and disposable formwork
It is very convenient to use disposable column formwork. It is made from a polymer base and a paper covering that wraps around it in layers. To prevent the paper base from getting wet, it is laminated and coated with a waterproof adhesive.
The convenience of using disposable installations is as follows:
- have an affordable price;
- they are easy to install;
- After the concrete mixture has hardened, removing the cardboard base will not be difficult;
- The removed cardboard is disposed of as normal household waste.
The disadvantage of conventional cardboard forms is the characteristic relief on the columns in the form of a spiral. If this is unacceptable and elements with a perfectly smooth surface are required, samples coated on the inside with wax or polymer material should be selected. The price for such products is higher, but the price is still affordable.
Less commonly used are permanent formwork options, which forever remain part of the cast structure. Fixed options are made from polymer materials or asbestos cement.
Removable formwork
Reusable forms are represented by plastic and metal formwork for columns. The forms are half pipes that are installed on top of a metal column frame.
Plastic models have less adhesion to the solution than steel forms, so this type of reusable formwork is more convenient to use. Two types of columns are used:
- panel room;
- block-transom.
Panel systems are intended for the construction of square or rectangular structures. The shields are fastened together using special fastening items. The use of beam-transom formwork for columns is often practiced. The system consists of three main elements:
- crossbars made of durable steel;
- beams of different sizes;
- formwork slabs.
These elements can be easily combined with the panel formwork system, which allows you to create a wide variety of shapes. Reusable formwork is more expensive than disposable formwork because:
- storage costs are required;
- costs for maintaining the molds are required.
Stages of work on arranging a columnar foundation for a gazebo
The entire process of arranging the foundation for the gazebo is carried out in stages. It includes the following basic operations:
- Determining the location and size of the site allocated for construction, cleaning the intended area.
- Determining the quality of the soil and the evenness of the site.
- Drawing up a project and drawing of the future foundation, taking into account the depth of soil freezing.
- Marking the location of pillars on the ground.
- Digging pits or drilling wells for installing foundation columns.
- Arrangement of the bottom of pits or wells.
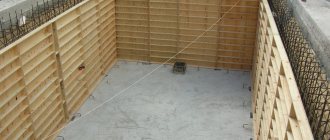
- Installation of formwork under pillars.
- Reinforcement of columns.
- Pouring concrete into the installed formwork.
- When using reusable formwork, dismantle it.
Now about all these stages of work - in more detail..
The gazebo is positioned so that you can truly relax in it in any weather
- The first step is to determine the area where the gazebo will be located. Due to the fact that this building usually becomes a place for relaxation, where home events with tea drinking will take place, it is unwise to build it too far from the house. Otherwise, you will have to run with the dishes across the entire area, which is quite inconvenient.
During the hot season, you always want to relax and sit in a shady place, so if possible, it is best to place the gazebo under the trees - in this case, its roof will not be too hot from direct sunlight. However, you should not start construction under very old trees. In windy weather, large branches can break off, and if they fall, they can damage the roof of the gazebo.
Some property owners prefer to use a gazebo to cover the unsightly appearance of a neighbor's fence or other area. But in this case, you will have to make its back wall blank.
To summarize, the gazebo should be located in a convenient place in all respects, as well as a safe place where nothing can interfere with your rest.
- Next, the quality and composition of the soil is determined. If its top layer is weak, it means that the foundation pit or wells for installing a column foundation must be made somewhat deeper, since the foundation must rest on dense load-bearing soil. To determine this parameter, you will often have to dig a “control” hole approximately 500÷800 mm deep in the area in order to see the soil layers with your own eyes. However, if construction is carried out on a long-established site, then the owners or their neighbors probably know the characteristics of the soil, and there is a local sustainable and proven practice of deepening the foundation supports.
At the same stage, you will need to calculate the differences in the site's topography and decide how to level them out. This leveling can be done in two ways - by removing the top layers of soil to the required level, or by raising the foundation pillars to different heights above the ground surface.
On a site located on a slope, it is often necessary to use foundation supports of different heights above ground level
If you have to build a gazebo on a slope, then calculations of the height of the foundation pillars must be made with special care, since they must ultimately be ideally brought to the same level. Otherwise, the floors of the gazebo may turn out crooked, and the stability of the entire structure will be very doubtful.
- Now, having received the necessary data, it is necessary to draw up at least a rough draft of the future foundation. With such a “document” it will be easier to work on the ground and easier to acquire the necessary materials for its construction. The drawing can also be done by hand. The main thing is to put all the necessary dimensions on it and indicate the number and location of all the main structural elements.
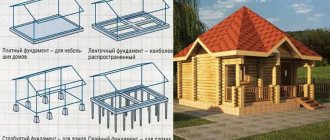
As an example, we can consider the designs of these variants of shallow foundations. One of them involves connecting the pillars with a concrete belt, and the second is designed for wooden strapping along the top of the columns
- Next, when the parameters of the future structure are determined, you can proceed to work on the ground. They begin to mark out the area for cleaning and digging pits (drilling wells).
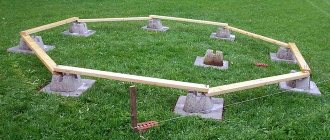
Layout plan for an octagonal gazebo.
It will be easier with a traditional quadrangular one, but accuracy and precision will still be required. Pegs with stretched cords are used to mark the lines for the location of the gazebo on the site. The corners of the area allocated for the foundation are marked with corner elements specially made for this purpose - cast-offs, which will help you quickly cope with the marking process. All marking details - stakes and cast-offs - must be firmly fixed, since cords are stretched between them. Two cords are pulled from each side of the future building - they will determine not only the line, but also the width of the trenches for arranging the foundation pillars, if this is provided for in the project.
To prevent weeds from growing from below the gazebo, it is best to completely remove the layer of fertile soil at the site of its construction
- The next step is to clear the area from the top fertile layer of soil. If this is not done, the weeds will eventually grow between the floor boards, and it will be extremely difficult to fight them. After arranging the foundation, it is recommended to fill the space under the gazebo with a layer of sand and then crushed stone, which must be compacted well.
- Now the places where the foundation pillars will be installed are measured and precisely determined. The distance between them is determined by the area of the gazebo and the thickness of the timber used for piping and the thickness of the boards for flooring. But most often it does not exceed 1400÷1500 mm. The centers of holes or wells are indicated by hammered stakes or crosshairs of stretched cords.
At the points indicated by the markings, pits are opened or wells are drilled under the foundation pillars
- The next step is to dig pits (or drill wells) for arranging the pillars. Accordingly, these pits can have a round or square cross-section. In addition, it is necessary to take into account what formwork will be used for the construction of supporting elements of the structure.
If you plan to install removable formwork to the entire height of the column, then the pit should be larger than its planned size, approximately 150 mm on each side. After removing the formwork, the space around the pillar is filled with so-called backfill, which includes previously removed soil mixed with crushed stone or coarse gravel. After filling this mixture, it is well compacted.
When using permanent formwork, which will simultaneously become a kind of protective shell for the column, the pit is dug (drilled) with a size equal to the outer diameter or external linear dimensions of the column, depending on the chosen shape and the type of formwork.
The depth of the wells for supports under the gazebo can vary from 400 to 1500 mm. It depends on factors such as the structure of the soil, the depth of soil freezing in a particular region and the material used to make the gazebo. If it is planned to be built of brick, then the depth and cross-sectional size of the pillars should be significantly larger.
However, as a rule, summer buildings are built from wood. And if the soil layers have a dense structural structure, and the gazebo is being built in one of the central regions of Russia, then it will be enough to deepen the supports by 600-700 mm. At the same time, it is necessary to take into account the fact that a “reserve” of depth will be required for the arrangement of sand and crushed stone “pillows” under the foundation.
- The next stage of work is to prepare the bottom of the excavated pits (wells). First of all, they are filled with a sand cushion, which must be well compacted. The thickness of this layer should be 100÷150 mm. Sand in this case serves the function of protecting the foundation columns from possible movements of the soil when it freezes. It is recommended to lay a layer of crushed stone (or gravel) on top of the sand, which can be 100÷150 mm, which also needs to be compacted.
- Now it’s time to install the formwork. It should be noted that the most common structures in private construction are disposable or permanent materials. These products are easy to install and affordable, and are especially suitable for laying out the foundation for such a lightweight structure as a gazebo.
One option: A welded metal mesh is rolled into a cylinder and inserted into a “pipe” made of roofing felt.
After this, such a structure is installed in the well. Some craftsmen install the formwork simultaneously with the reinforcing elements, if they choose a metal mesh that can be bent cylindrically. This option is used, for example, if roofing material is used for formwork, which is also rolled into a “pipe” of any diameter. Once assembled, such a structure is fixed with wire clamps - and then carefully lowered into the prepared well.
If roofing felt formwork rises above the ground surface, then the material itself for its manufacture must have a sufficiently large thickness of 2–3 mm. Additionally, the upper part of the cylinder is strengthened with wire clamps, which must withstand the bursting load created by the concrete poured into the formwork.
If you plan to use ready-made plastic or cardboard formwork, they are simply cut to the required length and then installed in the prepared wells.
The option with car tires is somewhat more complicated, since you will have to dig a wider pit for them, and also cut off the upper and lower surfaces of the lower tires, leaving only the walls. An exception would be the top tire, since it is necessary to leave not only the walls, but also its upper side. Another obvious disadvantage of using old tires is the excessive amount of concrete that will be required to fill such voluminous formwork.
Many amateur builders find other solutions. For example, for the permanent column formwork under the gazebo, unnecessary metal buckets from finishing materials used up during construction were used
The free space around any formwork is filled with previously selected soil mixed with gravel or sand, which must be thoroughly compacted as far as space allows.
- A reinforcement structure is installed into the finished formwork of any material. It is usually made of a metal rod with a diameter of 8÷10 mm - it is no longer required for the gazebo. The number of longitudinal rods depends on the cross-sectional size of the column, but usually two or three pieces are enough. The length of the reinforcing bars should be such that their upper end rises above the level of the column by at least 30 mm - if this is required for further connection with the arbor trim parts.
Bonded or welded reinforcement cages are placed inside the formwork cylinders.
However, often they do not release the reinforcement - they use other methods of attaching the crown beams of the gazebo to the base. For example, special embedded connecting parts are used, specifically designed for further fastening of wooden structures. These parts are installed before concrete is poured and are often additionally linked to the reinforcement frame of the pile.
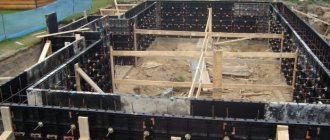
Foundation pile in columnar disposable formwork with an installed embedded bracket, after filling it with concrete
The frame rods are connected to each other by pieces of reinforcement, secured perpendicular to the vertical elements by tying them with steel wire. Welding is used less frequently, since due to overheating of the rods at the seams, it significantly reduces the strength of the reinforcement frame.
The reinforcement frame is installed inside the formwork in such a way that a distance of 20÷25 mm remains between its internal walls and metal elements. In this space, an outer concrete layer of the column will be formed, which will protect the reinforcement from the effects of ground moisture, and therefore from corrosion.
- The final stage of work is pouring concrete mortar into the finished formwork with an installed reinforcing frame.
It is important to produce a high-quality solution that will withstand fairly heavy loads and exposure to aggressive external factors. Therefore, when mixing the mass, it is necessary to observe the proportions of the components used. As a rule, for such an application, concrete with grade strength M200 will be sufficient.
How much mortar is needed for concreting a support, what materials are needed to make it yourself? – Perhaps our online calculator will help with these questions:
Calculator for calculating the amount of M200 concrete and ingredients for its production
Go to calculations
Prices for crushed stone
crushed stone
We prepare the concrete solution ourselves
Making your own solution is not as simple as it might seem to an ignorant person. Optimal dosing of all components and adherence to the technology for mixing them are necessary. Read more about this in a special article on our portal “How to make concrete with your own hands .
- The finished solution is poured into the formwork and distributed throughout the entire internal space. To ensure that there are no air bubbles left, which will turn into cavities when they harden, it is advisable to vibrate the poured solution. It is clear that not everyone has an internal vibrator, so at a minimum the concrete must be “bayoneted” - pierced in several places with a piece of reinforcing rod. The length of this rod should make it possible to reach the lowest layers of the fill. At the same time, you should not rush to fill it - it is better to fill it gradually, making sure that all air bubbles have come out and the solution has become as compacted as possible.
After filling the formwork, the surface of the solution must be leveled.
Now all that remains is to wait for the solution to set and the subsequent maturation of the concrete. After 10 days, if removable formwork was used, it can be dismantled. However, it is too early to begin further construction operations - it is recommended to allow the piles to fully gain strength, which will take about four weeks.
Whatever foundation is used, a waterproofing gasket must be provided between it and the wooden frame parts
Before installing wooden frames on foundation pillars, the upper ends of the supports should be covered with waterproofing material. Roofing felt is most often used for this purpose. It is recommended to lay this sheet material on bitumen mastic, previously applied to the surface - it will become an additional waterproofing layer.
Such measures will help protect the wooden parts of the gazebo itself from the penetration of moisture, which can spread by capillary action from the soil along the concrete structure of the columns.
* * * * * * *
Let's summarize. Column formwork for a columnar (pile) gazebo foundation can be made from different materials, even from those that were not mentioned in the article. But the most convenient are ready-made technological solutions, although you will have to pay extra for them. Each site owner himself must determine which formwork option will be more convenient and profitable for him to work with. The main thing is that the foundation itself is reliable.
And finally, watch a short video that shows a simple, original method of pouring the supports of a columnar foundation using homemade formwork.
Formwork depending on the shape of the columns
Depending on the project, formwork is selected for round or rectangular columns. Curly shapes are used much less frequently. Non-standard formwork options often have to be made to order.
Round columns
You can use disposable or reusable formwork for round columns. Cardboard forms are used as disposable forms. Reusable elements for casting round columns can be made of plastic or metal. The formwork of round columns can have a smooth surface or a surface with a spiral pattern. Forms for round columns differ in size:
- diameter, standard mold sizes range from 150 – 1100 mm;
- height, maximum length of the standard form is 11 meters;
- The wall thickness depends on the diameter and ranges from 3 to 22 mm.
Square and rectangular columns
For the construction of square and rectangular columns, panel and block-transom forms are used. Panel systems can be assembled from linear panels. When using them, it is possible to construct elements of certain sizes.
The disadvantage of this option is its narrow scope. When using universal shields, you can form columns of different sizes and shapes (square, rectangular).
Shields can be made of plastic; this option is suitable for the construction of low building elements, since plastic has a relatively low load-bearing capacity. Wooden options are most often used in private construction and are assembled with your own hands. To install the forms, boards and beams are used.
Template conductor for anchor connections
When pouring a concrete base under metal columns, a special jig is used to control the depth and height of installation of anchor bolts. Essentially, this is a kind of template for installing anchors. Most often, the conductor is made of metal, on the upper surface of which marks are applied for alignment with the axes and subsequent verification of correct installation using a theodolite. Holes for fastening bolts are made in accordance with the diameter of the anchors.
Before pouring concrete, the bolts are welded to the reinforcement frame of the base, and after pouring concrete, until it gains its technical hardness, the correct location of the bolts is checked. The next step is to control the rigidity of the formwork and anchors. At the end of this control operation, the height-plan indicator of the location is checked.
Template conductor for anchor connections
For heavy steel structures, heavy or reinforced versions of anchor bolts are used. The dimensions of both the diameter of the bolt and its length and thread pitch differ significantly from light anchor connections. Installation of reinforced heavy bolts is carried out using templates in the desired position before pouring the base with concrete. For greater fixation of such templates, additional fixation with frame racks is used, giving the structure a more rigid appearance.
After pouring concrete, the anchor bolt templates are removed, while, as a rule, the frame remains in place. When carrying out this stage of work, special attention is paid to the correct location of the bolts; literally all parameters are monitored - height, depth and verticality of installation. This is one of the most labor-intensive processes, but it determines how correctly the foundation is installed. To facilitate work at this stage, several reference templates-conductors are used. Welded from a metal channel or other metal profile of large thickness with the coordinates of the axes marked, it must have a large mass and rigidity. In the designated places, holes are drilled to match the diameter of the anchor bolts. For light bolts, as a rule, a regular wooden beam is used.
Before installing the bolts, check that the jig is installed correctly. It is aligned along the coordinate axes, and the height is set according to the marks on the frame posts.
Calculation of the amount of formwork
It is not difficult to calculate the formwork for casting columns if it is possible to purchase disposable or permanent forms that correspond in size to the design dimensions of the structures. In this case, simply purchase formwork for round columns in the required quantities.
During self-construction, calculations are carried out taking into account the dimensions of the columns and the dimensions of the boards for assembly or the dimensions of the panels. When performing calculations, take into account the following points:
- the columns have a relatively small thickness compared to their height; this circumstance must be taken into account when calculating the load on the material;
- the pressure on the upper part of the mold is significantly less than on the lower part;
- a large difference between height and width negatively affects the stability of the shape, so assembled structures must be strengthened by installing supports;
- the forms must withstand the loads exerted by the concrete mixture; curvature of the form is unacceptable; a column with such a defect will look unsightly, in addition, it will be fragile.