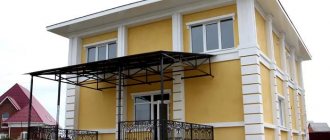
Houses made of concrete and foam plastic - features of American technology
Modern houses should not only be beautiful and reliable, but energy-saving and economical. For this reason, unusual methods of construction from materials that have not previously been used have become increasingly popular. One of the new products can be called thermo houses.
We are talking about houses made of concrete and foam plastic. The photo below shows a diagram of the insulation of a polystyrene foam facade.
Application of foam plastic
Insulation with expanded polystyrene is not limited to just the facade. It has long been used as an insulating material for other surfaces in construction:
- Internal and external walls. In addition to heat preservation, they serve well as sound insulation, and are also often used to insulate partitions.
- Roof. If earlier there were strong doubts about such an application due to the flammability of the material, now this problem is solved by covering it with non-flammable roofing coverings - plasterboard, cement plaster or gypsum.
- Foundation. In this case, extruded foam is widely used, since it is less susceptible to moisture that seeps into the ground. It is also used for basement insulation.
- Floor and ceilings. Usually the slabs are not even fixed with anything, since they are laid quite tightly on the floor surface. In addition to heated floors, you also get a soundproofing coating that suppresses noise from footsteps and moving furniture.
- Permanent formwork. This application is widespread in capital construction, providing reliable protection from the cold to the future building.
Using polystyrene foam for roof insulation allows you to retain a greater percentage of heat and achieve good sound insulation
Video description
We wanted to show you another inexpensive and very interesting project of a frame house with a sauna inside the house:
- Erection of the roof and installation of external wooden slabs, future external walls of the building. Installation of insulation and future electrical wiring cables. Elimination of cracks and holes with polyurethane foam.
Recommendations for choosing heat-insulating material. Mineral wool insulation is reliable, its service life is about 25 years - at a competitive cost of the material, it is durable and does not require constant updating.
Expanded polystyrene decomposes over time, and at the same time polymer compounds are formed that poison the environment and residents.
In construction using Finnish technology, sandwich panels with mineral wool are more often used; it is universal and simple.
- Finishing external and internal works . Wall covering, from budget drywall to the personal preferences of future residents.
Advantages and disadvantages of expanded polystyrene
The polystyrene foam material is a porous, air-containing raw material, used in most cases as a heat-insulating material.
In industry, the material can also be used as electrical insulating and packaging material.
The material has become widely used due to its quality indicators:
- low level of water absorption;
- low thermal conductivity;
- ease;
- biological stability;
- durability;
- compressive strength;
- not affected by temperatures;
- ease of installation;
- low price of material.
Comparison of insulation materials
Despite the impressive list of positive indicators, polystyrene foam has disadvantages that must be taken into account during installation:
- low sound insulation;
- instability to solvents and many chemicals;
- afraid of fire. When burned, it releases harmful toxic substances;
- poor resistance to ultraviolet radiation;
- easily susceptible to the influence of rodents and insects, which, by making holes in the material, provoke its destruction;
- low vapor permeability;
- fragility.
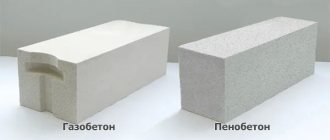
IMPORTANT! Expanded polystyrene is sometimes compared in terms of characteristics and external indicators with another similar material - polystyrene foam.
However, the production technology of these materials is different: polystyrene foam is produced by extrusion, when the granules melt when combined into a single structure, polystyrene foam is produced by gluing granules with dry steam.
Specifications
Methods for attaching penoplex to the wall, the most optimal method
To install penoplex sheets as insulation for aerated concrete and other types of walls, several fastening methods are used:
- EPS is attached with special glue or mastic;
- Use of special polyurethane foam;
- Fastening penoplex using dowels.
Each option has its own characteristics. Experienced builders use several methods simultaneously to better fix penoplex. For example, the use of glue, and additional fixation on top with dowels.
Subject to the recommendations and requirements for the use of each method, the strength of the insulation is guaranteed, which can withstand the additional protective layer of finishing.
Fastening with dowels
Fastening with polyurethane foam
Comparison of conventional and cavitation
| With foam generator | Cavitation | |
| pros | + Such installations are cheaper. + They are more widespread and there is more experience in using them. | + stable density + simplicity and minimum risk of getting defective + higher strength + the ability to make very low density foam concrete |
| Minuses | – Strong instability in the density of concrete at the outlet (+-30%) – It is necessary to adhere to the regulations very carefully. All loading intervals, number of components, temperature. If you pour it yourself or under supervision, it’s fine. If hired workers, they can make a defect instead of a normal product. - More nodes - more places where it can break. | - Their distribution is small, which means few reviews, little experience. - High price. |
| Equipment suppliers and prices | Here's an example: Manufacturer's website Installation of Sunny-014 + compressor - 150,000 rubles. | Manufacturer's websiteSet: 250-350,000 rub. |
Where is it used?
There are a number of features that can improve the efficiency of using materials such as foam concrete block. However, polystyrene foam can be used only in certain cases. Concrete with crumbs is suitable for pouring the floor in a garage or other buildings of a similar type.
It is undesirable to use concrete and foam chips when constructing walls and pouring floors in residential buildings. Practice has shown that concrete floors are most often used for laying parquet and other coverings. Correctly carried out insulation will achieve the best effect. Laying building materials in low-rise and high-rise floors is questionable.
Specifications
The innovative method of monolithic construction of buildings has become an excellent opportunity for those who dream of acquiring their own housing. After all, until recently, even low-rise buildings that did not differ in special dimensions required large time and financial costs. Today, cottages are built literally within a few days, and the problem of material investments is no longer so painful for the developer.
But these are not all the strengths of polystyrene foam formwork. The list of their characteristics is quite large, because technically and physically this material is at a high level. Among these characteristics it is worth highlighting:
- thermal and noise insulation;
- ease of connection of communication networks;
- environmental safety;
- possibility of combination with any of the building materials;
- ease of installation;
- moisture resistance;
- light weight;
- resistance to mold or mildew;
- non-flammability.
Types of permanent formwork
Before we begin to describe the polystyrene foam structure, we will consider other types of this technology, since it is not the only one. The point now is that permanent formwork can be constructed not only from expanded polystyrene, but also from other materials. Therefore, in this light, formwork can be:
- chip-cement;
- foam;
- universal block;
- fibrolite.
All of the described types are popular in the construction craft, but polystyrene foam is still considered a classic. And the reason for this is the numerous advantages of the material.
Positive aspects of the material
Before using polystyrene foam blocks, it is important to study their positive features. Among the main ones is the inability to absorb moisture. Among other things, the products demonstrate high resistance to prolonged and direct exposure.
They have excellent sound insulation and also allow you to achieve excellent thermal insulation characteristics. The blocks are able to breathe, that is, they slowly pass air currents through them. This makes the surface resistant to fungal diseases and rotting.
The material of the described type is lightweight, which simplifies the work. Among other things, the blocks are quite easy to process.
[my_custom_ad_shortcode3]
How to calculate the cost of construction work?
So that you can clearly understand what the savings will be, we will give an approximate calculation of the cost of building a house using the described formwork. It (cost) depends not only on the price of building materials, but also on the size of the future building. Here are the building materials needed for one square meter.
| Name | Quantity | Price |
| Formwork | 3.3 pieces (with standard sheet sizes) | 490 rub. |
| Fittings (if the building will have more than three floors) | 10 kilograms per meter | Depends on current price |
| Solution | 0.15 cubic meters (125 l) | Depends on current price |
Now let’s find out how much it will cost to create the formwork, if we do not take into account the cost of performing the work:
- the area of the walls (openings are taken away) will be 180 square meters (10x10-40);
- the price of the formwork itself is 88,200 rubles. (180x490);
- the price of filling with mortar is 81,000 rubles. (180x15 = 27x3000);
- price of fittings – 37,800 rub. (180x10 = 1.8x21000).
Let's summarize. On average, the cost of materials for such a house will be 207 thousand rubles, or, in other words, 1150 rubles per square.
Insulation of the foundation with penoplex
Previously, we talked about how to properly insulate a foundation using penoplex, talked about the cost of materials and work, we advise you to read this information
Features of the thermal house
Among the features of such foam plastic buildings, it should be noted that they require the installation of a ventilation system and heating, that is, in the winter months such a house must be warmed up, although energy consumption will be minimal.
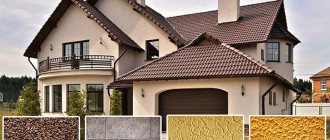
Finish options
The construction of foam plastic houses has its own characteristics, but one of the advantages over others should be noted that the walls in this case can be covered with almost any type of finishing materials.
Scheme of thermal insulation of the foundation with polystyrene foam.
For example, you can use ventilated facade systems, which are not only attractive and give the building a modern, stylish look, but also provide an optimal microclimate in the house.
Interior walls can be finished with a variety of materials. Today, they are most often sheathed with plasterboard, which provides many design options.
Do-it-yourself installation of permanent PPS formwork
It is quite simple to build such a structure, which will ensure the solidity of the foundation wall or house, from profile polystyrene foam blocks, since no size adjustment is required. In addition to precise geometry, the blocks have a tongue-and-groove connection system, which allows for strong connections while stabilizing the laying direction vector. That is, it is almost impossible to deviate to the side when installing blocks.
Step-by-step instructions for assembling monolithic PPS formwork:
- Installation of expanded polystyrene blocks begins with laying a layer of waterproofing on the surface on which the blocks of the first row of the foundation wall will be laid. The blocks are fastened together with reinforcement rods threaded directly through the body of the product. When laying out the first row, corner and end block outlets for internal walls and partitions are immediately laid. All subsequent rows should be shifted relative to the previous row by 30%, that is, laying should be done in a checkerboard pattern - this will help make the wall stronger and more rigid;
- Assembling the reinforcement frame for formwork - rows of reinforcement rods are laid for each row, along the left and right edges. To ensure that the reinforcement fits into the wall and does not interfere with the assembly, special protrusions are made in the polystyrene foam for the iron reinforcement rods. The rods are overlapped with each other, connected not by welding, but by soft knitting wire with vertical rods of the reinforced frame mounted in the base of the foundation;
- The solution for filling the mold is prepared using the standard recipe: Portland cement plus sand, in proportions 1:3, then the dry construction mixture is mixed with water to a workable consistency. Holes for laying utilities, and, if necessary, the communications themselves, are laid and carried out before filling the form with PPS solution. The end surfaces of the blocks are protected with polystyrene plugs;
- It is strictly forbidden to add rubble, crushed stone or gravel to the solution for pouring permanent EPS formwork, since large pieces of material can push through walls made of polystyrene foam or expanded polystyrene. The cement mixture is poured into the formwork in layers, each layer can be no more than 1 meter thick. All layers are compacted and leveled.
The body of each formwork product is two blocks of PPS material, which are fastened to each other with locks and lintels, and in addition connected by a layer of mortar. Such elements can be used for both heated and cold rooms - only the thickness of the formwork will change, but not the method of constructing the wall.
The main advantage of monolithic technology is its low cost and quick assembly of formwork followed by filling with mortar. Since it is polystyrene foam that acts as the wall material, thermal insulation is already built into the structure, and any, even unheated, room in winter will be warm enough so that the walls do not freeze. Plus, the material is so light that even a multi-story house can be easily built without the use of lifting and loading equipment.
Of the shortcomings, only one can be named that deserves correction - the flammability of the material. This disadvantage can be eliminated with a thick (up to 2-3 cm) layer of plaster.
Technology of insulating walls with penoplex from the outside - what elements does the thermal insulation pie consist of?
To insulate external walls, the following order of placement of thermal insulation layers is used:
- Glue, it is applied to a wall that is previously dry and cleaned of various types of dirt and irregularities;
- Insulation, which is additionally attached to the wall with special mushroom dowels. This allows the sheet to lie tightly on the wall surface without creating heat bridges;
- After fixing the penoplex, it must be protected from exposure to ultraviolet radiation. Therefore, a layer of reinforced putty using a soft mesh is applied. If you plan to finish with siding, then it is recommended to install a waterproofing membrane;
- Decorative finishing creates an additional layer of protection and gives an aesthetic appearance to the building.
Phased construction of a polystyrene concrete house
Wall blocks made of polystyrene concrete - ready for work
So, you’ve probably already decided for yourself whether this material is right for you. And if you told him yes, then you can count on the construction of the structure in just 3-4 weeks (not counting the foundation), if you work without breaks and with a friendly team.
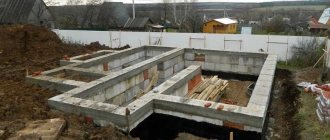
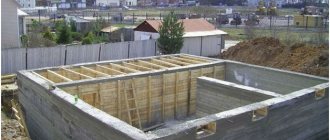
Foundation structure
The beginning of any construction is laying the foundation, and, as we have already said, it can be lightweight for a polystyrene concrete house.
You can choose the appropriate option for yourself from the following types:
Pile foundation - birch logs are used only as supports for the formwork
Pile foundation - reinforced concrete and metal options are suitable;
Columnar foundation with a grillage made of metal channel
Columnar foundation;
Pouring a strip foundation with channel logs
Strip foundation is the most material-intensive solution.
You need to choose the type of foundation taking into account the characteristics of the soil on which you will build and the climatic conditions in your place of residence.
This foundation will last an incredibly long time.
- The most universal solution in this case is the use of a pile foundation, since it can be used on almost any type of soil. It is especially advantageous to take the metal version, since it can be installed in just a couple of hours, scalded with a grillage made from a channel, and immediately begin building walls.
- The second in speed and convenience will be a columnar foundation, and the most extended in time will be the strip version, since although the concrete in it may be of a low class, it still requires 28 days to gain its strength.
Pile tying options
The speed of installation of columnar and pile foundations will also depend on the type of grillage used. In some cases, it is made of reinforced concrete, which similarly extends the work over the already announced period.
Formwork for a concrete grillage on metal piles
Let's take that same pile foundation as an example and find out the procedure for its installation:
The first step is to clear the site for future construction. It is necessary to level it and remove the turf - the plant layer - from it.
The markings must be correct, otherwise the walls of the house will be crooked
- Next, precise markings are made using pegs and threads stretched between them. The main markings should follow the outline of the house. All angles are made right unless otherwise planned, which can be achieved by using the Pythagorean theorem about the legs and hypotenuse, as well as checking the length of the diagonals, which must be equal.
- According to the power of the future grillage and the piles themselves, we place marks for the places where the piles will be screwed in. It is difficult to make such a calculation without the necessary preparation, so without a project you have to use common sense, often playing it safe. A step of 1.5-2 meters is usually sufficient.
Installation of screw piles
Next, at the marked points, the piles are screwed in to the required depth, which depends on the depth of soil freezing in the region. Installation can be done manually, as shown in the photo above, or you can use the services of special equipment for a fee. The price for the work is not that high, so if you want to speed things up as much as possible, we use such services.
Trimming piles to level
- Depending on the terrain, the piles can be screwed in to different heights, so after installation they need to be cut to the same level. We mark it with a laser axle builder or everyone’s favorite hydraulic level.
- Cutting is done with a grinder.
The result is satisfactory
Next comes the turn of installing the grillage. We have already attached a diagram with all possible options, so choose the most optimal one for yourself - in our opinion, this is a metal channel that can be welded on in the shortest possible time, and you can immediately continue working.
Many people often ask the question: is it possible to lay a plinth made of polystyrene concrete blocks? In the case of building a house, the answer will be negative. The base is the above-ground part of the foundation, and the strength of polystyrene concrete will not be enough for it.
For these purposes you can use:
- Heavy concrete (FBS blocks);
- Expanded clay concrete blocks;
- Red brick;
- Rubble masonry;
- Rubble concrete;
- Reinforced concrete;
However, there is still the option of using polystyrene concrete blocks for the foundation and plinth, but only as permanent formwork.
Block for permanent formwork
And to be completely frank, such a plinth can be laid out under a very light structure - for example, if a bathhouse is being built from polystyrene concrete.
Bathhouse made of polystyrene concrete blocks
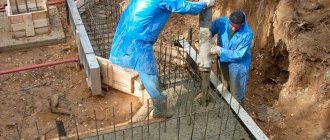
Pouring a concrete porch
Before pouring the foundation, the top fertile layer is removed from the soil, a pit is dug of the required depth and equal to the perimeter of the structure area with an addition of 10 cm in a circle.
Construction of a pit
The construction of a pit under the porch is shown in the photo.
Construction of formwork
Upon completion of installation of the side elements in the formwork, the external limits of the steps are fixed to the cutouts. Edged boards are used as limiters (the height of the step and the board must be equal).
Strips of formwork (plastic) are inserted between the piles. The height parameter of the strips must be equal to the height parameter of the steps.
The construction of the formwork is shown in the photo
Reinforcement procedure
A photo provides a clear picture of the reinforcement procedure.
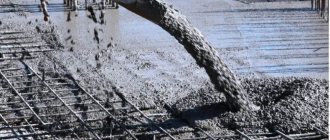
Concreting procedure
The concreting procedure is clearly shown in the photo.
After a week, the concrete completely melts into the required place, hardens, and the formwork is removed. The foundation is waterproofed on the sides using tar and roofing felt, after which the soil is backfilled.
What are the benefits of foam blocks for building a house?
They have a number of undeniable advantages:
Thanks to the use of this technology, the construction process is greatly accelerated. A house made of foam plastic blocks can be built in two weeks, which cannot be said about a house made of bricks. It does not require a large number of builders or special machinery or equipment. Polystyrene foam is an environmentally friendly material that does not transmit radioactive radiation. After all, it has long been used for food packaging. Since polystyrene foam has excellent sound insulation, a house made from it will have the same property. Therefore, peace and quiet for the inhabitants of the house are guaranteed. Blocks for building a house with foam plastic have high thermal insulation qualities - this reduces the cost of heating a house by 10-12 times. The need for heating arises only at temperatures below -5 degrees. Due to its low weight, compared to brickwork, it becomes possible to use lightweight foundations when building a house
Again, saving the family budget. Thinner but warmer walls made of foam blocks allow you to increase the living space. Another important property that foam blocks for construction have is their fire safety. Foam blocks are resistant to biological influences, microorganisms do not settle on them and they are inedible for all kinds of rodents. Due to the fact that foam blocks for construction are priced much lower than classic building materials, they initially have a regular geometric shape with a flat surface, which also does not require additional costs for labor-intensive wall finishing. And the most important characteristic, as mentioned above, is the low cost of foam blocks, and, accordingly, the cost of building the entire house.
But when buying foam blocks for building a house, the price of which is very attractive, you should still take into account the quality of the material. In our store you will find only high quality foam blocks at an affordable price
You can buy foam blocks for construction on our website with the click of a button. And all your questions will be answered by our highly qualified consultants, who are well acquainted with all the new products on the global construction market.
Buying foam blocks for building a house in our store is very profitable, because by doing so you reduce not only the time for building your home, but also the costs of building materials, labor, and in the future, heating the house, as well as additional sound insulation.
Living in a house made of foam plastic blocks is also very comfortable, because it is cool in the heat and warm in winter. And the construction of a house can not be delayed even in the winter months, since low temperatures do not affect the properties of foam blocks. And you can build absolutely everything from blocks that can be built from bricks. But thanks to the plasticity of foam blocks, it is possible to realize various architectural fantasies, which cannot be done with brick. Therefore, the built house will be beautiful and at the same time cozy, standing out among standard buildings with its originality.
Interior details
Ikebana made from this material and a plastic bottle looks great. There are practically no costs for such creativity, but the effect of the decoration is stunning. To create it, take a green plastic bottle and cut off the neck from it so that this part can be placed on a flat surface. The entire part of the bottle to the bottom is cut into thin straws and small pieces of foam are strung on each. It is better to take the material that consists of large grains in order to use them for this purpose. The bottom is inserted into the part that was cut off and the interior decoration is placed in the desired location.
On New Year or Valentine's Day, you can please your loved ones with pleasant souvenirs made by yourself. To do this, the intended part is cut out of raw materials, decorated, and covered with sparkles. A hole is made in its upper part so that you can thread a golden ribbon into the decoration, which will add solemnity.
Exterior finishing of a house from SIP panels with thermal panels
This finishing option allows you to immediately additionally insulate buildings; thermal panels have an effective insulator. Advantages: there is no need to make lathing and counter lathing, non-woven materials are not used to protect thermal insulation materials. Manufacturers offer a large selection of panels, each of them fully provides the products with components and additional materials. The standard list includes starting, response, finishing and connecting aluminum or metal strips, corner elements.
Thermal panels with clinker tiles
To finish the external surfaces of SIP panels with panels, you will need a metal profile for plasterboard, hangers and self-tapping screws. Before starting work, you need to prepare a hammer drill, a level, an electric jigsaw, metal scissors, a cylindrical grinder (grinder), a level, a set of screwdrivers or a screwdriver.
Step 1. Mark the position of the frame on the surface of the slabs. The work is made easier due to the fact that the slabs have very even planes; nothing special needs to be adjusted. The distances between the vertical load-bearing supports of the frame depend on the type of slabs and are indicated in the manufacturers' recommendations. At the required distance, beat off the vertical lines with a blue rope; the profile holders are fixed along them.
Step 2. Attach metal profiles to the holders, use metal screws. Check the position of the sheathing again; it is very difficult to correct errors in the future.
Fastening metal profiles
Step 3. Secure the lower starting bar. The position must be strictly horizontal.
Installation of the lower starting bar
Checking the horizontality of the starting bar
Step 4. Install the panel into the ledge of the starting strip; the panels have a groove at the bottom. Attach it to the metal profile. The next panel is fixed in the same order. When fixing, make sure that the screws do not turn in the metal profiles; select the optimal tightening force.
Installation of the first thermal panel
Groove and lip
The panel is attached to the profile
Installation of the second thermal panel
Exterior finishing of a house from SIP panels with thermal panels
If the length of the building wall is greater than the length of the panels, then special joining profiles must be attached at the joints. Most manufacturers, along with the strip, sell a decorative element for closing it; the color and structure of the element correspond to the parameters of the panels. There must be a vertical sheathing post in this place; keep this in mind during marking and installation.
The joint is covered with a decorative element
How corners are mounted
Step 1. Take the starting strip, cut a piece about 10 cm long. Cut the lip and bend the piece at a right angle.
Corner from a piece of starting bar
Step 2. Attach the prepared corner to the wall of the building. Insert the groove of the corner element of the panel into the protrusions, secure at the top with screws. Using the same principle, install corner panels to the entire height of the façade wall.
Example of installing a corner panel
The finishing of door and window openings is done using special additional elements. They can be made to order or used purchased with pre-sizing
During installation, pay attention to the tightness and direction of the joints, do not allow water to get under the casing
Next, the openings are finished
The finishing strip under the roof can be of two types: it is fixed to the profile and a panel is inserted into the groove, or it is fixed on it, and then the assembly is screwed to the strip.
Installation diagram of the finishing strip
Another option is finishing the house with fiber cement siding.
Looks pretty nice
Finishing another house made of SIP panels with fiber cement siding
Another photo of the same object
Siding prices
Siding
https://youtube.com/watch?v=qn53PyDeyLk
Securely connect the insulation to the wall
Often foam plastic is attached only with glue, and this is enough, but I recommend additionally connecting the insulation to the wall using disc dowels. It definitely won’t be superfluous - it’s better to spend a little more time and money, but be sure that nothing will happen to the insulation.
Of course, the length of such dowels can be different, so for your case you need to calculate it, taking into account the thickness of the insulation, glue, spacer part of the dowel and another two to three cm “for reserve”. They can be attached directly to the block - in the corners and in the center, or at the seams. Both methods are effective.
The slabs can be additionally fixed using disc dowels
First I drilled holes for the dowels, then installed them using a drill. Sometimes these dowels simply become clogged, depending on which ones you purchased.
Then the insulation must be reinforced, otherwise the material may simply deteriorate and stop “working” as it should. You need to prepare a plaster-adhesive mixture, apply a thin layer, press the reinforcing wall and smooth it on top. It is better to start with windows and doors, and then “process” all the walls in parts. Additionally, I used a drip profile.
It is very important to take into account that if you have several pieces of mesh, they should be laid with an overlap of at least 10 cm.
Installation of reinforcing mesh
Then I leveled the surface and putty it. That's all! You can “decorate” the walls outside, but this deserves a separate post.
At the end the wall needs to be puttied
What is permanent formwork
First of all, you need to understand what permanent formwork is. This is a molded structure used in the construction of load-bearing elements made of reinforced concrete. It consists of ready-made block complexes or individual slabs, between which reinforcement is mounted, and then a cement solution is poured.
After it hardens, the forms are not disassembled; they remain part of the house for the entire period of use. Permanent formwork technologies make it possible to reduce the construction time of buildings, since the process of disassembling forms is eliminated; they remain part of the building.
Buildings made from permanent formwork do not need to be additionally protected from heat loss, since the formwork structure itself plays the role of a heat insulator.
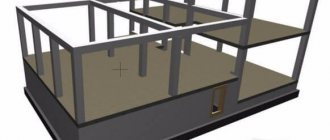
Features of the technology
A polystyrene foam house is actually built from polystyrene foam, i.e. foam blocks. Such elements are produced with a cavity inside into which concrete is poured.
In essence, this is a permanent formwork that ensures the formation of reinforced concrete walls, because Before pouring, steel reinforcement is inserted into the polymer. This creates a wall that is covered with insulation on the outside and inside.
Construction foam blocks can be of different types and sizes - blocks similar in size and installation to cinder blocks; non-separable panels and large collapsible panels, which are assembled from 2 foam sheets, fastened with special ties.
For any type of these products, the principle of building a house is similar - a wall is assembled with an internal cavity for pouring concrete. At the final stage, the wall surfaces are plastered or finished with facing materials.
There is another option for foam houses. They are assembled from structural insulating panels (SIP), which are a combination of OSB boards and foam plastic (expanded polystyrene). Unlike the previous case, the polymer ends up inside the reinforced concrete structure, because poured into cavities at the factory.
Advantages of a polystyrene foam house
We build a house from polystyrene foam
To tell you about buildings made of foam plastic, it is worth highlighting a number of advantages that a building made of foam blocks can boast:
Foam blocks help build a very warm structure
Such insulation, as it were, envelops reinforced concrete profiles on each side.
A house made of foam blocks can serve as a “thermos”
Such a building can sufficiently retain warm air not only in the cold season, but also keep it cool on hot days.
Available formwork
Formwork is not the familiar panels that need strengthening and installation. At their core, these are blocks of foam plastic, in the middle of which there is a cavity. According to some characteristics, this material is very similar to cinder block, but externally you can’t tell them apart from each other. When constructing a building from block foam, you fill its interior with concrete mass, installing reinforcement there in advance.
Possibility to use permanent formwork
Related article: Decorating a kitchen with false panels
This formwork is presented as a complete material. The installation technology is the same: install the blocks, install the reinforcement and pour the concrete solution into it. In principle, such formwork can be presented in 3 varieties: as slabs, blocks or standard panel formwork, which is fixed together with specialized jumpers. Using panel formwork is the most affordable option from a financial point of view, but working according to such a scheme is not as easy as we would like.
The most suitable solution when doing construction work yourself is to use blocks that are so reminiscent of the long-familiar cinder block.
Also, foam plastic and concrete structures have some negative aspects, the most significant of which is considered to be the “thermos” effect. It can only be overcome by installing a high-quality forced ventilation system in the house, which makes the work performed more expensive.
Another, no less unpleasant point is the environmental friendliness of the structure, which, even if tightly sealed with plaster, is out of the question. It is also worth noting the possibility of the material igniting, after which toxic substances will be released during combustion, which can even kill a person.
As you can see, not everything is as rosy as it might seem at first glance.
Necessary tool
To build walls from foam blocks, you need to take care of the following tools in advance:
- grinder for cutting reinforcement;
- string for cutting foam;
- spatulas;
- trowels;
- graters and graters;
- pliers;
- hammer;
- mallet with a rubber layer;
- construction mixer;
- hammer drill for installing dowels in concrete;
- a tool for installing formwork in the manufacture of a reinforcing belt;
- paint brush or roller;
- knife;
- jigsaw;
- scissors;
- building level;
- roulette;
- metal ruler;
- plumb line
If this miracle blazes, there is a significant risk that people will not have time to leave the house.
There is a solution - cover the walls with non-combustible materials. On the inside there are two layers of gypsum fiber board, on the outside there is plaster or DSP. The weak spot, as usual, remains the roof.
As you can see, lighting foam plastic covered with a layer of plaster is not an easy task.
The video used EPS with fire retardants. I think it wouldn’t be amiss before purchasing the entire batch from the manufacturer to take one package, light a fire in the backyard and see if the material contains fire-fighting additives.
We insulate the ceiling
The ceiling must be insulated without fail, since it is through it that the bulk of the heat escapes. To insulate it you will need:
- PPT slabs;
- Vapor barrier film;
- Double sided tape;
- Nylon thread;
- Nails.
Insulation work is carried out in the following order:
- Just like on the walls, a vapor barrier layer is fixed using double-sided tape and a stapler;
- Nails are placed at the bottom of the beams so that the heads stick out, this is done for further tying with thread;
- Next, the foam slabs are installed between the floor beams and fixed using nylon thread; by the way, additional fixation may not be necessary;
- Afterwards, a second vapor barrier layer is installed, attached to the beams using a stapler.