Reinforced concrete panels with cavities are used to construct floors between floors, as well as in the construction of private buildings. They are a connecting element in prefabricated and prefabricated monolithic buildings, ensuring their stability. The main characteristic is the load on the floor slab. It is determined at the building design stage. Before starting construction work, calculations should be performed and the load capacity of the base should be assessed. An error in calculations will negatively affect the strength characteristics of the structure.
Load on hollow core slabs
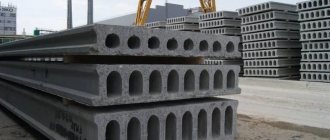
Types of hollow core floor panels
Panels with longitudinal cavities are used in the construction of floors in residential buildings, as well as industrial buildings.
Reinforced concrete panels differ in the following characteristics:
- void sizes;
- shape of cavities;
- external dimensions.
Depending on the cross-sectional size of the voids, reinforced concrete products are classified as follows:
- products with cylindrical channels with a diameter of 15.9 cm. Panels are marked with the designation 1PK, 1 PKT, 1 PKK, 4PK, PB;
- products with circles of cavities with a diameter of 14 cm, made from heavy grades of concrete mix, are designated 2PK, 2PKT, 2PKK;
- hollow panels with channels with a diameter of 12.7 cm. They are marked with the designation 3PK, 3PKT and 3PKK;
- round-hollow panels with a cavity diameter reduced to 11.4 cm. They are used for low-rise construction and are designated 7PK.
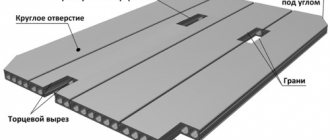
Types of slabs and floor design
Panels for interfloor foundations differ in the shape of the longitudinal holes, which can be made in the form of various shapes :
- circle;
- ellipse;
- octahedron.
By agreement with the customer, the standard allows for the production of products with holes whose shape differs from those specified. The channels can be elongated or pear-shaped.
Round hollow products also differ in size:
- length, which is 2.4–12 m;
- width in the range of 1m3.6 m;
- thickness of 16–30 cm.
At the request of the consumer, the manufacturer can produce non-standard products that differ in size.
Main characteristics of hollow core floor panels
Cavity boards are popular in the construction industry due to their performance characteristics.
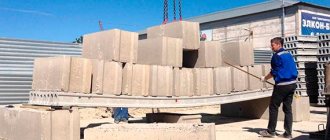
Calculation of punching of interfloor slabs
Highlights:
- expanded standard range of products. Dimensions can be selected for each object individually, depending on the distance between the walls;
- reduced weight of lightweight products (from 0.8 to 8.6 tons). Weight varies depending on concrete density and dimensions;
- permissible load on the floor slab equal to 3–12.5 kPa. This is the main operational parameter that determines the load-bearing capacity of products;
- brand of concrete mortar that was used to fill the panels. Concrete compositions marked from M200 to M400 are suitable for production;
- the standard interval between the longitudinal axes of the cavities is 13.9-23.3 cm. The distance is determined by the size and thickness of the product;
- brand and type of fittings used. Depending on the standard size of the product, steel rods are used in a stressed or unstressed state.
When selecting products, you need to take into account their weight, which must correspond to the strength characteristics of the foundation.
Screed calculation.
In order to level the floor, a cement screed is often used, but in order for everything to be successful, it is necessary to calculate the screed . If you do everything correctly, you can save your money, because all the purchased material will be used. But only a few know how to correctly calculate the screed . Next, we will tell you about all the intricacies of correct calculation of the screed, which will help make your floor perfectly flat, and at the same time save a lot.
How are hollow core slabs marked?
The state standard regulates product labeling requirements. The marking contains an alphanumeric designation.
Marking of hollow core slabs
It determines the following information:
- panel size;
- dimensions;
- maximum load on the floor slab.
The marking may also contain information on the type of concrete used.
Using the example of a product designated by the abbreviation PC 38-10-8, let’s look at the decoding:
- PC - this abbreviation means an interfloor panel with round cavities, made by the formwork method;
- 38 – product length, which is 3780 mm and rounded to 38 decimeters;
- 10 – rounded width indicated in decimeters, actual size is 990 mm;
- 8 is a number indicating how many kilopascals the floor slab can withstand. This product can withstand 800 kg per square meter of surface.
When performing design work, you should pay attention to the index in the product labeling to avoid errors. Products must be selected according to size, maximum load level and design features.
Instructions for the calculator
Our service provides a choice of two types of calculations for single-span floor beams. In the first case, you are asked to calculate the section of the beam with a known step between them, in the second case, you can find out the recommended value of the step between the beams with the selected section characteristics. Let's look at how the calculator works using an example when your task is to find the cross-section of a beam.
To calculate, you will need to know a number of required initial parameters. First of all, these are the characteristics of the beam itself:
Then you need to indicate the conditions under which the ceiling will be used:
After this, configure the design and fill in the fields of the calculator:
If necessary, enter the cost of one cubic meter of wood in order to find out the total cost of all lumber.
Also, please note that usually the beam pitch is not made less than 0.3 m, since this is not practical from an economic point of view, and more than 1.2 m, since the subfloor may sag with all the ensuing consequences.
When you click the “ Calculate ” button, the service will calculate the beam online and display the recommended cross-section values for the selected beam.
In addition, in the “Calculation Results” block you can find out:
A qualified calculation of the floor using wooden beams is the key to the durability of the structure and safety for your family.
Advantages and disadvantages of cavity slabs
Floor slabs with cavities
Hollow slabs are popular due to a set of advantages :
- light weight. With equal sizes, they have high strength and successfully compete with solid panels, which have a lot of weight, accordingly increasing the impact on the walls and foundation of the building;
- reduced price. Compared to solid analogues, the manufacture of hollow products requires a reduced amount of concrete solution, which allows for a reduction in the estimated cost of construction work;
- ability to absorb noise and insulate the room. This is achieved due to design features associated with the presence of longitudinal channels in the concrete mass;
- increased quality of industrially manufactured products. The design features, dimensions and weight do not allow handicraft production of panels;
- possibilities for accelerated installation. Installation is much faster than constructing a solid reinforced concrete structure;
- variety of dimensions. This allows the use of standardized products for the construction of complex floors.
Product benefits also include:
- the ability to use the internal space for laying various utility networks;
- increased safety margin for products manufactured at specialized enterprises;
- resistance to vibration, temperature changes and high humidity;
- possibility of use in areas with seismic activity increased to 9 points;
- smooth surface, which reduces the labor intensity of finishing activities.
The products are not subject to shrinkage, have minimal dimensional deviations and are resistant to corrosion.
Hollow-core floor slabs
There are also disadvantages :
- the need to use lifting equipment to perform installation work. This increases the overall cost and also requires a free site to install the crane;
- the need to perform strength calculations. It is important to correctly calculate the values of static and dynamic loads. Massive concrete coverings should not be installed on the walls of old buildings.
To install the ceiling, it is necessary to form an armored belt along the upper level of the walls.
Calculation of the load on the floor slab
It is easy to determine by calculation what load the floor slabs can withstand. To do this you need:
- draw a spatial diagram of the building;
- calculate the weight acting on the supporting base;
- calculate the loads by dividing the total force by the number of slabs.
When determining the mass, it is necessary to sum up the weight of the screed, partitions, insulation, as well as the furniture in the room.
Let's consider the calculation method using the example of a panel with the designation PK 60.15-8, which weighs 2.85 tons:
- Let's calculate the load-bearing area - 6x15=9 m2.
- Let's calculate the load per unit area - 2.85:9 = 0.316 tons.
- Let us subtract the dead weight from the standard value 0.8-0.316 = 0.484 t.
- Let's calculate the weight of furniture, screeds, floors and partitions per unit area - 0.3 tons.
- A comparable result with the calculated value 0.484-0.3=0.184 t.
Hollow-core floor slab PC 60.15-8
The resulting difference, equal to 184 kg, confirms the presence of a safety margin.
Floor slab – load per m2
The calculation method allows you to determine the load capacity of the product.
Let's consider the calculation algorithm using the example of a PC 23.15-8 panel weighing 1.18 tons:
- Let's calculate the area by multiplying the length by the width - 2.3x1.5 = 3.45 m2.
- Let's determine the maximum loading capacity - 3.45x0.8=2.76t.
- Let's subtract the mass of the product - 2.76-1.18 = 1.58 tons.
- Let's calculate the weight of the coating and screed, which will be, for example, 0.2 tons per 1 m2.
- Let's calculate the load on the surface from the weight of the floor - 3.45 x 0.2 = 0.69 tons.
- Let's determine the safety factor - 1.58-0.69 = 0.89 t.
The actual load per square meter is determined by dividing the resulting value by the area of 890 kg: 3.45 m2 = 257 kg. This is less than the calculated figure of 800 kg/m2.
Purpose of the calculator
In private construction, wooden beams are used as floor joists. Wood as a building material has more advantages than disadvantages. The only thing that worries you when choosing is the flammability of wood. It is fundamentally wrong to assume that concrete does not burn. It begins to crack at a temperature of 250 - 300 degrees, and at a temperature of 550 degrees the ceilings crumble. Wood treated with special compounds burns very slowly, and even charred beams can serve as reliable support for many years.
Such reliability is only possible if the timber is laid with a margin of safety. During operation, wooden beams bend and must withstand constant load. These include everything that lies above the ceiling: floors, partitions, furniture, equipment, people, and so on. The standards require the load to be taken in reserve. The online calculator calculates wooden floor beams in order to find a combination of length and cross-section at which the strength will be optimal.
Wooden joists in a concrete block house
Calculator for calculating wooden floor beams
Load on a floor slab in an old panel house
When determining how much weight a floor slab can withstand in an apartment of an old house, a number of factors should be taken into account:
- load capacity of walls;
- condition of building structures;
- integrity of the reinforcement.
When placing heavy furniture and bathtubs of increased volume in old buildings, it is necessary to calculate what maximum force the slabs and walls of the building can withstand. Use the services of specialists. They will perform calculations and determine the magnitude of the maximum permissible and permanent forces. Professionally performed calculations will help you avoid problematic situations.
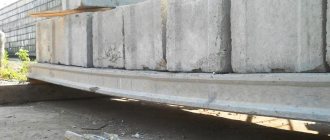
Supporting the lintel on the brickwork
An important component of the construction of window and door openings at any facility. Reinforced concrete slab lintels prevent mixing of bricks and destruction of the wall.
When constructing brick buildings, it is common to use several types of lintels:
- Made of metal. These structures are considered lightweight and are used only when the loads are light. In this case we are talking about channels, angles, fittings.
- Arched brickwork, which is both a lintel and a decorative element.
- Made of reinforced concrete - prefabricated structures installed in openings in the presence of heavy loads. The support of the lintel on the brickwork is calculated according to SNiP.
Composition of floor screed.
For proper screeding, it is necessary to study the components and consistency of the solution in advance. The screed should contain not only cement, water and sand, but also various other additives that are designed to perform specific functions. For example, you can add polystyrene granules or expanded clay to your solution; this, in turn, has insulating properties. Whatever filler you choose, always remember that the ratio of cement and filler is 50% to 50%. But only to cement!
Calculation of screeds for differences.
Often people use several types of different flooring for one room, and in this case, you need to think about how to avoid large differences when laying such a floor. It is very important to correctly calculate the place where the joints will be so that the floor ends up even.
Indeed, the thickness of floor tiles differs from the thickness of laminate, linoleum or other covering. In order to avoid unevenness, it is necessary to correctly calculate the floor screed . For example, to lay parquet they use mastic, glue, plywood and parquet, but for ceramic tiles they use only glue and tiles. It turns out that the thickness is significantly different.
So here's the correct calculation:
Next action: 28-15 = 13 mm, it turns out that at the junction of these two materials the difference will be 13 cm. In this case, experts advise that you can add a few more millimeters, since in most cases, when laying parquet, it can rise. If this happens, the tiles can be leveled.
Source
Calculation of the required amount of mixture.
Each package contains information about the average consumption of the mixture, and this must be taken into account. Suppose we need to fill 20 mm of screed for the entire volume, the consumption is 2 kg per sq.m. with a thickness of 1 mm. Therefore, you need to multiply 20x2 = 40, that is, 40 kg per 1 sq.m. The next thing is to calculate the correct amount of mixture for the entire area of the room: 40x20 (area) = 800 kg. Most often, dry mixtures are packaged in bags of 50 kg or 25 kg, so 800 must be divided by 50 (or 25) to obtain 16 (32) bags of mixture.
Solution distribution.
The solution for the rough base must be distributed over the floor so that the floor becomes perfectly level. This rule must be observed, because there are often cases when the solution is poured not only with unevenness, but also with the wrong slope. Remember that after the screed has dried, it may greatly decrease in size, and you may discover new surprises in the form of the fact that it has dried unevenly. Because of this, the floor begins to crack and peel. In order to avoid this situation, experienced people use water; they moisten the problem areas well with it.
Determination of level.
To correctly calculate the screed , you first need to set the zero level. To do this, you can use a water level or a laser device: a level. It must be moved around the room and fixed with marks, which must then be connected with a line. This is the only way to achieve the correct horizontal plane.
From the resulting line, that is, from the zero level, it is necessary to measure the distance. All measurements should be recorded to determine the maximum height. The smallest value is the highest point, the largest value is the lowest point. Using the data obtained, it is necessary to calculate the height of the screed . For example: the greatest height is 1 cm, the smallest is 0.7, it turns out that the difference between them (1 – 0.7 = 0.3) is the average thickness, which must be taken into account. The screed layer is 3cm, which means 3 + 0.3 = 3.3. Conclusion, you should buy the mixture at the rate of 3.3 cm per width.
Calculation of material costs for floor screed.
When purchasing screed materials , do not forget the fact that the solution decreases in volume as it dries. Calculating material consumption is absolutely simple, you just need to use several formulas. Let's say you need to make a screed in a room with an area of 20 sq.m., and the thickness of the screed should be 25mm. You need 20x0.25+0.5 cubic meters of solution. Since cement is mixed with sand in a ratio of 1:3, it is possible to calculate the amount of each. To do this, you need to divide 0.4 by 4, where we get 0.125. We multiply this resulting number by 3. And we find that we need 0.125 cubic meters of cement and 0.375 sand. If it doesn’t suit you or you don’t like the calculation in cubic meters, you can convert the data to kilograms. We know that 1 cubic meter of cement is equal to 1300 kg, we get: 0.125x1300 = 162.5 kg of cement.