The high strength characteristics of concrete have made it a popular material for many types of construction work.
In addition, concrete compares favorably with other modern building materials in its durability, as well as its brutal appearance, which, however, harmonizes with any kitchen or bathroom interior.
Considering all of the above, as well as its low cost, it is not surprising that concrete has become a popular building material for the manufacture of countertops.
It is also worth noting that concrete is relatively easy to work with, unlike, for example, natural stone. Thus, almost anyone can make a concrete kitchen countertop with their own hands.
In today’s article we will look at one of the options for making a concrete countertop, which was shared by the author of the YouTube channel “KCCP”.
DIY concrete kitchen countertop: how to make it from white cement
Most people think that cement is always grey. In fact, there is white, it is added to plasters, grouts, putties, and adhesives. It differs in composition from gray (much less magnesium and iron oxides). After adding special pigments, it is used to create objects with bright, clean colors. Although white cement is more expensive than gray cement, it is preferable for the manufacture of interior elements.
Advantages of white cement:
- white solution;
- sets faster (in 40 minutes) and hardens (in 16 hours);
- strength is higher than that of gray.
For countertops, it is important that white cement mortar can be painted in almost any color.
When purchasing, the class (from M400) and manufacturer are taken into account (the quality is higher among foreign ones). When working, only clean tools are used (rust is not allowed). The metal reinforcement is first covered with a layer of gray cement mortar.
Product Features
Before choosing, you must take into account a number of features that will allow you to understand how high-quality the composition you are using:
- when stirring the glue there should be no clots or lumps;
- storage in packaging can reach a very long time;
- high-quality products protect against the formation of fungus and mold;
- it must be safe for health;
- The preparation process is indicated on the package and even a beginner can perform it.
If the glue has all these characteristics, then most likely you are buying a quality product. Preparation of the solution takes no more than 10 minutes.
Advantages and disadvantages of concrete countertops for the kitchen
The main advantage is the ability to create any non-standard shape. The texture is changed by toner. The finished product is coated with polymer.
Advantages of a concrete kitchen worktop:
- suitable for any interior style;
- strength is the same as granite;
- the top layer can be made of another material;
- easy to restore;
- the choice of decorative elements is not limited;
- the surface is resistant to scratches, chips, and high temperatures (with protective varnish up to 150 degrees);
- If there is a protective polymer layer, the table will not be damaged by coffee, wine or even table vinegar.
However, it is better to cut food on a board, as the protective coating is easily scratched.
The main disadvantage is the relative difficulty of making it yourself. When installing concrete kitchen countertops on old furniture, reinforcement is required. If the technology for preparing the mixture is violated, the product will crack.
For care, neutral cleaning compounds and a cloth (soft sponge) are used. If this rule is not violated, the kitchen work surface will last a long time.
Estimated cost of making a concrete countertop
About the pros and cons of marble
If we are talking about natural stone, then you need to understand that the cost of such a countertop will be very high, especially if you are planning to make a large countertop.
Perhaps this is the main disadvantage of marble. Now let's find out the benefits of marble:
- Great appearance. I want to spend hours admiring the beauty of this stone. It is impossible to select several identical countertops; each is unique. There are no absolutely identical stones in nature.
- Wide choice of colors. You can choose your favorite shade of marble.
- If you install lighting fixtures correctly, soft light can highlight the natural beauty and texture of the stone to give it expressiveness.
- Marble is a natural material and therefore is not capable of causing allergic reactions.
- During the hot season, a marble countertop can keep you cool.
- Marble is a hard material and will last a very long time. Of course, if you care for the stone correctly.
What are the disadvantages of marble countertops:
High price. Even if you order a small countertop, the cost of marble products still remains consistently high. Sensitivity to temperature changes. Since marble is a natural material, temperature changes should under no circumstances be allowed, namely, it is forbidden to place a hot pan that has just been removed from the stove on a cold surface. Spots and even cracks may appear on the surface. Marble is a porous material and therefore reacts almost instantly to any liquid. If you spill coffee, tea, wine or juice on a beige marble countertop, dark stains will remain on the surface. If you don’t wipe the stain right away, it will be difficult to get rid of the stains. Immediately soak the liquid with a paper or cloth towel, and then wipe the surface dry with a clean cloth. Sometimes, if the liquid is too caustic (red wine, freshly squeezed juices (cherry, orange, carrots, beets)), then special chemicals will help save the surface from the appearance of unpleasant stains
You just need to use them very carefully. No acids! It is very easy to spoil a countertop made of white marble and other light shades. Even a slice of lemon or a drop of lemon juice can cause yellow spots to appear.
Vinegar, citric acid and lemon juice are the main enemies of marble countertops.
What to do if you really want to install a countertop made of natural stone in the kitchen, because marble reacts very sensitively to chemicals and acids. There is always a way out; you need to purchase a special protective agent for marble with the addition of natural ingredients. If you have ever treated a marble countertop with a protective agent, do not forget that from time to time you need to reapply the protection. And this does not 100% exempt you from careful handling of cast marble countertops. Therefore, it is better to decorate part of the kitchen interior with natural stone, but it is better to equip the workplace (where food is prepared) with more modern materials that are resistant to various liquids.
If this is your first time treating a marble surface, you should first test the product on a small, inconspicuous area of marble, and then treat the entire area of the countertop. By the way, if protective fluids do not cope with their tasks, there is only one way out - grinding and polishing the stone.
Look how beautiful the black marble countertop looks in the photo:
And also a tabletop made of green marble:
Stages of making your own countertops from cement mortar
No special knowledge or experience is required to perform this work. After determining the location and main parameters of the finished product, manufacturing is divided into separate stages. Our step-by-step instructions can help.
It is important to strengthen the formwork frame and choose the correct pouring method:
- shotcrete (spraying) - thickness can be from 1 cm, weight per square meter up to 30 kg (weight does not exceed that of a product of similar dimensions made of artificial stone);
- monofill - with a thickness of 3 cm, the weight of one square meter is 60 kg.
With the first option, there is no need to strengthen the frame.
Basic materials for making a concrete kitchen countertop
The main thing is concrete; it’s better to make the solution yourself.
In addition to white cement, the following is required:
- fillers (marble chips, sand);
- water (with a minimum amount of salts);
- dyes;
- reinforcing mesh (wire 2-3 mm);
- knitting wire;
- LDSP (MDF) or plywood (from 12 mm), boards 30x50 mm, timber 50x50 mm for formwork;
- self-tapping screws (for fastening formwork elements);
- sink pipe 50 mm with a cross section of 35 mm.
It is important to buy high-quality, durable materials.
Tools
Homes should have:
- roulette;
- pencil, ruler;
- metal bucket;
- concrete mixer (drill attachment, mixer);
- trowel;
- putty knife;
- level;
- wood saw;
- jigsaw;
- screwdriver;
- wire cutters, pliers;
- grinder (sandpaper).
You will need coarse and fine-grained sandpaper.
Drawing development
A kitchen countertop made of concrete will turn out to be of high quality if all parameters (dimensions of the working surface, location of the sink, dishwasher and other appliances) are taken into account as accurately as possible. The desired size of the drawing is natural or a template can be made from plywood or hardboard. When taking measurements, an accuracy of up to 1 mm is required.
If the working surface is large, to facilitate installation it is better to divide it (install partitions in the formwork with boundaries on the walls of the cabinets). In the corner version, the joint is placed on a support under the tabletop. It wouldn't hurt to measure the angle and level the walls.
Construction of formwork
First, the casting method is selected: direct or reverse. In the first option, the formwork is done on pedestals, with the front side of the finished product on top. In the second option, the formwork is assembled on a separate table, with the front side at the bottom. Backfilling allows you to make the front surface as smooth as possible and reduce the amount of work during finishing.
The drawing is transferred to laminated chipboard (plywood), 30x50 mm boards are attached to the edges (this is the best option, a board with a thickness of up to 50 mm will be too thin and fragile). To secure it from the outside, metal corners are screwed onto self-tapping screws. Next, a reinforcing frame is created with cells 20x20 mm (25x25 mm). The top edge does not reach the top of the sides by 3 cm. You need to lay a film on the bottom of the formwork (it is important not to create folds), then a reinforcing frame.
Sink hole
The location is indicated by sides, the height of which corresponds to the formwork parameters. There are nuances that distinguish overhead models from built-in ones.
- For overhead model. Overhead sinks have sides. To accurately determine the size of the hole, the product must be turned over and measured with the sides. Their width should be equal to the width of the formwork sides. This allows you to simply insert the sink into the table top.
- For built-in. With this option, the outline is created along the edges. 50x50 mm bars are attached to the inside of the line with self-tapping screws. An important element of built-in models is the landing chamfer, which is difficult to make. Therefore, for a concrete countertop for a DIY kitchen, it is better to buy an overlay model.
Types of gas ovens
Gas ovens allow you to save on energy consumption, have the same arsenal of functions and do not require special operating skills.
Gas ovens can be hob-dependent or autonomous. The first models are mounted under the countertop. Their disadvantage is that if the surface breaks, the oven will not be able to function autonomously.
Autonomous models have one significant advantage - they can be installed anywhere, without focusing on the location of the hob. If it suddenly fails, this type of oven will allow you to quickly cook and reheat food.
You can purchase a gas oven together with a gas oven. This is rational if there is room to place it in the kitchen. Such equipment easily connects to a single backbone network and does not bring unpleasant surprises during operation.
There are also the following types of gas ovens:
- Depending on the type of air circulation: convection and without convection.
- Depending on the functions performed: multifunctional and simple.
- Subject to availability of additional features.
By type of ventilation, gas ovens are simple - those in which hot air moves naturally.
But buyers are often interested in convection gas ovens, which have a special fan. As a result, the air is heated and distributed evenly throughout the oven.
Multifunctional gas ovens can be transformed into a microwave oven and replace a lot of other kitchen appliances. Such options will cost more, but due to their high functionality they are worth the investment.
Additional functions of a gas oven are those that will be a good help for the housewife, but you can do without them if you wish. These include:;
- auto-ignition - allows you to quickly light the oven;
- cold door function. The child will not burn his hand if he touches the door;
- the presence of built-in filters - this additional feature will eliminate all odors inside the chamber and prevent them from “escaping” into the room. This is especially true in the kitchen studio;
- timer - will not allow the dish to burn if the cook misses the cooking time;
- grill;
- gas control - the function ensures that the gas does not go out. If this happens, the oven will automatically turn off.
Reinforcing frame
When calculating the dimensions of the reinforcing frame, it is important to take into account that it is located 2.5 cm from the top edge of the formwork. This is important to consider when cutting wire.
Installation of reinforcing structure
The reinforcing frame can be assembled either separately or in formwork. The second option is more convenient. You need to screw in self-tapping screws around the perimeter of the laminated chipboard (can be replaced with plywood), and level the caps with a level or ruler. Sections of reinforcing wire are screwed to the self-tapping screws and secured at intersections using tie wire.
Sealing joints
Before pouring the concrete mixture, the formwork is treated from the inside with sealant. If you want to make a work surface with rounded corners, pipes are inserted into the corners of the wooden formwork, and the free space is completely filled with sealant.
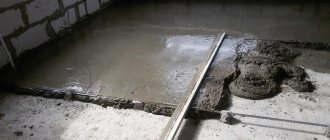
Making the mixture, concreting
The formwork is filled immediately or gradually (in layers).
Instructions for making your own cement mixture:
- take marble chips, sand, white cement, water in the ratio 4:2:1:0.5;
- make cement laitance (mix cement and water);
- gradually add the remaining ingredients.
Low quality materials should not be used. It is important to mix the composition well.
Casting mold
It is made from laminated chipboard (without texture), although plywood can also be used. But it is worth noting that any roughness will be imprinted on the surface of the countertop and then you will have to grind longer (remove a thicker layer of concrete from the surface).
Manufacturing of boards
The sides will be strips of laminated chipboard and screwed to the base with self-tapping screws. It is imperative that through holes for self-tapping screws be drilled in the sides, otherwise the chipboard will delaminate. It is advisable to screw in the screws as often as possible so that the cement mortar does not bend the sides.
As a decoration, you can install a strip of metal (aluminum or copper). In this case, the strip will serve as a divider of the tabletop into two halves.
To prevent water from leaking out of the mold, coat all seams with silicone sealant. You can give the silicone an even radius by smearing it with the corner of a plastic card.
To create a larger radius, you can use curved pieces of plastic (1/4 of the wall of the plastic sewer pipe) as liners.
We provide a place for the tap outlet
To do this, place a piece of pipe on the form in the right place. This will save you from unnecessary work (drilling a hole in concrete).
The form is ready, now it needs to be vacuumed so that sawdust and debris are not imprinted on the surface of the countertop, and thoroughly wiped off dust. Then apply a release agent (wax separator) so that the concrete does not stick tightly to the chipboard. The heads of the screws need to be covered with plasticine so that cement does not get on them and disassembling the mold is not difficult.
A concrete slab must be reinforced, so we lay a reinforcing mesh on the bottom. The mesh should not come into contact with the bottom of the mold (the bottom in this case will be the surface of the tabletop), it is necessary that it be located in the thickness of the slab, for this we stretch the mesh with thin wires. As decoration, we place small colored pebbles, pieces of glass, etc. on the bottom of the mold.
Decoration
Various materials are used for decoration: toner (mineral additive), glass fragments, beads, pebbles, coins, shells, threads. The elements are laid out on the surface and glued (so that they do not move during pouring).
Concrete countertop decorated with marble chips
Large stones can be added to the solution; after dismantling the formwork, the top layer is removed by grinding. The filler is exposed.
Wood inlay technology came from Europe. Figures are cut out of veneer, and similar elements are cut out of plexiglass. Before pouring, an ornament is created from the figures, the wood is replaced with plexiglass, and glued. The formwork is filled with white cement mortar, leaving 2 cm to the top edge.
After drying, the front sides of the wooden figures are soaked in oil, the bottom side is glued to the concrete, sanded, and coated with oil again. The finished surface is varnished.
To make a marble-like countertop from concrete for your kitchen with your own hands, several mixtures are made and they do not need to be mixed too thoroughly. The most popular layer is epoxy resin; some prefer to lay tiles (ceramic, composite), or mosaics. With the latter, the tabletop does not need to be sanded after production.
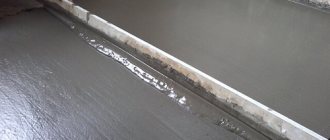
Solution for filling the face layer
No large fillers are added to the mixture, less water is needed. If layer-by-layer filling technology is used, marble chips are added. Mixing is carried out at low speed.
The thickness of the decorative layer is one third of the thickness of the tabletop. When pouring, the solution is compacted with a spatula (voids are removed).
How to pour the base layer of a concrete countertop for a kitchen
When the decorative layer is located at the bottom, the fundamental one is poured in half an hour, covered with a film, which after a day is replaced with a moistened cloth. The formwork is dismantled after two days.
If the foundation layer is poured first, the front layer is created after complete drying.
Sanding a concrete countertop for a kitchen
Sanding is required if there is no decorative layer. To do the job you need an angle grinder and wheels. First, the surface is treated with coarse-grained, then fine-grained. If there are small depressions on the surface, they should be treated with a special mixture and sanded again.
Unique products from the Bershovo workshop
Take, for example, bath countertops made of decorative concrete; they look very stylish and elegant. They can become the highlight of any bathroom. In addition, this material is excellent for use in damp areas. A bathroom sink and countertop made of decorative concrete will serve you for many years without complaints.
You will find a large assortment of countertops for bathtubs made of decorative concrete here in the Bershovo workshop.
Such products are created from decorative concrete, which has high performance characteristics: it is resistant to temperature changes, humidity and the formation of mold and mildew.
The strength, resistance of this material to chemical and mechanical influences and reasonable price have made decorative concrete a material in demand today.
It is an excellent alternative to natural stone, while it is more pleasant and “warm” to the touch. And due to its antibacterial properties, it is also hygienic.
And this is a very important requirement for products intended for furnishing a bathroom.
Decorative concrete sinks create a special look in your bathroom. Decorative concrete sinks provide the opportunity to choose the color, thickness, style and shape of the product. Whether the sinks will be used in your bathroom or powder room, in a commercial office or restaurant application, requiring double or triple fabrication options, we can help you achieve a solution to your design challenges. Decorative concrete sinks will be made especially for you to suit any of your design requirements. We can offer you ready-made solutions in our Store or choose from the design options presented on this page.
Reviews about concrete countertops in the interior
Although the production technology is simple, concrete countertops are difficult to purchase. There are few workshops offering such services. Those who managed to buy such coatings do not mention negative qualities in their reviews. Concrete countertops are an excellent alternative to artificial stone surfaces. For a dark set, you can make a light work surface, for a light one, a dark one. Many people are attracted by the opportunity to create unique decor.
To better understand how to make such a countertop yourself, we recommend that you carefully watch the video below.
Concrete is suitable for many interior styles: minimalism, country, Scandinavian, industrial. To make a work surface yourself, you first need to create the most accurate drawing possible. When constructing formwork, special attention is paid to holes for sinks and household appliances. It is advisable to coat the finished product with a composition that improves performance characteristics. Any design can be used, the main thing is that it matches the style of the interior.
Preparation of formwork
When making your own countertop, it is important to complete this area of work with the utmost precision and accuracy. After all, the strength of the product and its appearance in general will depend on the quality of the workpiece.
After a decision has been made regarding the height of the structure, parts of the required length need to be cut from the beams - these are the vertical parts of the future formwork. They will need to be secured to the floor. To do this, you will need profiles. If the contact with the walls is direct, then the racks must be drilled through. They are secured using anchor dowels. After fixation, the vertical parts are connected to the horizontal ones. Thus, the formwork frame is ready.
To make the lower part you will need a wooden MDF sheet. The formwork must be made in such a way that the concrete can be pulled out later without damaging it.
If the countertop has a sink, then you need to place a metal ring inside in the required place. Also, when using the hob in the future, this place must also be marked.
Bathrooms are a special place in the home, an island of bliss created for relaxation and relaxation. Being alone with yourself and soaking in a fragrant bath after a hard day at work is a great pleasure.
Despite the often compact size of this room, it is important to create a cozy and comfortable interior in which an atmosphere of peace and harmony will reign. Bathroom arrangement should be taken seriously, carefully considering every detail
Incorrectly selected furniture and accessories can immediately ruin the entire look and impression of the interior. And, conversely, a small touch, and the interior will be transformed and sparkle with new colors
Bathroom arrangement should be taken seriously, carefully considering every detail. Incorrectly selected furniture and accessories can immediately ruin the entire look and impression of the interior. And, conversely, a small touch, and the interior will be transformed and sparkle with new colors.