Hello. This summer I started construction. I decided to build a small extension to the house. Naturally, with your own hands. After the construction is completed, I will describe the whole process, but for now I want to tell you how I came up with the idea of building reliable and frost-free lintels over window and door openings from improvised means.
There are a great variety of technologies for constructing lintels. Ready-made reinforced concrete lintels are sold, you can put metal corners, you can build formwork and pour it yourself from concrete, etc.
But ready-made jumpers are quite expensive, and you have to pay for delivery and unloading - you can’t bring them in a car)))). And then you can’t throw one up.
Metal corners are also not cheap (after all, you need quite powerful ones). In addition, I also encountered such a drawback - over time, rust passed through the putty and wallpaper. After all, the layer of putty above them is very thin - the plaster hides their thickness, and above them there is only putty. I do everything myself, I like to work alone, so I decided to pour concrete on site.
There are some “moments” here: The concrete lintel should not freeze, otherwise the window openings will “cry” in winter. This problem is usually solved by laying 5 cm of extruded polystyrene foam on the outside. It's not cheap either.
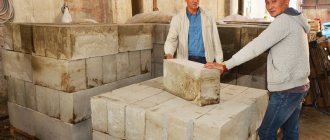
I build from gas silicate blocks. The manufacturer has U-shaped blocks that can be laid out on a support, and then concrete can be poured into the resulting trench. It seems to be normal, but... The cost of such blocks is not at all humane. (Exactly four times more expensive than usual), and again you have to go with a trailer for them..
So I did it easier.
So, we will need: 1. Boards for formwork. (Any ones you don’t want) 2. Gas silicate blocks. 3. Cement. 4. Sand, or ASG 5. Reinforcement.
First of all, we build the formwork:
So, I got a “permanent formwork” made of porous, non-freezing material. The space remaining in the middle, measuring 100 by 250 mm, is more than enough to make a powerful reinforced concrete lintel. (Especially since 250 is the height.)
All that remains is to make the concrete. I prepared it from M500D20 cement and sand and gravel mixture. It can also be made from sand, but I had PGS.))))). By the way, when making from sand, the volumetric proportions of cement/sand should be maintained at 1/3. And when using ASG, the proportion can be increased to 1/5 without losing the concrete grade. (If there is no clay in the ASG).
Having opened the barn, I sadly realized that getting a concrete mixer was not so easy. I haven't received it since the fall.
Then again sand and again cement. It’s better to do this on a steel sheet or concrete pad, but I only had unnecessary old film on hand.
We throw the resulting “sandwich” with a shovel to the edge of our site, pouring it strictly at one point. The point is that this creates a slide and the grains of sand, rolling down, completely collapse in the cement.
Since the blocks are now placed on glue, they are not needed. Therefore, I tied them together and placed them as reinforcement in the jumpers.
If you have little reinforcement and it is not enough for several layers, then do not forget that concrete works very well in compression, and very poorly in tension. Therefore, the reinforcing belt should be positioned as low as possible. From above he will not give anything at all.
That's all! The jumpers are ready. Maybe it will be useful to someone.
By the way, if I didn't have the partition blocks, I would just saw the big one. It will be cheaper this way - partition walls are more expensive than regular ones, if you count them in cubic meters. This is very easy to do, for example, using my homemade saw:
A very important stage in the design of a building is the calculation of the lintel over the door or window opening. In order to complete this task, it is necessary to determine in advance what type of reinforcement will be used in this case. Also important indicators are the approximate load exerted from above and the dimensions of the opening. Let's take a closer look at this issue.
Main varieties
To construct the lintel, especially durable materials are used; they can be from the same category as the wall itself, or they can be radically different from the original structure. The main condition is to ensure the strengthening of the opening, as well as the uniform distribution of the applied load. All this will help to adjust further calculations for the structure in the wall.
In order to strengthen the opening in the load-bearing wall of a panel house or any other house, the following materials can be used:
Depending on the chosen option, the installation of lintels above the opening differs in technological terms. Brick structures should also be placed in a separate category; they should be considered in more detail.
The main types of lintels for strengthening a doorway
Brick
A brick lintel is used to create openings in a load-bearing wall in brick houses; it is usually used for small structures. A device of this type of construction is based on the use of a particularly strong mortar, as well as the introduction of metal rods or pipes into the masonry.
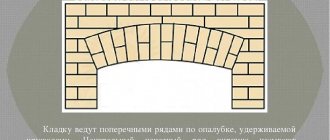
A distinctive feature of this type of construction is the ability to create spectacular arched vaults. In this case, the masonry consists of straight and wedge-like elements. The seams should be perpendicular to the exposed lower tier. All joints are tightly filled with mortar. In order for the arch to hold its shape until the solution dries completely, it is additionally reinforced with wooden spacers. This formwork is installed in advance.
In the shape of an arch, 2-3 rows are often erected. The position of each of them is determined according to a special template. To adjust individual elements, use a square and a cord. It is necessary to be equal to the center and the first row.
Brick lintel installation diagram
Types of steel angle used for the manufacture of metal jumpers
Angle steel used in construction is made in two ways - rolling and bending. In structures designed to withstand heavy loads, a rolled angle is usually used, since it is characterized by:
- increased strength due to thickening on the inside of the corner;
- clear contours of the outer corner, while the metal product obtained by bending has a slightly rounded outer corner;
- large wall thickness: bent products are usually made thin-walled, since the bending process is carried out without heating, and very powerful, expensive equipment is required to work with thick products.
For the manufacture of rolled corner profiles for ordinary purposes, carbon steels of ordinary quality are used, St3 is most often used. For metal products planned for use under conditions of increased loads and/or in regions with cold climates, low-alloy steels are used, most often 09G2S.
Based on the width of the shelves, there are equal and unequal corners. Products with equal shelf widths are widely distributed.
Reinforced concrete
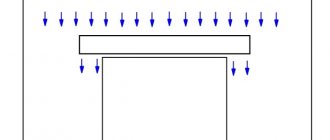
To strengthen the opening in the load-bearing wall of a house, reinforced concrete lintels are most often used. A preliminary calculation allows us to determine which element will be most suitable in this case. Such reinforcement of the opening can be made directly on site using formwork, reinforcement and liquid concrete.
To speed up the process, already cast elements are most often used. In order to secure them in the load-bearing wall, it is additionally recommended to use reinforcement to strengthen the sides of the opening. In other words, the metal is laid on those areas that are in direct contact with the reinforced concrete part.
The main requirement in this case is compliance with the installation rules. The lintel must completely cover the opening and extend approximately 25 cm into the wall. The exact requirements are determined by the specific type of structure. For each type of lintel and its relationship with the width of the opening, special standards have been developed.
Mostly straight products with metal filling are used. However, in some cases, it is possible to make a lintel according to a given template, which will follow the shape of the opening and at the same time act as reinforcement for the supporting structure.
Scheme of reinforced concrete lintel
Brickwork of ordinary lintels. Jumpers made of reinforcement
Category: Brickwork
Ordinary jumpers
Ordinary lintels are laid from selected whole bricks, observing the horizontality of the rows and the rules for tying ordinary masonry. The height of an ordinary lintel is 4-6 rows of masonry, and the length is 50 cm greater than the width of the opening. For laying lintels, use a solution of grade no lower than 25.
Under the bottom row of bricks in the lintel, in a layer of mortar 2-3 cm thick, at least 3 reinforcement rods made of round steel with a diameter of at least 6 mm are laid, usually at the rate of one rod with a cross-section of 0.2 cm2 for every half-brick of wall thickness, if the design does not stronger reinforcement is required.
The reinforcement absorbs the tensile forces arising in the masonry. The ends of the round rods are passed beyond the edges of the opening by 25 cm and bent around the brick (Fig. 1).
Ordinary lintels are made using temporary formwork from boards 40-50 mm thick. A mortar is spread over it, into which the reinforcing bars are then embedded. The ends of the formwork are supported by bricks released from the masonry; after the formwork is removed, they are cut down.
Sometimes the ends of the formwork are inserted into the grooves on the slopes of the openings, which are laid after the formwork is removed. Yes If the opening width is more than 1.5 m, then a stand is placed under the formwork in the middle and supported on wooden circles (boards placed on edge).
Rice. 1. Laying ordinary lintels: a - facade; b - section; c - masonry on plank formwork; d - masonry on inventory circles. 1 - reinforcing bars; 2 - boards; 3 - wooden circles; 4 — tubular circles
Inventory tubular supports-circles are used. They are made from two pieces of pipe with a diameter of 48 mm, inserted into a third piece of pipe with a diameter of 60 mm.
When laying circles, the pipes are moved apart so that the ends of a smaller diameter go inside the grooves left in the masonry.
Two circles are placed on each opening; they can also be installed when the opening already has window and door blocks. With other types of circles, the opening can be filled with blocks only after removing the lintel formwork.
Brickwork - Row lintels
Metal
Strengthening a window or doorway with concrete is possible only if the load-bearing wall is necessarily reinforced; some houses can be equipped with simpler metal structures. Such jumpers are most often presented in the form of an angle profile; they are made of durable metal that can withstand pressure and tension under enormous loads on it. With the help of such corners it is very convenient to build reinforcement in a brick wall.
In order to install such a part, it is necessary to fit it to the seams in the masonry. It is not necessary to reinforce the walls on the sides with reinforcement. In this case, it is enough to place the corner only 15-20 cm deep into the wall.
Prefabricated metal lintels can be used for almost any type of structure; they can be installed directly on the construction site, without making preliminary calculations.
The easiest way to strengthen a doorway is to use a metal lintel
Jumper. Buy or make it yourself
You can buy a ready-made reinforced concrete lintel. With this solution you gain time, because you don’t need to make it yourself and wait until it gets stronger to continue construction. However, then you will have to spend money on buying a jumper and delivering it. The finished reinforced concrete lintels are laid on the mortar.
You can make the jumper yourself on the ground, and then install it in the right place. The advantage of this method is that it can be done in advance. And by the time you need it, you just need to install it.
Making a lintel using permanent formwork. The essence of this method is that in the place of the future lintel (window or doorway) the following is placed:
- three reinforcement rods with a diameter of 12-14 mm, located at a distance from each other, and pre-treated with anti-corrosion solutions. The reinforcement is laid so that it extends onto the walls from the opening by at least 500 mm, and the distance between the rods does not exceed 50 mm (if the distance is greater, it is better to add another reinforcement rod). This method is used very rarely and only on small openings. In this case, only aerated concrete blocks can be laid on top of the reinforcement;
- A pre-fabricated structure is installed on top of the opening, consisting of two corners (minimum 40 mm), between which reinforcement is laid and then welded. In this case, the width of the resulting product should be the same as the thickness of the wall. This method is used often, because it can be used on small and large openings, and both aerated concrete blocks and bricks can be laid on top of the structure. The only caveat is that the larger the opening, the larger the corner will be needed.
Making a lintel using removable formwork. This method is used when filling the lintel in place. In this case, formwork is installed above the opening, the sides of which are attached to the walls, and its lower part is fixed above the opening using spacers (the lower part of the formwork does not rest on the walls). It should be remembered that the formwork, and then the poured lintel, must extend onto the walls in different directions from the opening by at least 200 mm.
Next, inside the formwork, at a height of at least 50 mm from its bottom and at the same distance from the sides, a pre-prepared mesh welded from 12-14 mm reinforcement is laid. To prevent the mesh from falling onto the lower part of the formwork during pouring, crushed stone granules or brick fragments are placed under it. After the preparatory work has been completed, concrete can be poured into the formwork.
To fill the lintels, concrete is used, made in the following proportions:
- Cement - 1 portion
- Sand - 2 servings
- Slag - 1 serving
- Crushed stone (fraction - up to 15 mm) - 3 portions
- Water - depend on the situation.
When pouring the solution into the formwork, it must be compacted and leveled so that no voids form anywhere, which will subsequently lead to cracks.
After the jumper is poured, it is left for five days until completely hardened. Then the sides of the formwork are removed and construction work continues, and the lower part and spacers are removed only after the concrete has completely hardened. Typically, concrete gains its full strength after 14 days, but this also depends on weather conditions.
Some recommendations
- During construction, it is better to use either ready-made reinforced concrete lintels (purchased or poured in advance) or lintels made using removable formwork.
- The height of the reinforced concrete lintel should be at least 1/20 of the length of the opening, and it is advisable to make the width according to the width of the wall so that there are no extra ledges.
- It is better to fill the lintel so that its upper part is flush with the top of the last laid brick or gas block. This will make it possible to continue laying without any changes.
- When making a lintel yourself, it is better to use reinforcement with a diameter of 14 mm to make the reinforcing mesh. This will add strength to the reinforced concrete belt.
- When pouring the solution into the formwork, it must be compacted well to avoid the appearance of voids.
- It is better to remove the spacer and the lower part of the formwork no earlier than after 25 days.
- If you don’t know what lintels are needed for your building, then it’s better to consult with professionals.
Materials used
- Ready-made jumpers
- Solution
For the manufacture of
- Armature
- Corners (if necessary)
- Binding wire (or welding)
- Boards and nails for formwork
- Cement, sand, slag and crushed stone for mortar
- Concrete mixer (if necessary)
Calculation of a lintel in a wall
Exact calculations are performed during the project preparation process. To do this, you need to take into account the specifics of the building material, the potential load exerted on the opening and the features of the structure itself. The main parameters in order to make the final calculation of the reinforcement of a doorway in a load-bearing wall are:
- strength: 1.12 * part strength * material strength;
- deflection: standard moment * design length of the jumper / (10 * moment of inertia * modulus of elasticity of the material) = 1/200;
- load, including from the top masonry and floors: thickness of the opening * width of the opening * height of the masonry * specific gravity of the material;
- moment of resistance: design load/8/design material resistance;
- moment of inertia: depth of support of the jumper * moment of inertia of the material * design length of the part / (10 * modulus of elasticity of the material).
You will only need four parameters that you know well:
– width of the opening to be closed;
– type of wall brick (silicate or ceramic);
– whether the wall is load-bearing (whether the floor slabs rest on it).
Four simple steps:
- Step 1: width of the opening to be covered. Enter the width of the opening in meters. The program is designed for openings with a width from 0.8 to 2.7 m; if you enter a larger width, lintels of 2.7 m will be calculated. The calculator does not care which opening is being considered: a window or a door.
- silicate one-and-a-half brick GOST 379-95 “Silicate bricks and stones” with a height of 88 mm.
Step 2: type of brick masonry walls. The program selects lintels for buildings from the following materials: ceramic single brick GOST 530-2012 “Ceramic brick and stone” with a height of 65 mm;
- All! By entering these four values, you will get a layout of lintels over one opening. In addition, the calculator will provide a specification indicating the brands and GOST standards of jumpers, the required number of jumpers per opening and the weight of each of them. Follow the same procedure for all openings of your house or cottage, and you will receive materials for a comprehensive order of all precast concrete lintels for the site. Thus, you will receive all the necessary information for purchasing jumpers free of charge. More details
After entering the data, you will see a diagram of the layout of the jumpers along the opening. If necessary, you can go back any number of steps and change any of the parameters. The layout scheme will be recalculated immediately.
The program lays out only timber lintels of PB grades in accordance with GOST 948-84 “Reinforced concrete lintels for buildings with brick walls.” This standard applies to reinforced concrete lintels made from heavy concrete and intended to cover openings in brick walls of buildings for various purposes.
The jumper brand consists of alphanumeric groups. For example, the brand of jumper 5PB27-37 is deciphered as follows: 5 – jumper with a cross section of 250×220 mm; PB – bar lintel; 27 – length of the jumper in decimeters, rounded to the nearest whole number (in this case 2720 mm); 37 – design load taking into account its own weight, rounded to the nearest whole number (in this case 37.3 kN/m). In brands of jumpers that have sling loops, a lowercase letter “p” has been added. For example, 5PB27-37-p.
If necessary, we are ready to provide documentation with initial data and specifications of selected jumpers completely free of charge. Specify the email address to which we will send the required document, which also contains information about the organization that carried out the selection of jumpers, the name of the responsible specialist and a link to the approvals of our organization that allow us to carry out the specified type of design work. An example of document formatting is provided at the link. s Laying out reinforced concrete lintels is one of the stages of designing a cottage. Other important steps include designing foundations, laying out floor slabs, designing basement walls and staircases. From us you can order a project for the load-bearing structures of a cottage or house, which will be completed by experienced designers (see “our team”). In our work we use modern software systems for calculations and design of load-bearing structures.
DIY lintels for window and door openings
So, before you start making jumpers, you need to determine their type. For small houses with a lightweight roof structure, non-load-bearing lintels can be used, which will provide additional savings. Also, “bashki” can be used in cases where the floor slabs of all existing floors rest on reinforced belts. Such belts themselves absorb the loads and distribute them evenly.
Let's consider the manufacturing technology of the jumper. First you need to make a lintel for the facing masonry, the role of which will be played by the corner. Usually a corner of 100 mm is used, but not less than 75 mm. The corner is installed in such a way that its vertical shelf is not on the outside, but between the front and backing masonry, then it will not be noticeable. The edge of the corner must be positioned flush with the window quarter. This will allow you to press the window tightly when installing it without the formation of cracks and gaps. The size of the window quarter is 50 mm.
Now we will consider two options for making a lintel: pouring it directly above the opening or on the ground with subsequent installation in the opening. Which option is better? There is no fundamental difference. In the first case, you will have to tinker with the installation of the formwork, in the second, you will have to lift and install the finished lintel manually. The second option is more difficult, because it is not always possible to hire a crane to lift the lintel. Also in this case, it will be necessary to make two lintels for the window, each 150 mm wide (the thickness of the backfill is 300 mm: foam block and 100 mm of insulation).
If you give preference to the first option - filling the lintel in the opening, you can save not only effort, but also time and money. An important advantage is that with this manufacturing there will be only one jumper, and not two, as in the second option. True, the installation of formwork can raise a number of questions, because it must not only be securely fastened itself, but also hold fairly heavy concrete inside.
How to perform a load calculation
Unfortunately, despite its importance, lintels in construction are an element that does not receive the attention it deserves because in many cases it is done on the fly without any specifications or requirements. However, it is necessary to follow the technology and correctly calculate the loads. Otherwise, cracks may form in the immediate vicinity of the holes. But these unpleasant consequences can be easily avoided. This will be helped by choosing the correct type of jumper to use and meeting the minimum requirements.
The jumper is calculated based on the applied load, which includes:
- Jumper weight;
- Wall weight taking into account self-supporting capacity;
- Wall weight distribution;
- The load caused by the support of beams or floor slabs on a certain section of the wall;
- Linear dimensions of the jumper.
How to choose a jumper? In many cases, you can rely on the dimensions of tables with standard prefabricated concrete products (series 1.038 for regular and 1.225 for extended openings).
Formwork for lintel
The formwork is made of wooden boards, the thickness of which is 20-25 mm, from which the panels are made. The boards are fastened together with nails or self-tapping screws. It is better and faster to use self-tapping screws, screwing them in with a screwdriver. Then the formwork will also be easy to disassemble by unscrewing them.
First, a horizontal shield is installed in the opening, resting on supports. It can be placed flush with the backing masonry or slightly extend beyond it. In the second case, the vertical shield will be installed on top of it, and not on the side.
A reinforcing mesh is laid out in the formwork on a horizontal panel, and then the vertical panel is secured with self-tapping screws. For better fixation of the vertical shield when pouring, it can be additionally tied to the masonry mesh with knitting wire and tensioned. This will prevent the shield from moving under the load from the concrete, and it will fit tightly to the window.
Strengthening openings in frame buildings
For a frame building, the presence of lintels in the upper part of the openings is strictly necessary. The requirements described below are valid for frames made of both metal and wood.
If the width of the opening does not exceed two steps for installing the frame racks, the nearest side rack elements are connected by two horizontal crossbars, and then two vertical spacers are added between them, setting the required width of the opening.
If the opening width is equal to three or more distances between the frame posts, it is decorated with crossbars in the same way. For additional support of short racks above the opening, they are unloaded onto adjacent ones using diagonal braces running from the center outward. In all cases, the cross-section of the crossbars should not be less than the size of the rack elements of the frame.
If the opening exceeds the width of five times the distance between the posts, the verticals closest to it should be double. The internal pair is connected to each other by a horizontal jumper, and the external one is the same, but higher by half the height of the opening. The space between two horizontal crossbars is filled with a diagonal stiffening mesh based on the principle of floor trusses.
Insulation of the lintel
An insulating layer must be made between the facing masonry and the lintel. To do this, you can use mineral wool, as in the case of wall insulation. Insulation thickness – 100 mm. Mineral wool is placed in the formwork, after which concrete is poured.
Insulating the lintel using mineral wool has a drawback - the window that will be installed in the opening will rest against the surface of the wool, and even filling the joint with polyurethane foam will not provide one hundred percent fixation of the window frame. When using mineral wool, the slopes of the window opening must be covered with backing bricks so that the window rests against it and is securely fixed using polyurethane foam. If this is not done, the foam will again come into contact with the wool, not providing the necessary fastening to the window structure. But when using backfill masonry on slopes, you will have to insulate them again.
In order not to create unnecessary problems for yourself and not to duplicate the insulating layer, you can immediately use a simpler and more reliable method of insulating the lintel. As insulation, instead of mineral wool, you can use extruded polystyrene foam - pumpan - which, unlike cotton wool, has a fairly durable surface. The thickness of the pumpan sheets is 30 mm. When installing a window, the gap between the frame and the insulation is filled with foam, which rests against the hard surface of the pumpan sheet and securely fixes the window in the opening. In this case, there is no need for an additional layer of insulation. Thus, when using solid insulation, you can save on insulation of slopes and get reliable fastening of the window.
How to make a reinforced aerated concrete lintel?
Question: Please tell me how best to make lintels in aerated concrete walls, what materials to use, what reinforcement to use?
When constructing houses and buildings from aerated concrete, it is rational to use reinforced lintels, which, in comparison with reinforced concrete lintels, are easier to construct.
In our projects, in order to save money and time for the construction of aerated concrete structures, we very often use such a constructive solution.
How to properly make reinforced lintels in aerated concrete walls?
When constructing external aerated concrete walls, builders always strive to get rid of “cold bridges” at the lintel level. Therefore, monolithic or prefabricated reinforced concrete lintels made of heavy concrete should be insulated. To do this, either heat-insulating U-shaped aerated concrete blocks (expensive and very fragile elements during transportation and installation) are used as permanent formwork, or, after removing the removable formwork during the exterior finishing of the building, the timber lintel is insulated with slab insulation. It should be emphasized that such measures are quite expensive and are not always justified.
Unlike reinforced concrete lintels, reinforced lintels have an important advantage: they do not need to be insulated , since steel reinforcing elements are located along the lintel and do not create “cold bridges”.
Reinforced lintels can be used for door and window openings up to 1.2 m .
It is best if a monolithic reinforced concrete belt is placed above such lintels, which will distribute the pressure from the interfloor structures to the walls of the building. In the case of direct concentrated support of beam structures on a reinforced lintel, it is necessary to reinforce the lintel strictly according to calculations. This calculation can be performed by an experienced design engineer.
How to reinforce lintels?
- bar reinforcement of a periodic profile (rebar of classes: A-III; A400C, A500C) with a diameter of 8, 10 and 12 mm, see photo 1a;
- rigid reinforcement from steel angles (63x5; 63x6; 75x5; 75x6 mm), see photo 2;
- rod reinforcement and steel corners (combined version), see photo 1b.
Photo 1. Reinforced lintels: a) with rod reinforcement; b) with corners and rod reinforcement
Photo 2. Jumpers reinforced with angles
The lintel reinforcement elements should be placed beyond the opening (on the piers) by at least 350 mm in order to anchor them into the walls and securely support the lintel on the piers.
The procedure for constructing a reinforced lintel in aerated concrete masonry
Reinforced lintels are manufactured in the following sequence:
- Laying of aerated concrete walls is carried out up to the level of the lintels.
- Removable formwork is installed, which can be made of wooden beams or panels (planks, plywood or OSB boards).
Photo 3. Formwork made of wooden beams for making a reinforced lintel
Photo 4. Panel formwork for making a reinforced lintel
- Preparation of reinforcing elements: preparation of elements of the required length, laying them in the design position (when using corners, they are primed or painted with enamel).
- Making grooves in aerated concrete blocks, see photo 5.
Photo 5. Aerated concrete block with grooves for laying reinforcement
- Applying glue to the grooves and installing aerated concrete blocks in the design position, see photo 1.
- Removing formwork. Usually the formwork is removed 1.5...2 weeks after the lintel is made.
- Elements from the corner are plastered with cement-sand mortar over a metal mesh (expanded sheet metal or woven plaster mesh are used).
Good luck with your construction of reinforced lintels. I hope our tips will help you save a lot of money on construction))).
We also recommend reading the article about laying aerated concrete blocks using homemade hand tools.
Lintel reinforcement
The diameter of the reinforcement for the lintel depends on its type. In this case, a “head” was chosen, which takes a minimum of loads and is non-load-bearing. This choice was made due to the presence of a reinforced belt and a lightweight roof structure. For such a jumper, a reinforcing mesh made of two reinforcement strands with a diameter of 6-8 mm is suitable. Working reinforcement is laid along the lintel. The reinforcement bars must be fastened together by knitting with binding wire. Welding is not used to connect them. The result should be a mesh that looks like a ladder.
Design advantages
Corner window structures are not load-bearing, so their design is entrusted to specialists . But the advantages of these openings are undeniable:
- With them, the mass of the building itself or an extension, for example, a veranda, is reduced.
- They are visually attractive. Such original panoramic glazing of the maximum size is now welcomed, especially in minimalist architecture.
This design looks attractive both outside and inside.
- Thanks to such corner openings (especially without a corner impost), natural light increases by a third. This means the room will become the brightest.
Design possibilities
The decoration of the classical style is complemented by English sash windows - all the lower sashes rise upward.
The design of the opening depends on the architecture of the house, its exterior and the interior of the room. Therefore, manufacturers surprise us with many innovative discoveries. For example, you can find transparent frame models. They are suitable for private houses in modern styles and exclusive multi-storey ones.
A blind window is ideal for a children's room.
The glazing itself is divided into subgroups:
- when glazing balconies and terraces, aluminum or plastic profiles are used;
- For bay windows (protrusions of the house), corner windows, only warm glazing is used - plastic.
Reinforcement of formwork with supports
When installing a horizontal formwork panel, it is imperative to use supports. Some builders do not do this, not taking into account the rather significant weight of concrete, which is about 2.5 t/m3. When pouring mortar into the formwork, it can displace the shield or deform it, bending it down. This will definitely affect the shape of the jumper, and it will be very difficult to correct it. So it’s better to immediately take care of reliable formwork and its rigid structure.
When securing a support located in the center of the opening, it should be positioned closer to the window. The inner edge will not sag, since it is attached to the vertical board.
Conclusion
Are you convinced that corner windows are an architectural accent of modern buildings? I think that after reading the information above, you can easily decide on the choice of design. Some more visual information can be seen in the video in this article. And, of course, I will answer all questions - write in the comments.
Did you like the article? Subscribe to our Yandex.Zen channel
December 6, 2016
Design,Windows
If you want to express gratitude, add a clarification or objection, or ask the author something, add a comment or say thank you!