- What is the minimum dressing of aerated concrete blocks?
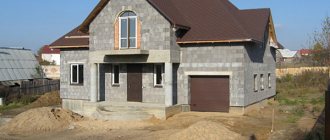
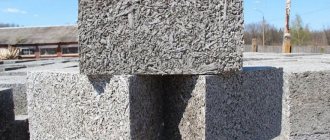
Each masonry material is endowed with a certain set of characteristics that must be taken into account when choosing the thickness and structuring of the enclosing structure, which includes the entire set of insulation and finishing materials. The laying of aerated concrete blocks requires special attention, as they have a high degree of moisture and vapor permeability. To get truly warm and durable housing with a comfortable microclimate, you need to take into account many other nuances, which will be discussed in this article.
What solution are aerated concrete blocks placed on?
The strength and thermal insulation properties of the finished wall are determined not only by the characteristics of the stone from which it is built, but also by the quality of the binding solution used. There are only three options:
- Sand-cement mixture of grades M100-M150. Mixed directly on site, the average layer thickness is 10 mm. The solution is beneficial for use when masonry is made from substandard material.
- Adhesive for cellular concrete on cement. These are specialized factory-made dry mixtures that are mixed with water immediately before installing the blocks. They also contain cement and sand, but here the ingredients have a finely ground dispersion. The mixture is modified by adding additives that regulate the viability and hardening time of the solution, and provide the seam with the necessary compressive strength. When using cement glue, heat loss through the joints is minimized, since the thermal conductivity coefficient of such mixtures is several times lower than that of a conventional mortar.
- Polymer based adhesive. The raw material base of such glue is polyurethane foam, supplemented with stabilizers, hardening accelerators, and surfactants. This is a relative novelty, and many people confuse foam glue with ordinary polyurethane foam, the purpose of which is sealing. It greatly increases in volume, but has rather weak adhesion, whereas the adhesion of foam-glue is at least 1.2 mPa.
Is it possible to lay an aerated block on cement mortar?
Now let’s try to figure out what is more convenient and, most importantly, more profitable to install gas blocks. It all depends on the quality of the material that was initially purchased for the construction of the walls. Many people believe that the cost of laying aerated concrete depends entirely on the price of the blocks - and they are very mistaken. Cheap blocks are either autoclaved products, which have more deviations in geometric parameters than GOST allows (category 2), or non-autoclave ones, which have two to three times as many defects.
Expert opinion Vitaly Kudryashov builder, aspiring author
Ask a Question
Note: Only 1 grade can be mounted with glue, which has a minimum of deviations from the specified parameters. Otherwise, the cost of laying aerated concrete blocks per square meter will increase so much that the difference will exceed the savings obtained by purchasing cheaper substandard material.
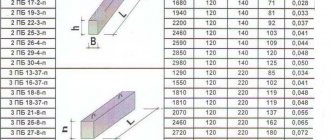
In the table you can see how the grade of blocks affects their geometry (deviations are given in millimeters):
| Block category | Deviations in linear dimensions | Difference in length of diagonals (deviation from rectangularity) | Damage to edges | ||
| By height | By length and thickness | ||||
| Contortions | Damage to ribs and corners | ||||
| I grade | 1 | 2 | 2 | 1 | 5 |
| II grade | 3 | 4 | 4 | 3 | 10 |
| III grade | 5 | 6 | 6 | 5 | 15 |
By and large, the third category should not be on sale at all, since the old GOST (21520) contains a note indicating that the last date for the release of such products was 1996. However, among the non-autoclave blocks sold on the markets there are also such products. Therefore, in the later introduced standard 31360 (for autoclave blocks), this grade is no longer allowed at all (there are only categories 1 and 2).
The difference between them is also significant, which primarily affects the thickness of the seams and the complexity of the work. Everything is simple here: the thicker the seams, the more mortar will be used on them - and given the cost of factory glue, the cost of installing second-rate blocks will double.
The first category can be mounted on anything, but in this case it is better to abandon the DSP, since it is impossible to form a thin seam with its help. And the larger the total area of the seams, the more intensely the masonry loses heat, since the mortar has a thermal conductivity coefficient 4 times higher than that of aerated concrete. It is possible to install aerated concrete blocks on mortar, but it is not advisable because the walls turn out to be colder.
Is it possible to lay gas block on tile adhesive?
Ceramic, stone or fiber-reinforced concrete tiles are also mounted with cement adhesive, so many are interested in whether it can be used for aerated concrete masonry.
- Obviously, such interest was provoked by the low price of some types of adhesives (about 160 rubles per bag), while glue specially designed for cellular concrete costs 180-270 rubles. In large volumes, the difference in money can be significant - but won’t this affect the quality of the masonry?
- It may have an effect, and here's why. Good quality tile adhesives are much more expensive (up to 500-700 rubles/25 kg), and it would be nice to think about why. Of course, there is a difference, and it lies in the proportions and fraction of the filler. Cheap mixtures contain more sand and it is coarser than expensive ones. And this increases the thermal conductivity coefficient, which is extremely undesirable for aerated concrete.
- There are no or very few water-retaining additives in such adhesives, so moisture from such a solution will be instantly absorbed into the base or simply evaporate. This affects not only the plasticity of the solution, but also its adhesive qualities. For comparison, the adhesive strength of Stick De Luxe glue is 0.7 mPa (price 183 rubles), and that of Fixator glue is 1.6 mPa (price 460 rubles).
- For normal fixation of blocks, a lower adhesion value is sufficient, since for most adhesives for cellular concrete it is only 0.5 mPa. Therefore, in principle, tile adhesive can be used for laying aerated concrete. In any case, even a cheap tile mix will be a better choice than regular mortar.
Its plasticity and water-holding capacity can be improved by adding PVA glue, about 5% of the total mass of the mixture. Expensive tile adhesive contains redispersible polymer (latex powder). There is no need to add any additives to the expensive glue, but due to the higher price, no benefits are expected.
How to make a solution for aerated concrete with your own hands
Even if you install the blocks with glue, a regular cement-sand mixture will also be needed for the work. At a minimum, it will have to be used to level the base of the plinth on which the first row is being laid. There are two options for manufacturing DSP: buy a dry mix like Peskobeton M 150, it costs about 150 rubles per 40 kg bag. The maximum filler size is 1.25 mm, so if necessary it can also be used as the main masonry mixture.
Otherwise, you will have to buy cement and sand separately, dose them depending on the brand of binder and mix them with water. The exact proportions will depend on the brand of cement. To make an M100 mortar using M500 cement, you need to add 5.3 parts of sifted, and preferably fine, sand to one part of it. First the dry ingredients are mixed and then water is added. Water-cement ratio – 5.8.
What is the best way to fasten aerated concrete blocks: the advantages of factory-made adhesives
The main advantage of specialized adhesives, when compared with conventional mortar, is the ability to make seams with a thickness of 1 mm or more, which do not become cold bridges. We talked about cement adhesives in some detail, and even touched on the issue of using tile mixtures. Now let’s say a few words about polyurethane glue, which, provided that you purchase category 1 autoclave blocks, can be considered the most convenient to use and cost-effective option.
Let's understand the advantages of foam glue:
- Foamed polyurethanes have the lowest thermal conductivity coefficient among insulation materials - it is 7 times lower than that of cement-based adhesive, and 20 times lower than that of CPS. Therefore, walls mounted with this glue will be the warmest.
- One can with a capacity of 750-900 ml replaces a bag, or even two cement glue. If 100 m² of masonry with a thickness of 300 mm requires 29 bags (25 kg each) of dry glue, then only 10 bottles may be enough for a balloon. Now compare their mass, and you will understand that 7.5-9 kg can be carried in your hands, while for half a ton of bags you will have to hire a truck. And this is money not only for delivery, but also for loading and unloading. Again, masons also charge money for climbing to the floor.
- Since foam is a fairly new material, many people treat it with distrust. However, tests have shown that even when the joints are not completely filled, the strength of the connection is higher than in the case of mortar. And if you consider how much time this method of gluing blocks saves (no water needed, no mixer or electricity required), then you also save on labor costs.
- Foam consumption directly depends on the format of the blocks used, as well as how correctly the dispenser is adjusted. Ideally, the thickness of the exiting roller should not exceed 20 mm in diameter.
- On a partition block up to 100 mm wide, apply 1 strip of glue in the center. With a width of 125-200 mm - two strips. On the wider ones there are three or two, and between them there is a snake. One bottle can be enough to install a whole pallet of aerated concrete, and they can hold 1.6-2.2 m³ of blocks.
So, don’t let the price of 440 rubles scare you, because good polyurethane glue will replace 1.5-2 bags of cement. It is squeezed out of the tube using a mounting gun. In this case, its masonry looks more aesthetically pleasing, since the light foam does not contrast with aerated concrete.
Step-by-step instructions for laying aerated concrete with your own hands
The use of CPS worsens the thermal insulation qualities of the walls, since due to different thermal conductivity coefficients the uniformity of the masonry is disrupted. It is better to mount the blocks with glue, but it requires the correct geometry of the blocks themselves and a perfectly flat surface of the base.
- Therefore, work begins with determining the unevenness of the surface of the base, finding the highest point at which the remaining corners must be aligned, and from which the laying will begin.
- If the base is monolithic and there are bumps on its surface, it is better to first smooth them out with a sander, and then fill the recesses. However, the greatest number of irregularities occurs on the brick base; a rather thick screed has to be made on top of it.
Expert opinion Vitaly Kudryashov builder, aspiring authorAsk a Question
Note: To uniformly apply a thick layer of mortar, craftsmen often use a template, which consists of 4 metal strips secured with clamps.
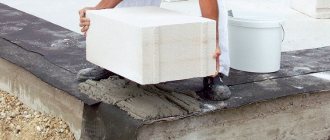
- After leveling the base, cut-off waterproofing is performed on it, preferably in two layers. You can use either cement-based penetrating compounds, or glue waterproofing or roofing material onto bitumen-polymer mastic.
- Regardless of how perfectly the surface of the foundation is leveled, the first row will still be mounted on a cement-sand mortar. They begin to use glue from the second row.
Our step-by-step instructions will help you figure out how to lay aerated concrete blocks with your own hands.
What is the minimum dressing of aerated concrete blocks?
Any masonry, not just gas-block masonry, requires row dressing to increase resistance to bending loads. This is a laying scheme in which the blocks of the upper row are shifted relative to the lower ones. In total, in the case of large-format stones, 4 methods of structuring masonry are used.
- In 1 block, serial chain dressing. This masonry option is used in the construction of partitions and walls up to 300 mm thick, and here it is generally the only possible one.
- In 2 blocks, dressing in rows and vertically, with an offset of at least 1/5 of the total wall thickness.
- In 2 blocks, but with bandaging every two rows in a stitched row. In this case, the ligation of blocks in spoon rows can be practically zero.
- In 2 blocks without vertical ligation. Here, ligation is performed only in row chain, with a shift of at least 10 cm. And to ensure a connection between two vertical layers, connections in the form of steel plates or fiberglass mesh can be used.
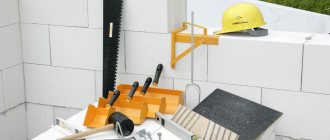
Selection of all materials and tools
Working with aerated concrete does not require a large number of special tools. Their set varies, depending on what kind of masonry mortar you are going to work with and what material is chosen for reinforcement.
- In any case, you need a set of general construction tools: bubble and water levels, plumb bob, hammer drill, mallet, tape measure, square. To cut aerated concrete, it is better to have a circular saw, although it can be easily cut by hand. A power tool will simply make the work easier and faster, because you will have to cut the blocks at the end of each row and at the border of each opening.
- If the masonry is being carried out on a central concrete block, a concrete mixer is needed, and a thick-layer mortar is applied with a plaster spatula. When working with cement glue, to mix it, you need a clean container and a mixer attachment on a hammer drill. It is applied to the blocks using a carriage, a toothed bucket or a spatula. When using foam glue in a tube, you only need a mounting gun.
- The classic way to strengthen masonry is to use reinforcement bars. It is placed in grooves cut in a row of already assembled blocks (these grooves are called grooves). To cut them, a wall chaser tool is used, which can be either manual or electric. When reinforcing rows of masonry with galvanized or fiberglass mesh or steel strip, this tool is not needed at all.
- When laying masonry, to control the horizontality and height of the rows (especially when the mason has no experience), it is necessary to use row slats and a mooring cord.
If blocks with smooth edges (without grip pockets) are purchased for construction, it makes sense to purchase a device for carrying the blocks. It is much more convenient to use than to carry aerated concrete in your arms.
How to set corners when laying
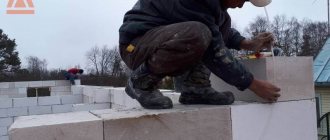
After the general leveling of the base has been carried out and waterproofing has been carried out, you can begin laying the lighthouse blocks. On walls less than 6 m long, corner stones are beacons; in longer spans, intermediate stones are also laid (usually at the intersection of walls).
The first block is placed in the corner of the building that has the highest elevation. Using a hydraulic level, it is transferred to the remaining corners; the slight difference is compensated by the thickness of the mortar layer. When checking with a bubble level and making adjustments with a mallet, you need to achieve a perfectly even position of the corner blocks. This will guarantee the evenness of the entire row.
At the corners, two perpendicular blocks are laid at once. The bed for them is lined with cement-sand mortar, and the vertical planes are coated with glue so that the seams are as thin as possible. A cord is stretched between the lighthouse blocks, with the help of which it is easy to control the position of all intermediate blocks.
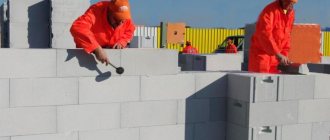
Laying the first row
The first row is the most critical, so it is laid out slowly, checking the level and adjusting each element of the masonry. If you allow differences in this row, then towards the top of the wall they will only get worse. Irregularities will not only lead to an increase in glue consumption, but will also provoke the occurrence of stresses in the masonry, which contribute to crack formation.
- When the corner blocks are laid, a row strip is attached to them using a self-tapping screw, on which markings are made according to the height of the row and the thickness of the seam. A thread (mooring cord) is attached to the rail, which serves as a horizontal guide for laying all other blocks. At the end of the row of masonry, the berth will have to be rearranged.
- Blocks at corners and at the intersections of external and internal walls are always intact and are installed first. To attach the rest of the masonry to them, you have to insert at least one additional element. You can calculate it so that the extension is not in the corner, but near the doorway. Its length is measured according to the actual distance between the two blocks, after which the full-length product is cut into two parts.
- Before inserting the extension into place, the side surfaces on the right, left, and on the insert itself are coated with glue. The DSP is applied from below and the block is installed in the prepared cell. The excess squeezed out solution is carefully removed with a spatula, and the cracks in the vertical joints are covered with glue from above.
Expert opinion Vitaly Kudryashov builder, aspiring author
Ask a Question
Note: If the house has internal walls, they are erected simultaneously with the laying of external walls. First, the first row is built along the outer perimeter, and then the first row of the inner wall. Here, there should also be entire blocks at the junctions, and it is better to insert the extension somewhere in the middle or near the opening.
The end of the internal non-load-bearing wall can be connected end-to-end with the laying of flexible connections. But if the internal wall is also load-bearing, then a groove along the width of the perpendicular block can be provided at the junction points. In order not to cut it out on the finished wall, the blocks in the place where the groove should go are given an L-shape immediately during laying.
How to wet aerated concrete before laying, and is it necessary to do it at all?
The question about wetting the blocks arises due to the porosity of the material, which is capable of, as they say, “drinking” moisture from the solution. Loss of moisture disrupts the hydration of the cement and weakens the strength of the resulting stone, which is why, for example, brick is usually soaked in water before laying. Is it necessary to do the same with a gas block?
Of course, there is no need to soak the whole concrete under any circumstances, since porous concrete will absorb more moisture than necessary. It is possible to wet the surface, but only depending on the ambient temperature. If work is carried out in hot weather, this will not be superfluous, and the blocks will dry out quite quickly.
However, please note that we are talking about cement-sand mortar, and not glue! Adhesive mixtures contain water-retaining additives, so moisture from them is not absorbed into aerated concrete. If it is cooler outside + 25 - and even more so when work is carried out in the cold season, you don’t even need to wet the blocks of the first row.
Wall masonry
Before you begin laying out the second row, the first one must be reinforced. Many builders are quite skeptical about reinforcement such as punched tape or fiberglass mesh, and consider steel rods to be more reliable. Manufacturers of aerated concrete also do not specifically mention other types of reinforcement in their instructions. Therefore, we will talk specifically about this option.
Reinforcement with rods
To strengthen aerated concrete masonry, A400-A500 reinforcement is used. The cross-sectional area is calculated as 0.02% of the masonry area. The reinforcement step is no more than 100 cm along the height of the rows. The total number of rods required for a particular wall (R) is calculated using the formula R=2LH/4h.
On the right side of the formula they multiply:
- number of rows of reinforcement (2);
- wall length (L);
- the height of the wall (H) - and divide by the height of the row, multiplied by the frequency of laying reinforcement (4 is every fourth row).
To this amount you will need to add the reinforcement necessary to reinforce the openings - multiply the number of openings by the number of grooves plus the size of the overlaps. The openings are reinforced under the window sill and under the support of the lintel, extending 50-90 cm into the masonry on each side.
The diameter of the reinforcement is usually 8 or 10 mm; depending on the thickness of the wall, it is laid in one or two rows. In the first case, the groove is made in the center, in the second (when the wall thickness exceeds 200 mm) you need to cut two parallel grooves, retreating from the edges of the masonry by 6 cm on each side.
In order not to measure these distances each time, builders make a template from a board, the width of which corresponds to the distance between the grooves. Having laid it exactly in the center of the masonry and screwed it with self-tapping screws, fines are selected on the sides of the template. Their depth should be such that the rod is completely submerged and does not interfere with the laying of the next row of blocks.
The cut scrub must be thoroughly cleaned of dust; masons often use a brush for this. Then pour liquid glue into the grooves and begin to embed the prepared rods into them. With this reinforcement, cement-based adhesive is mainly used. When installing gas blocks using polyurethane glue, it is much more convenient to reinforce them with fiberglass mesh.
Structural reinforcement must be performed only in those places where there are openings that weaken the masonry - as well as where structures resting on aerated concrete create point loads: lintels, beams, rafters. Along the entire perimeter, every 100 cm in height, it is recommended to reinforce walls with a thickness of less than 300 mm. Thicker walls only need reinforcement for spans longer than 6 m.
Expert opinion Vitaly Kudryashov builder, aspiring author
Ask a Question
Important: In earthquake-prone areas or when building on a slope, it is recommended to also provide vertical reinforcement near openings and in corner areas. For this purpose, ventilation O-blocks are used, which, when stacked on top of each other, form a channel. Reinforcing bars are placed into it, inserted into the foundation from below, and into the reinforced belt from above, and filled with ordinary concrete. The result is a rigid spatial structure that enhances the load-bearing capacity of the masonry and its resistance to lateral loads.
In the corners of the building and at the junction of external walls with internal walls, striations are performed along a radius. The fittings here must be solid. It can be extended in the middle of the wall, with an overlap equal to 40 times the diameter of the reinforcement.
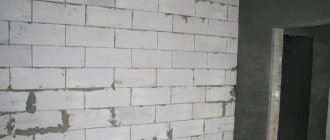
Second row and beyond: is it necessary to grout the seams when laying aerated concrete blocks?
After the first row has been reinforced, after 3-4 hours you can begin the next level of masonry. First, you need to go over the surface with a grater and eliminate small deposits of glue, unevenness and roughness. Dust and debris are swept away with a brush.
In the second row, laying also starts from the corner, but the block is placed so that the poke rests on the spoon - this will ensure the necessary dressing. Using a notched ladle or spatula, apply glue over the entire area to be glued - there should be no dry areas.
The block is installed at an angle. The squeezed out glue is not rubbed into the seam, but is carefully removed with a spatula and sent back to the bucket. The optimal thickness of the adhesive layer in aerated concrete masonry is no more than 2-3 mm. After the corner block is placed on the opposite corner, the mooring cord is again stretched between them, along which the rest will be mounted.
Template for laying aerated concrete blocks
The most difficult thing, especially for an inexperienced mason, is to ensure the most uniform application of the adhesive mixture, the layer thickness of which is only a couple of millimeters. Builders are no strangers to creativity, which is why a device was invented to simplify and speed up the process of applying glue.
It can be made from a piece of plywood or board 25 mm thick and 150 mm wide. A frame along the width of the masonry is assembled from three sections using self-tapping screws; a comb trowel is attached to the fourth side at a slight angle. It turns out to be a box without a bottom, inside of which glue is applied. When stretching the template along the row, even “beds” of glue remain on the surface.
What is the speed of laying gas blocks by one person?
When doing block masonry, the speed of wall construction depends on the experience of the mason and on the quality of organization of the work. On average, in an eight-hour working day, one worker can lay 55-60 blocks. But this is only if a professional mason with experience works. A beginner is unlikely to master this standard, although much will depend on the type of tool and equipment used.
There is a difference: cutting blocks by hand or with a good electric saw; work with a spatula or use a carriage. It takes time to set the corners, cut out the extensions, and level the masonry. And a person doesn’t work like a robot: breaks and breaks are also different - for one it’s enough to drink water for 5 minutes, and for the other he smokes for half an hour.
How to level aerated concrete masonry
Leveling aerated concrete takes a lot of time, and the more deviations the blocks have and the worse the base under the first row is prepared, the more labor-intensive this process will be.
Firstly, the block itself must be cleaned of dirt and dust (from ice in winter) before installation. It is better to put aside products with broken corners and edges and later use them for cutting extensions, or use them in the masonry of internal walls.
Secondly, differences should not be allowed between the levels of the horizontal surfaces of two adjacent blocks, as this creates unnecessary stress in the masonry. It is impossible to level with glue, and it is also expensive, so you have to use a plane on aerated concrete.
The tool is a board with cuts into which blades with metal teeth are glued. There is a handle on top for easy holding. By moving the plane with forward movements, you simply scrape off the protrusion. Minor surface imperfections can be sanded with a float.
Bay window masonry
Complex architectural elements of the house require the most time to work. One of the most popular is the bay window, without which modern house designs are practically impossible today. This is a part of the room that extends beyond the plane of the facade and is limited by walls of a complex configuration that differs from a rectangle. A bay window can be triangular, trapezoidal, polyhedral or spherical, which forces masons to shape the blocks accordingly.
Some manufacturers offer factory-made semicircular gas blocks. For example, under the YTONG brand two types of arc-shaped blocks with a radius of 900 and 500 mm are sold. However, the price of such a block is 303 rubles per piece, which is 3-4 times more expensive than a regular block, so many builders lay out spherical walls from additional panels, which, as is done in brickwork, are given a wedge-shaped shape. Multifaceted walls are laid out from rectangular blocks, in which a recess is cut out, allowing an angle to be formed in the desired degree.
How to dismantle aerated concrete masonry
Sometimes, if something doesn’t work out (for example, the mooring cord sagged and the row deviated from the horizontal), or at the last moment it was decided to make some changes, it is necessary to disassemble the already laid blocks.
To do this, you have to use a hacksaw, which makes a cut along the vertical seam from top to bottom. Then a thick board is screwed onto the side edge of the block, which should be hit with a hammer, knocking the block out of place. Then you will need to clean it with a float to remove any glue or mortar build-up - and you can reinstall it.
If the wall has already been erected, and changes concern the width or location of the opening, a fragment is simply cut out in the masonry, after which the opening is reinforced with a metal frame or a longer lintel.
Preparation of all materials and tools
The set of tools and consumables required for the construction of an aerated concrete frame of a house or other building may vary depending on the chosen masonry technology: with mortar, with cement glue, with polyurethane glue, with reinforcement with rods or masonry mesh.
If, for example, you are building a garage from a non-autoclaved block using mortar, you will need a concrete mixer. Dosing of the masonry mixture can be done with an ordinary trowel (mason's spatula). When using mineral glue, you need a plastic container and a drill with a mixer attachment for mixing, a carriage, a bucket-comb or a notched trowel, with which the glue will be distributed over the surface. To work with PPU glue you only need a mounting gun.
Due to its low density, aerated concrete is quite easily processed with hand tools: wall chaser, hacksaw, plane, grater. But it is easier and faster, of course, to carry out such work with an electric tool: an angle grinder converted into a wall chaser by adding a second disk, an alligator or reciprocating saw, or a grinder. Here, who and what has enough of their own supplies of tools, or the funds to purchase them. Many people make a toothed ladle and even a plane with a grater on their own.
If the thickness of the walls is large and large masonry blocks are used (a block measuring 600*250*500 mm, weighing 58 kg, is unrealistic to move around the site with one hand), it makes sense to purchase a special grip that will allow two people to carry it. It would also be useful to purchase a metal corner template, with which you can make a perfectly perpendicular cut of the block.
And of course, no construction project would be complete without general-purpose tools:
- marking: tape measure, cord, square, plumb line;
- control: hydraulic level, bubble level or laser builder;
- cutting: hacksaw, angle grinder, circular saw;
- percussion: hammer-pick, mallet, drill or hammer drill.
Speed of laying gas blocks by one person
The speed of completing any work depends on the dexterity and professional skills of the person performing it, and the work of a mason also depends on how correctly the process is organized. On average, during a standard work shift, one person with normal skills can lay about 60 blocks. A beginner is unlikely to cope with such a volume, especially if he does not have the opportunity to use an electric tool - manual cutting of additional parts and grinding the sections with a grater slows down the process quite a lot.
What are the mistakes when laying aerated concrete?
When building houses from cellular concrete, mistakes are often made both at the stage of design and construction of the box, and at the stage of finishing work.
Below is a list of them and measures to help avoid problems:
| At what stage is an error made? | What is it? | How to do it right |
| Design of a low-rise building | Construction of a monolithic frame filled with gas blocks. | The strength of aerated blocks, even low-density ones (today d300 products have strength class B2), is quite enough for a three-story house. The frame is not only extra money, but also a place for active heat loss. |
| Design and non-design construction | Construction of foundations with insufficient rigidity. | To prevent the formation of cracks in aerated concrete masonry, the foundation should be made only of reinforced concrete: a slab, a strip with a depth below the UPG, bored piles with a reinforced concrete grillage. |
| Carrying out masonry | Lack of horizontal (cut-off) waterproofing. | Between the surface of the plinth and the first row of masonry there must be two layers of waterproofing material. Optimally, this is roofing material glued to mastic. |
| Carrying out masonry | Poor leveling of the base under the first row of masonry and each subsequent row. | A smooth surface is the key to high-quality masonry. Moreover, due to the thickness of the solution, it can only be leveled on the base. In the rows, leveling is carried out using a plane and a trowel on aerated concrete, control is carried out by level. |
| Carrying out masonry | Using DSP for the entire masonry. When working with the solution, aerated concrete, which already has a high initial humidity, becomes even more wet. Accordingly, the thermal insulation qualities of the wall are reduced. The reason for this is also the large area of the seams with a high thermal conductivity coefficient. | Ideally, only the first row of blocks is laid on a regular mortar - the second and subsequent ones are mounted with glue. |
| Carrying out masonry | Missing or incorrect dressing. | We talked in detail about dressing options. When chain laying, vertical joints must move at least 10 cm. |
| Strengthening masonry | The absence of an armored belt or its implementation with a gap. | The load-bearing monolithic beam must be installed along the entire perimeter of the masonry - including along the gables, if they are aerated concrete. That is, it necessarily loops. |
| Strengthening masonry | Missing or incorrect reinforcement of openings. | In the row preceding the opening, it is necessary to lay reinforcement. Its ends are inserted into the masonry 50 cm from the vertical boundaries of the future window. In the absence of lintels, the same reinforcement is done above the opening. When the lintel is mounted, only the heels of its support are reinforced. |
| Wall connections | Rigid connection between the outer and inner walls. | Bandaging blocks when connecting walls can only be used when they bear the same load. Otherwise, you need to use flexible connections. |
| Wall insulation | The use of materials with low vapor permeability for external wall insulation provokes the accumulation of moisture in aerated concrete. | Outside, you need to install a material that allows steam to pass through better than aerated concrete itself. Among the insulation materials, these are various types of mineral wool. To use, for example, polystyrene foam, you need to wait at least six months until the initial moisture content of the masonry decreases to equilibrium. The same applies to finishing materials, but they can simply be mounted using a ventilation façade system. |
Reinforcement of aerated concrete walls in the area of openings
Stresses are created in the reception area, which cause cracks to appear. To avoid defects, the upper section of the opening should be reinforced with reinforcement.
Horizontal reinforcement provides:
- Preparing grooves in the upper part of the opening.
- Laying steel reinforcement in the cavity.
- Filling the rods with cement mortar.
To speed up the work, it is advisable to use standard U-shaped aerated concrete elements.
Cost of laying aerated concrete blocks
People who are not ready for labor feats and prefer to let professionals do the work are interested in how much it costs to lay aerated concrete blocks per square meter in 2022.
Let's take a look at the sites offering the relevant services and find out:
| Type of work | Unit | Price of work in rubles in the Moscow region |
| Laying aerated concrete blocks | m³ | 1800 |
| Laying external walls made of aerated blocks with brick lining | m³ | 2700 |
| Construction of aerated concrete partitions | m² | 450 |
| Installation of lintels over openings | PC | Minimum 300 |
| Insulation of walls with 100mm thick mineral wool slabs | m² | 130 |
| Laying ventilation ducts and chimneys | m³ | 1600 |
The easiest way is to immediately find a company that will carry out the work for finishing or turnkey. In this case, you can also get a free project. On average, a small house in basic configuration with a total area of 100 m² will cost 2,470 thousand rubles. For this money you will receive a box with brick lining installed under the roof. For a house with clean finishing of the premises, communications and installed plumbing, you will have to pay a million more.
Connecting the partition to the walls
It is very important to correctly connect the walls and the future partition. It is best to secure it with anchors made of stainless steel. One anchor must be installed per meter. If there are no anchors, they can be replaced with galvanized punched tape.