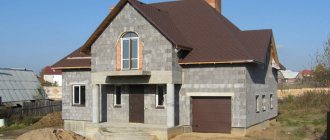
You can divide rooms into partitions and interior spaces not only using the structural type of blocks used for the main load-bearing walls, but also structural and thermal insulation.
What are the requirements for partitions, what materials, consumables and building mixtures are needed, what features and errors may arise in the construction of walls - we suggest you familiarize yourself with the proposed article.
General requirements for interior walls in a house
After the load-bearing walls, lintels and ceilings have been laid, the builders begin to think about laying the partitions planned for the project. First of all, they make markings on the floor, walls and ceiling, in accordance with the intended drawing, not forgetting the basic requirements for aerated concrete partitions:
- Structural strength . It is made in such a way as to withstand mechanical and external factors in the room, and fastening elements can be attached to it.
- Light weight . According to the project, the fence is planned without additional (extra) loads.
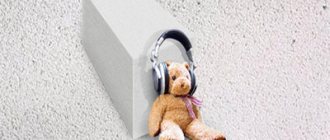
- Sufficient sound insulation . Interior partitions must meet the requirements of 43 dB. In apartment buildings this index is 52 DB.
- Thickness _ Despite the fact that the septal cellular material comes in different thicknesses, the most optimal size is 100-175 mm. The presented indicator has sufficient strength and sound insulation.
- Environmental friendliness . The structure is made from environmentally friendly material, which is safe due to its mineral composition.
- Fire safety . The partition must prevent fire. The minimum fire resistance limit for aerated blocks is 0.25 hours.
- Availability of a quality certificate . Materials used in the work must have quality marks and markings provided by the manufacturer.
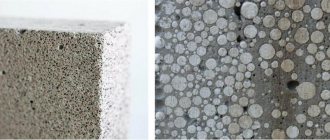
- Material density from D500 to D700 . This requirement indicates the quality characteristics of the material, according to which the higher the D, the stronger the partition will be.
The above conditions are fully met by the autoclave block, which belongs to the category of structural and thermal insulation.
If the owner of the house wants to complete construction as quickly as possible, then experts advise using large-sized products for work , with dimensions in length and width of 750x625 mm.
For interior partitions, these blocks are the best option.
According to generally accepted standards, partition structures are directly dependent on height (h). So, for example, with h 2.5 m, a block with a thickness of 75 mm is used; at h 3 m – 100 mm; at h 3-5 m – 200 mm.
Important ! The basic rules for the construction of aerated concrete structures are contained in SP 339.1325800.2017.
Load on floors
If you use floors made of aerated concrete slabs, this will ensure good thermal conductivity. And the weight of aerated concrete slabs is less than those made from other materials.
It is better to use a monolithic floor, as it provides additional support for the walls during seismic vibrations.
The thickness of the ceiling depends on the reinforcement and load-bearing capacity of the walls. To do this, take slabs up to 3 m with a load-bearing capacity of up to 800 kg per 1 m2.
Necessary materials and tools for installation
To build partitions from aerated blocks, you need to determine where to place them. You can use a sand-cement mixture, with a good grade of cement M400-500 and a polymer additive . The composition is purchased in dry form or prepared from the components yourself. As you use the mixture, dilute it in the required quantity. The solution is always used for the first layer of masonry.
The second and subsequent layers are faster and easier to install using foam or adhesive. The first holds the material together within 10 minutes, and the glue within 1-2 hours. For example, 1 bottle of foam replaces a bag of glue, which, like sand-cement mortar, must be diluted as it is used.
In addition to the materials presented above for laying composition, the following are used in the construction of partitions:
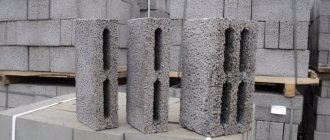
- Aerated concrete structural and thermal insulation blocks of the required size, indicating factory markings and quality certification.
- A container for diluting the solution, a shovel, sticks, a concrete mixer and a hand-held construction mixer.
- Waterproofing (roofing felt), any plaster (dry or ready-made in buckets).
- Electric drill, wall chaser, regular hammer, rubber mallet.
- Spatula, trowel, carriage, grater, saw, square, construction square, cord, gripper, plumb lines, laser meter.
- Reinforced rods, without signs of erosion.
- Fastening elements (anchors, strips, screws, nails).
You will also need work clothes and gloves . It’s easy to install the partitions yourself, or you can contact a construction company, which, according to the estimate, will provide consumables and tools.
Important ! If you plan on long-term cooperation with a construction company, you must conclude an agreement according to which the customer will receive guarantees for the work performed.
Calculation scheme
The principle of calculating the required material is very simple. No complex formulas are required here. To correctly calculate the number of blocks, it is enough to use the following scheme:
- To determine the total area of the wall, you need to multiply the length and height, then subtract from the resulting value the dimensions of door or window openings, which are calculated according to the same scheme. For example: a partition 10 m long, 3 m high, total area is 30 sq. m. The design has one opening measuring 1*2 m. The final number will be: 28 sq. m. For walls with complex shapes, a similar calculation principle applies.
- To determine the number of gas blocks, you will have to divide the resulting area of the future partition by the lateral parameters of the block.
It is important to add 5% of aerated concrete for unforeseen expenses or defects. Because it often happens that at the end of the work there may not be enough material. As a result, unnecessary problems will appear.
Step-by-step instructions for laying interior walls
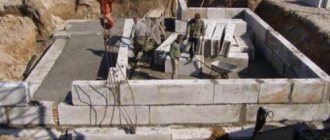
When arranging the foundation for partitions with gas blocks, it is worth pointing out that the foundation is laid in advance, before laying the main load-bearing walls. Depending on the type of soil, a strip or monolithic foundation is used. The first one after installation should take 6 months to settle, and the second one – 1 year.
After the construction of the main walls and ceilings, they wait 1 month , and only when they gain strength and strength do they begin to make partitions. Roofing felt (1-2 layers) is placed on the foundation base before the construction of the main walls. So, when they plan to make partitions, the waterproofing is most often already laid, which greatly facilitates preparation for internal construction.
Step-by-step instructions, after preparing the foundation, tools and consumables, according to masonry technology, consist of the following steps:
- Markings are applied to the floor, walls and ceiling, a cord is installed along which the masonry will be carried out, a sand-cement mortar is prepared, which is necessary only for the installation of the first layer of blocks (according to building regulations). Then it is more effective to use glue or foam (the best option, with instant setting).
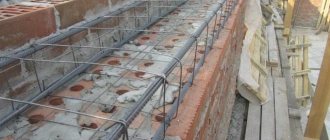
- The blocks are laid in a checkerboard pattern, the excess parts are cut off with a hacksaw. Every 2-3 layers are reinforced with metal rods or construction anchor tape. If necessary, the surface of the blocks is ground with a grater or smoothed with a plane.
- The resulting seams are filled with foam or mastic. Anchoring is carried out using flexible or rigid ties. Between the last row of masonry and the ceiling, the resulting gap is filled with construction foam, making sure to install a damper joint before doing this.
Some experts believe that if from the second layer to the very ceiling they are placed on polyurethane foam for fastening, then the blocks need not be reinforced at all. But, if the project plans to install heavy hanging structures next to the partition or on it, then reinforcement is necessary. 24 hours after installation, finishing work can be carried out on the interior partitions.
After laying the first layer of cement composition, it needs to be given time to harden . Usually it is up to 12 hours, sometimes faster, especially in the warm season. Subsequent blocks are laid in a strict geometric bandage along the seams, with settling along the surface using a rubber mallet.
Important ! In the process of work, you should not forget about the connections - flexible or rigid. Anchors and plates are repeated every 3 rows.
How to lay partitions from aerated blocks is shown in the video:
Block selection criteria
Aerated concrete blocks for partitions may differ in strength grade, size and other properties. To find the best option that will correspond to the characteristics of a residential property, you need to carefully study and calculate the required parameters.
Brand
When choosing a brand of material, it is necessary to take into account the purpose of the interior partitions. For a load-bearing wall inside a building, it is customary to use a block numbered D500 or D600. The density indicators are high enough to hang furniture, decorative elements and other interior details weighing up to 150 kg on the partitions.
If you need to build a lightweight partition that will not be subject to heavy loads, the use of blocks under the brands D400-D350 is allowed.
Dimensions
The next parameter of partitions is dimensions. The classic length of the stone varies from 600 to 625 mm with a height of 200-250 mm. In this case, the thickness is 75-200 mm in increments of 25 mm. The dimensions of aerated concrete blocks can vary depending on the layout of the building.
Combination of aerated concrete with wooden materials
When arranging housing, the interior space can be divided by partitions made of wood, and vice versa, in houses made of timber, aerated concrete partitions can be installed. Both options include general preparation for masonry. The nuances differ slightly.
In wooden houses, masonry is done according to markings , paying close attention to the quality of fastening of flexible or rigid connections along the very surface of the wall, as well as for the first and top row. To prevent structural noise in a wooden house, you will need fibrous soundproofing material (tape), which is placed at the joints with the floor, ceiling and walls.
Frames using wood, blocks and drywall are also a very common option. This type begins with the dimensional marking of the future partition and laying the first layer of blocks. Then the timber is attached to the frame, and then the drywall. But this option is considered costly and time-consuming, so it is rarely used. This method will be inexpensive only if instead of a steel frame there is a completely wooden one.
Frame partitions will require additional insulation from mineral wool, sawdust, shavings, but the structural and thermal insulation block does not need to be insulated. That is why cellular aerated concrete is a more practical option for all types of houses .
What type of brick is best to use for the construction of interior partitions?
Brick walls are more durable than partitions made from aerated concrete blocks. Internal structures are usually built in half of the product. After plastering, the wall thickness should be approximately 160 mm. If you plan to hang heavy pieces of furniture, it is better to use solid brick.
The most optimal solutions for the construction of internal walls are silicate and ceramic bricks. The first one is not characterized by such good moisture resistance, so it is not recommended to use it in bathrooms and other rooms with high humidity. When it comes to wet rooms, it is better to purchase hollow or solid bricks, the latter of which is especially suitable for use in difficult conditions.
Possible mistakes
Difficulties and mistakes made when laying aerated concrete partitions can arise in the following cases:
Purchasing low quality material that does not have labeling, certification or warranty from the manufacturer.
This applies to gas blocks, cement, glue and all other consumables. Blocks must have a high D density.- Errors in calculating the shape of the wall, its thickness and external load.
A well-drawn professional drawing from a local architectural bureau of urban planning or a construction company that provides this type of service can protect against this problem. - Lack of waterproofing, anchoring and construction technology. Such errors will contribute to the rapid destruction of the partition or the appearance of cracks on the wall, which will require additional financial costs to eliminate the problems, with additional time spent.
- Failure to comply with temperature conditions. Recommended temperature for indoor work is +5 °C. At warm temperatures, work proceeds quickly, and solutions and glue harden well.
- Construction of walls immediately after pouring the foundation. It is necessary to comply with the technical conditions for starting work, in accordance with GOSTs, so that there is no destruction or cracks in the future.
In order to avoid errors in work, it is necessary to adhere to the following standards when working with gas blocks :
- GOST 21520-89;
- GOST R 57334-2016/EN 771-4:2011;
- SP 339.1325800.2017;
- STO 501-52-01-2007;
- STO NAAG 3.1–2013.
Aerated concrete blocks are a lightweight and very practical material that is easy to construct, following technological rules.
Is it necessary to reinforce the structure, how to do it
It is important to strengthen aerated concrete walls if the building is located in an area of seismic activity.
If seismic activity is very high, then reinforcement should be done every row, otherwise - every 4-6 rows.
To do this, shallow slits are made with a wall chaser, they are cleaned of dust, lubricated with glue and the reinforcement is laid so that it is covered on all sides with the mixture.
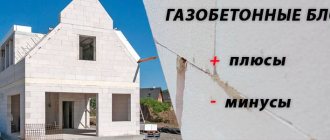
Installation benefits
The advantages of using gas blocks are as follows:
Ease and high speed of masonry, as well as processing (surface grinding, chipping, sawing with a hacksaw).- Good thermal insulation and sound insulation characteristics.
- Economic benefit and practicality.
- Excellent combination with reinforcement.
- Environmental friendliness and fire protection.
- Possibility of using any finish.
The disadvantages of using gas blocks are considered:
- Allowing only minimal operating loads.
- Arrangement using flexible and rigid anchoring (tapes), which must be performed several times.
When characterizing aerated concrete partitions, buildings have more advantages than disadvantages.
Finishing
The finishing depends on the operating mode of the room itself.
- Residential premises without high levels of humidity - in fact, any finishing methods for aerated concrete partitions are allowed (plaster, wallpaper, wood paneling). If the aesthetic appearance of the masonry does not bother residents, then operation without finishing is possible.
- Seasonal premises, garages, sheds can be used without finishing. You can also use all the types of finishes listed above. The only restriction is placed on plasterboard coverings, due to the risk of mold.
- Wet rooms and bathrooms must have a layer of waterproofing in places where water gets in. It is also necessary to provide a vapor barrier. Suitable materials here include drying oil impregnation, bitumen mastic or roll bitumen waterproofing, polymer mastic, ceramic tiles with seam protection using silicone, wallpaper with polymer coatings.
- Saunas, steam rooms - a layer of waterproofing and a layer of reinforced vapor barrier are required. Foil-coated insulation materials work well. The finishing cladding can be done using lining.
Construction of partitions from gypsum fiber sheets GVL
Gypsum-fiber sheets (GVL) are a board based on modified gypsum into which reinforcing cellulose fibers are introduced. In fact, it is an analogue of drywall, which has a more rigid and dense structure and is characterized by increased volumetric mass. Due to its increased strength, such material can be used not only for arranging walls, but also for the construction of dry screeds. But for suspended ceiling systems, due to their weight, GVL is not recommended.
The peculiarity of GVL sheets is their moisture resistance. They are suitable for constructing partitions in wet rooms. In addition, the sheet has increased impact resistance: it does not form splits, cracks or dents under random mechanical loads and impacts.
The advantages of GVL are as follows:
- high compressive strength and impact resistance;
- moisture resistance;
- ease of machining;
- environmental friendliness;
- does not shrink, does not elongate when heated;
- different geometry.
The technology for installing gypsum plasterboard partitions is no different from the method of installing gypsum plasterboards. The same profiles are used as the frame. However, due to the large mass of GVL, it is important to pay attention to the thickness of the profiles. The recommended thickness is at least 0.5-0.6 mm. It will provide higher structural rigidity and, as a result, operational reliability.
The sheets themselves can be of different thicknesses. For interior partitions, a good option is GVLV Knauf 2500x1200x12 mm. This material is more resistant to stress. You can confidently hang furniture and other technological products on it.
Cheaper and less weighty GVLV Knauf 2500x1200x10 mm. Naturally, this option is less suitable for hanging heavy objects and accessories. It is quite suitable for arranging bathrooms with subsequent finishing with ceramic tiles.
Disadvantages of GVL and ways to eliminate them
The disadvantages of GVL include the higher price of the material and its weight. But these shortcomings are not critical and do not have a special impact on performance properties.
Due to its density, the material is more difficult to cut and fasten. This can be solved by using a power tool instead of a hand tool.
The biggest disadvantage of gypsum plasterboard is the lack of a perfectly glossy surface, like gypsum plasterboard or PGP. The sheet has a roughness that does not allow installation of finishing finishing immediately (for example, wallpapering or painting). The solution is puttying. But these are additional material, labor and time costs.