Lintels over building openings are traditionally prefabricated concrete blocks or elements manufactured directly on site. For a house made of aerated concrete, there are certain restrictions and requirements.
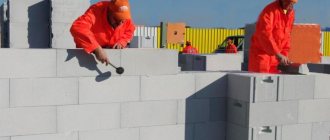
Construction from piece materials is a procedure carried out according to a single methodology, regardless of the type of building material used. The technology has been developed over centuries and is based on the principles of working with brick. When block materials appeared in the arsenal of builders, the basic techniques of the basic methodology were used. This fully justified itself and made it possible to speed up construction work, since the size of the blocks made it possible to increase the height of the building much faster. However, it was necessary to take into account the characteristics of the materials used and make adjustments to technological processes taking into account the capabilities of the blocks used. One of the most demanding materials turned out to be aerated concrete, a popular but very capricious material. For example, the design of the upper part of wall openings is carried out in several ways, and the most common of them are lintels from a corner in a wall made of aerated concrete. This is a very simple, non-controversial approach to solving the issue. Let's take a closer look at it.
Methods for making lintels for aerated concrete blocks over windows and doors
Proper reinforcement of aerated concrete buildings is the key to the durability of the structure being built, and also helps prevent the occurrence of cracks and deformations during the entire period of operation.
- Factory solutions Ready-made version of reinforced gas silicate lintel according to GOST
- U-block construction
- Reinforced concrete lintels
- Device using U-blocks
Reinforced elements are used when it is necessary to increase the strength of gas silicate walls in cottage and private low-rise construction. Lintels for aerated concrete blocks are installed when constructing all window and door openings. This helps distribute the loads from the floors and prevent the appearance of cracks in the window area.
General information about lintels in construction
The meaning of jumpers
Aerated concrete masonry is subjected to serious stress not only during the construction of the house, but also during operation. To distribute the load evenly, reinforcement is installed on the opening using a wall chaser. When the reinforcement is placed in the groove, it is secured with mortar.
When choosing a material, you need to focus on the performance of this material and the span length. One of the important points is the weight of the jumpers. Monolithic reinforced concrete structures place a heavy load on load-bearing walls, and installation is carried out using special equipment. And when laying aerated concrete structures, you can handle it yourself.
Jumpers in a private building
When a private house is being built, the technology differs in some respects. Today, the construction market offers several types of lintels, differing in their design and rules of application.
Aerated concrete lintels
A ready-made solution in the form of a reinforced gas silicate/aerated concrete lintel, made in accordance with GOST, which can be purchased. Such elements are ordinary beams for aerated concrete with a rectangular cross-section and reinforcement treated with an anti-corrosion mixture and acting as an internal frame. They have arrows indicating the direction of installation. The construction option under consideration is recognized as the easiest and does not require special knowledge for installation. However, you will have to pay a lot of money for it.
Among the advantages it should be noted
- - absence of cracks when reinforcement is carried out correctly. They do not float and are not subject to destruction during prolonged use;
- — aerated concrete lintels are high-strength, light-weight structures, therefore they do not place a high load on the walls and foundation of the building;
- - structure - lintels are similar to building blocks, which is a high indicator of thermal efficiency without the need for additional insulation of the structure.
- How many bars are needed depends on the thickness of the block. If the wall is 40 cm, you will need 2 pieces of 15 cm and one of 10. If half a meter, then 2 of 15 cm and 2 of 10 cm.
- The dimensions of the jumpers are 124 mm in height, 115-175 mm in width, and 1300-3000 mm in length.
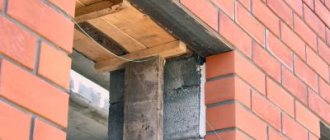
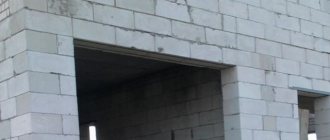
U shaped blocks
U-blocks today are a popular option for the construction of prefabricated lintels over windows made of walls made of cellular aerated concrete with permanent formwork. The dimensions of such blocks coincide with the dimensions of standard walls, and installation does not require the use of special lifting mechanisms.
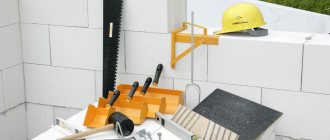
U-shaped lintels are prefabricated and can be easily sawed using a hacksaw for aerated concrete. The products are 20 cm wide and contain 12 cm grooves into which frame reinforcement is placed and installation is carried out using wooden formwork.
The installation technology is as follows
- — a rigid platform is prepared, supported by bars or metal pipes in several places;
- - the blocks are laid on the platform with a launch of 25 cm onto the walls. If these are supports, then they must be solid;
- - a thicker wall is placed on the outside of the building. Insulation is applied to it. The sides are glued with a special solution for aerated concrete, following the rules;
- — a volumetric reinforcement frame is placed in the trays in the form of 4 rods with a diameter of 12-16 mm, fastened together with wire in increments of 40 cm;
- — the tray is filled with fine-grained concrete M200;
- — when pouring concrete, you need to achieve uniform distribution of the mixture and complete enveloping of the reinforcement. This can be achieved by laying concrete in layers;
- — dismantling of the formwork is carried out after 21 days.
You can assemble U-products on the ground or indoors on a level area with a stable base. Another option is to use plank flooring.
Reinforced concrete elements are made using heavy concrete mixtures and reinforcing bars.
For reference. When there are no plans to insulate the house, it is advisable to make an insert made of polystyrene foam or similar insulation.
Reinforced concrete lintels
They look like a concrete beam with reinforcement inside. The base is M200 concrete, which is cold and necessarily requires insulation. When creating formwork, you may encounter some difficulties.
The advantage of the design is that it can cover large openings, regardless of the shape of the building.
If the opening is large, then the monolith is made by hand.
If you need to cover a span of 2.8 m long, then divide 280 by 20 and get a height of 14 cm.
Reinforcement is carried out with 6 twelve-millimeter rods in half-meter increments. The length of the beam support should be 35 cm on one side and the other. The supports are filled with a solution 1.5 cm thick.
To make a monolithic lintel, formwork is made from boards or plywood. Insulation in this case is laid on the inside. Some people make the formwork smaller so that the thermal insulation layer can be glued after the formwork is removed. You can use extruded polystyrene foam as a material, which has high thermal insulation and durable properties. This formwork is not removable. A frame made of reinforcement is placed inside it and filled with M200 concrete. After 3 weeks, the monolithic lintel will be ready.
Important! Concrete is inferior to gas silicate in thermal conductivity.
The use of reinforced concrete is possible if the walls of the house are insulated with mineral wool, otherwise such a structure will become a bridge of cold.
Preparation of the solution.
Plastering window slopes with your own hands will not do without a mortar with a binder.
As such, clay, cement or building gypsum plus fillers (usually simple sand) are used. What is the composition of the solution? It can be simple or complex depending on the proportions of cement, clay, lime and gypsum used. Do-it-yourself plastering of window slopes is carried out both using a mixture made with your own hands, and with a mixture purchased at a hardware store. Buying a high-quality mixture is preferable; you don’t have to worry about maintaining the proportions that are important when mixing the composition.
Plastering window slopes with your own hands will be successful with the correct proportion of the binder and filler. Without this, the solution will either be too “greasy” and will quickly crack when drying, or it will be “skinny” and fragile.
We offer several criteria by which you can navigate the degree of fat content of the solution:
- a high-quality mixture clings a little to the spatula;
- oily – clings too much;
- skinny - does not cling to the instrument at all.
How to brick a window
Residents do not always need an abundance of window openings. Sometimes you need to bookmark an extra window. Let's look at a situation where the walls are made of brick.
Technological process of bookmarking:
- Mix the solution. Prepare containers of the required volume. Pour in a dry mixture of cement and sand. The kneading is carried out in a ratio of 1 to 3. Mix the components thoroughly, add water. We get a thick solution.
- Clean the surface from dirt. Knock down any large protruding parts.
- The opening is treated with a primer.
- The outer part is laid with bricks on the edge (to save material).
Support depth
This parameter usually depends on the type of jumpers.
- Load-bearing structure made of aerated concrete with reinforcement : maximum opening - 1 m 75 cm, support depth - 25 cm. No additional insulation is required.
- Load-bearing reinforced concrete structures with permanent formwork made of U-block structures: maximum opening - 3 m, depth of support on the masonry - 25 cm. No additional insulation is required.
- Monolithic load-bearing structures made of reinforced concrete . Must correspond to the lengths of the beams - 35 cm. Additional insulation is required. Reinforcement is performed - 1 m 20 cm. The reinforcement protrudes beyond the dimensions of the opening by 50 cm. It is recommended to carry out ordinary reinforcement above the openings.
- Monolithic non-load-bearing reinforced concrete structures 200 cm 35 cm : maximum opening - 1 m 20 cm, depth of support on the masonry - 20 cm. Additional insulation is required. It is a non-load-bearing structure using a metal corner as a base. Recess is required at the base of the masonry.
How to choose jumpers
When selecting a load-bearing lintel device to strengthen a gas-block opening, you need to pay attention to the design features and the distance between the support blocks.
When choosing the type of cross beam, you need to perform a number of calculations:
- Bending moment strength.
- For lateral force.
- On the reference cut.
- To deflect.
Please note that calculation standards depend on the type of product used:
- Reinforced concrete lintels are calculated according to SNiP 52-01-2003. Technical requirements for them are contained in GOST 948.
- Gas block - according to STO 501-52-2007.
- Wooden - according to SP 64.13330.2011.
The use of reinforced concrete lintels in houses built from cellular beams is not recommended due to their high thermal conductivity. After installation, the slab will have to be additionally insulated.
Recommendations from professionals
- Block jumper. Installed if the house is built of similar material. The width of the opening should not exceed 1.2 meters, the height - no more than two-thirds of the previous indicators. For reinforcement, reinforced rods with a cross-section of 6-8 mm are placed under the blocks. The ends of the reinforcement are bent upward and inserted behind the laid blocks. The blocks are laid using an adhesive solution. The outlet on the sides must be at least 115 mm.
- Ready-made concrete lintels. The material of the building does not matter. The choice of beams depends on the height of the row of walls of the building. If it is brickwork, make sure that the height of several rows together with row seams is equal to the height of one lintel laid on the mortar. In the case of blocks, select beams according to the height of the block. Installation is carried out with an overlap of at least 25-30 cm on each side. If 2-3 parallel beams are laid, the space between them is filled with adhesive, cement mortar.
It is unacceptable to drill holes, make grooves, or carry out other mechanical operations with concrete lintels. This will lead to a decrease in the strength of the structure.
- Corner jumpers. To strengthen brick and concrete window openings, metal corners are used. The elements are laid on the inside and outside, flush with the outside of the wall. Installation of the first row of purlins is carried out with trimming of block elements. The margins along the edges are at least 10-13 cm. For an opening no more than 1 meter 20 centimeters wide, the size of the corner flange is 50 mm. Before installing metal elements, treat with anti-corrosion agents.
What if it's cladding?
Installing a lintel under facing bricks requires the right approach. To preserve the appearance of the external cladding, do not use concrete, corner, or monolithic structures. Use a metal plate. It is not visible from the outside, and the bottom is masked by ebb.
Installation is carried out in the following order:
- Depending on the depth of the opening, two, three or more plates are prepared. Thickness is at least 3-4 mm, but do not overdo it. Thick plates are more difficult to decorate.
Example with a metal strip
- The side facing the inside of the masonry is connected by similar plates and metal rods. They sit down to weld. Assembly is carried out on the ground.
- The assembled lintel is laid above the window opening. The overlaps on both sides are 15-20 centimeters. For reliability, the plates are secured with anchors into the brickwork.
After proper installation, proceed to laying the purlin from facing bricks.
Key advantages of steel angle
To make lintels, reinforced concrete monolithic or prefabricated blanks are used. However, for the manufacture of some structures it is recommended to use steel products, including rolled corners.
Among the main advantages of using metal products, the following should be noted:
- simplicity and speed of installation;
- the ability to continue laying a brick or block wall immediately after installing the lintel;
- high levels of strength and durability with the condition of correct selection based on the operational characteristics of the building.
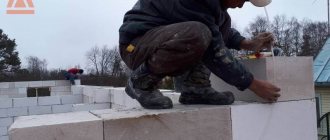
Laying ready-made aerated concrete lintels
To strengthen holes, builders often use factory-made solutions, since it is easier to make a lintel over a window made of aerated concrete from ready-made reinforced products.
Ready-made lintels are used to cover openings up to 2.5 m wide. The lintels are made from steel reinforcement frame and aerated concrete grades D500-D700 with increased compressive strength. They can be made to order - according to specific parameters established for construction.
Peculiarities
Advantages of ready-made aerated concrete lintels:
- high laying speed;
- absence of “cold bridges”;
- relatively light weight.
Types of steel angles for lintel equipment
Steel construction angles are made by rolling or bending. If the design involves increased loads, rolled metal is used, which is characterized by:
- high strength due to thickening at the bend;
- clarity of the contours of the outer corner in comparison with a rounded corner made by bending;
- increased wall thickness parameters due to production features.
To make a rolled corner profile, conventional steel alloys saturated with carbon are used, most often St3. For the production of metal products used in aggressive environments, it is recommended to use low-alloy raw materials marked 09G2S.
Taking into account the width of the shelves, unequal and equal shelf products are distinguished. At the same time, it is the latter that have become widespread in various fields of industry.
How to use a corner to create a protective pad
Let's consider three options for using a corner as a protective element for wall corners.
The first is when the walls in the room are already plastered, leveled and everything is ready for repair.
- If the walls are prepared for finishing work, then you just need to secure the corners with ordinary putty, as described above. Without fixing the corner too much. We only need it to maintain an even appearance and begin gluing or painting the walls.
The second, for example, when the repair has already been done, but the corner is damaged and needs to be strengthened. Or, if there is no repair and it is not planned, but the corners need to be tightened, etc.
- Here it is worth taking precise measurements, initially plastering the wall near the corner and the corner itself, and then using gypsum plaster and cement to make a corner for the lighthouse.
The third option is when you need to secure and align the corners of an arch, box, or partition.
- In this case, ordinary plaster is sufficient, but sometimes, in cases where it is necessary, a mesh is used to strengthen the corners.
Such actions are necessary to align and strengthen the corners.
For thin items or hard-to-reach corners, you can use construction adhesive.
There are also self-adhesive corners on sale, but they are used only for such corners as, for example, an arch made of durable plasterboard, boxes in the wall, etc.
To join corners, it is necessary to select identical corners and suitable sizes.
Plastic corners are perfect for residential premises, where necessary. But, for example, for office, shop and other non-residential premises, where there is a lot of traffic and activity, it is better to use aluminum corners.
Slopes using a corner
Making slopes yourself is very difficult if you are not a professional craftsman, but it is possible. Keep in mind that attention always falls on the slopes, and they must be strong, perfectly level, and smooth. The future condition of the window also depends on how the slopes are made. If putty is applied incorrectly, the window may begin to fog up, cracks may appear, and there will be a draft from the window.
Initially, you need to thoroughly putty the entire window and prepare it for working with the corners. It is necessary to constantly measure the slopes and measure them with a construction ruler to ensure that they do not have unevenness. The same applies to door slopes. Then proceed to the corners, here the lighthouse technology is used. You need to securely fasten the corners, and at the same time very evenly. Because the inside will be without finishing materials. In order for the angle to be very even, you need to slowly apply the mixture, stroke by stroke, 10 cm at a time and immediately level it with a spatula.
Advice. Prepare two spatulas, new ones, so that there are no stuck or dried mixtures, paint, etc. on them. With their help it will be easier to make a perfectly even angle. Having leveled, immediately apply two spatulas on both sides, pressing them tightly, and hold for about 20-30 seconds. Actions for every 10 cm should not take more than 1.5 minutes, otherwise the mixture will dry out and you will not have time to trim the lines between strokes!
Or buy a spatula like this.
Having completed everything, wait until the corner dries. Then check with a clean hand by lightly rubbing it and then using a ruler. If small unevenness or roughness is found, then do not panic, you will just have to work a little more. Take the grout (sandpaper) and, without being too zealous, slowly, in a circular motion, like a mechanical device, rub out the defects from top to bottom. And so on both sides, then measure again. Then you can walk a little with a roller dipped in plaster. As a result, the slope is painted inside with a special paint, preferably with a roller.
How to calculate the load
Technically, the lintel at the top of the opening is a regular beam and the calculation for it is carried out in a similar way. There are two main requirements that this part must satisfy:
- The sections of the walls on which the lintel rests must adequately bear the load.
- The residual deformation (deflection) of the lintel under load should not exceed the permissible values for windows or doors installed in the opening.
It is always necessary to take into account the self-supporting properties of the wall. Very often, when constructing masonry, opening lintels perform their function only for the first 2–3 weeks after their installation, and then they simply remain in the walls without any need. This applies to those openings over which a masonry pillar is preserved, equal in height to the length of the span. Here, a lintel is not needed at all - the wall will support itself, and the larger the blocks used for masonry, the smaller the height of the pillar should remain.
In other cases, the jumper is calculated based on the applied load, including:
- own weight of the jumper;
- the weight of the wall taking into account its self-supporting capacity (the height of the masonry above the opening);
- distribution of the weight of the wall (for summer masonry, only 1/3 of the width above the opening is taken into account, for winter masonry - the entire wall);
- the load caused by the support of beams or floor slabs on a given section of the wall.
The linear dimensions of the jumper are also important. Its width is determined by the thickness of the wall, its height by the required load-bearing capacity. The length of the lintel corresponds to the width of the opening plus twice the depth: from 10 cm for brick walls and up to 30 cm for loose porous blocks.
In most cases, to determine a suitable lintel, it is enough to make a selection from tables with standard prefabricated concrete products (series 1.038 for standard and 1.225 for very wide openings). The required product is determined by the width of the opening, taking into account the depth of the filling. If the required lintel is thinner than the wall, you need to install several of these, or at least two of them.
Of course, no one insists on purchasing finished products. You are free to cast reinforced concrete lintels yourself, as well as replace them with wooden or steel ones at your discretion, having first performed a calculation of the lintel for deflection.
Plastering a doorway
Sometimes doors are not placed in the opening, but even in this case the doorway requires finishing. And the easiest way to do this is with plaster. The technology of the plaster itself is similar, but the guides and methods of their installation are different.
Plastering the doorway begins only after both adjacent walls have already been plastered. The opening itself is covered with a primer (the selection principle is the same).
The guides are installed from the sides. These can be boards, metal profiles, two rules, pieces of plastic, fiberboard, etc. One is installed on the right, the second on the left, they are fixed. The most convenient way to secure them is with clamps. If there are no clamps, you can use nails or screws - the remaining holes will then need to be carefully repaired.
To plaster a doorway, you need two guides, which are installed on both sides
The leading edges of the guides will serve as the basis along which the rule or wide spatula will move. The sequence of actions is the same: the first layer is rough, the second is finishing, if it is necessary to bring it to perfect condition, grout is done. For more information on how to putty a doorway, watch the video.
Design of private houses made of wood concrete
Arbolite is a lightweight material. Suitable for the construction of low-rise buildings up to 7 meters in height. It should be noted that the process of making wood concrete blocks is quite simple, and it is not difficult to do them yourself. Materials such as concrete and sawdust are very easy to find.
A house made of wood concrete is the best alternative to expensive housing. It's easy to build with your own hands. Knowing the characteristics of wood concrete will help you avoid mistakes when constructing a building. What is wood concrete? This is an accessible, cheap material that has a lot of positive properties, such as: low thermal conductivity, ensuring good heat retention in the room, light weight of the blocks, long service life on par with other building materials, low production cost. With all the positive qualities, you should know the features of the material, taking into account which you can build a durable house from wood concrete: Susceptibility to moisture due to the content of sawdust. Taking this factor into account, plastering of the surface is used, due to which the house is made durable.
Strengthening the opening in a monolithic and panel wall.
There are several ways to strengthen such openings:
Strengthening the opening in the load-bearing wall of panel and monolithic buildings.
However, the most common way is to reinforce the doorway with a corner in the form of a frame:
Strengthening the openings with a metal frame made of corners.
An opening in a load-bearing wall with reinforcement in this case is performed in the following sequence. Before constructing the opening, temporary wooden posts are placed in the spacer with the ceiling or formwork posts are used for these purposes. The grooves are cut out for the frame posts and the lintel. The corners of the rack are placed in the design position, and part of the shelf is cut off at the corner of the jumper, installed and welded to the racks. Next, they cut out a part of the wall for the supporting corners, install them and weld them. After that, the entire opening is cut in small parts, the frame is scalded with plates, anchored and plastered over the mesh. After all the work is completed, the opening reinforcement structure is not visible in any way and does not spoil the presentability of the repair.
Strengthening openings with reinforcing mesh
POROTHERM block (Porotherm) is a large format porous ceramic stone. POROTHERM blocks are used for both external load-bearing walls and internal walls - interior partitions
You have decided to get a brand new garage on your property. Perfect solution! But before you buy materials, think for a minute. And it’s not at all about what materials to buy. Formulate for yourself the answer to the question “why?” In order to park the car?
The phrase clinker tiles has long been heard by everyone who has thought about a good renovation in an apartment or about building a country house. But does everyone know how it differs from non-clinker and, in general, what other types there are?
Now it has become fashionable to use brick-like panels with insulation for the exterior decoration of a house. In fact, this is not just fashion, it is a thoughtful solution for those who value beauty and do not like to overpay. What are the features of this solution? “Baltic Ceramic Company” will tell you.
The Losinoostrovsky brick factory began its work in 1934, when the first brick production workshop was launched.
You have probably already noticed that the facades of houses are very different not only in color. Now the choice of facing materials is greater than ever, and it has become easier to get confused in this variety. Well, let's look at what functions the facade of a country house performs; this will greatly help us decide on materials.
Probably, if you have already been interested in bricks, the phrase “strength grade” is familiar to you. Today we will tell you what it is, where it is important to take it into account, and most importantly, what the strength of bricks and tiles should be.