- 1 Types of masonry 1.1 Cement-sand mixture
- 1.2 Glue
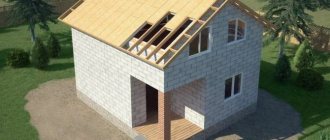
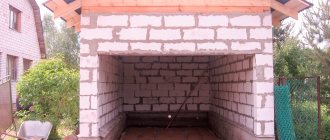
The foundation has been poured, the next stage is the construction of walls. The construction of aerated concrete walls requires strict adherence to technology. With the start of laying the first row, the question arises - how to fasten the blocks of cellular concrete? Let's look in detail at solutions that can hold porous materials together, which will help you assess the situation and make the right decision.
Types of masonry
The issue of a binding solution for blocks can be resolved at the stage of purchasing masonry building materials, having decided on the purpose of the building. The masonry can be cement or adhesive. The thermal conductivity of the first and second methods is higher than the thermal conductivity of the material itself; the thermal characteristics of the structure depend on the thickness of the connecting solution.
Return to contents
Cement-sand mixture
Until recently, a solution of cement and sand was the only correct solution for fastening blocks when constructing walls. The advantage of the mortar is that the shape of cellular concrete may be imperfect; the layer of mortar between the blocks reaches 1.5-2 cm and covers all irregularities. This type of fastening does not have good thermal characteristics and will require additional thermal insulation for the walls.
Return to contents
Glue
Laying a wall of aerated concrete blocks using glue.
The adhesive type of fastening is relatively new on the construction market. The glue blocks must be of the correct shape, without irregularities. A 2-3 mm layer of adhesive between the concrete gives the wall excellent thermal conductivity characteristics that do not require additional thermal insulation.
It is more financially profitable to lay cellular blocks on cement, but this method is more suitable for mixed partitions and utility structures; it is better to use glue to fasten the blocks of the walls of an apartment building.
Return to contents
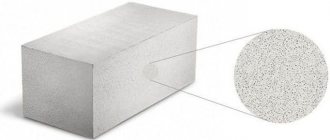
Characteristics of foam and gas blocks
We have become a little familiar with the composition of the raw materials and the technological process; now it’s time to pay attention to the main set of material characteristics and their numerical values.
GOST establishes a number of requirements for the material that all manufacturers must comply with. However, due to high competition, each of them is trying to distinguish its products by modernizing manufacturing technology and changing the proportions of raw materials to improve basic qualities. Let's look at the minimum allowed by the standard and the maximum offered by manufacturers.
Technical and operational properties
Let us consider, using the table, the main properties of two representatives of the group of materials under consideration.
Table 1. Small wall blocks made of cellular concrete: technical characteristics:
| Property name | Its meaning in foam and aerated concrete blocks, comments |
| Frost resistance | The indicator is set by GOST. The minimum threshold is 25 cycles. Products intended for the construction of external walls must comply with this value in relation to the frost resistance grade. This value has not been established for partition blocks, and the frost resistance of the heat-insulating type of material is also not standardized. In practice, manufacturers assure potential consumers that the material can withstand up to 150 cycles, and the foam block – up to 100. There has not yet been confirmation from the developers, due to the insufficient period of existence and use of the blocks. |
| Average density, kg/m3 | The value ranges from 300 to 1200. As mentioned above, the density of the material largely determines the Sulfur of its application. In this regard, a classification of material was developed in accordance with the average density indicator. We'll talk about it a little later. |
| Strength, grade B | Strength grades must correspond to a certain density. The existing ones range from 1.5 to 15. |
| Thermal conductivity W*mS | The thermal insulation capacity is quite high. The coefficient can be equal to 0.08 and reach 0.34. If there is moisture during operation, this value will increase, but this will not fundamentally affect the thermal efficiency of the wall. |
| Environmental friendliness | We have already reviewed the composition and were able to verify that the mixture does not contain harmful and toxic components. |
| Fire resistance | GOST indicates the non-flammability of the material. Moreover, it can withstand high temperatures for up to several hours. |
| Vapor permeation | Both representatives are capable of vapor permeation. The most favorable climate will be created in the room, since the blocks tend to absorb excess moisture and release it when dry air predominates. |
| Soundproofing | The least durable products have the maximum soundproofing ability. In general, the structural and thermal insulation material is quite sufficient so that additional sound insulation of the room is not required. |
Types of blocks and their application
Let's take a brief look at the classifications.
Above, we already mentioned the existence of several methods of hardening and said that the block can harden by processing it in an autoclave, or naturally. In the first case, the effect is exerted by pressure exceeding atmospheric pressure and high temperature.
In the second case, light heat and moisture treatment is possible, which helps improve properties and shorten the drying process.
Non-autoclave
The autoclave is ahead of its competitor in many indicators, such as:
- Frost resistance grade and durability;
- The ratio of strength, average density and heat preservation ability;
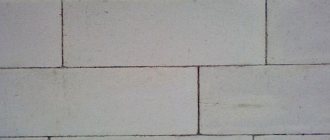
- The autoclave curing block has better geometry and pure white color;
- It is less fragile.
In contrast, it is worth mentioning that the cost of hydration hardening products is slightly lower, by about 10%.
Synthetic and hydration hardening material
Density marked the beginning of another classification.
- Blocks characterized by a density of 300 or 400 kg/m2 are called thermal insulation. They are used, of course, in the process of thermal insulation.
Note: For this, not only blocks and slabs are used, but also monolithic material. It is actively used for sound and heat insulation of roofs, enclosing structures, and floor screeds.
- If products have a density value of 500, 600, 700, 800 or 900 (kg/m3), then they are structural and thermal insulating. With their help, you can erect a building wall or partition. They are excellent as the main material for low-rise construction.
- But if you decide to build a 3- or 4-story building, it is better to purchase a gas-foam block with an increased strength and density, that is, structural ones. They are able to withstand a larger load, and with their help you can build a building several floors high.
On a note! The range of foam concrete also includes products called structurally porous. They are especially dense. They are not produced in mass quantities, only on order. GOST does not mention their existence.
Regarding the destination:
- Walls are erected using wall blocks;
- Partitions – using partition walls;
- Stationary formwork can be constructed from y-shaped formwork. They are also used when installing door and window openings.
Y-shaped products
Blocks can have different accuracy categories, which depend on the magnitude of permissible deviations. The photo below shows the requirements of the standard.
Geometric deviations
Note! The thermal conductivity of the future wall largely depends on the category. This is explained very simply. For example, products of the first category are laid on glue, while the thickness of the seam is kept to a minimum. The result is a minimum of cold bridges.
First category
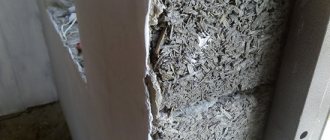
If you are laying products of the third category, you will not be able to use an adhesive composition; you must use a solution whose layer thickness will depend on deviations from the linear dimension. It can reach 2 cm or 3 cm. As a result, there are many more loopholes for cold penetration.
That is why the third category is recommended for use in the construction of non-residential buildings.
Blocks of the third category look unpresentable
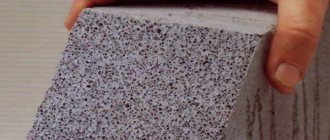
Wall blocks can have a smooth surface or have a groove and tongue. In the latter case, laying the wall will be much easier, and a beginner will have the opportunity to build an almost ideal surface.
Foam blocks are also produced in the form of products with a textured front surface. Purchasing these will save the developer from the need to finish the outside of the building.
Positive and negative aspects of the material
Table 2. Advantages of foam and aerated concrete:
| The values of density and strength allow the material to be used both as insulation and in the construction of load-bearing structures. |
| Provides cost reduction for building insulation. |
| Indicates the durability of the future structure and its weather resistance. |
| Eliminates harmful effects. Allows the use of products in the construction of specialized institutions. |
| Also an equally important advantage. The possibility of a building fire is reduced. |
|
|
| The products can be processed relatively easily and this, you see, is convenient. |
| A particularly important plus, indicating the possibility of reducing costs when constructing a foundation, since the construction of a massive foundation is not at all necessary when building a lightweight structure. |
| The construction process will be significantly accelerated due to the dimensions. |
| Any developer can try himself as a manufacturer. This is not only a useful experience, but also a cost reduction. |
| Low price | This group of materials is highly competitive not only due to its qualities, but also due to its reasonable price. |
| Unfortunately, this property characterizes both representatives of the group. |
| Despite the fact that foam concrete has this ability reduced to 10-16% due to the closed pore structure, it still needs protection. For aerated concrete the value is 25%. |
| They are afraid of the mechanical effects of the product. |
| Any hardware will not work. This is due to the characteristics of the material |
| Requires planning for securing heavy objects at the project level and strengthening them. |
Method of joining with glue
Having completed the preliminary work - unloading cellular concrete, preparing glue, we proceed to the construction of walls. The technology is simple and does not require special training. For a high-quality result, we will need the following equipment:
- concrete mixer for mixing the adhesive mixture;
- drill with a nozzle for mixing components;
- Master OK;
- level;
- grinding float;
- hard grater;
- spatula with notches at the end;
- containers for solution;
- cement, sand, water, glue.
Nowadays, there are convenient machines on the market that help you accurately apply the adhesive solution. The new tool simplifies the work and helps control the thickness of the applied solution. Laying blocks is done faster, reducing material costs and work time.
Prepare a solution from a dry mixture by adding dry components to a previously measured amount of water. The finished solution is prepared in small portions, stirred periodically, preventing separation. In the cold season, mixtures with special antifreeze additives are used.
Return to contents
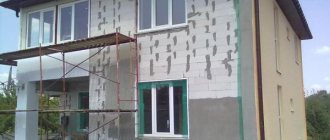
Rough finishing of block walls: stages
Surface finishing of cellular concrete blocks consists of:
- cleaning the wall, removing dust
- impregnation of the outer layer with a primer
- applying a leveling layer
- primers for the top plaster layer
- applying a textured layer
- applying the finishing coat.
Priming of cellular concrete and plaster is carried out with styrene-butadiene or styrene-acrylic compounds.
Laying the first row
The laying of external walls should begin from the corners.
The accuracy of laying the next rows depends on the correctly laid first block. The first row is placed on the prepared foundation. Using a level, give the blocks an even horizontal position; with proper markings, laying out the rest of the cellular concrete will not be difficult.
To achieve a perfectly even line, the row is laid out on a cement mixture, thereby leveling out differences in the foundation. Continue work with the formation of corner blocks, ensuring the location is exactly in place. The blocks are laid out along one line. Sweep each element from dust and dirt.
The edge of the block is smeared with glue using a serrated spatula, an even layer of the mixture is laid out on the foundation and the prepared block is laid. The building level checks the correct horizontal position of the row. If the outer concrete elements do not meet standard standards, a saw is used to give the required shape. Element by element - the first line is laid out. Having completed the layout, check the row for the presence of roughness and remove them with a special grater. After completing the inspection, the entire area is rubbed with a damp brush.
Return to contents
The first method of laying walls from cellular concrete blocks
According to the first method, when laying spoon rows,
the stones are laid out either flat along the wall
with a distance between them equal to
the thickness of the seam
, or upright - with a distance equal to the length of one stone.
The laying out of the stone begins
approximately at a distance of
800 mm
from the place where it is laid, so that the stone being laid does not interfere with the mason and so that the mortar for a horizontal joint can be pre-layed
on two stones
.
Before installation
stone in place mason:
- first apply the mortar with a trowel to the end of the previously laid stone,
- then takes with both hands the nearest set stone by its longitudinal edges
- and puts it in place, turning it from a vertical position (if the stone was placed upright) to a horizontal one
- and lightly scooping
additional mortar from the bed with the bottom edge of the stone to ensure proper
filling of the vertical joint
.
Second and subsequent stripes
All subsequent rows are laid out with a purely adhesive solution prepared according to the rules. The adhesive mixture covers the entire side surface of the newly laid material and the entire width of the lower, lined up blocks. The seam when professionally installed reaches 3 mm.
The work should start from the corners, in the side edges of which the fishing line is stretched. Lay out the material along a stretched line, checking with a level that it is horizontal. Don't forget about bandaging the masonry, but don't overuse it either.
According to the rules, half a block of dressing is done with fresh solution, once in three stripes.
Return to contents
Wall elements
The lintel is supported at each end by at least 200 mm.
Jumpers are structures that require special attention. Wall lintels are load-bearing structures installed on door slabs, under window blocks, internal and external walls. By using simple elements in masonry walls, a uniform surface is achieved, which simplifies finishing work.
Possible methods for installing jumpers:
- The use of factory-made material “stitched” with metal reinforcement made of cellular concrete or reinforced concrete. Factory reinforced lintels are used to their full length; cutting them is unacceptable. The recess of the base under the ceiling is at least 25 cm on both sides. Depending on the thickness of the wall, one or two lintels are used side by side. Each structure has an inscription about the permitted load and the amount of reinforcement inside. Reinforced cellular structures are preferred. They are ideal for use: the size fits well with the blocks; excellent thermal conductivity characteristics; laid on glue.
- Monolithic U-shaped cellular structures are prepared using wooden supports mounted in the openings. U-structures are laid out on them. A frame of reinforcement is laid in the recess and filled with mortar. It is important to vibrate the concrete solution to completely eliminate air bubbles. The supports are removed only after the concrete has completely hardened (28 days).
- Creation of reinforced concrete structures using formwork. Factory-made forms made of reinforced concrete, or those made independently, are used for interior work. Due to the high degree of thermal conductivity, structures installed outside require additional insulation. The process of installing reinforced concrete differs from reinforced structures in that it is laid using cement mortar, and the formwork is removable.
Return to contents
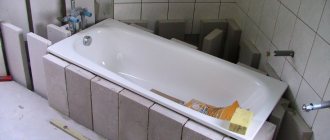
Internal partitions
Cellular concrete with a width of 7.5 - 10 cm is ideal for the construction of internal partitions. The wall will be strong, with good thermal insulation. A wall or partition inside a building is erected according to the same rules as for exterior work. First you need to make markings for installation using a special device. The surfaces of walls and floors must be perfectly smooth, without cracks, holes, or potholes.
The glue prepared according to the instructions is applied to the edges of the material, then we proceed to laying the partitions. We lay out the inner wall in a checkerboard pattern. To give strength, we start even rows with a half block. The blocks are connected to each other with a thin layer of glue.
To improve the strength of the partitions inside the building, they are erected parallel to the external walls, fastening them with dressings. When constructing internal structures after the construction of external walls, for better stability, metal hooks are placed in the internal and external partitions. The number of hooks is at least 3, located along the entire height of the wall.
The erected structure is left for three days, and the resulting gaps between the ceiling and the partition are filled with polyurethane foam to maintain the required level of thermal insulation. For rooms with high humidity, the use of porous building material is not recommended.
Return to contents
How do you put partitions on the glue from the inside?
Cellular concrete blocks are very beneficial when constructing partitions from the inside of a house. For internal partitions, products with a thickness of either 75 or 100 mm are applicable. Such a wall surface will receive the necessary strength, lightness, and excellent noise and heat insulation performance.
Let's choose one of 3 options for joining them to the wall from the outside:
- To the full depth of the block in the wall from the outside. This option is chosen provided that the material both outside and inside was from the same batch, has similar dimensions and qualities, and installation is carried out simultaneously.
- Into the block from the outside to a depth of 150 mm. It is carried out by cutting out external blocks with different dimensions and laying them at more than one time.
- With or without the wall blocks touching each other. It is advisable to use when joining walls made of dissimilar materials.
This is how the blocks are laid. Good luck!
Preventing errors
Mandatory horizontal waterproofing of walls made of cellular concrete.
Compliance with a number of rules will help to do high-quality work and increase the repair-free service life of the structure.
- Waterproofing. The porous material perfectly absorbs moisture, but despite this, it is highly resistant to liquid when it evaporates quickly. It’s not worth taking risks; it’s better to protect the walls from getting wet. Cellular concrete requires waterproofing. First of all, take care of the horizontal waterproofing (roofing felt, oilcloth), which separates the load-bearing walls from the foundation, then do the vertical one. They connect with each other.
- No moisture or damage. Cellular concrete is characterized by strength, but under mechanical stress it is easy to damage. When working with the material, you should use a rubber or wooden hammer and move it carefully. Weather conditions during construction are different, nothing bad will happen if the blocks get wet. Under the sun's rays they will dry. But no one can guarantee the appearance of the sun after the rain. It is necessary to protect the concrete from getting wet. There is a protective film on the blocks, do not remove it until the last concrete is used, it will protect the pallet of material.
- Stability of walls. It is necessary to ensure a dressing between the inner and outer wall.
- Window sill area. In walls made of cellular concrete, the window sill area must be reinforced with reinforcement.
Return to contents
Limitations or applicability
Under what conditions is it permissible to use this or that technology?
Unfinished masonry
The main function of exterior decoration is decorative. If the appearance of unfinished masonry does not cause any complaints, and the thermal characteristics are completely satisfactory, then this method is suitable for masonry from blocks without chips or with chamfers on a white adhesive mortar, or for neatly executed masonry using mortars and adhesives of all types. You need to understand that this is an almost perfectly mounted wall, made of good material with high-quality installation.
Laying blocks with a chamfer
Painting with textured paints
Suitable for masonry made of blocks without chips or with chamfers, for masonry with rubbed chips and a polished surface. In terms of quality, the condition of the wall should be close to ideal. The paint must be façade with the necessary vapor permeability.
Painted masonry made from cellular concrete blocks
Plaster finishing
Technology with a thin plaster layer is applicable if possible, limited to a thickness of up to 7 mm, with a maximum deviation of +-2 mm. The base (wall) must be of very good quality on the surface, with virtually no deviations.
Thin layer plaster system
Details about finishing foam concrete: Finishing cellular concrete thin-layer plaster system
Technology with a thick plaster layer. Applicable with a maximum deviation of +-10 mm. Which allows on the basis of some local deviations from the plane.
Thick layer plaster system
It is also possible to use thick-walled plaster and technology with a thin plaster layer. The first layer (thick-walled plaster) evens out local deviations in the base, the second layer forms the base (base layer) for the finishing plaster. This type of finishing requires technical and economic justification. For example, the deviation of the vertical wall is 20 mm.
Uncompromising quality of wall plaster will be ensured by: a ready-made solution from the STO company
Facing masonry
Facing brickwork implies that all design work has been completed before construction begins; this is due to the structural features of preparing the foundation.
Facing with tile materials
Bonding ceramic tiles on the facades of buildings made of cellular concrete is installed according to the scheme: the first layer (thick-walled plaster) evens out local deviations and creates a more durable surface for installing the base layer. The second layer forms a strong base for gluing ceramic tiles. Thus, a layer of thick-walled plaster acts as a “leveling” coating, not only for deviations from the plane, but also creates a smoother transition from a less durable block to a more durable base layer. Which has a positive effect on the operation of the system. Facing made of tile materials has linear expansion due to temperature changes, so it is necessary to use both elastic adhesive and a good base, which is successfully solved in this option.
Ceramic tile finishing system
Insulation system
SFTK technology (facade thermal insulation composite system). This is a finishing option when it is necessary to improve the thermal characteristics of a building or “hide” unevenness of the base through the use of insulation with different thicknesses. For example, the design thickness of the insulation is 100 mm, but there is a deviation along the base of 50 mm, then in this area, insulation with a thickness of 150 mm is used and as a result you get a smooth and beautiful surface. Attention! The minimum required thickness of the insulation layer is calculated by a heating engineer for a specific building.
Associated thermal insulation system
The best solutions for facade insulation are presented on the page: ready-made systems for facade insulation
NFS (suspended façade system)
The technology is applicable both without insulation and with the use of thermal insulation (only mineral insulation “MVP”). In this way, you can “hide” almost any flaws in the foundation, and the use of a thermal insulation layer will improve the thermal characteristics of the building. The choice of finishing coating is limited only by the customer’s imagination.
Ventilated facade with plaster finishing layer
Ventilated facade using insulation, plaster finishing layer