You will need to correctly calculate the required amount of materials, select foam concrete of the appropriate density and size, glue on which the sections will be laid, and also strictly adhere to the laying technique.
In the article we will discuss the nuances of construction, how to correctly lay foam blocks with your own hands, costs, as well as possible errors and difficulties.
About foam concrete blocks
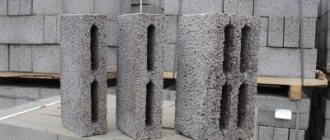
When choosing a building material, you should pay attention to the uniformity of the structure.
If you decide to build walls with foam blocks, you need to choose the right building material. Building structural units made of porous concrete in most cases have dimensions of 60x30x20 cm (length, width, thickness, respectively), although other dimensions are possible. When choosing a building material, you should pay attention to the uniformity of the structure, the correctness of the geometric shapes, the presence of chips, broken corners, and other damage. High-quality building blocks must be free of visible defects.
Standard blocks are produced with a continuous structure and a smooth surface on all sides. Larger foam blocks may have technological voids, side pockets for easy hand grip, and tongue/groove type joint locks. These elements make the building material lighter and make it easier to work with it yourself
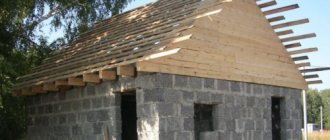
In addition to the main masonry blocks, you will need special U-shaped foam blocks for the construction of a reinforcing reinforced belt, the total length of which should slightly exceed the perimeter of the building for one-story construction and two perimeters for the construction of two floors (the first reinforcement of the structure for the interfloor ceiling, the second for the roof structure).
Characteristics of foam concrete blocks
Foam concrete blocks.
The building material has the following characteristics:
- Reliability and durability . A properly laid foam concrete block is a virtually ageless material.
- Warmth . The high thermal resistance of such walls allows you to reduce heating costs by 30%.
- Excellent sound insulation.
- Easy to use . Any home craftsman who has worked with brick or cinder block can lay out masonry from foam blocks with his own hands. There are only a few nuances here, which will be discussed below. Since even non-professional builders can lay cinder blocks or bricks correctly, you won’t have any special problems with this material.
- Environmental friendliness . Over the entire period of operation, the material does not emit harmful substances into the air, second only to wood in terms of environmental friendliness.
- Foam blocks and gas blocks are made in various sizes and shapes.
- The relatively light weight allows you to significantly save building materials by laying the foundation to a shallower depth.
- Fire safety . According to test results, the material has the first degree of fire resistance.
- Wide range of applications. Today there are the following types of foam blocks:
- Structural. Which are used to create loaded structures that carry additional load in addition to their weight.
- Thermal insulation, used for insulation purposes.
- Thermal insulation and structural, combining the properties of the two previous types.
Many home craftsmen are interested in the following question: “Is it possible to lay floor slabs on a foam block?” Of course, you should build load-bearing walls yourself using foam concrete blocks of grade 600 (and higher) only.
Foundation for masonry made of foam concrete blocks
As mentioned above, foam blocks require a reliable foundation that would minimize any deformation and pressure from the soil. And a monolithic base is an excellent choice.
However, it has several significant disadvantages:
- The price of such a foundation is quite high; moreover, its construction is unjustified due to the relatively low weight of the foam block structure.
- With such a foundation, you will not be able to equip a basement, which in some cases significantly expands the usable space of the house.
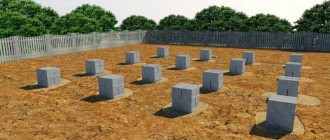
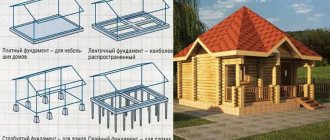
Considering these factors, many home craftsmen prefer columnar or strip bases, which, with the right approach, can also become a reliable basis for such a house.
Strip foundation.
When a builder asks whether it is possible to lay floor slabs on foam blocks, this means constructing a two-story structure. And if a columnar foundation is aimed at lightweight buildings, then a strip foundation may be quite suitable for a two-story house, so we will consider the features of working with this material.
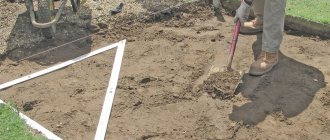
The instructions are:
- We mark the territory using pegs and a fishing line that is stretched between them.
Advice! When marking, you should take into account the allowances for arranging the formwork, which amount to a total of 15 cm.
- We dig a trench according to the markings. Its depth should be about one and a half meters. If you are planning to arrange a basement, the depth should be increased to at least two meters.
- We make a base for the formwork, which is made from wooden beams. Boards are nailed to the inner sides of the beams, forming the formwork.
- Pour a layer of sand (about 15 cm) into the formwork, which must be watered and compacted tightly. Water generously and evenly.
Advice! In order to check how well the sand layer is compacted, you just need to step on it. If no trace remains, then everything was done correctly.
- Using a construction stapler, we attach plastic film to the formwork.
Advice! The film cannot be used in winter, as it will lose its elasticity, which will lead to poor quality of the foundation.
- Take steel rods and wire and tie the reinforced frame together. The design of such a frame is not of fundamental importance; the main criterion here is strength.
- Now you should start pouring concrete. For this, a mixer machine or a specialized pump is used.
- We distribute the concrete evenly over the formwork using a wooden lath. Make sure there are no empty spaces or protrusions on the surface.
- After a month, you can start laying walls.
Consumables, tools and accessories for construction
When deciding to build a house from foam concrete yourself, the first step is to purchase blocks of the required density and size. For load-bearing walls, sections of cellular concrete D600 will be needed, and for internal partitions - D500.
When purchasing building materials, you should pay attention to the same shape and size of the product. The more regular the sections are shaped, the easier it will be to work with them and the minimum amount of mortar will be required to fill the joints.
It is the solution that guarantees the strength of the masonry, so you need to determine for yourself what binder will be used. The material for coupling the sections should be such that the thickness of the seam is minimal in order to save material and retain heat in the future.
There are two options for materials that are used as a binder mixture:
cement-sand mortar, to which a plasticizer and foam-forming material are added - it is used if there is an error on the edges of the blocks of more than 2 mm;- a special industrial adhesive designed specifically for laying foam concrete blocks, used to work with perfectly smooth blocks that have the appropriate characteristics according to GOST, sold in the form of bulk mixtures.
In addition to materials for work, you will need tools:
- a perforator attachment designed for mixing the solution;
- construction level;
- plane, sanding board;
- grater and wall chaser;
- rubber hammer for leveling sections;
- electric milling cutter or hacksaw;
- trowel and notched trowel;
- carriage for applying glue;
- brushes and cord.
Why glue and not mortar - the advantages of a thin seam
First of all, I note that glue can only be used for autoclave blocks that have precise geometry. It is not worth using glue for non-autoclaved foam concrete, since it cannot be applied in a thick layer, and when applied thinly, cracks will form.
As for the autoclaved aerated concrete or gas silicate block, the use of a special adhesive solution when laying it provides a number of advantages:
- Reducing cold bridges . The solution between the blocks has high thermal conductivity, since it does not have air-filled cells, like foam concrete. Therefore, the narrower the seam, the smaller the cold bridges, and accordingly, the warmer the housing;
Thin seams make the wall stronger and warmer
- Strengthening . The seams in any masonry are the least durable areas of the wall. Therefore, reducing the thickness of the seam increases its load-bearing capacity;
- Good adhesion . The glue has better adhesion to the blocks than regular mortar. This also improves the strength of the masonry;
- Increases the speed of wall construction . During the process of building walls, you have to be distracted much less often by preparing the mortar. In addition, the glue is applied faster than the solution;
The use of glue increases the speed of masonry
The only downside is that the glue can only be applied in a thin layer. As I already said, this limits its scope. In particular, glue is not usually used for the first row of blocks.
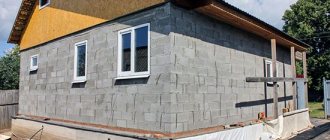
Masonry of external load-bearing walls
It is recommended to lay foam blocks on a pre-leveled base. If there is a significant difference in height, it is recommended to use a cement-sand mortar for this purpose. After leveling, waterproofing is laid on the base.
Laying foam blocks with your own hands begins with preparing the products. To do this you need:
- eliminate irregularities and chips;
- remove burrs using a grater or drywall plane;
- set aside heavily damaged blocks and leave them for later trimming.
Conclusion
Now you know how to lay walls made of foam blocks and you see that this work can be done independently.
To get a good result, it is necessary to constantly monitor the horizontal and verticality of the masonry, avoid voids in the seams, and correctly lay the first row and corners. If you adhere to the developed technologies, you will be able to build a warm, beautiful and reliable house with your own hands.
Installation of the first row
The first products are fixed on cement mortar at the corners of the future building, and the first of them is installed in the highest part of the base on a thin layer of the mixture. Lighthouse masonry elements are considered basic, so their installation must be carried out with special care.
Important! When installing a corner block, make a protrusion above the base within 3-5 centimeters. This gap will prevent the accumulation of moisture at low tide. Thus, the masonry will remain dry and will not be subject to destruction as a result of moisture saturation and exposure to negative temperatures.
When fixing the side wall elements, it is recommended to use a building level. Correction of their position is carried out with a rubber hammer. After installing several rows of lighthouse blocks, nails are forced into the seams and the cord is pulled. If there is a significant distance between the corner parts (more than 6 meters), it is recommended to use intermediate guides.
Using a carriage to apply glue to foam concrete
The first row of foam concrete is laid on a cement-sand mixture using a trowel, all subsequent versts on the adhesive mixture using a notched trowel or a special tool, a carriage.
Note! The construction mixture is spread not only on the horizontal surface, but also on the side edges of the products. The vertical seam must be filled with mortar without fail. Failure to comply with this rule will lead to the appearance of voids, accumulation of moisture and destruction of the product under the influence of negative temperatures.
When laying foam blocks on a regular mortar, the thickness of the horizontal seam should be within 1-1.5 centimeters, the vertical gap should be about 1 centimeter. If there is a perfectly leveled surface, masonry can be done using glue. In this case, the thickness of the gaps between adjacent elements is determined according to the manufacturer’s recommendations.
Advice! When the surface of the block is wetted with water, its adhesion to the glue will increase. This recommendation is valid for installation in the warm season.
If necessary, blocks are cut to the required dimensions. A product with a thickness of 5 centimeters or less looks ugly. To eliminate this unpleasant moment, you can increase the thickness of the seams. After laying the product on the solution, it can be further adjusted over a short period of time. Subsequently, unevenness is eliminated using a drywall float or a special plane.
Installation of the second row
The second and all subsequent rows of walls begin to be laid from the corners after measuring the deviation from the vertical and horizontal position. When performing such work, the cord is moved to a higher block and secured in the seam. An adhesive mixture is used to lay all subsequent rows, which saves material and work time.
It is not recommended to lay foam blocks with gaps crossing at an angle of 90 degrees; such seams only weaken the masonry. For high-quality dressing of seams, the products are shifted at least 25% of the length. The ideal option is to bandage half the size of the element.
The second and subsequent rows of blocks are laid on glue. The thickness of the building mixture should be within 5 millimeters. The glue is applied with a notched trowel, spreading evenly over the surfaces. After laying and preliminary leveling, the thickness of the seam will decrease to 3 millimeters.
Laying the second and subsequent rows of foam blocks
During work, the horizontal and vertical position of the blocks is adjusted using a plumb line and a building level. To improve the load-bearing capacity of the wall, reinforcement is carried out every 3-5 rows of blocks. To do this, grooves of the required depth are made in the products and reinforcement is laid. Attention should be paid to the fact that the metal rods should not extend beyond the surface of the blocks.
When laying foam concrete with your own hands, you must comply with a number of requirements:
- The adhesive composition or cement-sand mortar must be prepared in small portions, because such substances retain their performance characteristics for 1.5-2 hours after mixing.
- The blocks are adjusted within 10-15 minutes after installation. When doing DIY work, use mixtures with maximum adjustment time. In this case, an inexperienced builder will have more time to level the masonry. When using a high-quality solution, it will be problematic to correct the block without damage.
- Work on the installation of foam concrete walls must be carried out during the warm season from spring to mid-autumn, at temperatures from +5 to +25 degrees.
- To simplify installation, the surface of the blocks is moistened. After such procedures, the adhesion of the porous surface improves.
- You can apply an even layer of glue using a notched trowel.
It should be noted that finishing work is carried out only a month after the walls are installed. This is due to significant shrinkage of foam blocks, up to 3 millimeters per meter of length.
How to tie stitches
Suture dressing options
The load-bearing walls of a residential building can be laid out in one or two rows of blocks. Products with standard overall dimensions of 20*30*60 centimeters are not enough for the construction of enclosing structures, so they are laid in two rows and reinforced with mesh. When laying foam blocks with butts, the products must be placed in a perpendicular position relative to the main masonry. If the length of the material exceeds the width of the supporting structure, trimming is done.
When laying foam concrete flat, the rows are mounted parallel to each other and connected to each other using flexible connections. Sometimes the main masonry of the walls is combined with brick cladding; here the materials are reinforced with metal mesh. The corner part also needs to be bandaged. It is considered normal to place a vertical seam in the middle of the foam block.
When installing internal load-bearing walls, individual blocks can be joined as follows:
- With bandaging to the full depth of the part. Here the first foam block intersects with the masonry of the outer wall.
- With combination on part of the element. In this case, the product is wedged into the main masonry by 15-20 centimeters.
- With joining of material. In this case, dressing is not used; the foam block is placed close to the outer wall.
Experienced builders recommend using the first option for laying foam concrete walls. In other cases, reinforcement is inserted into the masonry of the outer wall every 3 rows of blocks.
A few words about finishing
Finished walls can be plastered from the inside with tile adhesive or the same one you used for masonry. The layer of plaster in this case should be 5-7 millimeters. During the finishing process, it is necessary to glue the reinforcing mesh. Therefore, the glue is applied to the surface in two layers - a mesh is glued to the first fresh layer, and after it dries, a second, leveling layer is applied.
You can plaster walls made of aerated concrete using tile adhesive
In most cases, it makes no sense to use plasterboard and other sheet materials for finishing, since the walls of their aerated blocks are smooth. Absolutely any materials can be used as a finishing coating - wallpaper, tiles, decorative plaster, plastic panels, etc.
As for exterior finishing, the best option is siding with preliminary insulation with mineral wool using the “ventilated facade” technology. You can learn more about the process of finishing foam concrete from other articles on our portal.
Calculation of building materials for the construction of foam concrete walls
When planning to build a house from foam concrete blocks, you must first perform a number of calculations. To determine the need for material, a building plan will be required.
Initial data:
- foam block length – 60 cm;
- product width – 20 cm;
- block height – 30 cm;
- the dimensions of the building outline and the height of the box are determined by the plan;
- thickness of foam concrete walls - determined at the design stage;
- Dimensions and number of openings are indicated in the design documentation.
Settlement operations are performed using various methods:
- manually. Knowing the dimensions of the foam blocks, the thickness of the walls and the dimensions of the building box, it is easy to independently determine how much foam concrete is required;
- using an online calculator. It allows you to more accurately determine the number of blocks, taking into account additional parameters, including the thickness of the joint in the masonry.
Let's look at how manual calculations are performed. To calculate the required number of blocks, follow these steps:
- Calculate the perimeter of the box by adding the lengths of the walls.
- Determine the wall area by multiplying the height of the walls by the length of the contour.
- Calculate the total area of window and door openings.
- Subtract the resulting value from the total wall area.
- Divide the resulting area by the area of the lateral plane of the foam block.
Using a specific example, we will determine the number of foam concrete blocks required to build a box with dimensions of 5x7 m, a height of 3 m and a wall thickness of 0.3 m.
To calculate blocks you need:
Calculations of the required number of blocks
- Determine the area of the box - (5+7+5+7)x3=72 m2.
- Calculate the area of doorways (0.7x2=1.4 m2) and window openings (1.3x1.5=1.95 m2).
- Sum up the values obtained for the openings - 1.4 + 1.95 = 3.35 m2.
- Calculate the area of the walls without openings - 72-3.35 = 68.65 m2.
- Determine the area of the lateral plane of the foam block - 0.6x0.2=0.12 m2.
- Calculate the number of blocks – 68.65:0.12= 572 pcs.
Dismantling technology
Dismantling work on foam block walls is required mainly when the owner decides to redevelop it , for example, to increase the usable area in the house. This type of work is very labor-intensive and dusty. Performers are required to have professional skills and effective tools.
The owner of a building in which they plan to dismantle the walls must first obtain official permission from local authorities, BTI and other regulatory organizations, for example, the department of architecture.
It will also be necessary to resolve in advance the issue of disposal of building materials after disassembly. Before starting work, be sure to turn off all utility networks in the house , especially power lines and gas supplies. Work is carried out in protective clothing with personal protective equipment.
Manual disassembly of foam blocks is a very labor-intensive operation; at a professional level, such work is performed using diamond cutting. This technique guarantees high-quality wall removal, without noise or vibration effects on the main structures of the house.
Read more about this here.
Problems and errors
When building walls from foam blocks, difficulties may arise in the form of:
- Working with foam concrete in damp or frosty weather can lead to cracking of the masonry.
- Poor quality filling of joints will make the masonry weak and increase heat loss.
- Before laying, blocks should be cleaned of dust and dirt, and if necessary, soaked in a soil mixture to improve the adhesion of the sections to the mortar.
- The laying of the first row must be done responsibly and in accordance with all the rules; the quality of the wall masonry along the entire height depends on this.
- The minimum offset of the blocks of the following rows should be from ¼ to ½ the length of the section size.
- The blocks should be corrected no later than 15 minutes after they are laid on the solution, while it has not yet set.
- Window and door openings must be reinforced.
- The masonry mortar should be mixed in small portions.
It is possible to plaster the walls only a month after their construction, since the foam block shrinks up to 3 mm per 1 m.
Approximate costs for working independently
If you lay the walls yourself, you can get an inexpensive house made of foam blocks. Material costs will only be used to purchase building materials.
Knowing the total volume of future walls according to the project, it will be possible to calculate the required number of blocks.
Average price of 1 cubic meter m of foam blocks measuring 600x300x200 mm is 2500-3200 rubles. To this amount are added the cost of glue (for 1 cubic meter of masonry there is approximately 20-30 kg of dry mixture), which equals 200-250 rubles.
If we add here the cost of reinforcement, cement, sand and other consumables, then 1 cubic meter. m of independent masonry will cost 3000-3500 rubles.