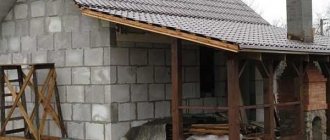
Construction of a private house is a very complex and responsible process. The strength and durability of any constructed structure depends on the correct technology and careful execution of work. Each stage must be considered separately, especially if you want to do everything yourself.
Today we will look at the construction of a partition from foam blocks, focus on the most important points, and also tell you how to do this work as quickly and accurately as possible.
As a result, you will get a strong and even wall, the skill of which even a professional builder will envy.
Material characteristics, cost
Recently, it has become very popular to make partitions from foam blocks. What is so attractive about this material?
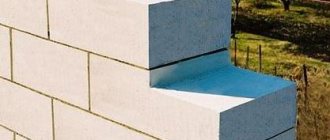
Firstly, it has such positive qualities as good sound insulation and heat retention. Compared to brick, it has a lower density, which reduces the weight of the structure and, accordingly, the load on the base, which is especially important in private construction.
Secondly, the surface turns out smooth and is quite easily subject to further finishing - plastering, putty, application of finishing materials.
Thirdly, the block can have different parameters, i.e. you can choose the appropriate wall width.
The thickness of the blocks can be 50 mm, 75 mm, 100 mm, and also new – 150 mm. The height and length are usually standard and are 300 mm and 600 mm, respectively. They also differ in strength and density classes.
Usually 100 mm thick blocks are chosen for partitions. In 1 cubic
m. there will be 57 of them. From this you can calculate how many total blocks you will need to buy.
It is only necessary to determine the area of the future partition, which is easy to do by multiplying the height of the wall by its width. Fourthly, the affordable cost of the material is a positive aspect. For example, the price of 1 cubic. m.
blocks 100 mm wide will cost between 2900 - 3600 rubles. depending on the selected density and strength class. Based on this, you can calculate the cost of the entire partition, which will also include the price of the glue that holds the foam blocks together. Like any material, foam blocks also have disadvantages.
It is porous and light, which will not allow you to attach a heavy shelf or cabinet to the wall. Self-tapping screws will fit into the wall very well, but they will often fly out under heavy loads. You will also need quite a lot of primer and putty, since they are absorbed into the pores. These points and features should be taken into account when further finishing the wall.
How to cut foam concrete
The technology for constructing foam concrete partitions always includes cutting the material. Mostly the procedure is performed to reduce the length of the block. If desired, you can reduce the thickness of the element, but the procedure is rarely required. Cutting a block to length or height is quite simple.
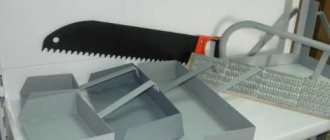
For cutting, you can use a regular hacksaw for wood, but it is better with small teeth. The disadvantage of this method is that the condition of the saw quickly deteriorates; dull teeth will have to be sharpened, and the procedure is long and requires certain skills. The best way to cut is to use a specialized saw; it lasts longer thanks to the pobedit coating on the teeth.
Wood hacksaw 500 mm
Basic Rules:
- You should not use a grinder, as it creates a lot of dust and it is quite difficult to make an even cut;
- Drilling is carried out with any electric drill with a Pobedit drill bit. You can insert a dowel into the drill chuck and then a self-tapping screw;
- a drill without impact mode with a special attachment for making wide holes will allow you to create a recess for mounting a socket or switch;
- Using an angle grinder, it is easy to drill walls under electrical wiring cables.
Laying an internal wall from foam blocks
In order to make a smooth and durable partition, in addition to the foam blocks themselves, we will need: construction tools, special glue for connecting the blocks, polyurethane foam and others.
The first stage is marking. We determine the place where our wall will be located and draw lines on the floor, existing walls and ceiling, which must be even, because the wall is a strictly vertical structure and significant deviations will contribute to its destruction. For these purposes, you need to use special laser devices, and markings can be applied using dye thread.
The construction of a partition made of foam concrete blocks requires precision; you need to carefully ensure that the wall is flat over its entire surface and does not bend in the center. If you have experience in this matter and do not need additional guides, then you can proceed to the next stage. However, if you are a beginner, we recommend that you make guides.
This can be a frame made of profile or wood, which is installed along the lines of our markings. You can stretch a rope or fishing line in the center, along which you will align the partition in the middle of the masonry. The next stage is preparing the surface of the base and the places to which the new wall will adjoin. They must be cleaned, leveled if necessary and treated with a primer.
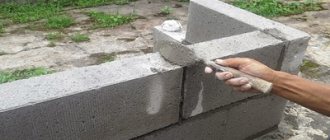
Now you can proceed directly to the construction of the partition. We dilute the solution (glue). How to do this correctly is usually indicated on the packaging. The consistency should not be too thick, the solution should drain, but at the same time it should not be too liquid. Next, we begin to fold the wall, focusing on the guides, and also checking the horizontal and vertical positions using a building level.
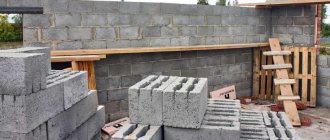
Each block must be pressed tightly against the previous row and the adjacent block. This will avoid significant shrinkage in the future. You start laying out the first row with a whole foam block, the next one with half of it. Thus, the masonry is created in a checkerboard pattern (in a staggered manner), which gives the partition strength.
When you reach the ceiling, you need to stop working and let the wall dry. This will take about two days. We recommend sealing the gap between the wall and the ceiling with some kind of elastic material that will smooth out vibrations and deformations.
For example, it could be polyurethane foam, which has excellent soundproofing properties. But you also need to be careful with it and not overdo it with its quantity. For a clear example, we suggest watching a useful and fairly detailed video on how to make a partition from foam blocks with your own hands with minimal time and maximum cleanliness. This video also additionally describes a method for creating a door and window opening in a partition made of foam blocks. Inside the layout of an apartment, an interior partition made of foam blocks is erected when it is necessary to simultaneously divide a room with a large area into two rooms, and in the process of division to obtain good heat and sound insulation.
Making walls
Tips for working
Without a doubt, every beginner who has never renovated an apartment before can independently build a wall from a foam block.
- For “clean” but strong bonding of blocks, we can use not cement, but the latest high-quality adhesive mixtures specifically for foam blocks.
- The wall must be erected strictly according to the level, then the foam blocks for the partitions in the apartment will line up perfectly evenly.
- foam blocks;
- fittings, reinforcing mesh, metal rods;
- glue;
- betoquartz contact (i.e. acrylic styrene primer).
Materials
Calculation of the number of foam blocks
We will measure the parameters of the partition taking into account the openings of windows or doors.
- Total area of the partition: multiply the height by the length.
- From this resulting area we subtract the area of all planned openings.
- Determine the area of the foam block.
- We calculate the number of blocks: divide the resulting area of the partition by the area of 1 block and get the number of blocks.
Laying foam blocks
So how to build a wall of foam blocks in an apartment?
- Let's start by marking the boundaries of the future partition, first on the floor, then symmetrically on the ceiling and, accordingly, on the walls.
Note! Experts recommend using a modern laser level. To perfectly mark the lines, use a tapping cord or marker.
- Using this marking we install a metal leveling frame from the profile. This will ensure optimally straight lines for laying foam blocks. And we align the middle with a stretched cord.
Advice! Before laying, the floor, ceiling and walls must be cleaned of dirt and covered with a high-quality deep-penetrating primer.
- We fasten the blocks with foam concrete glue, or you can use traditional cement mortar. But the glue gives perfectly smooth seams, enhances thermal insulation and provides strong adhesion.
The instructions guarantee glue consumption for 2mm joints - 15 kg/m3. It is more economical to apply this adhesive solution with a spatula so that when laying the block the glue does not drip copiously.
By the way, let’s not forget about grinding in the foam blocks when laying them: slightly rocking the block, press it into the solution on the lower foam block and move it towards the adjacent block.
Note! This masonry will be strengthened by rods and reinforcement pins driven into the load-bearing walls in the places where they adjoin each new row of blocks.
- 2 days after completion of the masonry under the ceiling, we will seal the gap with polyurethane foam. It is much cleaner, lighter, and better quality than cement.
Preparing openings
When correctly solving the problem of how to make a wall of foam blocks in an apartment, we remember that after installing the partition, it is worth disassembling the framing frame - it is no longer needed.
- Now we will trim the door or window openings and trim the edges with a saw.
- If this requires cutting an opening in the partition, we will make it a little larger so that the installation of the window or door is correct.
- The foam blocks at the top must be securely reinforced. To do this, we will cut deep 10 cm grooves at the top of the side walls and insert pins secured with spacer wedges.
- Before finishing the surface, we will do the electrical wiring.
- When finishing, fill all voids with a good quick-drying solution.
Strengthening the wall
- We cover the foam concrete partition with plasterboard, wood, plastic or traditionally plaster it.
Which is the best foam block to choose for a partition?
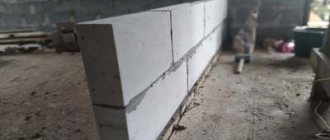
Foam block is a material with the correct parallelepiped shape for masonry using a binder adhesive mixture. Typically, foam blocks are made from a cement-sand mixture, in which, when aluminum powder is introduced, a chemical reaction is achieved, that is, hydrogen is released, the bubbles of which foam the future masonry stone. Regardless of the dimensions, the foam concrete from which the blocks are made has the same properties everywhere.
Foam blocks are made in different overall dimensions, but specifically for the construction of partitions or piers, masonry stone with dimensions of 10x30x60 cm or 20x30x60 cm is used. If on the future partition you plan to install a wall-hung installation, for example, of a water heater, boiler or shelving, then it is recommended to use a foam block 20x30x60 cm.
When is the use of reinforcement required?
The installation of a partition made of foam blocks should be reinforced in some places.
- When is it necessary to tie a partition to load-bearing walls and a pier? Before laying the interior partitions, large pins or nails are driven into the main walls at the junction with the future structure - these elements will serve as the connecting link of the structure. Before this, shallow holes of 5 cm are made in the walls, and pieces of reinforcement with an adhesive solution are inserted into these places. Holes are cut in the foam concrete or the building material is laid on the protruding edges of the reinforcement. Next, you will need to drive the rods through 2-3 rows of masonry.
- Connections between walls are made for structures that will be connected to the partition being built.
- The masonry is reinforced with fiberglass construction mesh. It must be laid in the three upper and three lower rows. If the masonry exceeds three meters in height, it is necessary to lay reinforcement in the middle part.
Advice! It is recommended to work only with freshly prepared adhesive solution. Otherwise, the glue loses its qualities, and the wall accordingly loses its strength.
Necessary conditions for masonry
If interior partitions from foam blocks are made in a private house, then two parallel grooves are cut on the surface of the screed, the existing screed is knocked out between them and a shallow foundation is laid at the level with the main screed. The depth of laying the foundation strip is 30-40 cm. If a reinforced concrete screed is made over the entire area of a private house, then on such a surface the partitions are laid from foam blocks without additional preparation. If the partition is being erected in an apartment of a multi-storey building, then along the trajectory of the future partition the floor is dismantled covering up to the floor slab.
Next, using a level, the evenness of the surface of the floor slab is assessed and, if necessary, along the trajectory of the future partition, a belt is made from cement mortar, equal in width to the foam block. Often it is necessary to install an electrician in the partition and make a socket. This can be done immediately by making small grooves and laying the wire. You can check whether there are any losses or breaks using current clamps.
Main characteristics of foam blocks
Let us specify the main advantages of these blocks:
- Cellular concrete gives low heat transfer, which means we do not need to spend additional money on thermal insulation and expensive insulation materials.
- Foam blocks perfectly muffle sounds - so additional sound insulation is no longer needed.
- The air cells of foam concrete almost do not absorb moisture. This is the most important requirement for any building material, guaranteeing the reliability and durability of the building. Such a foam block wall in an apartment is absolutely not subject to shrinkage.
- Foam concrete does not burn and does not even support combustion.
- Foam concrete blocks are environmentally friendly, which is very important for our health. Such blocks are in 2nd place after wood in terms of environmental safety: they do not emit toxins.
- The price of a cubic meter of foam blocks is 40% cheaper than the same amount of brick.
Step-by-step installation of a partition made of foam blocks
1. For laying the first row of partitions made of foam blocks, a cement-sand mortar is used.
In an old trough, 3 parts of sifted quarry sand and 1 part of grade 400 or 500 cement are mixed to a homogeneous consistency. If the sand contains large pebbles and pebbles, it must first be sifted independently. The finished working solution should have a thick consistency.
2.
At the very beginning of the future partition, the first foam block is laid on a layer of cement mortar 10-15 mm thick. Using a spirit level and a hammer, the foam block is settled and leveled horizontally and vertically. At the other end of the future partition, a foam block without mortar is laid on the base.
3. A 0.5 mm nylon thread or fishing line is pulled between the removed foam blocks along their front side. Then, guided by the nylon thread, the entire first row of masonry is laid out on the cement-sand mortar, while the last foam block is also laid on the mortar. When laying the first row, the main task is to obtain an even horizontal level.
It is for this purpose that a cement-sand mortar is used for laying the first row of partitions made of foam blocks, which allows the stone to be leveled due to the thickness of the seam.4. Before starting to lay the second row of the wall, an adhesive mixture is first prepared. The adhesive for laying foam blocks has many properties similar to the composition of the adhesive for ceramic tiles. It is just as viscous and viscous. Prepare a working adhesive mixture for foam blocks using a construction mixer.
5.
The second row in the masonry begins with sawing one foam block into two equal parts using a grinder with a stone disc. Having received two halves of the foam block, each of them is laid at the beginning and at the end on a thick adhesive mass. Initially, the glue is applied to the surface of the first row using a small spatula. Then, using a spatula-comb, the glue is stretched and its thickness is set.
After this, using a small 10 mm spatula, glue is selected on both sides of the foam block from the first row and, only after that, half of the foam block of the second row is placed on the glue. a row of whole foam blocks. In this case, the third row will begin again from whole foam blocks laid on glue. By observing this sequence in dressing, the entire masonry of internal partitions is made from foam blocks.
7. When constructing partitions from foam blocks, it is imperative to tie the partitions to the main load-bearing walls, and additionally reinforce every third row. For reinforcement, after every three rows in the adhesive seam, either 2 parallel wire rod strands or a reinforcing mesh intended for brickwork are laid.
In this case, at the point of contact of the partition with the load-bearing wall, they are drilled into the main wall to a depth of at least 10 cm and the ends of the wire rod are inserted into the resulting holes.8. During laying of the last row, the foam blocks are cut in length and adjusted in height so that there is a gap of 10-15 mm between the ceiling and the foam block. The remaining gap is foamed with polyurethane foam 1-2 days after the completion of the masonry. If you perform foaming immediately, then there is a possibility that when the foam expands, the top row in the masonry may “collapse.” If it is necessary to urgently complete the masonry work, and there is no mounting foam available, then the upper gap under the floor slab can be filled with a small spatula with cement-sand mortar.
If the work is done carefully, there is practically no need to plaster the surface of the partition made of foam blocks. The good thing about foam block as a masonry material is that it creates a partition with absolutely even two planes. For further internal finishing of the partition, instead of plaster, a fiberglass mesh is mounted on the wall plane, and the entire plane is puttied with glue 2-3 mm thick.
29.06.2017
The modern housing stock for new residents provides a huge field of activity, since sometimes there is nothing in the new apartment except the main walls.
Therefore, happy buyers of a new home have to independently carry out all the interior decoration, right up to the construction of interior partitions.... Contents: Construction of partitions from foam blocks Types of foam blocks: their sizes and thickness Tools and materials used for laying foam blocks Step-by-step plan for constructing a partition from foam blocks with your own hands Until recently, for the installation of partitions everywhere ordinary brick or plasterboard was used (a two-meter sheet of durable cardboard with gypsum filling). But brick is too heavy a building material, and delivering it to multi-story buildings without a freight elevator is difficult. And drywall does not have great strength and good sound insulation.
Instructions for building a partition step by step
Do-it-yourself installation of the wall is carried out in stages.
1. Preparing the base. Of course, foam blocks cannot be installed on parquet, tiles or wooden floors. In this case, there will be no adhesion to the base. A full foundation is not required, since partitions and walls made of foam concrete are not load-bearing. A full-fledged foundation for the structure is not required - it is enough to make a regular cement screed 7-10 cm thick from B20 cement, level it using a level, and let it dry completely.
2. Marking the contour. The distances indicated in the project from existing structures to the future partition are first laid out on the floor plane, strictly maintaining the angles. Then, using a tape measure, building level, metal profile or paint cord, mark the walls and ceiling.
3. Installation of temporary frame. For these purposes, a profile is used, which is attached with dowels and nails to the floor, walls and ceiling.
4. Preparation of walls and ceiling. This work is necessary to improve their adhesion to the glue. Use an industrial vacuum cleaner to remove dust and impregnate a wide strip of primer parallel to the profiles mounted on the ceiling and walls.
5. Preparing the glue. It is mixed in a bucket using a drill with a special mixer attachment. The consumption of the adhesive mixture is approximately 15 kg per cubic meter of wall.
6. Laying foam blocks. This work is performed step by step in the following order. Apply the adhesive solution to the base and wall with a spatula in a strip that is slightly higher and longer than the block, and its thickness is 3-4 mm. The foam block is placed in the right place, tapped with a mallet, and the correct installation is checked using a fishing line stretched between the vertical posts of the frame. Next, glue is applied to the plane of the bottom row and the end of the previous block. Each next row is shifted by 0.5 times the length of the foam block to make the partition stronger.
7. Dismantling the frame. 2 days after the last row has been laid and the glue has set, the auxiliary frame is dismantled. The gap between the upper plane and the ceiling on both sides of the wall is filled with foam. This creates elastic seams (necessarily continuous) - they serve to compensate for the thermal expansion of the partition made of foam blocks.
Finally, the doorway is made with your own hands. Its standard height is 207 cm from the floor, its width is 8 cm greater than the width of the door leaf. Check the verticality of the marked lines and cut out the opening with a reciprocating saw. Its upper part is reinforced with steel rods with a diameter of 16 mm. The work is done as follows: parallel grooves (10 cm long) are cut on each side, foam concrete is knocked out of them, rods are inserted and secured with mounting wedges.
When is reinforcement necessary?
When making a partition on your own, you should strengthen it in certain places with reinforcement.
1. Connection with main walls and piers. Before installation begins, pins or large nails are driven into the adjacent walls at the junction with the future partition, acting as connecting elements. First, holes 50 mm deep are drilled in the wall, into which pieces of reinforcement lubricated with an adhesive solution are inserted. Holes are simply cut out in the foam blocks, or the blocks are laid directly on the protruding ends of the reinforcement. Subsequently, the rods are hammered in every few rows of masonry.
2. Ligaments between the septa. Connecting elements are installed for those structures that will then be tied to the partition being constructed.
3. Reinforcement of masonry. For this purpose, a construction mesh made of fiberglass is used. It must be laid in the three lower and upper rows. If the masonry is large, its middle part is also reinforced.
Recommendations and possible errors
Sometimes you hear that laying foam blocks can be done without installing metal structures made from profiles. However, the frame simplifies the task for beginners who are building a wall with their own hands for the first time. They will not have to worry about aligning the foam blocks along the marked marking line - they will only need to control the middle using the aforementioned fishing line. There are other nuances that allow you to avoid common mistakes.
1. The masonry turned out to be fragile.
With the help of a special construction adhesive, foam concrete sets well and holds securely. Adhesive compositions are produced in the form of dry mixtures. Usually they come with instructions, according to which the powder is diluted with water.
It is allowed to work only with freshly prepared glue: otherwise it loses its qualities, and the partition loses its strength.
2. The wall has shrunk and the trim has cracked.
To prevent this from happening, be sure to buy autoclave cut foam blocks. In addition, they are ground in during installation. The action plan is as follows. The block is placed at a distance of 2 cm from the previous one, and then with a sliding movement it is pulled up and pressed against it, focusing on the bottom row. This squeezes out excess glue.
3. When making a doorway, the cut out fragment was pressed down by the saw blade.
When cutting out an opening in the partition, you first need to drill a number of holes in the foam blocks with a drill. In this case, the lower horizontal cut is made first - in this case the saw will not jam.
It is best to plaster interior partitions with the adhesive mixture used for installation. Then the operations are performed step by step:
- installation of electrical wiring;
- putty;
- cladding or painting.
The price depends on the product brand (density), manufacturing technology, and manufacturer’s reputation. For example, certified autoclaved, steam-dried, cut foam blocks of the D700 brand are 10-15% more expensive than molded and less dense analogues that do not have a quality certificate. The average cost of material in the capital region is shown in the table.
| Brand | Dimensions, mm | Price, rub/m3 |
| D500 | 300x100x600 | 3040 |
| D600 | 250x250x625 | 4900 |
| D600 | 150x250x600 | 2550 |
If you decide to hire professionals, you should first clarify the cost of laying interior partitions. This will allow you to create a general estimate of construction or repair work.
Currently in Moscow, average prices vary between 400-500 rubles/m2. The more expensive the masonry is, the thicker the block and the more complex the structure configuration.
Installation of partitions from foam blocks
In recent years, a more modern and practical material has appeared in construction - foam concrete and foam blocks made from it, which are perfect for constructing interior partitions. This building material has a whole list of priority qualities, it:
- relatively lightweight with impressive dimensions; has good heat and sound insulation; easy to process, flexible for cutting holes, channels for pipes and electrical wiring; easy to saw with a hacksaw, ideal for realizing all kinds of design ideas, for creating arches and any configurations; has sufficient thickness to form a doorway in the wall; has a smooth surface and is perfect for any decorative finishing, priming, tiling, plastering, wallpapering; resistant to sun, moisture, temperature changes and active biochemical substances; has an affordable price.
Such excellent characteristics make foam blocks an indispensable building material for organizing partitions in houses, apartments, offices and industrial premises.
The only drawback of foam concrete blocks is that the shape is not always ideal. Therefore, it is preferable to purchase this material from large manufacturers, where product quality checks are more thorough and the geometric shape of the blocks meets standard standards.
To build a durable partition that will last a long time, you need to understand the types of foam blocks.
First of all, you need to understand that foam concrete blocks with different densities are used for external and internal walls. For the construction of external walls, foam blocks with a density of at least D 300-500 are used. Internal partitions can be erected from less durable foam blocks.
In addition to the density, this material also differs in the manufacturing method. There are autoclave and non-autoclave methods. The latter is more often used by small enterprises that do not have good quality due to poorly established technical control.
The non-autoclave manufacturing method creates uneven porosity of the material. As a result, a partition made of such blocks shrinks by about 3 millimeters on a section of the wall 1 meter high. Therefore, a partition made of foam blocks made by autoclave will be much stronger.
This material also differs in the stamping method; it can be cutting or forming blocks. In the first case, blocks are cut from foam concrete with a special circular saw. The result of this manufacturing method is geometric evenness of the edges and perfectly matching block sizes.
With the molding manufacturing method, liquid foam concrete hardens in special forms. Although all forms are standard sizes, block sizes may vary. This is the minus of molding.
Therefore, when purchasing material, it will be completely natural to give preference to foam blocks made by cutting.
Separately, it is worth highlighting the issue of the size of foam blocks for partitions. Typically, blocks with the following parameters are used for the construction of interior partitions:
- thickness varies: 50, 75, 100 or 150 mm; height and length - standard 300 mm x 600 mm; weight depends on thickness and density 5.5 kg - 16.2 kg; optimal density D600.
Foam blocks with such parameters are suitable for partitions of any height.
Blocks with a thickness of 100 mm are most often used. Despite their small thickness, interior partitions made from foam blocks are durable, with good soundproofing and fire-resistant characteristics.
Before starting work on constructing a partition from foam blocks, you need to prepare a set of necessary materials and tools:
- glue for foam blocks at the rate of 15 kg per 1 cubic meter. meter (with a layer of 2 mm); cement mortar for laying the bottom row; mounting foam for foaming the gap between the top row and the ceiling; foam gun; pins - self-tapping screws, metal embedded pins; spatulas and trowel; a drill with a mixer for mixing glue and cement mortar, a container for glue; a hammer with a rubber pad for leveling blocks when laying; construction laser or regular level; corner, wood hacksaw for sawing blocks; a plane or grater for foam blocks to level the surface before finishing; electric milling cutter or wall chaser for making holes and grooves in the partition; a large brush for sweeping away concrete dust from rows before applying glue.
After preparing everything necessary for the construction of a wall partition made of foam blocks, you can proceed directly to the beginning of work.
Types of foam blocks, their sizes and thickness
Foam block can be classified according to several factors, namely:
- production method;
- sizes;
- purpose;
- density.
As for the dimensions, the length is a standard indicator and is 600 mm. The thickness varies from 100 to 400 mm, while the width ranges from 200 to 400 mm. It is the thickness of the block that will determine the thickness of the wall. Products with standard dimensions are a block of 600 x 300 x 200 mm. It replaces almost 19 bricks.
In order to build an interior partition, it is better to use 100 mm blocks, while the external walls, which are also called load-bearing walls, should have a thickness of 300 mm. Installation of thermal insulation is usually carried out in blocks with a thickness of 200 to 400 mm.
Attention! The dimensions of foam blocks for partitions may vary if a wall is erected between two rooms with different temperature conditions.
Non-autoclaved
Foam blocks for partitions can be non-autoclave. They are dried under natural conditions, when the air temperature is kept above + 10 ˚С. A non-autoclaved foam block can also be dried by heat and humidity treatment. In this case, the material is placed in a special chamber. This method of processing the future product is ideal for gaining strength.
Autoclaved
Such a partition foam block not only undergoes drying under pressure and temperature, but also has a slightly different ingredient composition. Instead of cement, sand is added here. The amount of the first component is reduced by almost half, which makes it possible to obtain more outstanding characteristics.
Technological processes during production proceed much faster. All particles are bonded together as tightly as possible, which makes it possible to obtain a material with high strength and minimal shrinkage.
Molding
At this stage of foam block manufacturing, molds are used that consist of a steel pallet covered with a 5 mm sheet. Sides are attached to the sides, which also serve as stiffeners. This part of the mold should have maximum thickness, because it is on this surface that the highest load is placed when pouring the mold. To secure the assembled form, there are eyelets along its edges.
At the molding stage, the foam concrete solution is poured into molds and left until it dries and gains strength. Products in finished form are removed from the molds - this is how formwork is removed.
Attention! The foam block, which is made using injection molding technology, has several disadvantages, one of them is the unsatisfactory geometry of the products. Corners may be damaged during the demoulding process, which occurs due to the material adhering to the walls of the form. But this technology also has its advantages, they are expressed in economic benefits for the manufacturer, which means that such material can be cheaper for the consumer.
cutting
A foam block can have an ideal surface if it was made using cutting technology. First, the material is poured into a mold and dried, resulting in a large mass that is released and sawn into individual blocks. As a result, it is possible to obtain products of specified sizes. As a result, it is possible to obtain blocks with ideal geometry, no chips or irregularities at the corners, as well as a clean surface of the products without lubrication.
Step-by-step plan for constructing a partition from foam blocks with your own hands
How to build a partition from foam blocks? In order for the partition to turn out smooth and of high quality, when constructing it, it is important to follow the sequence of construction technology and be extremely careful. For more dense installation, foam blocks should be wetted.
First of all, for the strength of the partition being built, reinforcement pins must be installed in the load-bearing floors at intervals - one pin for 2-3 rows. Draw the lines of future masonry on the floor and walls, mark the doorway, if one is planned.
Strengthen a metal profile along the marked lines, which will ensure even laying of the blocks. Before laying out the first row of partitions made of foam blocks, it is necessary to clean the base from construction dust and debris, then apply a primer. After the primer has dried, you can begin diluting the glue, following the instructions.
The glue should be thick enough so that the mixer does not fall off when left in it, and at the same time thin enough so that the remaining glue falls freely from the mixer. The first row of blocks along the metal profile is strengthened in two ways: if the base is concrete, the blocks are laid on a cement mortar; On the finished flooring, the blocks are fixed using self-tapping pins. Each even row must begin with half a block so that the rows are staggered and the vertical seams do not coincide (banding masonry).
Before applying the glue, the surface of the rows is leveled with a plane or trowel, after which the cement dust is swept away with a wide brush. Subsequent rows are laid on the prepared adhesive solution, which is applied in such an amount that after installing the blocks, it is slightly squeezed out on both sides. Then you need to grind the block to the upper edge of the previous row and to the adjacent blocks; this technique will avoid shrinkage of the wall in the future.
Do not forget to periodically check the vertical position using a plumb line or level. If it is necessary to form a doorway, a ceiling is made in its upper part from a wooden beam or 2-3 steel reinforcement rods, on which foam blocks are laid out “staggered”. The parts of the foam blocks protruding from the sides of the opening are cut off with a hacksaw after the masonry has dried.
(The window opening is formed in the same way, if necessary). After erecting the partition, it must dry for 48 hours, during which time it is left alone, then the guide profiles can be dismantled. After the masonry has dried, the small gap remaining between the last row of the partition and the surface of the ceiling is filled with mounting foam in an unbroken line along the entire perimeter on both sides of the partition.
Excess foam is carefully cut off after it dries. To cover the wall with decorative tiles, there is no need to prepare the wall surface; the tiles are easily attached to the porous structure of the foam block with a special tile adhesive. Before wallpapering, the partition is primed, plastered and leveled with several layers of putty.
So, to summarize: interior partitions made of foam blocks are a simple, economical, fast and very convenient way to divide an office, industrial or residential space into separate boxes.
Foam block is an excellent building material with excellent characteristics.
For clarity, we suggest watching a video about the installation (installation) of interior partitions made of foam blocks and masonry.
Modern technologies are focused on making building materials durable, meeting all the necessary requirements for hardness, thermal conductivity, water resistance, durability, and also easy to install. By lightening the specific gravity of the material, the manufacturer can increase its size, which helps to repeatedly reduce the time for constructing buildings.
Aerated concrete not only has all of the above, but also has a perfectly flat, almost smooth surface both on the outside and on the inside of the walls.
Finishing it is convenient, quick and easy. Choosing is also easy if you trust consultants or have the necessary knowledge yourself. For the uninitiated, you need to hire a specialist to focus on structural loads, average daily temperature in winter, and other personal aspects during the construction of a particular facility.
For orientation: the average choice for private construction is the density of autoclaved aerated concrete D500, the thickness of the walls without insulation is 380 mm, insulation is not needed, but external finishing work is required.
Recommendations and possible errors
Beginners usually make the same mistakes when building aerated concrete partitions. To avoid them, I recommend that you familiarize yourself with them:
- Poor floor preparation. If you place the blocks on a dusty surface, they will definitely peel off. Therefore, surface cleaning and priming is a mandatory procedure;
- Laying the top knot without an elastic gap. The deformation coefficients of a building are different from the deformation coefficients of a wall. Therefore, if you fill a gap with a solution, it will definitely peel off in the form of a crack.
If you arrange a unit without a gap, for example, put a brick in the gap, then the load from the ceiling will fall on the partition. As a result of stresses for which the blocks are not designed, they will begin to crack;
Each block must be properly ground to the base
- Poor quality lapping of blocks. If you do not rub the blocks well against each other, the wall will shrink greatly;
- Lack of guides . It is difficult to ensure an even vertical plane of the wall using measuring instruments alone. Therefore, you should not rush and try to build a partition without an enclosing frame;
- Preparation . Before you start building a partition, it is advisable to take a plan of the building and make a drawing of the future structure, so that you don’t have to redo anything later.
Use only autoclaved aerated concrete for construction, as it is stronger and has a more precise shape. It will not be possible to lay non-autoclaved blocks on a thin layer of glue without gaps.
- Dimensions of foam blocks for partitions
Preparing the foundation for aerated concrete walls
The choice of foundation for an aerated concrete house also depends on a number of local aspects, in particular on the soil. And on the overall structural mass of the house, of course.
But, since aerated concrete is a lightweight material, you can make a horse move, significantly saving on the construction of the foundation (without at all compromising its load-bearing capacity). To do this, we are changing the type of foundation from pile or heavy strip, or even combined, to slab. We will build the house on a load-bearing slab, which has a huge supporting area and will withstand any structural loads, without having to dig it half a kilometer. Not only will the labor intensity and volume of excavation work - the longest and most labor-intensive - be reduced, but also the total cost, as well as the time for constructing the foundation.
The theory is enough, we need to know what to do and how to continue living. Therefore, let’s move on to practical recommendations: The tiled foundation for aerated concrete blocks begins with excavation work and proper marking of your entire site. This process is not very labor-intensive. It is enough to just dig a trench 20-30 cm deep and lay a sand cushion. The main thing is to compact the sand well.
The better the sand base is compacted, the more ideal the main masonry will be. Ideally, use a vibrating plate, which can be rented. The next stage is the installation of all necessary communications: water supply system, sewerage. After installing the communication systems, you should make an ideal and durable concrete screed to protect the sand cushion from damage. Next, we erect the formwork. Lateral we lay the seams with sheets of foam plastic for high-quality thermal insulation. After the above cement screed has completely hardened, we cover it with a waterproofing layer, paying attention to the high-quality tightness of the seams between the layers of insulating material. The top layer can be made of ordinary dense polyethylene. We install a stable frame from reinforcement.
The installation step should not exceed 40 cm. Only now should concrete be poured. Be sure to let it sit until it completely hardens and gains strength - this, as has already been said and is constantly being said, is at least two weeks. Make sure that the moisture does not evaporate intensely! You should cover the slab with a cloth and moisten the surface as necessary. Please note that aerated concrete needs waterproofing. The gap between the main wall and the foundation (basement) can be either flat, protruding or sinking.
Conclusion
Let's briefly list the order of work:
- marking a place for laying a foam block partition (possible with profiles);
- We drive reinforcing bars into the load-bearing walls every 2 rows, as well as into the floor (self-tapping pins and dowels will also work);
- with the other end, let this rod fit into a horizontal, even seam of the masonry (an alternative is aluminum hangers, one edge attached to the block and the other to the wall);
- along a stretched cord, we place the first row of blocks moistened with water on the primed floor;
- then lay out the second row staggered so that the vertical seams do not coincide with the first row;
- we reinforce the first 2 rows with laying mesh or rods, or even fiberglass mesh, and then the subsequent ones in the same way;
- we lay a beam on the doorway;
- We will leave a 1 centimeter gap at the ceiling, which we will then fill with foam;
So, with minimal labor costs, we will build universal walls with sound absorption, rational heat transfer, and optimal strength. Everything is simple, and the video in this article will clearly demonstrate all the nuances of the work.
Laying aerated concrete blocks
Aerated concrete blocks are laid in a row, fastened together not with cement mortar two centimeters thick, but with a special adhesive mixture.
The seam in this case has a thickness of 3-5 mm. The glue is applied with a notched trowel, but if professionals are working, then you can even use a shovel... Actually, you can lay aerated concrete on a cement-sand mortar, nothing bad will happen. Have you been laying facing tiles on cement for centuries? Regarding the fit of the “bricks” - these are not bricks. These are perfectly smooth and completely identical elements that only need to be sawed off to size at the corners.
You can do this right on the spot, with an ordinary saw or a grinder with a stone disc. Just be careful when cutting with an angle grinder! It is generally not recommended to do this indoors. The dust will be very terrible. Be sure to wear a respirator. Aerated concrete is surprisingly easy to process; it can not only be sawed, but also planed, and even cut with some effort.
All the advantages of the material are obvious, but aerated concrete, as we understand from the fact that it is easy to saw, does not have sufficient strength and rigidity of its own. Therefore, any metal structures or materials with a denser structure laid on top of it will actively deform the blocks.
The ceiling channels will be cut, broken, and ditches and holes will be made in it. An armored belt is required to prevent the material from being cut. Reinforcement is done with ordinary brickwork directly on top of the block - this is for small and not too heavy houses. In the case of a spacious cottage, the armored belt needs to be laid out in real terms, with reinforcing bars. Two bricks in height is enough. If you are building a two-story building, then it is advisable to also install an armored belt in front of the second floor, on which the joists or floor slabs will rest.
What do we need
Materials:
- building blocks themselves;
- adhesive for foam concrete;
- polyurethane foam;
- fittings for lintels (at the rate of two pieces per opening);
- reinforcement bars or metal mesh;
- fastening corners (they can be replaced by a galvanized perforated strip);
- boards.
Tools:
- construction mixer (as a simplified version: a hammer drill or a drill with an attachment);
- gun for working with polyurethane foam;
- a hacksaw or grinder with a cutting disc for stone or concrete;
- building level;
- roulette;
- hammer with rubber striker;
- trowel;
- spatula-comb (do not neglect the comb; among other things, it significantly saves solution).
Auxiliary equipment:
- container for adhesive solution;
- brush (broom);
- beacons;
- cord (line);
- dyeing thread for marking.
Personal protection:
- protective glasses;
- respirator;
- gloves.
Because When sawing blocks, a lot of dust is generated, I strongly recommend that you carry out the work in a respirator and safety glasses.