"Ooo! Have you also studied foundation reinforcement?” – we heard such questions decorated with surprised eyes from our neighbors at this stage. But we know for sure that if you don’t know how to do something, it doesn’t mean that you can’t learn it. Even when it comes to reinforcing the foundation slab.
We are building a house with our own hands, so we are responsible not only for construction, but also for design, studying standards and the experience of self-builders, calculating the necessary materials, purchasing and much more. In this article, we share what we learned about the rules for reinforcing a foundation slab, and also talk about the adventures associated with this stage.
Why is it necessary to reinforce a slab foundation?
The foundation of a house must withstand different types of loads: compression and tension. We will talk about the first type of load in the article about pouring the foundation with concrete. But whether the slab will withstand bending and tensile loads or not depends on how competently the reinforcement stage was carried out.
A foundation slab without reinforcement is possible, but still this design option is not for a heavy permanent residential building. If you build some kind of outbuilding on non-heaving soils, you can think about saving on reinforcement. But for the construction of a residential building, this is, of course, not serious. As mentioned above, the foundation may not withstand tensile and bending loads.
For clarity, I’ll give you an example: you have a monolithic foundation slab poured for a house. When you put up the walls and roof, the pressure on the slab will be exerted to a greater extent on the contour of the foundation just under the walls, and not across the entire area. Thus, the walls will tend to break off the concrete, especially if the preparation of the base and the cushion under the foundation are done poorly. And if you also take into account the force of frost heaving, then the pressure on the slab will increase. The walls will push the foundation down, and the heaving soil will press into weak, unloaded areas. Which, as a result, can lead to a fracture of the foundation. So, in order to eliminate such moments, you need to approach the issue of reinforcement competently.
Common mistakes when reinforcing
There are frequent cases of errors leading to disruption of technology and reduction of operating time. These include:
- there is no polyethylene protective film on the surface of the erected monolithic slab (due to the outflow of water when the concrete hardens, the surface of the base dries out excessively, as a result of which cracks form);
- the prepared sand and gravel substrate is not compacted (distortions and cracks);
- when forming the formwork system, cracks are not sealed, which leads to leakage of the concrete mixture and a reduction in the optimal water level in the solution;
- there is no waterproofing over the equipped substrate (reduction of the water level in the poured solution);
- reinforcement bars are placed directly into the ground (corrosion of the material occurs in the shortest possible time, violating the integrity of the structure and the purpose of reinforcing the base);
- non-compliance with recommendations on the dimensions of fractions of reinforced frames (voids are formed);
- when arranging column elements, the reinforced frames are not fastened to the rods of the columns, which leads to an uneven distribution of loads on the constructed foundation;
- lack of a protective layer (premature corrosion of metal elements).
Watch the video on how to avoid mistakes when laying reinforcement and further pouring the foundation.
https://youtube.com/watch?v=GLqVVVe0yrM%3F
What kind of fittings are there?
For different types of foundations with different degrees of load, the required type of reinforcement is used. Let's figure out what materials the reinforcement can be made of. Next there will be a lot of SNiPs, numbers and technical designations, but don’t be alarmed. Just accept that all this data is necessary if you want your building to have a long life.
Steel reinforcement
Made from carbon (consists of iron and carbon, alloying elements are present in very small quantities) and low-alloy steel (an alloy of iron and alloying elements such as nickel, copper, titanium, vanadium, etc. Contains up to 0.25% alloying elements ). Low alloy steel has better mechanical characteristics and is more resistant to corrosion.
According to the type of production, fittings are:
- Cold rolled. It is produced by the cold method, which requires more ductile steel. In the class division it is marked B.
- Hot rolled steel. It is processed at high temperatures and welds perfectly. Marked with the letter A. Most often used in private housing construction.
- Rope steel. It is marked with the letter K. This is a twisted reinforcing rope, consisting of a group of wires. The most commonly used rope is a seven-wire rope. Excellent adhesion to concrete.
According to the type of surface, the reinforcement is divided:
- Smooth. Not suitable for building foundations, as due to the smooth surface it adheres less well to concrete. Can be used for floor screeding or for building walls.
- Ribbed reinforcement with ring profile. Adheses well to concrete, but gradually loses its adhesive strength with repeated loading.
- Ribbed reinforcement with crescent profile. It adheres worse to concrete than to a ring profile. But due to the peculiarity of the profile, the endurance of the structure is higher, since the susceptibility to periodically repeated loads is better.
- Ribbed reinforcement with a combined profile. The profile is designed for A500SP fittings.
Types of reinforcement
Strength classes of reinforcement:
Outdated fittings class markings according to GOST 5781-82: A-I, A-II, A-III, A-IV, A-V, A-VI.
Modern designations of fittings class: A240, A300, A400, A500, A600, A800, A1000.
- The letter A at the beginning of the marking indicates rod reinforcement
- The marking with the letter B at the beginning means that it is a wire
- The letter K at the beginning means that this is a rope reinforcement
- Marking with the letters At at the beginning means thermally strengthened reinforcement. Such fittings have increased strength and resistance to corrosion.
- The letter K after the numbers means that the reinforcement is resistant to corrosion
- The letter C at the end after the numbers indicates that this reinforcement can be welded
Reinforcement strength classes
More detailed markings can be found in GOST 34028-2016 Reinforcing bars for reinforced concrete structures.
Composite polymer reinforcement (ARP)
Types of automatic transmission:
- glass composite (ASC);
- basalt composite (ABK);
- carbon composite (AUK);
- aramidocomposite (AAK);
- combined (ACC)
The type of automatic transmission should be selected taking into account the operating conditions of the structure, the nature of their loading and economic indicators. You can study in more detail Amendment No. 1 to SNiP 52-01-2003 Concrete and reinforced concrete structures.
The automatic transmission is made from plastics. Costs more than steel reinforcement. One of the advantages of the composite is that it does not conduct current, weighs significantly less, and is absolutely not afraid of corrosion. It is still rarely used in private housing construction. But are these advantages so important in private housing construction?
The video compares composite reinforcement with steel
Types of reinforcement for reinforced concrete structures
There are several types of reinforcement for reinforced concrete. There are many differences, and each type has certain areas of application and limitations. Main types of products:
- hot rolled steel profile;
- cold drawn wire;
- strengthened reinforcement after heat treatment;
- products with additives of rare metals that give the rods special properties.
The profile can have different shapes and cross-sectional areas; its properties depend on the type of steel. It is customary to denote by numbers the yield strength of the metal (the conventional limit of effort at which irreversible deformation begins), the possibility of using welding when forming the frame (C) and corrosion resistance (K). Most modern medium- and large-scale structures use reinforcement tying technology, so manufacturers limit the production of products with index C.
Marking and profile
Types of fittings A240, A400 and A500C are suitable for private construction. When working on the foundation of a private house, welded joints of rods continue to be used. To improve the quality of setting of concrete and metal, a profile rod is used, on the surface of which there are annular, crescent-shaped and mixed protrusions. Thanks to this solution, minimal mobility of the mesh inside the hardened structure is achieved.
Welded and anti-corrosion fittings
In project construction, situations often arise when individual sections of reinforcement end up in cavities, therefore, at the level of design and creation of a technological map, the need to use rods with index K is taken into account. Concrete from an industrial-scale manufacturer, subject to pouring technology, forms a strong structure, integral with the rods, strength characteristics which eliminates the occurrence of cracks under tensile and torsion loads.
Metal additives
When producing reinforcing steel, carbon, titanium, magnesium, molybdenum, zirconium and chromium are added. Each of the additives causes certain changes in the properties of the metal, but it should be remembered that strong and reliable carbon steel quickly loses these characteristics at welding points.
What reinforcement should I use for the foundation slab?
The most commonly used diameters of longitudinal working reinforcement in private buildings are 10, 12, 14 and 16 mm. 6 and 8 mm are used as transverse reinforcement. For reinforcement of foundations, reinforcement of class A400 - A500C is mainly used. For reinforcement of class A400, the yield strength is 390 N/mm2, and for class A500C it is over 500 N/mm2. Another important difference is that A400 cannot be joined by welding, in which case the structure of the steel is weakened. For these reasons, class A500C fittings are most often used. For foundations, reinforcement with a crescent profile is best suited because it has higher resistance to periodic loads, despite worse adhesion to concrete compared to a ring profile.
Characteristics of the reinforcement series
In order to understand which reinforcement is best suited, you need to decide on the type of foundation and calculate the loads on it.
Thickness of a slab foundation: Example of how to calculate the thickness of a slab
What is the need for reinforcement?
In order to increase the strength of concrete and reduce its quantity, reinforcement is used. In theory, any material can act as reinforcement. But in practice, steel and composite are most often used.
A composite is a complex of materials. The basis can be basalt or carbon fibers, which are filled with polymer. Such fittings are lightweight and not subject to corrosion.
Steel, compared to composites, has much greater strength and relatively low cost. In the process of reinforcing monolithic walls, channels, angles, I-beams, corrugated and smooth rods are used. In the case of creating complex building structures, metal mesh is used for reinforcement.
Reinforcement comes in different shapes. But most often you can find the rod one on sale. In the construction of low-rise buildings, corrugated rods are usually used. They have a low price and excellent adhesion to concrete, which makes them very popular among buyers. Steel rods, which are used in the construction of monolithic structures, usually have a diameter in the range of 12-16 mm.
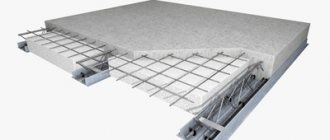
Foundation slab reinforcement diagram
The reinforcement scheme for a slab foundation is selected based on the following characteristics:
Foundation thickness. For a foundation slab with a thickness of 15 centimeters or less, reinforcement is performed with one mesh consisting of longitudinal and transverse reinforcement. For greater thickness, the reinforcement of the foundation slab is performed in two layers. When reinforcing, you need to remember about the protective layer of concrete for the reinforcement; it protects the reinforcement from corrosion. According to clause 10.3.2 and table 10.1 SP 63.13330.2018, the thickness of the protective layer of concrete should be:
– In the open air without additional protective measures, at least 3 cm
– In the ground without additional protective measures, in monolithic foundations with concrete preparation of at least 4 cm
– In monolithic foundations without concrete preparation (only for lower working reinforcement) at least 7 cm. The concrete preparation can also be a crushed stone cushion, since it is not a capillary conductor of moisture, provided that drainage is done and the cushion is not standing in water.
Cushion under the foundation slab: Geotextile, footing, crushed stone
Foundation load. It is necessary to calculate the total weight of the house, snow and wind loads in your region. And also determine in which places greater pressure will be exerted on the foundation (load-bearing walls, columns).
Bearing capacity of the soil. It is necessary to carry out geology, determine the type of soil and, using a table from SNiP, find out the bearing capacity of the soil.
Diameter of fittings. If the side of the foundation slab is 3 meters or less, then use reinforcement of 10 mm. If the length exceeds 3 meters, then reinforcement with a diameter of 12 mm and above is used.
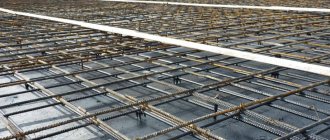
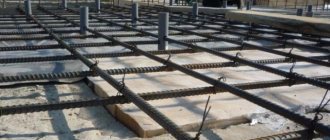
Pitch of rods. In accordance with clause 10.3.8 - 10.3.10 SP 63.13330.2018, the reinforcement spacing in a monolithic foundation slab is 20-40 centimeters. No more than 20 cm with a cross-sectional height of up to 150 mm. No more than 40 cm with a cross-sectional height of more than 150 mm. The maximum distance between reinforcement bars should not exceed the thickness of the foundation by more than one and a half times. In places where heavy loads are placed on the foundation (load-bearing walls and columns), the size of the reinforcement cell for a slab foundation is reduced by 2 times.
Step-by-step process instructions
A monolithic floor slab is a critical structure for any building, so it is constructed strictly according to the design. Serious contractors carry out monolithic slabs according to a technological map, which describes all stages of construction of the structure from cutting reinforcement to removing the formwork, after the final hardening of the concrete.
Main stages of the structure:
- Install formwork of removable or permanent type.
- The load of additional reinforcement is carried out according to the drawing, and it is necessary to use ready-made reinforcing bars as much as possible.
- Cut pieces of knitting wire. The coil is secured in advance with tape at 3 or 5 equidistant points, depending on the diameter of the coil, to create pieces of wire convenient for twisting, after which the coil is cut along the marks with a grinder.
- They begin to tie the bottom layer of the mesh from the blanks. Knitting is done with a special hook or, for small volumes, with ordinary pliers.
- Install plastic barriers with a minimum clearance of 25 mm to ensure the creation of a protective layer on which the lower mesh will be installed
- Then a separating layer is created to install the upper mesh.
- All structural elements are tied into a rigid frame.
- Next, the resulting reinforced frame is poured with concrete mortar in one step, using a concrete pump.
Important information! The formwork is removed no earlier than a month after the concrete mass has completely hardened; for the first 2-3 days, the surface of the monolithic structure is moistened with water to avoid the formation of cracks.
Percentage of foundation slab reinforcement
For concrete to become reinforced concrete, it is not enough just to lay reinforcement. There is such a concept - the minimum cross-sectional area of longitudinal reinforcement in reinforced concrete elements. If the percentage of reinforcement is below the minimum, then the transition from concrete to reinforced concrete will not occur, the concrete will still remain concrete. Magic? No. It’s just that in order for the reinforcement to play its role, there must be a sufficient amount of it. SNiP 2.03.01-84 clause 5.16 states that the minimum percentage of reinforcement for the foundation slab is:
- 0.05% of the cross-sectional area of concrete. Reinforcement S in bending and also in eccentrically tensioned elements when the axial force is located outside the working height of the section
- 0.05% of the cross-sectional area of concrete. Reinforcement S, S” in eccentrically tensioned elements when the longitudinal force is located between reinforcement S and S”
- From 0.1 to 0.25%. Reinforcement S, S” in eccentrically compressed elements
- In elements with longitudinal reinforcement distributed evenly along the contour of the section, as well as in centrally stretched elements, the minimum cross-sectional area of all longitudinal reinforcement should be taken to be twice the values indicated above.
You can't spoil the porridge with oil, but you can ruin the foundation with reinforcement. Therefore, there is a maximum percentage of reinforcement. Exceeding the standards will worsen the technical characteristics of reinforced concrete. The maximum percentage of reinforcement for columns is 5%, and in all other cases 4%. It must be taken into account that the concrete mixture must penetrate freely between the reinforcement.
How to reinforce corners
The corners bear a lot of load. Therefore, when reinforcing, care must be taken to strengthen them.
In this case, the following rules must be taken into account:
- the rod must be bent so that one side of it is buried in one wall of the foundation, and the other in the other wall;
- if the rod is not long enough to make a bend, then L-shaped profiles can be used to fasten the rods at the corner.
Most often, class A3 fittings are used for this.
Calculation of foundation slab reinforcement
The standard for rebar cutting is 6 and 11.7 meters. For example, we can calculate the reinforcement for a foundation slab measuring 6*6 meters. Let's take a slab 15 centimeters thick for a light one-story country house made of hollow cinder block. Since the slab is 15 centimeters, the reinforcing mesh will accordingly be in one row, consisting of longitudinal and transverse reinforcement. None of the sides of the slab is less than 3 meters, respectively, the thickness of the reinforcement for the slab foundation in this case will be 12 mm in diameter. The reinforcement pitch will be 20 cm, because the slab is 15 centimeters, let’s take it with a margin, although the pitch could be increased. The house is small, so there will be only 4 load-bearing walls in the house, the internal partitions will be light and will not require additional reinforcement of the foundation underneath them.
So, let's count. The length and width of the slab are 600 centimeters. To calculate how many reinforcement rods are needed for longitudinal reinforcement, you need to divide the slab length of 600 centimeters by the reinforcement pitch of 20 centimeters.
It turns out, 30 rods + 1 last rod + 2 rods for reinforcement under load-bearing walls, the step there will be 10 centimeters, a total of 33 rods.
Transverse reinforcement of the foundation slab is calculated similarly to longitudinal reinforcement, since the values are the same. It turns out that to reinforce this slab we will need 66 reinforcement rods.
Monolithic foundation slab reinforcement diagram
Reinforcing material
The choice of material is a fairly important step. To reinforce a strip foundation with your own hands, use steel rods of different sections or fiberglass reinforcement. But most often metal is used.
The main horizontal reinforcement has a cross-section of rods from 12 to 24 mm. The rods that will be positioned vertically are auxiliary. Therefore, usually the cross-section of vertical rods is from 4 to 12 mm . Such a large difference is due to the variation in loads on the foundation and is directly dependent on the type of soil and the weight of the structure.
Auxiliary vertical rods are installed if the height of the foundation exceeds 15 cm . In this case, reinforcement with a cross section of 6-8 mm of class A1 is used. The frame is assembled from rods and clamps, cleaning them from rust. If necessary, the rods are straightened and cut. Knitting wire and a hook are used to connect the rods. Welding work can be performed if the rods are marked “C”.
The choice of diameter is influenced by the number of horizontal levels and the reinforcement scheme of the strip foundation.
Do-it-yourself reinforcement of a monolithic foundation slab
Initially, we designed a house measuring 6 by 6 meters with an attic floor. In this case, everything would be simpler with reinforcement: a mesh of six-meter rods, with reinforcement around the perimeter, under the walls. They wanted to make the second floor a gable roof and cover the gables with wood. But, having estimated how much lumber it will take for all this (in Georgia, timber costs twice as much as in Russia), imagining how we will cover such a roof together, how much timber will need to be hauled up, calculating how much space the stairs to the second floor will take up floor, we decided to replay it before it was too late. It’s good, at least this idea came to mind at the stage of digging a pit.
Foundation slab pros and cons: marking, excavation
The updated project was completed in one day, and additional blocks were ordered before the factory had time to bake the first batch and send it to us. We decided to build a house 6 by 8 meters, also with a gable roof, only with a slight slope, only half a meter. The small slope is due to our southern climate and sparse snow with little cover. The project added a fifth load-bearing wall, on which the ridge girder will rest.
Calculation of reinforcement for a foundation slab, personal experience
Since our house is relatively not heavy, not large in size, the load-bearing capacity of the soil is good, we carried out good crushed stone preparation for the house, drained the foundation, designed an additional load-bearing wall in the middle (which makes the load more uniform) and after calculating all the loads, it was decided not to pour excess concrete and, accordingly, do not hide expensive rolled metal there.
In our case, a slab of 15 centimeters was more than enough, and therefore one row of reinforcing mesh (remember the theory above).
Next, we determine the diameter of the reinforcement. Taking into account the dimensions of the slab and the load on the foundation from the walls and soil, relying on the positive experience of self-builders and standards, we conclude that reinforcement with a diameter of 12 mm will be sufficient, both in longitudinal and transverse locations. The reinforcement spacing was taken to be 20 centimeters. Although it would have been entirely possible to increase it, we decided not to skimp on it. Under load-bearing walls, the reinforcement spacing was halved. The reinforcement was used with a length of 6 meters (for the transverse one, a rod length of 6 meters was enough, and the longitudinal one was increased). So, let's start the calculation with transverse reinforcement. The length of the building is 800 centimeters. We divide 800 cm by 20 cm (reinforcement pitch), we get 40 rods + 1 last one + 2 for reinforcement under load-bearing walls, a total of 43 rods.
Now we consider the longitudinal reinforcement. The width of the building is 600 centimeters, divide 600 cm by 20 cm, we get 30 rods + 1 last one + 3 for reinforcement under the load-bearing walls (three, because there is a load-bearing wall in the middle of the house), a total of 34 rods. But since the length of the longitudinal reinforcement should be 800 cm, it is necessary to add another half of 34 rods (1 rod is enough for 2 longitudinal sections). This means that we add 17 more rods to 34.
Total: 43 + 34 + 17 = 94 reinforcement bars 6 meters long, we threw another 16 pieces onto the reinforced belt, which we will fill after the walls are built.
Under load-bearing walls, the reinforcement spacing is 10 centimeters (over the rest of the area - 20 centimeters)
Ordering reinforcement for the foundation slab
Ordering fittings turned out to be a whole story for us. We were looking for ribbed reinforcement with a crescent profile of classes A400-A500. We found out in the regional center the price per linear meter - 2.15 lari (1 lari ~ 25 rubles), class A500. We decided to find out in larger cities, found it for 1.7 GEL, a good deal - 297 GEL (7,425 rubles), minus delivery 100 GEL (2,500 rubles), still five stick. It's decided, let's order. But not everything is so fast; in Georgia no one is in a hurry. It turns out that we have to wait for a car with a long body to appear to deliver our cargo. We've been talking to the seller for a week on the phone, but things are still there. At that point, we are already done with the crushed stone backfill, the next stage is formwork for 1-2 days and that’s it, we are faced with easy work, and we don’t like that!
A week later, after many long calls, the seller finally responded and said: “Okay, I’ll give your number to the person, he will call.” Less than five minutes later, a man calls and in pure Russian (only the word “brother” gives him away), asks what and how much is needed. Gives a verdict: 660 linear meters of A500 class fittings at 1.5 GEL per linear meter will cost: 990 + 150 GEL for delivery. I indignantly ask why 150, because a week ago it was announced 100, and I mentally rejoice that the fittings have fallen in price per meter by 20 tetri, which enriches me from an order of 132 lari (= 3,300 rubles). The person testifies that, they say, we have a pass over a mountain and it’s hard for the car to drive, it will take more gasoline. I mentally wave my hand and tell him to harness the horses and take her at a gallop as quickly as possible. At the other end of the phone there was a voice: “Now I’ll tell you the details of where to transfer the money.” To which I replied: “That won’t work, I don’t transfer money to a stranger for goods that I don’t see. Brother, first the chairs, then the money. I need this fittings, I’ve been waiting for it for a week, I won’t let you down.” The person on the other end of the phone: “...Aufff...give me the address.”
Two hours later the call rang: “I’ve arrived.” I clarified whether he really came to us, it seemed too fast. But he rushed towards the center of the village; as it turned out, he really had five kilometers left from the regional center. Having reached the center, I saw the 24th Volga driving in, and my fittings were on the roof; it turned out that a car with a long body was not so necessary! We unloaded these 600 kilograms in 10 minutes, chairs for me - money for him, everyone was happy!
Reinforcement for foundation slab
Tips for quality concrete reinforcement
If you decide to carry out reinforcement yourself, then this process should be approached as responsibly as possible. It is very important to adhere to all techniques and regulations so that the building receives maximum stability and durability. Try to follow these recommendations:
- Metal or polypropylene fiber is added to the solution when mixing it. Please note that the strength enhancer must be mixed together with the other ingredients for at least 15 minutes. After this time, the solution will be ready.
- When choosing a reinforcing material, pay attention to whether it is suitable for use with concrete. Certain types of reinforcement are suitable exclusively for specific foundations.
- The working fittings must be able to withstand the load received. Make sure this parameter is calculated correctly.
- To protect the building from shrinkage, you can use a road mesh.
Concrete reinforcement is a procedure that is necessary to strengthen the building material and its load-bearing capabilities. There are a huge number of reinforcement methods. The choice of a specific type depends on the building being constructed.
Sources
- https://erkon-beton.ru/vidyi-i-osobennosti-armaturyi-dlya-betona
- https://kladembeton.ru/poleznoe/rabota-armatury-v-betone.html
- https://1-proect.ru/pravilno-vyazat-armaturu-monolitnoy/
- https://1beton.info/maloetazhnoe/plity/armirovanie-monolitnoj-plity-perekrytiya-chertezh-raschet-poshagovaya-instruktsiya
- https://stroy-podskazka.ru/perekrytiya/armirovanie-plity/
- https://3dmetal.ru/armirovanie-okonnyh-i-dvernyh-proemov/
- https://mebelrion.ru/armirovanie-dorozhnyh-plit-armirovanie-dorozhnyh-plit-markirovka.html
- https://DomZastroika.ru/foundation/vypolnenie-pravilnogo-armirovaniya-monolitnoj-zhb-plity.html
- https://ExpertFasada.ru/beton/armirovanie-betona/
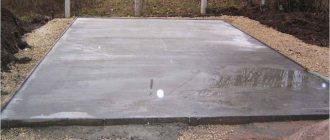
Initial cycle
The construction of the foundation itself began in August 2018 - I used an excavator to dig a pit for the slab. Despite controlling the level using a rotary machine, a level base was not achieved; as a result, I had to do manual finishing and remove about 10 m³ with a shovel. At the same time, I finished with the drainage installation, which began in the spring - a perforated pipe covered with crushed stone, protecting the ditch with geotextiles and adding sand to the upper level in the plane with the quarry.
Next, I covered the pit with geotextiles and prepared it for backfilling with crushed stone. In order to save money, the work was carried out in one helmet, the speed was appropriate, so it was decided to end the season at the stage of installing a cushion under the slab. The filling itself required 18 m³ of crushed stone and 110 m³ of sand, compaction with a vibrating plate of 120 kg. The last layer was coarse alluvial quarry sand (60 m³), fortunately, due to the high humidity it compacted well.
Thunder999FORUMHOUSE Member
The maximum difference in the end turned out to be no more than 3 cm. With a 10-inch pin, under my weight – 86 kg, I couldn’t push it down to the crushed stone. I’ll leave it for the winter, then I’ll see if I can add more or remove the excess. In the meantime, in the winter I plan to purchase fittings, polystyrene foam, and other building materials.
Reply to the post “Morning”
During my student years, when I was in the 2nd or 3rd year of a construction college, I took the final coursework in architecture. Here I will make a small digression to understand the scale. The course work consists of an explanatory note and two sheets of A1 format with drawings of the facade, sections, components, etc. I’ll attach an example from Tyrnet:
So, you received the task, selected the designs and start drawing. No, not on sheets. On graph paper.
Each element was drawn, submitted, received the go-ahead to transfer these drawings onto sheets, and off we went. By the way, everything is done in pencil, no AutoCAD or the like. And this is where the story itself begins. The teacher is a woman of indefinite Balzac age, storing “potted” flowers throughout the classroom, utility room, window sills, etc. About a week until the defense. The drawing is almost ready, I'm bringing it for checking. According to the results - a sheet crossed out with a pen - “the nodes were placed incorrectly.” Okay, let's not rush, there is time. I redraw it two evenings and finish the rest at night. I'll bring it. The result is that some small structural element is crossed out as boldly as possible, it turns out that it does not fit here (GOST says that it does, but the teacher has his own opinion). But we don’t want to spread dirt on the drawing, so what? That's right, let's redraw it. Then we redraw it again, and again, and again, because the doorway here is somehow different, the toilet is not the right size, replace the window with a double-leaf one. Each time it was something crazy or so insignificant that it was even funny. In a good way, all these “mistakes” are found in one go and corrected in one night, but she shook the common sense of me and everyone who didn’t chip in for her on the fucking ground under the flowers. The day before the defense, based on the results of the test, they find some other dregs, which the teacher happily crossed out with a grease pencil. It’s clear that you don’t have time to redraw, so you try to erase and redo only what has been corrected as carefully as possible. To the reasonable question of why the hell it would be to trash a drawing, they assured me that they would not lower the grade for dirt. OK. A few days after the date of general defense, after curses, after sleepless nights and many corrections, I was finally allowed to take individual defense. I will not describe my condition, I think you understand. I slept no more than 4 hours for 2 weeks, and sometimes even less. For three days before the defense, I didn’t sleep at all. So, I'm renting. With half-closed eyes, absolutely without hesitation, she spoke the text of the defense and answered all the questions. And I hear “three, your drawing is dirty.” After everything that had happened, I didn’t even say a word, silently took my record book, came home and, again, without saying a word, I lay down and passed out for two days. I was a good student, without any special talents, but not a C student either. Never gave bribes. Many years have passed, I work in my specialty in a very good position. Everything is fine with me, but when this topic is mentioned, all I dream about is showing her my work book and spitting in her face. Sorry, I wrote on a burning chair, maybe chaotically. It's boiling.
Insulation, reinforcement, concreting
The construction season opened in April 2022, the drainage showed itself to be excellent, the pump turned on every hour and calmly pumped out water.
I started working on the foundation with the manufacture of L-blocks - I made a cutter for EPS with a spiral for heating elements, a power of 3000 W, with a starting and charging device.
At the same time, he was laying communications and now advises everyone to lay the mortgages before backfilling the pit, and not in a lovingly compacted cushion.
Thunder999 recommends assembling L-blocks not only with adhesive foam, but also with screw disc dowels, combining adhesive and mechanical fasteners.
Next, I laid the insulation and made the wiring.
Thunder999FORUMHOUSE Member
Today I installed hot and cold water. It took 41 meters of PEX b 16, 35 meters of 25 mm corrugations. I will do it like Andrey Chance did, using the corner of the sewer pipe 32, 0.5 cm below the concrete level. And then pulling the pipe. Over the weekend, I installed a storm drain with a double-walled pipe 110, made ladders and half-layed 50 mm polystyrene foam on the blind area and backfilled it.
Laying heated floors - six contours, fixed into the slab with anchor brackets, two per day. I installed a manifold, laid out electrics for lighting and sockets along the stove - outlets for sockets of 1 m, for electrics, 1.7 m each, corrugated, with some groups combined.
When tying the bottom card of reinforcement, I was glad that I had stocked up with 6-meter rods; it would have been problematic to lay out 12 of them and tie them together. I tied the top card in the same way and reinforced the porch, and this completed the zero cycle.
I poured the slab with factory-made concrete - in the July heat, the solution from the first mixer had already begun to set, while the second one had just finished pouring. Both a vibrating screed and a helicopter were used for finishing. To avoid having to cover up the holes, the embeds should not be buried more than 5 mm, otherwise you won’t be able to find them by knocking.
Purchase and delivery of fittings
One of the common ways to save on materials is to purchase outside the hot season, when you have somewhere to store them. Reinforcement used to be no exception and winter prices were somewhat lower, keeping this in mind and the forum member decided to profit. And literally “before our eyes,” while he ordered and paid for three tons of reinforcement (D10 and D12 mm), it began to rise in price. At first it was insignificant, but at the construction site, as in life, I saved money, and I think I earned it. It was decided to store it on pallets and cover it with a banner for protection, and in the spring to begin installing the insulation and reinforcement frame. During unloading, the fence was damaged; fortunately, there were just two sheets left in stock to replace those damaged due to the crane being skewed. In principle, it turned out to “get off with a slight fright”; due to the foot getting into the soft ground, the crane could have completely overturned, collapsing the fence.
And when two weeks later I went to the website where I purchased the reinforcement, I saw that it had gone up in price not by hundreds, but by thousands - for each ton I would now have to overpay five thousand. Even if fifteen thousand in global terms is not a particularly significant amount, but when you managed to save it and didn’t have to overpay, it’s always good.