Floor slabs are designed to divide a building into levels (floors). If the slabs are located between floors, then this is a ceiling, if above the last floor, then it is a covering. The only difference is the load-bearing capacity. These building structures are subject to increased requirements for strength and reliability, since they are the main load-bearing elements and absorb the load from the entire floor, including floors, partitions, equipment, furniture and temporary loads.
Floor slabs can be:
- depending on the material: reinforced concrete, concrete, wood, metal, combined;
- depending on the method of execution: prefabricated or monolithic;
This or that type of floor slab is used depending on the design features of the building, the maximum load on the floor and the installation method. Next we will look at how to make a ceiling with your own hands.
An example of calculating a monolithic floor slab
Before you start making the slab, it is advisable to make a calculation. Next, an example of calculating an interfloor slab for deflection will be performed.
Initial data for calculation
Let’s take the size of a building with a monolithic ceiling as 6x6 m, separated in the center by internal walls (span 3m). We will take the thickness of the floor to be 160 mm, while the working height of the floor section will be 13 cm. For the manufacture of the slab, class B20 concrete will be used (Rb = 117 kg/cm2, Rbtn = 14.3 kg/cm2, Eb = 3.1 * 10^5 kg/cm2) and steel reinforcement A-500C (Rs=4500kg/cm2, Ea=2.0*10^6 kg/cm2).
Collection of floor loads
The load on the floor will consist of the weight of: the floor slab (in our case 160 mm), cement screed 30 mm thick, ceramic tiles, standard weight of the partitions and payload. All data is summarized in the table below, taking into account the coefficients.
Calculation of a slab based on deflection deformations
Floor operation diagram:
Now we need to select the cross-section of the reinforcement; to do this, we determine the maximum moment:
and coefficient Aо with the width of the slab section b=1(m):
The required cross-sectional area of the reinforcement will be equal to:
Therefore, to reinforce 1 linear meter of a floor slab, you can use 5 rods with a diameter of 8 mm with a pitch of 200 mm. The cross-sectional area of the reinforcement will be As=2.51 cm2.
We have come close to calculating the slab based on deflection deformations. From the initial data we know that the permanent load on the floor is 0.63t/m² and the temporary load on the floor is 0.2t/m².
We calculate the maximum moment from the action of a long-term load:
And the maximum moment from the action of a short-term load:
We find a coefficient that takes into account the type of load and loading pattern S = 5/48 - for beams with a constant uniformly distributed load (Table 31, “Guide to the design of concrete and reinforced concrete structures made of heavy concrete”). y'=y=0 (Table 29 “Guide to the design of concrete and reinforced concrete structures made of heavy concrete”).
Coefficient for determining: k1cr; k1dl ; k2dl.
We calculate the curvature of the axis under the simultaneous action of short-term, long-term and constant loads:
Now we need to determine the maximum deflection in the middle of the span:
The condition is met, which means that the reinforcement Ø8 A-500С we adopted with a step of 200 mm is correct!
Preparatory work before concreting.
Before we begin installation work, we will determine the water content in the soil. The easiest way to hire surveyors, but not everyone has the means to do so. Therefore, we will do everything ourselves. 1 If the house or garage is located on a hill, the risk of groundwater is reduced several times. Accordingly, on the plain, in the lowlands, it increases. 2 Look at a map of the area. If there are rivers, streams, or dry rivers nearby, the risk of water appearing increases many times over. 3 Reeds growing nearby also indicate the presence of water in the soil. 4 The ideal option is to find out about water from neighbors who have already built a cellar or any building below ground level. Let's say there is groundwater in the soil. When you pour a concrete slab above ground level or at the same level, groundwater will flow in and out without causing any inconvenience. If you pour a concrete slab below ground level, it will quickly absorb moisture. What can protect us? A layer of clay will provide a little protection from groundwater. But keep in mind that clay, absorbing moisture, increases in volume. In this case, a thin concrete slab under pressure can burst. Before the clay layer, level the ground and compact it.
After 1200 - 1600 millimeters, dig small trenches, going deep to the bayonet of the shovel. Then pour the clay evenly. Compact the clay layer. The previously dug trenches will be slightly smaller, but they should remain (approximately 10 - 15 centimeters wide, 10 - 15 centimeters deep). What are they needed for? When we pour a reinforced concrete slab, the trenches form stiffening ribs. They will strengthen the structure. The impact of the clay layer will be weakened. If you are pouring a concrete slab in a dry basement or level with the ground or higher, the clay layer with trenches can be omitted. Just level the ground and compact it. Make the surface as smooth as possible. This will allow you to more accurately calculate the volume of concrete and save concrete mixture.
Monolithic floor slabs for garage
Even building structures such as floor slabs can be made with your own hands. Let's look at the garage floor design. We will be covering a span of 4300 mm long, so the slabs will be made 4500 mm long. On each side the slab will rest on a 100 mm brick wall.
Materials for making the plate
How to make floor slabs with your own hands? To make a slab we will need:
- corrugated sheet H75/750 x 4500 mm, it will be used as removable formwork;
- wooden boards 150 mm high and 25 - 30 mm thick;
- fittings with a diameter of 16 mm;
- mesh with a cell 100x100 with a diameter of 5 mm;
- screed with a diameter of 8 mm, 2 pieces per slab;
- concrete class B20.
The process of making a slab with your own hands
A sheet of corrugated sheets is laid on a rigid base. You need to place cross members (wooden boards, 4 pcs) under the sheet. We arrange formwork from boards around the perimeter of the sheet.
We place reinforcement in each sheet tray (5 pieces). The protective layer of concrete should be 25-30 mm. We attach loops (4 pieces) to the same reinforcement bars for transporting the slab (in our case, raising it to the height of the garage floor level). We lay a mesh at the top of the slab, which should also be protected by a 30 mm layer of concrete.
In order for the corrugated sheet to adhere well to the concrete, it must be lubricated with oil (working off) or covered with plastic film. Concrete consumption per slab will be 0.4 m3. Concrete is prepared in a gravity concrete mixer, poured and compacted with a vibrator. The slab can be removed only after 7 days, when the concrete has gained 70% strength.
It is also possible to install ceilings directly on the walls. Sheets of corrugated sheets are laid, reinforcement is performed and formwork is installed. The concrete is lifted by crane into a bucket and poured in a continuous layer. It is necessary to install supports under the ceiling while the concrete gains strength. This method will be more expensive, since the corrugated sheets remain in the ceiling.
How much does it cost to make a floor slab?
Now let’s calculate the costs of manufacturing slabs with a total area of 29 m2 and a height of 150 mm. The cost of concrete is $335, the price of H75 corrugated sheeting is $400, fittings are $235, crane services are $135. As a result, we get the amount of $970. This cost will be if you make the slab directly in the garage, that is, the corrugated sheet remains under the concrete floor.
If you make floor slabs with your own hands on the ground, then the cost of the floor will be slightly cheaper; we remove the cost of corrugated sheets. The total will be 705 $.
How self-leveling floors are made
Self-leveling floors
After final drying, the slab should look perfectly flat, smooth, and neat. Therefore, it is advisable to purchase so-called self-leveling floors, and then fill the surface of the slab additionally.
First stage. The floor is revealed.
Second phase. The primer composition is being prepared. The mixture is diluted.
Third stage. The composition is poured from above.
In this case, the following factors need to be taken into account.
Firstly, you must use the volume of water indicated in the instructions.
Secondly, you will need a special roller with spikes. This is a tool for smoothing the composition. Then the poured mass will not only be evenly distributed over the surface, but also air bubbles will come out.
It should be understood. The mixture is smoothed evenly over the floor surface. If you unload it into one place, it will not level on its own.
To cover the slab of the initially designated area, 3 bags of the mixture will be enough. Then it will be possible to create a coating of 0.3 cm. Then the floor becomes ideally smooth. First you need to wait for the concrete to dry, and then this finishing composition must dry completely. The curing period is determined by the manufacturer.
Do-it-yourself prefabricated monolithic floors (SMP)
SMP series TZhBS are developed as an alternative to wooden floors and monolithic reinforced concrete hollow slabs. SMP TZhBS is a prefabricated structure, combined at the installation stage into a solid ceiling using a reinforced screed.
A distinctive feature of SMP TZhBS is that all concrete elements are made from rigid solutions. In order for the production of SMP to be economically feasible, all floor components must be produced industrially using modern, high-performance equipment.
Composition of SMP TZhBS
Prefabricated monolithic floors include:
- I-beams made of stressed concrete;
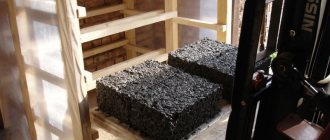
- hollow-core blocks made of expanded clay concrete or concrete, laid between beams;
- reinforced concrete layer connecting the ceiling into a solid structure.
Advantages of SMP TZhBS
- High load-bearing capacity, up to 1000 kg/m2.
- Refusal to perform a monolithic belt.
- High heat and sound insulation.
- Possibility of laying utility lines in voids.
- Low consumption of materials per square meter of flooring.
- Possibility of installing the ceiling yourself.
SMP installation technology
1. Delivery of SMP elements to the construction site. Produced by trucks with a capacity of at least 3.5 tons with a crane. One flight provides delivery of materials for 30 m² of flooring. Unloading is done manually or with a crane.
2. The installation of a floor slab with your own hands begins with laying I-beams on load-bearing walls with a step of 70 cm and support of at least 10 cm.
3. Laying hollow-core blocks between beams.
4. Fixing the outer beams with masonry.
5. Laying reinforcing mesh over the entire floor area.
6. Pouring a monolithic concrete screed that combines beams and hollow blocks into a single structure. Concrete flows into the space between the hollow core slabs and beams, creating a strong, rigid structure.
Options for installing floors on prefabricated monolithic floors
All types of floors can be laid on SMP TZhBS. As an example, linoleum and parquet floors are considered. The order of layers is indicated from bottom to top.
Linoleum floor
- Sand layer 30 mm thick.
- Soft fibreboard 12 mm thick.
- Roofing felt waterproofing.
- Cement-sand screed from mortar grade M 150, 40 mm thick.
- Leveling layer of polymer cement 8 mm thick.
- PVC linoleum on a heat and sound insulating substrate, laid on bustilate.
Parquet floor
- A layer of sand 30 mm thick.
- Wooden logs with a cross-section of 80×40 mm, laid in increments of 400 mm.
- Parquet board 20 mm.
The height of the floor with the finished floor is 340 mm (240 mm floor + 100 mm floor).
SMOOTH STONE RECIPES
There is pretty much one recipe that requires smooth stone to create, and that is the Blast Furnace. You will need five iron ingots, a furnace and three Smooth stones. The blast furnace is used to smelt ore blocks and works twice as fast as a regular furnace! This is useful for making large quantities of ingots very quickly.
DIY monolithic floor slab for home
Slabs used in houses are usually made of reinforced concrete. These are typical ready-made factory structures that only need to be placed correctly during the construction process. They have good performance properties, but there is an option with better characteristics. This is a monolithic floor slab, and it is quite possible to make it yourself, without ordering from construction companies. Such a slab is not only an order of magnitude superior to conventional reinforced concrete ones, but also does not require special skills or specialized complex equipment for its manufacture.
Compared to standard reinforced concrete slabs produced in factories, monolithic flooring has several advantages:
- The structure will not have seams, which adds strength to it, since the load on the foundation is distributed evenly over the entire surface. This improves the overall durability and safety of the building.
- Monolithic pouring makes it possible to experiment with the layout of the house, since it rests directly on the columns. You can create various corners and crannies for which it would be quite difficult to select individual floor slabs. This opens up wide scope for design ideas.
- Finally, the monolithic design allows you to equip a safe balcony without any additional support. Creating a balcony is not mandatory, but many people want to have one in a country house, so why not do it.
You can create a monolithic floor slab with your own hands, without hiring a team of workers or using complex equipment. It is enough to do everything step by step, carefully and in compliance with safety precautions. In addition, you need to choose high-quality materials for your structure.
Technology for constructing a monolithic floor slab
In order to make a monolithic slab, you will need a drawing. Any construction begins with a diagram and calculations. It is better to place an order at a construction office and entrust the calculations to professionals. The result will tell you what the correct dimensions of a slab suitable for construction should be, what reinforcing reinforcement to choose for it, and which of the existing grades of concrete is best to use. You can try to perform all the necessary calculations yourself; there are diagrams on the Internet that can be used to perform this operation. An ordinary country house, as a rule, has a span of no more than 7 meters, for which a slab with standard dimensions and a thickness of 180 to 200 mm is suitable, this is the most commonly used size.
To make a new monolithic slab you will need the following materials:
- Steel reinforcement having a diameter of 10, or, alternatively, 12 mm and a bending device for it.
- Concrete marked M 350. You can also make a concrete solution yourself by mixing sand, cement and crushed stone.
- Formwork and supports to support it, you will need one support per square meter.
- Plastic stands for reinforcing reinforcement for fixation.
The pouring process necessarily includes several points that are performed sequentially:
- If the existing span of the building is significantly larger than the standard 7 meters or the project being carried out clearly involves support on columns, you will have to calculate the floor slab.
- The first step is to install the formwork to begin work.
- The slab is reinforced with steel rods from which the frame is assembled.
- Concrete is poured.
- Using an internal vibrator, compaction is performed to enhance strength.
Once the height of the walls has reached the required level, you can begin to create a floor slab.
Installation of formwork
Conventional formwork used in construction is sometimes called a deck, and this is what is needed to create the slab. You can simply rent a ready-made, removable one, which is made of metal or plastic. You can also easily make it yourself from boards or plywood sheets. Of course, renting is much simpler, since the formwork is removable and collapsible, which means it can be easily removed. In addition, it has a telescopic device that allows you to adjust the height.
To create formwork manually you need to take sheets of plywood or boards. Structures made from boards must be well knocked down, carefully adjusting the wooden parts. If there are cracks and holes left, you need to use a waterproofing film and wrap it around the formwork.
How to install formwork?
- First you need to build vertical supports. If this is a rented formwork, then their role is performed by metal racks with a telescopic height adjustment system. You can take wooden logs. The distance between the posts used is one meter. The racks must be at least 20 cm away from the wall.
- Crossbars are placed on top of the installed racks - these are special longitudinal bars necessary to hold the formwork.
- On the crossbars there will be a deck made of moisture-resistant plywood. The horizontal beam should rest tightly against the adjacent wall without leaving any holes.
- The top edge of the structure used must match the existing top edge of the wall, so the height of the studs should be adjusted to an acceptable level.
- The location and exact horizontality must be checked using a construction level.
In some cases, for convenience, the formwork is covered with a film with waterproofing properties or lubricated with automobile oil if it is made of metal. This is done to make it easier to remove the formwork and make the surface of the resulting concrete slab smoother. Telescopic rented racks are preferable to homemade wooden ones, since they can withstand significant weight - up to 2 tons, do not break, and cracks do not appear on them, as can happen with homemade supports. Temporary rental of such racks costs approximately 3 USD. that is, one square.
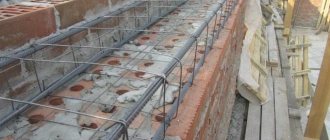
Slab reinforcement
When metal or homemade formwork is installed, you need to tie a frame of reinforcement mesh into it. For this purpose, strong steel rods marked A-500C are used. The size of one cell of the resulting mesh should be about 200 mm. The rods are connected using wire. Usually the length of the rod is not enough to cover the entire space, so you have to connect several pieces. To make the mesh strong, the rods must be overlapped by at least 40 mm.
The mesh must be applied to the walls, the norm for brick structures is 150 mm or more, for walls made of aerated concrete - at least 250 mm. There should be a distance of 25 mm between the protruding ends of the arranged rods and the installed formwork.
Additional reinforcement of the future slab is consistently carried out using a durable frame made of reinforcement. There are two meshes, the one at the bottom is carefully placed at a distance of 20-25 mm from the bottom edge, the other mesh, the top one, is placed lower at 20-25 mm from the top edge of the slab.
Plastic clamps are placed under the bottom tile to hold it at the required distance. They are located in increments of 1 meter, at those points where the intersection of the frame rods is located.
The total thickness is pre-calculated in a ratio of 1:30, where the first number means the thickness of the future product, and the second – the span length. For example, if the standard span is 6 meters, then the width of the slab will be exactly 200 mm. Since the reinforcing mesh is located at some distance from the edges of the slab, it is necessary to separate them, there should be a gap of 120-130 mm between them.
Stand clamps are needed to space the laid out reinforcement mesh in the frame at a distance from each other. The size of the upper shelves of the clamp should be 350 mm, while the vertical dimension is 120 mm, the location step is 1 meter, the fixing elements are arranged in a checkerboard pattern, alternately.
The end fixing element in the structure is installed in constant increments of 400 mm, directly at the ends of the frame. With its help, the slab will rest on the wall.
The mesh connector is needed so that the two meshes accept the load as a single reinforcing device. The installation step should be 400 mm, and when moving to the support area, you need to reduce it to 200 mm.
Pouring the slab
The best option is to purchase suitable concrete at the factory, from professional companies engaged in the manufacture of goods for construction. This greatly simplifies the task. In addition, if you carefully pour concrete evenly and using a mixer, the surface of the slab will be smooth and very even. But manual pouring will require an inevitable break while preparing a new portion of the mortar; accordingly, hardening will proceed unevenly, which can lead to defects in the finished slab. It is better to fill in an even layer, approximately 200 mm, acting without delay.
Before pouring concrete, you must remember to install special technical boxes in the formwork, designed to create chimneys or ventilation. After pouring, you need to use a special deep concrete vibrator. This will make the structure of the slab more durable, so it will be reliable and of high quality. You then need to be patient and allow the poured surface to dry and gain strength over a period of 28 days.
The emerging surface should be carefully monitored in the first week after pouring and moistened with plain water, but only moisten it and not pour it generously. The formwork can be carefully removed from the slab a month after pouring. After this, the new monolithic slab will be completely ready.
The total cost of materials and devices required to obtain a monolithic floor slab, as a rule, takes into account the costs of reinforcing reinforcement, possible rental of formwork, purchase of concrete and short-term rental of a construction mixer, as well as a deep vibrator. According to average estimates, it turns out to be approximately 45-55 USD. per square of constructed floor.
Formation of formwork
Installing formwork when monolithic construction technology is used is the most critical work. This design consists of several elements:
- shields;
- props
To make wooden shields, you will need to use boards. Their thickness should be at least 2 cm. Boards are cut into the required sizes and knocked together. What matters here is precision and durability, not aesthetics. To create the formwork with the parameters indicated above, you will need 4 panels. Their dimensions are 150 cm by 125 cm. Then the formwork will be created without unnecessary effort, and installation work can be completed quickly, and dismantling the structure when the time comes will be possible without any problems.
The supports will be:
- wooden beam;
- required board height.
For your information. Any material can become a support as long as it can support the weight of concrete.
For reliability, you need to install at least 6-8 supports on each shield. But if you manage to stock up on denser supports, you can use fewer of them.
The consistency of concrete is viscous, but still liquid. Pouring such a composition allows you to form an even overlap. But for this, thin plywood is installed on the boards, on their inner sides. Then the mixture will not spill, and a fairly smooth surface will immediately form.
Considering that the frame has already been installed, the formwork itself can be installed. In other words, the formwork should be installed at a distance of 4-5 cm from the bottom edge of the already created beam structure.
Tools and materials
To build a monolithic Swedish slab, you will need a whole set of tools and materials. It includes: a vibrator necessary for compacting and leveling poured concrete, a hammer, a shovel, a container for sand mixture, buckets, M350 pre-mixed concrete, sand, reinforcement, metal rods, a welding machine, geotextiles, waterproofing materials, water, pipes for heating, water supply, sewerage, wooden panels with fastenings for formwork. All this can be purchased at any specialized hardware store.
An interesting fact is that, unlike a strip foundation, a Swedish slab will be very expensive. But its quality is much higher. It retains heat better, is more reliable and durable. It can be suitable both for the construction of low-rise buildings and for private construction. The technology is quite simple.
What it is?
Wall panels are ready-made elements for the construction of buildings or other objects that were manufactured at a factory in an industrial environment. These elements, like a constructor, are connected to each other.
Thanks to this, the structure becomes especially strong and reliable, it meets all the requirements of state standards and can last for decades.
When making concrete panels, concrete is used, and when creating reinforced concrete structures, reinforcement (rods or reinforcing mesh) is added, which gives the elements even greater strength.
The reliability of reinforced concrete elements is much higher than concrete ones , because reinforced concrete additionally includes steel. Separately, concrete and steel have their own advantages and disadvantages that the second material does not have.
For example, the most significant drawback in concrete is its weak tensile strength, and the most important advantage is its high compression resistance. In the case of steel, the opposite is true. What is a minus for concrete is a plus for it and vice versa. Therefore, these two materials compensate for each other's weaknesses and together have improved technical parameters.
Concrete quality
Sometimes “concrete” is called haphazardly thrown stones, lightly doused with a solution of last year’s cement and slag, but such a solution is far from high-quality concrete. The properties of concrete depend on three factors: the brand of cement, the proportion of components and the presence of additives.
For load-bearing and self-supporting elements and critical structures (lintels, ceilings, flights of stairs), we recommend using cement grade 500. In other cases, grade 400 is suitable.
Crushed stone with a fraction of 5–20 mm is optimal for reinforced concrete structures. For small reinforced concrete products - 5–10 mm.
Attention! Crushed stone must be relatively clean, without significant admixture of organic matter.
The quality of concrete is also affected by the composition and origin of the sand: angular sea sand grains hold better in the solution than smooth river sand grains.
Attention! Even a small percentage of clay admixture in sand can dramatically reduce the quality of concrete.
The presence of clay can be distinguished by its characteristic brownish tint (pure sand is light yellow) and stickiness (the molded “snowball” does not crumble). Pay attention to this when unloading sand from a dump truck - how strongly it will stick to the body.
Classic proportions of concrete: 3 parts sand, 3 parts crushed stone, 1 part cement, water - to the desired consistency.
Attention! Concrete that is too “steep” (dryish) may not fill all the sinuses, and too liquid - it will crack (“cement milk” will leak out through the cracks of the formwork).
A common mistake: more cement - more strength. Cement is a chemically active binder. With its increased concentration and lack of sand, it simply reacts with water, breaks down into its constituent elements and “does not work.” When there is an “overdose” of cement, small and medium-sized cracks also appear on the surface, and the product has a whitish tint.
Bulk additives: slag, granulated slag, expanded clay, vermiculite and others are used only to improve heat-insulating properties. At the same time, the load-bearing capacity and resistance to atmospheric phenomena are sharply reduced (such surfaces must be protected). Do not add slag to the foundation to save money! The main function of the foundation is to carry the load from the walls. Viscose will help improve the properties of concrete (for flooring).
Liquid supplements mainly come in three varieties:
- plasticizers (make concrete more plastic)
- winter (accelerate hardening until temperature loss)
- hardeners (increases strength up to 15%)
For the production of small concrete products, be sure to use plasticizers according to the instructions.
Advantages and disadvantages
You can make a stove at home even without experience, since the technology is simple and affordable.
Monolithic and Swedish slabs are among those types that can be made on the construction site with your own hands. The positive aspects of this product:
- The manufacturing technology is simple and affordable.
- Filling can be done by workers without experience.
- Thanks to the monolithic structure, the foundation is resistant to deformation and soil displacement.
- The concrete slab base can withstand soil with a high meltwater capacity.
- Durability of use.
- After insulation, it can be used as a finished floor.
Flaws:
- The increase in the period of work performed is associated with the installation of a waterproofing layer and insulation.
- Filling requires the creation of a flat construction area. And when choosing a territory, pay attention to the lack of tortuosity.
- Involvement of special equipment.
- Complex calculations require contacting specialists. And all the data on determining the bearing capacity of the soil are presented in GOST, SNiP.
- Increase in cash expenses.
- The need for hydro- and thermal insulation.
"Home" reinforced concrete
Concrete is one of the most common building materials, known since ancient Rome. The principle of construction of reinforced concrete structures (RCS) and reinforced concrete products (RCP) has not changed since then. However, today the variety of concrete is enormous, and we will focus on those structures and products that can be manufactured and used in private construction.
Let's look at the most common reinforced concrete structures, which it would be reasonable to make yourself.
Foundation
There are the following types of monolithic foundations: pile (with or without grillage), strip (economy option, only under walls), solid slab (for buoyant soil, on sand), prefabricated foundations.
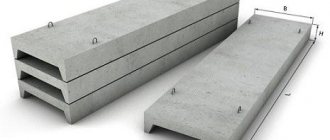
Floors
Used in stone houses. They are extremely reliable and durable, but require labor-intensive preparation of formwork.
Walls, piers, parapets
Parapets can be either semi-decorative (sides, railings) or structural (support for soil or embankment). Monolithic walls are quite complex in design, so they are rarely made at home.
Recommendations
It is important to consider some features of construction work:
- If a builder is using a stamp for the first time and has little idea what kind of impression it will leave, you can leave an imprint in the sand.
- It is advisable to avoid repeating stamps, especially if they imitate wood, granite and other materials. On the contrary, randomly composed compositions look more realistic.
- To obtain the effect of an aged surface, you should apply a little release powder to the liquid cement mixture, and spray this product on top, but in liquid form. The liquid will help dissolve the powder. This will leave accents of color on the cement that resemble scuff marks.
- The component particles must be pressed into the solution. Otherwise, it will be washed off when cleaning the surface.
- When stamping is carried out, the worker’s shoes must be clean: there should be no debris left on them, as this will spoil the texture of the product.
Sources
- https://1beton.info/vidy/arhitekturnyj/sostav-arhitekturnogo-betona-tehnologiya-izgotovleniya-oblast-primeneniya-arhikamnya
- https://kraska.guru/smesi/cement-i-beton/chto-takoe-art-beton.html
- https://www.TopDom.ru/articles/interior_design/beton_kak_vyrazitelnyy_akcent_interera_kvartiry_v_stile_loft.htm
- https://kvartirnyj-remont.com/art-beton.html
- https://ArmRinok.ru/gruntovki-i-smesi/art-beton-dekorativnaya-shtukaturka.html
- https://dom-i-remont.info/posts/materialy/arhitekturnyj-beton-svoimi-rukami-plyusy-minusy-komponenty-i-proporczii/
- https://StrMaterials.com/sypuchie/beton/chto-takoe-arhitekturnyj-i-kak-prigotovit-svoimi-rukami-sostav-i-proportsii.html
- https://dom-i-remont.info/posts/materialy/dekorativnyj-beton-svoimi-rukami-harakteristiki-proporczii-instrukcziya/
- https://1beton.info/vidy/arhitekturnyj/art-beton
- https://DekorShtukaturka.ru/dekorativnaya-shtukaturka/dekorativnaya-shtukaturka-pod-beton
- https://sombuka.ru/vidy/kak-sdelat-dekorativnyy-beton-svoimi-rukami.html