The most reliable (but not always appropriate) option for interfloor slabs is a monolithic slab. It is made of concrete and reinforcement. Read about the rules for installing monolithic floors in this article. Analysis of the characteristics of types and applications, installation of monolithic floors.
In what cases is it necessary to install monolithic floors?
Monolithic reinforced concrete flooring is the most reliable, but also the most expensive of all existing options. Therefore, it is necessary to determine the criteria for the feasibility of its design. In what cases is it advisable to install monolithic floors?
- Impossibility of delivery/installation of prefabricated reinforced concrete slabs. Subject to conscious refusal of other options (wooden, lightweight Terriva, etc.).
- Complex configuration in plan with “unsuccessful” arrangement of internal walls. This, in turn, does not allow laying out a sufficient number of serial floor slabs. That is, a large number of monolithic sections are required. The costs of a crane and formwork are not rational. In this case, it is better to immediately move on to the monolith.
- Unfavorable operating conditions. Very heavy loads, extremely high humidity values, which cannot be completely solved by waterproofing (car washes, swimming pools, etc.). Modern floor slabs are usually prestressed. Tensile steel cables are used as reinforcement. Due to their very high tensile strength, their cross-section is very small. Such slabs are extremely vulnerable to corrosion processes and are characterized by a brittle rather than ductile nature of destruction.
- Combining the functions of overlap with the function of a monolithic belt. Supporting precast concrete slabs directly on lightweight block masonry is generally not permitted. A monolithic belt is required. In cases where the cost of the belt and prefabricated floor is identical to or exceeds the price of a monolith, it is advisable to focus on it. When resting it on masonry with a depth equal to the width of the belt, the installation of the latter is usually not required. An exception may be difficult soil conditions: type 2 subsidence, seismic activity, karst formation, etc.
How to lay it correctly?
The technological map for the installation of such structures is developed depending on their type of structure and consists of laying PP on the working solution, at the joints.
In general, such work consists of 3 important stages:
- Preparation. Check the walls so that they do not diverge more than 10 mm in height; it is better if an armored belt is placed on the load-bearing walls at the installation sites, especially for those built from light concrete blocks. The place where the slabs are laid must be free of defects and clean.
- Selecting an installation scheme to ensure compliance with the design parameters for supporting the stacks.
- Laying the slabs involves an adjustment stage, when the slab hangs at a level of 40 cm above the site and the compliance of its location with the design marks is checked, and, if necessary, adjustments are made. The layout of the slabs is carried out exactly according to the design in compliance with the requirements of SNiP.
How to lay on load-bearing walls?
For small floor areas, the slabs are laid on load-bearing walls.
Algorithm for installing floors by a team consisting of a rigger and 2 installers:
- The rigger checks the cleanliness and serviceability of the mounting loops on the control panel.
- When detected, they are cleaned from concrete with a scalpel, and from contamination with an iron brush.
- A signal is given to the truck crane operator to supply slings.
- The hooks of the slings are attached alternately to the mounting loops.
- The command is given to the truck crane operator to tighten the branches of the slings.
- The strength of the hook is checked, after which the rigger must move to a safe place and give the command to the truck crane operator to raise the PP to a height of 20 cm.
- The reliability of the sling is monitored; if there are no comments, the rigger gives the command to the truck crane operator to move the PP to the installation area.
- The 2nd installer prepares the site for installing the slab, clears it of concrete buildup, pieces of ice and dirt.
- The first installer takes the prepared concrete mortar from the box with a shovel, applies it to the shelves of the crossbar, and uses a trowel to level the layer evenly.
- The 1st installer gives a signal to the truck crane operator that the PP is ready to supply.
- Installers accept the PP at a height of 200 mm from the required floor level and direct it to the installation site.
- The 1st installer gives a command to the truck crane operator to smoothly lower the panel, while both installers hold the panel during the lowering process.
- The 1st installer controls the accuracy of installation of the PP in height at the construction level; if necessary, together with the 2nd installer, they eliminate the detected deviations, changing the thickness of the mortar bed.
- The 1st installer controls the installation of the panel in plan and, if necessary, together with the 2nd installer, corrects its position with crowbars.
- The first installer gives the crane operator a signal to loosen the slings, they are removed from the mounting loops.
- The welder welds the embedded elements according to the design.
- Installers seal all joints with concrete mortar.
Installation of floor slabs - in the video:
Determining the required thickness of a monolithic floor
For bending slab elements, over decades of experience in the use of reinforced concrete structures, the value of the ratio of thickness to span has been experimentally determined. For floor slabs it is 1/30. That is, for a span of 6 m, the optimal thickness will be 200 mm, for 4.5 mm - 150 mm.
An underestimation or, conversely, an increase in the accepted thickness is possible based on the required loads on the floor. At low loads (this includes private construction), it is possible to reduce the thickness by 10-15%.
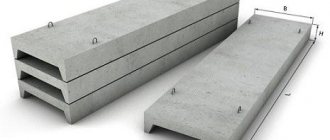
Hollow-core reinforced concrete slabs
In the construction of multi-storey buildings, hollow-core reinforced concrete products are used much more often than others. Depending on the method of preparation, they are divided into round-hollow and continuous molded.
Round-hollow slabs are the most popular types of slabs. They are most often used in the construction of houses. This type of flooring has been used for more than twenty years. The strength of these structures has been tested under high loads. A huge number of regulatory documents have been written on the topic of installation and production of round-hollow panels.
According to GOST 9561-91, the thickness of the product should be 220 mm, length - from 2.7 to 9 m. The width of reinforced concrete surfaces is 1, 1.2, 1.5 and 1.8 m. They are divided by serial numbers. In the production of such floors, reusable forms are used for pouring concrete.
VAT of floors
To determine the general principles of reinforcement of a monolithic floor, it is necessary to understand the typology of its operation through analysis of the stress-strain state (SSS). The most convenient way to do this is with the help of modern software systems.
Let's consider two cases - free (hinged) support of the slab on the wall, and pinched one. Slab thickness 150mm, load 600kg/m2, slab size 4.5x4.5m.
Deflection under the same conditions for a clamped slab (left) and a hinged slab (right).
The difference is in the moments of Mx.
The difference is in Mu's moments.
The difference is in the selection of upper reinforcement according to X.
The difference is in the selection of upper reinforcement according to U.
The difference is in the selection of lower reinforcement according to X.
The difference is in the selection of lower reinforcement according to U.
Boundary conditions (nature of support) are modeled by imposing the corresponding connections at the support nodes (marked in blue). For hinged support, linear movements are prohibited; for pinching, rotation is also prohibited.
As can be seen from the diagrams, when pinched, the work of the near-support section and the middle region of the slab is significantly different. In real life, any reinforced concrete (prefabricated or monolithic) is at least partially clamped in the body of the masonry. This nuance is important when determining the nature of the reinforcement of the structure.
Aspects of design of buildings and structures
At the design stage, it is important to take into account the permissible dimensions of the slabs and make calculations based on their dimensions. In practice, there are often cases when the construction process is carried out according to someone else’s design with the most convenient layout. For the successful implementation of such projects, it is necessary to adhere to strict compliance with the materials included in the project estimate. It is unacceptable to use projects for other types of materials using concrete floors that, due to their geometric dimensions, do not provide the required amount of overlap. In the event that the calculated data turns out to be incorrect and the length of the reinforced concrete products does not correspond to the actual ones, the available slabs for installation and installation must be chopped or sawed.
Ideally, in order to reduce construction costs to a minimum, it is necessary to install slabs of the required length and dimensions directly from the machine. At the same time, the costs of loading and unloading operations are reduced, and there is no need to equip a site for storing and stacking building materials. According to the storage rules, reinforced concrete products can only be laid on flat ground with wooden pads installed at a distance of 400 mm from the edge. The height of the stack cannot exceed 2.5 meters, and reinforced concrete products must be separated from each other by slats with a thickness of at least 25 mm. The slabs are stored under a canopy to prevent precipitation from getting onto the surface of future floors. Storage locations are selected based on accessibility during crane operation.
Reinforcement of a monolithic floor. Longitudinal and transverse reinforcement
Concrete works great in compression. The reinforcement is tensile. By combining these two elements we get a composite material. Reinforced concrete, which uses the strengths of each component. Obviously, the reinforcement must be installed in the tensile zone of concrete and absorb tensile forces. Such reinforcement is called longitudinal or working. It must have good adhesion to the concrete, otherwise it will not be able to transfer the load to it. For working reinforcement, periodic profile rods are used. They are designated A-III (according to the old GOST) or A400 (according to the new one).
The distance between reinforcing bars is the reinforcement pitch. For floors it is usually taken equal to 150 or 200 mm. In case of pinching, a supporting moment occurs in the support zone. It generates tensile force in the upper zone. Therefore, working reinforcement in monolithic floors is placed both in the upper and lower zones of concrete. Particular attention should be paid to the lower reinforcement in the center of the slab, and the upper reinforcement at its edges. And also in the area of support on internal, intermediate walls/columns, if any, this is where the greatest stresses arise.
To ensure the required position of the upper reinforcement during concreting, transverse reinforcement is used. It is located vertically. It can be in the form of supporting frames or specially bent parts. In lightly loaded slabs they perform a structural function. Under heavy loads, transverse reinforcement is involved in the work, preventing delamination (cracking of the slab).
In private construction, transverse reinforcement in floor slabs usually performs a purely structural function. The supporting shear force (the “shear” force) is absorbed by the concrete. An exception is the presence of point supports - racks (columns). In this case, it will be necessary to calculate the transverse reinforcement in the support zone. Transverse reinforcement is usually provided with a smooth profile. It is designated AI or A240.
To support the upper reinforcement during concreting, bent U-shaped parts are most widely used.
Installation of floor reinforcement.
Pouring the floor with concrete.
How to anchor slabs?
The project must have a diagram according to which the slabs are anchored - if there is none, you can use a standard one. After this, all the gaps between the panels and holes must be filled with mortar to create a monolithic structure. This provides the necessary rigidity, as well as the proper level of heat and sound insulation. If you have reason to believe that water has somehow gotten into the cavities inside the panels, be sure to get rid of it - this will require drilling holes. Otherwise, in winter at low temperatures, the water will turn into ice and destroy the ceiling.
Monolithic floor thickness
In accordance with the calculations performed, we can recommend, for the installation of monolithic floors, in private houses, a floor thickness of 150 mm, for spans up to 4.5 m and 200 mm up to 6 m. It is not advisable to exceed the span of 6m. The diameter of the reinforcement depends not only on the load and span, but also on the thickness of the slab. The often installed fittings with a diameter of 12 mm and a pitch of 200 mm will form a significant reserve. Usually you can get by with 8mm at 150mm pitches or 10mm at 200mm pitches. Even this reinforcement is unlikely to work to the limit. The payload is assumed to be 300 kg/m2 - in a home it can only be formed by a large closet completely filled with books. The actual load in residential buildings is, as a rule, significantly less.
The total required amount of reinforcement can be easily determined based on the average reinforcement weight coefficient of 80 kg/m3. That is, to install a floor with an area of 50 m2 with a thickness of 20 cm (0.2 m), you will need 50 * 0.2 * 80 = 800 kg of reinforcement (approximately).
In the presence of concentrated or more significant loads and spans, the diameter and pitch of the reinforcement specified in this article cannot be used for constructing a monolithic floor. Calculations for the corresponding values will be required.
Explanation of markings
The main parameters of the product are applied by the manufacturer to the side surface of the slab using an alphanumeric code. Full product markings must be displayed in the quality certificate for the product provided by the manufacturer. The consumer can independently decipher the marking using the following examples:
- PC 72-12-8- AtVt: P – hollow slab; K – voids are round in cross-section; 72 – product length in decimeters (7.2 m); 12 – product width in decimeters (1.2 m); 8 — permissible load in kPa (800 kgf/m²); AtV - the class of reinforcement used in the product; t – heavy concrete was used in the production of the slab.
Marking of slabs - PB 75-12-16 : P – hollow slab; B – made by formless molding; 75 – length in decimeters (7.5 m); 12 – width in decimeters (1.2 m); 16 – permissible load in kPa (1600 kg/m²).
- 2PG-60-4-AtVt : 2PG - ribbed slab with a height of 300 mm; 60 – length in decimeters (6m); 4 – load-bearing capacity in kPa (400 kg/m²); AtV – class of fittings; t - heavy concrete was used in the production of the slab.
- P-60-12-3.5 : P – solid section slab; 60 – length in decimeters (6m); 12 – width in decimeters (1.2 m); 3.5 – concrete strength corresponds to class B3.5.
Calculation of parameters
According to regulatory documentation, the depth of support for floor slabs for brick supports is in the range of 9-12 cm. In this case, the minimum support depends on:
- length of the finished reinforced concrete product,
- span masses,
- presence of thermal insulation,
- wall thickness,
- cladding,
- actual or expected load,
- seismic resistance of the building.
The minimum acceptable indicator is taken as the main indicator. So, for example, the smallest support for products along the length is:
- up to 4 m – 71 mm;
- more than 4 m – 91 mm.
The calculation takes into account the duration of the load, its nature - permanent or temporary. It is best to have the calculations carried out by a qualified builder or engineer.
Hatch Formation
Often it is necessary to form a floor hatch of a suitable size. In order not to spoil it, you need to carefully monitor the formation of the hole in it.
- First, markings should be applied to the slab, and cuts should also be made using a grinder
- Reinforcement is cut using an autogen
- The bottom part breaks through
Before starting installation work, it is necessary to carry out a set of preparatory measures that will ensure the reliability of the foundation. We wrote in this article how to make a foundation for an aerated concrete house