The foundation of a house is its most important, and most expensive, part. According to experts, depending on the type of foundation, its price can range from 40% to 60% of the construction cost. Of all the existing types of foundations, strip foundations are considered one of the inexpensive ones - they are suitable for all types of buildings.
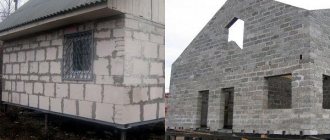
Properly calculated and made, it will successfully work under heavy buildings (reinforced concrete buildings, brick) and under light ones (wood, frame houses). A strip foundation for a house made of aerated concrete will serve its purpose well. Depending on the type and density, an aerated concrete block measuring 200x300x600 weighs from 18 to 25 kg. Buildings constructed from materials of this weight are considered lightweight, so they can be installed on strip, slab or column foundations.
Selecting the type and preparing the site for the construction of a strip foundation for a house made of aerated concrete
Not all types of foundations are suitable for a house made of aerated concrete. This is due to the “capriciousness” of the material. Some are not stable enough, while others will be unreasonably expensive.
When choosing a type, there are several factors to consider:
- properties of aerated concrete (ability to withstand high compressive loads and inability to work in tension);
- characteristics of the site (relief features, soil composition, height of groundwater);
- design features of the house (size in plan, number of storeys, presence of a basement, plinth, load on the foundation).
Among the types that are still permissible to use are the following:
- monolithic strip foundation for a house
made of aerated concrete; - prefabricated strip foundation;
- slab;
- pile with a monolithic reinforced concrete grillage;
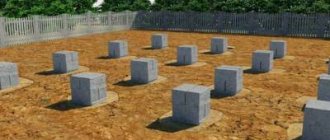
- columnar.
The last type - columnar, is practically not in demand when building a house from aerated concrete. It will only be stable on very stable soils. The slab version was not suitable, since I was designing several semi-basements located below the level of the planned ground. Well, it’s impossible to make a pile one with your own hands. In addition, the small size of the site (approximately 18x55 m) made it difficult to use large construction equipment. For the same reason, I abandoned the prefabricated strip structure. So it turned out that I could only build a monolithic strip foundation for my house on my own.
After I removed about 30 cm of plant soil and dug several test holes, I became convinced that the site where the house was being built was predominantly clay soil with large inclusions of sand lenses. The presence of clay and a fairly high seasonal groundwater level did not allow the use of a shallow foundation.
When the groundwater level is high, heaving soils can lift the structure when the water freezes. To prevent this from happening, the base of the foundation must be below the level of seasonal freezing of the soil.
In our region, the maximum depth of soil freezing is at 1.25 m, so the base should be lower. In addition, for a house made of aerated concrete, the structure must be very rigid. Otherwise, stresses may arise in the walls due to uneven subsidence of the foundations. But aerated concrete cannot withstand tensile stress. Cracks will appear in the walls, even if the masonry is reinforced. Such cracks may not indicate a general decrease in strength, but the insulating properties of the walls will be significantly reduced.
Monolithic design.
On complex soils, when there is a close approach to the groundwater surface, the choice is a monolithic concrete slab. Plates are divided into 2 subtypes:
- with stiffening ribs;
- without stiffeners.
The absence of stiffeners sharply reduces the strength of the slab, so this option is only suitable for a small building, and not for a residential building or cottage. For example, for a barn. For a house made of aerated concrete blocks, the best option on difficult soils is a shallow monolithic slab with reinforcement ribs made of reinforcement. It is distinguished by the following qualities:
- high load-bearing capacity;
- integrity during soil freezing;
- high resistance to deformation during soil shifts.
The listed parameters allow the construction of 2-3-story buildings made of aerated concrete on a monolithic foundation. This is also possible on sandy soil without heaving. It should be said that a higher number of storeys is unacceptable when building from this material.
Disadvantages of a monolithic base:
- It is impossible to make a basement, since a solid reinforced concrete pad lies under the entire area of the building.
- High cost due to high costs of reinforcement and concrete mortar.
Calculation of strip foundation dimensions
For a house made of aerated concrete, calculating the dimensions of the foundation involves assigning the width and height of the section, as well as the area of the base. The height of my structure is determined by the depth of soil freezing and the size of the above-ground part - the base. In total, the total height of the tape should be 1.8 meters (1.3 meters for the underground part, and 0.5 meters for the base).
The width of a reinforced concrete foundation can be equal to the area of the base with a rectangular cross-section. However, if the load is large, and this happens if the weight of the building is large, then the width of the base should be greater than the width of the wall.
If the height of the foundation tape is high, its width must be reduced in relation to the sole. This will help significantly save on the amount of concrete. And considering that I prepared the concrete with my own hands, there were also savings in labor costs and time.
The width of the sole is greater than the wall thickness of the strip foundation
So, I took the width of the tape equal to the thickness of the wall, that is, the width of the aerated concrete block - 375 mm.
All that remains is to determine the width of the base of the foundation. And here a more complicated calculation is required. To do this, you need to know the load on the foundation (the weight of the house) and the bearing capacity of the soil (design resistance).
I talked about how to calculate the load on the foundation in the article “Calculation of the foundation. Loads and impacts."
The bearing capacity of the soil is determined from the table Calculated resistances of various soils.
The calculated weight of the house is 400 tons. The calculated soil resistance is 3.0 kg/sq.cm.
According to the calculation method described by me in the article “Strip foundation. Calculation of sizes”, I determined the width of the sole. It must be at least 48.49 cm, so I took it to be 50 cm.
Making such a foundation does not cause difficulties if concreting is done in tiers. I took the height of the tier to be 30 cm, since in this case it was more convenient to carry out formwork work. For the adjustable formwork, I used homemade panels made from inch boards (25 mm thick) 100 mm wide.
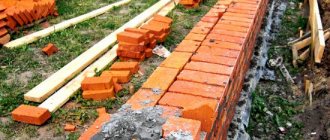
Laying the first row
The first row of aerated concrete blocks must be laid on a flat, waterproofed base
This is important, since capillary absorption of moisture in cellular types of concrete occurs very actively
Procedure:
- The surface of the tape is leveled and, if necessary, plastered to obtain a perfectly flat and horizontal surface.
- A double layer of waterproofing is laid - usually roofing felt is used.
- The highest section of the tape is determined (usually one of the corners). Ideally there should be no difference.
- Aerated concrete blocks are laid in the corners and carefully aligned along the axes of the future walls and horizontally. If necessary, an increased thickness of the adhesive layer is used.
- Cords are stretched between the corner blocks and intermediate blocks are laid. Using the cords as a guide, their position is aligned along the axes of the walls and horizontally.
- The surface of the first row is reinforced.
- After this, you can proceed to laying the second row.
The technology for laying aerated concrete does not differ from the usual one; an important point is the high-quality and reliable separation from the foundation material, which prevents the penetration of moisture.
Selection of foundation materials
To make a monolithic reinforced concrete strip foundation for a house, concrete and reinforcement are needed. According to calculations, the load on the tape was only 3.23 kg/sq.cm. Any concrete can withstand such a load. But, taking into account the proximity of groundwater, I designated the concrete grade structurally - M300. It took about 22 cubic meters. meters.
A huge margin of safety might not be justified for a house made of timber or logs. But for aerated concrete, a rigid strip structure will be the right solution. Reinforcement of the strip foundation is carried out along the top and bottom of the strip, since in these cross-sectional zones the greatest stresses arise when the structure bends due to uneven settlement.
As working loaded reinforcement, I used three hot-rolled A-III rods with a diameter of 16 mm. Transverse reinforcement of the tape was carried out with composite reinforcement with a diameter of 8 mm.
Transverse reinforcement is necessary to ensure the stability of the foundation wall, but with the loads that arise from my house, this task is irrelevant. The main function of the vertical rods in my design is to connect the concreting tiers together.
Reinforcement and knitting
The creation of a reinforcing frame is traditionally carried out by knitting with soft annealed steel wire with a diameter of 0.5-2 mm, depending on the size of the frame and the thickness of the rod. For knitting, a special tool is used - a hook, which is inserted into the loop and twisted, tightly connecting the rods.
The assembly turns out to be quite strong, considering that after pouring there is no point in connecting the rods - they work on their own.
Some builders use welding when assembling the frame. This is a completely acceptable option, but it is not suitable for fiberglass reinforcement.
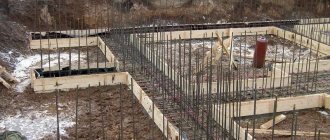
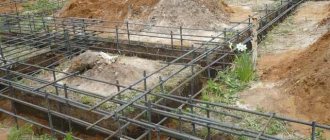
Step-by-step technology for constructing a monolithic strip foundation for a house made of aerated concrete
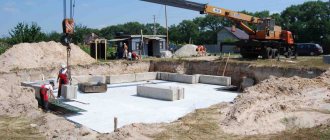
The construction of a strip foundation begins with cutting out a trench. In my case this was very problematic. The area is so narrow that there was even nowhere to store the soil removed from the trench. There was so much of it that the entire free area of the site was littered. Some of the soil even had to be stored inside the foundation. Subsequently, the soil was gradually used up to backfill each tier.
Contrary to popular misconception, a monolithic reinforced concrete strip foundation can be erected without filling the entire volume in one go.
I concreted the structure in tiers 300 mm high. Sometimes it was even necessary to tear the tier apart, since it was difficult to fill it entirely in one day. This is also nothing to worry about for the future foundation. It’s just that the technological break must be made at an angle, connecting the two “grips” with additional pieces of reinforcement. This technology allowed me to significantly save money on formwork by making it adjustable.
So, the first step was to level the bottom of the trench with sand, ensuring it was level. To compact the sand, it is enough to thoroughly water it. The sand cushion simultaneously further reduces the foundation pressure on the base. Its top should be below the freezing depth of the soil.
Adding soil, especially clay soil, for leveling is not allowed. It will not be possible to compact it, and later, under load, it will still sag, causing uneven settlement of the foundation.
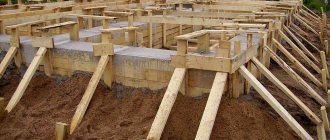
Having leveled the bottom, I installed the formwork for the first tier. Its width should be equal to the width of the base of the foundation, that is, in my case, 500 mm. The panels must be fastened carefully, since the concrete mixture has a large mass and can destroy the formwork.
After installing the shields, it is necessary to tie the reinforced frame for the first tier. The reinforcement in the corners of the foundation is not allowed to be connected crosswise. It is necessary to bend it, and make the joints of the rods in straight sections.
When connecting reinforcing bars, welding is not allowed, since heating changes the properties of the steel. The reinforcement is connected with an overlap with knitting wire, and its value must be at least 30 times the diameter of the reinforcement.
It is imperative to provide for the installation of transverse rods that will connect the lower and upper reinforcement chords, and also ensure reliable connection of the tiers with each other. I prepared the concrete mixture using a concrete mixer.
After pouring the first tier and initial hardening of the concrete (4-5 days), it is possible to strip the formwork and install panels for the next tier. Step by step, tier by tier, I filled the structure to the entire design height. At the same time, I filled the trenches with soil and sand.
In places where utilities (pipelines, cables) pass through the tiers, I left technological openings into which I immediately laid pipes. The edges of the openings must be additionally reinforced with reinforcement.
It is unacceptable to rigidly embed pipes in the tape, otherwise even with a slight settlement they may be damaged or even destroyed.
After installing the formwork for the top tier, I made a reinforcing belt. It is at the lowest and highest points of the foundation section that large tensile forces can occur, so in the middle tiers only structural reinforcement is needed, which I made from composite.
The rods must be installed in such a way that when concreting it is completely covered by a protective layer of mixture with a thickness of at least 25 mm. This will ensure reliable adhesion of the reinforcement to the concrete and prevent its corrosion if the material is used in conditions of high humidity.
The upper edge of the foundation, if it turns out to be uneven, can be leveled with cement-sand mortar.
About insulating shallow tape
There are many conflicting opinions about the need or uselessness of insulating MZFL. The real effect of using various insulation materials cannot be felt or seen in any way, so computer modeling is used to evaluate insulation. But in 90% of cases it shows low insulation efficiency using various methods and technologies.
Important! Carrying out the insulation operation involves a sharp increase in labor costs for expanding the trench and an increase in the volume of excavation work, and requires the use of additional expensive insulation materials.
Modeling shows that the level of heaving decreases by an average of 7%. The greatest efficiency of polystyrene insulation is achieved when polystyrene slabs are placed at the level of the top mark of the sand cushion and at a width of at least 60 cm along the entire perimeter of the tape. However, there are no guarantees that the effect of soil heaving will be completely eliminated due to a number of possible side factors of a natural and climatic nature.
When studying numerous persistent beliefs about the benefits of insulating the foundation with polystyrene slabs, the question arises about their confirmation by scientific research. As a rule, there are none, with the exception of research coming from manufacturers of insulating materials.
The conclusion can be drawn unequivocally: until the designers find the optimal insulation solution, confirmed by accurate calculations, step-by-step instructions and justified by building regulations, there is no point in insulating a shallow strip foundation. Of course, this is only a subjective opinion of professionals, based on personal practice and experience. Just like the opinion of opponents, this statement requires confirmation by standards and regulations.
There are only two proven and guaranteed ways to reduce soil heaving:
- Replacement of the heaving layer of soil with non-metallic traditional natural materials - sand and crushed stone or mixtures thereof.
- Installation of a drainage system appropriate to the soil characteristics.
As an exception: insulation of the base and blind area, which retain geothermal heat. But this is not for everyone and if possible, because before the appearance of all kinds of insulation on the market, heaving was dealt with in other ways.
How much will a strip foundation for a home built by yourself cost?
Volunteer Helpers
As a result of the work that I carried out over three summer months, I was able to make the correct reliable strip foundation for the house
from aerated concrete. And after finishing the work, I was interested in how much more cost-effective it was to build it with my own hands.
Even during the work process, I took into account how much money I spend on materials: crushed stone, sand, cement and reinforcement, step by step recording data on their quantity and cost. I did not include the cost of formwork panels in the price of materials, since I used them more than once, installing formwork for other structures - fences, retaining walls, foundations of utility buildings. As a result, it turned out that the cost of materials for the construction of the foundation did not exceed 150 thousand rubles. This is practically all the costs (not counting the completely insignificant cost of electricity used to operate the concrete mixer).
Well, to find out how much a ready-made turnkey foundation would cost me, I turned to several construction organizations, where, based on my parameters, they calculated the price that I had to pay for it. It turned out that they were ready to build such a foundation for me for only... 600-800 thousand rubles! The cost savings when constructing the foundation with your own hands amounted to at least 450 thousand rubles. It turned out to be a good extra income, considering that I was doing this in my free time from my main job.
Perhaps someone will find my technology interesting, and someone will try to make a structure with their own hands. Essentially, this article is a step-by-step instruction on how to build a monolithic strip foundation with your own hands. If necessary, I am ready to answer all clarifying questions in the comments.
If you found the information useful and interesting, do not forget to share it with friends and like-minded people using the social network buttons. Subscribe to the news, it will be interesting.
You may be interested in other articles from the category
"Do it yourself house"
Fill
For pouring, the easiest way is to order ready-made concrete in the required quantity. In terms of costs, this is not much more than making it yourself, but the time savings are significant.
If we take into account that a pause in pouring that lasts more than a day makes it necessary to wait for the casting to completely harden, after which work can continue, then the advantage of ordering ready-made high-quality concrete is obvious.
Filling is best done without interruptions and from several points. The surface is leveled with a special spatula. After pouring, the tape must be covered from the sun with plastic film, otherwise it will crack.
Final stages of work
Drying of concrete is carried out in stages. For the first 3 days, you need to water the tape with water every 4 hours, then for 7 days, watering is done 3 times a day. This is necessary to equalize moisture in the thickness of the material and prevent the formation of cracks.
The formwork is removed after 10 days, and work can continue after a month. After this, waterproofing is applied, the sinuses are filled and preparations are made for the construction of walls.