A monolithic strip foundation is an integral structure made of steel reinforcement and concrete strip. It is located along the perimeter of the building and under all load-bearing walls and elements. If the technology is followed, the structure becomes a single whole - a monolith - and has very high reliability and strength characteristics. For this reason, it is popular both in the construction of multi-storey buildings and private cottages.
It is advisable to use a monolithic strip foundation when the groundwater level is low: when it is located below the required foundation depth. Otherwise, it is necessary to organize drainage, and this requires additional (and considerable) funds.
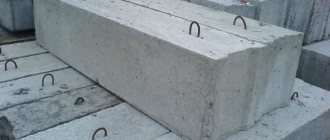
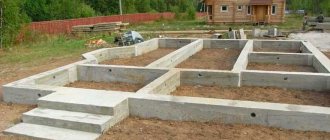
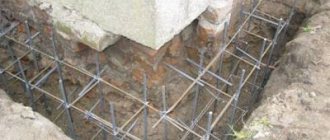
This is what a finished monolithic strip foundation looks like
Foundation calculation and drawing
To draw up a diagram of a monolithic strip foundation, it is necessary to carry out basic calculations according to SP 50-101-2004 “Design and installation of foundations and foundations of buildings and structures.”
Determine the perimeter of the building, the width of the walls, and the height of the fill. The height of the strip foundation depends on its depth (dictated by the type of soil, the massiveness of the future building) and the basement part protruding above ground level.
The volume of concrete of a monolithic foundation is obtained by multiplying its height by the length under the load-bearing walls and their width. Numerical values are taken from the plan and foundation sections in the building design.
To calculate the required amount of materials for formwork, we determine the area of the side surfaces. To do this, multiply the height of the foundation by its double perimeter. We divide the area of the side surfaces by the area of a unit of lumber and get the required number of boards or sheets of plywood.
On the plan of the strip monolithic foundation, all design solutions should be displayed in the graphic part:
- the building is linked to the terrain (on the layout plan) using a coordinate or dimensional reference;
- building axis;
- linking foundation structures to the building axes with dimensions;
- concrete class, waterproof and frost resistance grade, as well as other characteristics necessary to ensure the operability and durability of the foundation structure;
- foundation reinforcement (class of reinforcement, number and diameter of rods and their pitch, size of the protective layer);
- places of passage of utility lines;
- solution for insulation and waterproofing of strip foundations.
Additionally, in the section diagram, the base of the foundation and its upper part are noted. The descriptive part of the foundation plan drawing must contain a detailed specification of materials for its construction (name and quantity), technological instructions for the production of work and the use of materials.
Thus, you can calculate and draw up a diagram of the future foundation for the house yourself using special programs or order it from an engineer. The latter option will be more reliable, although it will require additional costs.
It is important to know! If a basement is planned, this must be shown in the drawing. Such a plan significantly increases the complexity of the scheme; in this case, its development should be entrusted to professionals.
Basic mistakes
Construction without a design and calculations is the main mistake. Each object has its own characteristics, so simply making foundations according to one model risks getting a low-quality and short-lived foundation.
Ignoring the importance of the sand cushion is also a mistake . The pillow should be the right height and well compacted. It will protect the tape from uneven settlement and cracking.
Saving on fittings is a mistake. Concrete is a fairly strong material, but it does not withstand tensile loads well. If the reinforcing frame is not strong enough, the tape will quickly collapse and the entire building will fail.
Materials and tools for installing monolithic strip support
The technology for constructing a monolithic strip foundation is quite simple and requires minimal use of specialized equipment. If you are faced with the task of minimizing the cost of construction, you can do without renting additional equipment. But, to get the best result, it is preferable to use the entire list of special equipment.
Tools and technique:
- level;
- laser level;
- hammer;
- pegs or reinforcement bars (for marking);
- cord for marking;
- shovel and crowbar;
- gun for tying reinforcement or welding machine;
- concrete mixer;
- vibrating or manual rammer.
Materials:
- sand;
- crushed stone;
- cement;
- water;
- reinforcement (for reinforcing belt) with a diameter of 10-16 mm;
- plywood, board, timber, nails/screws, sealant (for formwork);
- thick polyethylene film;
- waterproofing materials;
- insulation.
Difficult sections of the diagram.
If you are planning to build a capital and large-scale structure, then it will most likely require the creation of a complex prefabricated or monolithic foundation. As a rule, such diagrams cannot be contained in one drawing. Therefore, experts in the construction industry strongly recommend developing separate plans for complex areas. Alternatively, you can apply additional centerlines and section designations (if necessary) to the main plan, as well as create large sections on the sheet, having previously made a mark about this. In addition, depending on the degree of section, it is recommended to choose a scale of 1 to 20, 1 to 25, or 1 to 50, in order to get the section and complex structural elements as close as possible.
Strip foundation plan drawing.
Foundation installation: step-by-step instructions
- Site preparation
Before starting construction, it is necessary to conduct a hydrogeological analysis of the soil. Next, you need to level the site and remove the top layer of soil.
- Marking
Remove and secure the axes of the future building at the construction site in accordance with the project. It is necessary to take into account the thickness of the walls of a monolithic strip foundation (in accordance with the project, it can be different).
At the intersection points of the axes and at the ends of the axes, pegs or rods are installed, between which the cord is pulled.
- Cast-off
A cast-off is a continuous or intermittent fencing that determines the position of the axes of the building and the main dimensions of the foundation in plan.
To do this, use an edged board or pegs about 4 cm thick. In addition to the alignment axes, the cross-section of the prefabricated strip foundation is indicated. Worn-out will allow you to strictly adhere to the design dimensions in the future. The structure is made of pegs driven into the ground and a board that is nailed to them at the same level. The casting should not interfere with construction work, so it is done at a distance of at least 1 m from the edge of the trench or pit.
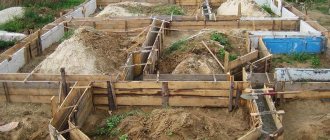
- Excavation
Excavation work - a trench is dug according to the markings, taking into account the width of the lower part of the foundation. When choosing a mechanized excavation, use a level to control the dimensions and horizontality of the pit. The last 15-30 cm of depth must be completed manually. After this, the horizontalness of the bottom and compliance with the breakdown along the axes are checked. If the soil is loose, it will need to be further compacted. The walls of the pit are its sides, forming the perimeter of the excavation. Slopes are walls inclined at a given angle. Depending on the type of soil and the conditions in which the work is carried out, it is determined what walls the pit should have: vertical or a certain slope must be specified. The walls of the pit are often constructed with the strengthening of the soil against possible collapse SP 45.13330.2012 EARTH STRUCTURES, FOUNDATIONS AND FOUNDATIONS.
Drains or drainage ditches are installed for pumping or discharging groundwater and sediments in accordance with SP 250.1325800.2016 BUILDINGS AND STRUCTURES. PROTECTION FROM GROUNDWATER and SP 104.13330.2016 “Engineering protection of the territory from flooding and flooding.” To form a drainage cushion, one layer of sand and crushed stone/gravel 10 cm thick is laid sequentially. Each level is compacted. In some cases, these materials are mixed and a 20 cm thick preparation is poured. The cushion should be 20-30 cm wider than the slab.
Even on dense soils with high bearing capacity, it is recommended to equip a drainage layer for the foundation.
- Installation of formwork
The formwork is installed to the entire height of the foundation. The structure is assembled from panels (boards or plywood) of sufficient strength to withstand the pressure of the concrete being laid. For this purpose, the shields are equipped with stiffening ribs made of timber with a cross-section of 50 x 100 mm.
The top of the formwork is fixed to the required thickness of the foundation using boards that connect the two sides of the formwork using self-tapping screws.
The verticality of the formwork walls is ensured by installing timber spacers in increments of 60-100 cm, which rest against the trench wall and are securely fastened.
Such formwork will need to be dismantled after the foundation hardens, but if desired, it is permissible to use permanent types of frames.
- Reinforcement
Reinforcement of a monolithic strip foundation is carried out with a volumetric reinforcement cage in accordance with the project. The reinforcement is installed longitudinally: working (with a diameter of at least 12 mm, class A500) and secondary (clamps with a diameter of 6-8 mm, A320 reinforcement with a pitch of 150-200 mm). It is very important that the rod has a protective layer of concrete of at least 20 mm from all external surfaces of the foundation and from the base soil. For this purpose, special plastic clamps are used.
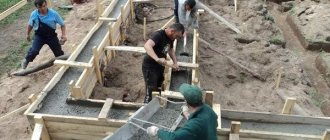
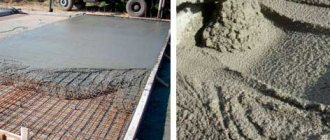
- Preparation of concrete
You can order delivery of ready-made concrete or make the mixture yourself. In any case, it is necessary to fill it as quickly as possible, ideally in one go. This will avoid uneven hardening of the foundation and stratification of the solution.
For concrete, use cement CEM II 32.5N (former grade M400), or better yet, higher. Sand, crushed stone and water for mixing must be taken in accordance with the requirements of GOST 26633-2015 Heavy and fine-grained concrete.
To further improve the characteristics of concrete, you need to buy CEMMIX superplasticizers. These are multifunctional supplements that serve a variety of purposes. For example, CemBase is used specifically for constructing the underground part of foundations, increases the strength and frost resistance of concrete, and accelerates the development of strength. The latter may be especially important at the end of the construction season.
You can buy superplasticizers inexpensively in Leroy; CemPlast is one of the best. It increases the mobility of concrete, significantly speeding up its uniform placement, and also allows you to use less water to prepare the mixture. The result is a stronger foundation for the home. The CemAqua waterproofing additive gives foundation concrete additional water-repellent properties, which has a positive effect on the frost resistance and durability of the structure as a whole.
Those who decide to buy superplasticizers in bulk from a manufacturer often choose Plastix plasticizer. It remains a universal means of increasing the mobility of concrete and the degree of its response. Polypropylene or basalt Fibra CEMMIX is useful for additional reinforcement of the mixture, which will allow you to achieve maximum strength of the foundation.
Concrete selection
All industrial concrete is divided into grades . Each brand is characterized by its compressive strength. The higher the grade, the higher the ability of concrete to withstand compressive pressure when hardened. In addition to the brand, concrete also has a class. In modern construction, class is a fundamental indicator. It is by class that ready-mixed concrete is ordered for a construction site.
The class is indicated in the regulatory and design documentation. But many builders are more accustomed to focusing on the brand. To avoid misunderstandings, there are correspondence tables for brands and classes.
When constructing lightweight buildings made of wood or porous concrete, the foundation is poured with class B15 concrete, which corresponds to grade M200. Brick houses with reinforced concrete floors are erected on foundations made of concrete class B20, or grade M250. For large brick cottages with 2 or 3 floors, as well as for small industrial facilities, the foundation is made of B22 concrete (grade M300).
In regions with high humidity and severe winter frosts, concrete with high levels of moisture resistance and frost resistance is used. This is class B30 or grade M400 . More durable concrete is rarely used in private construction. Sometimes it is used to pour a strip foundation for a massive building.
Read more about concrete grades for strip foundations here, and how to calculate the amount for pouring here.
Plastix
Multifunctional plasticizing and water-reducing additive for concrete.
More details
At low and negative temperatures, it is necessary to add anti-frost additives CemFrio or Hotice CEMMIX to concrete, which are also plasticizing additives.
- Concrete laying
Before laying concrete, it is necessary to insert pipe sections into the formwork where communications are planned to be laid. It is important to organize a convenient supply of the mixture, for example, through a chute. It is advisable to work the newly filled area with a submersible vibrator to compact it and eliminate air bubbles. If there is no special equipment, you can resort to bayoneting with a rod followed by tapping the formwork.
It is important to know! Concrete should not fall into the formwork from a height of more than 1.5 m. Otherwise, it will begin to delaminate, which will negatively affect the strength of the foundation.
- Caring for freshly laid concrete
In hot and/or windy weather, the surface of the monolithic strip foundation should be covered with a film so that it does not dry out and strength gains occur evenly. Concrete must be moistened every 2 hours for 7 days. In such conditions, the formwork can be removed on the 4th day, since the structure will have time to gain about 50% strength.
At low and negative temperatures, concrete must be covered to protect against heat loss or additional measures must be taken to heat the concrete until the critical strength of the structure is reached.
- Final work
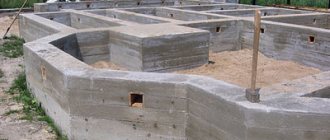
After removing the formwork, thermal and waterproofing of the strip monolithic foundation is carried out. In this case, the selection of materials is carried out individually. The free space between the walls of the trench and the foundation is filled with earth and compacted.
Construction of a basement in a house with a strip foundation
For a strip foundation with a depth of more than 0.5 m, the issue of constructing a basement can be considered. It’s worth noting right away that the project is far from budget-friendly: the volume of excavation and concrete work increases, and labor costs increase many times over.
As a rule, a basement is made under one small room in the house. In this case, the monolithic tape will serve as the walls of the basement. It should be well insulated not only from the inside, but also from the outside.
In cross-section, the basement under a house with a strip foundation looks like this:
The basement floor is filled with concrete mixture with reinforced frame. The thickness of the floor is at least 30 cm. The best option is to tie it to the tape using floor reinforcement, forming a rigid coupling. In this case, the floor will not sag.
You can ask your question to our author:
Installation of a pillow under the base
Use medium or coarse sand
A cushion is required under the base structure slab, which is placed in a pre-prepared foundation pit. To properly lay a sand and gravel cushion, you can follow step-by-step instructions, such as:
- First of all, medium or coarse sand is poured into the bottom of the pit. It is imperative that the granules be washed from clay, lime, and other typical impurities, due to which partial shrinkage of the structure will begin to form. This sand-based cushion is required to ensure that the entire load transferred from the building to the soil structure is uniform. Also, thanks to this installation, during the period of soil heaving, the foundation structure does not collapse.
- During the laying of the cushion layers, each of them is compacted separately. In simple words, a dense cake is formed, which contains several levels. Each of them has a height of 30 cm. This process of performing the work is required so that after a certain period of time a residential building based on a slab foundation does not sink into the soil layers.
- At the stage of installing a sand cushion under the foundation, you can think about installing utilities, such as a drainage system and water supply. The remaining types are performed much later.
- After the pillow is ready, a fabric consisting of geotextile should be spread over it. This material will prevent sand and gravel from mixing.
- A 20 cm layer of gravel is poured on top of the geotextile. This cushion is necessary so that the moisture that forms on the surface does not linger near the concrete base structure, but gradually goes through the layers of gravel and sand into the soil.
- The gravel must be laid evenly on the sand bed. Each layer must be compacted. If all requirements are not met, the constructed building will begin to collapse after a short period of time due to excessive shrinkage into the soil structure.
Determination of the degree of depth.
As already mentioned, the depth of the trench to create a strip-type foundation is calculated depending on the scope of application of the supports. Today, two main types of structures are popular – deep and shallow. Once you decide which option is worth giving preference, the corresponding designation should be made on the plan.
- The first type of base is characterized by reinforced reinforcement and is an excellent choice for large structures, the design of which involves the creation of basements, attics or heavy partitions. It is believed that the most optimal indicator of the degree of deepening of a trench for a tape is an indicator that is 20-25 meters higher than the level of soil freezing depth in a particular region.
- The drawings certainly contain information about how deep the tape will be buried. It is important to remember that the amount of consumables for forming buried supports is an order of magnitude greater.
Strip foundation reinforcement plan drawing.
Additional drawing (complex reinforcement).
Will the services of professional specialists be required to create the drawing?
Of course, a plan for a strip foundation for a residential building requires much more accurate and detailed calculations, which are best left to a specialist. When contacting a master of his craft, you can be sure that the drawing will:
- easy to read;
- as accurate as possible;
- meeting all SNiP requirements;
- containing comprehensive information about the preparatory work;
- having, in addition to the main drawing, technical applications in the form of various tables, diagrams, etc.
Strip foundation formwork plan drawing.
In this article, we tried to provide comprehensive information about the process and principle of creating a drawing of a strip foundation for residential as well as non-residential structures. And remember that if you are not confident in your abilities, then do not try to carry out the calculations necessary for such a basis on your own or using unlicensed programs. Saving in this case can be fraught with huge losses or even the destruction of the entire building or fence.
Fundamental differences in support schemes.
Above, we tried to describe in as much detail as possible the process of creating a structure plan for which a strip foundation drawing is used. But at the same time, we should not forget that the drawings containing information about the prefabricated type of supports are fundamentally different from monolithic ones in that they contain a section, as well as a designation of straight and angular reinforced concrete structures.
Strip foundation plan drawing.
Installation of slabs
Let's consider the algorithm for constructing a foundation made of flat foundation reinforced concrete slabs.
Preparation
Certain preparatory work needs to be done. The slab should be laid evenly, carefully leveling the base and removing vegetation. A foundation pit is prepared for the entire area of the building being constructed, the depth of which reaches fifty centimeters (the cushion and the thickness of the slab are taken into account)
Crushed stone and sand are poured onto the bottom in a layer of fifteen to thirty centimeters, taking into account the heaving of the soil. The layers are backfilled to a height of eight to twelve centimeters, and careful compaction is performed.
Waterproofing and insulation
We lay a layer of waterproofing material on the prepared pillow. Most often, roofing felt is used, from which two or three layers are made, leaving overlapping strips of fifteen to twenty centimeters.
A thermal insulation layer is laid over the rolled material. It is recommended to use foam boards or polypropylene foam as insulation. The main advantage of this material is its excellent thermal insulation properties, increased resistance to the negative effects of moisture and low temperature conditions. It is allowed to make the insulation layer from expanded clay, pouring a ten-centimeter layer.
Installation of slabs
To cover the entire foundation surface, you will need a certain number of ready-made reinforced concrete flat slabs. They are laid using lifting mechanisms as close to each other as possible. Product thickness parameters are determined taking into account the expected load forces created by the future object.
Under light outbuildings, it is enough to lay slabs of standard sizes, the thickness of which varies between twelve and fifteen centimeters. For the heaviest objects, slabs from twenty-five to thirty centimeters thick are used. The steel bars of the laid products are joined to create an overall reinforcing system. The surface of the laid slabs is carefully leveled relative to each element.
Concreting
There are gaps in the joining areas of the laid slabs, which should be sealed with a solution of sand and cement. To prepare the mixture, use cement material grade m 300 and higher and sand, taken in a proportional ratio of “one to three.” As soon as the solution has dried, a leveling screed is placed over the entire foundation surface.
To carry it out, use a similar mortar mixture, pouring a layer from three to five centimeters thick. The main goal is to form a perfectly smooth surface, for which during work you will have to use a building level for control and a rule that needs to be used to level the surface.
The next stage is to properly dry the poured screed, eliminating the appearance of cracks on the surface. To prevent the material from shrinking sharply, the surface layer is periodically moistened for eight to ten days. To retain moisture longer, it is recommended to cover the screed with polyethylene material.
How to pour the solution correctly
In order for the house to stand on a solid monolithic foundation, it is necessary to unload the mortar in an even layer over the entire area. The number of mixers or preparations with a concrete mixer is calculated to meet this requirement. Sectional application is unacceptable due to the appearance of transverse seams, which reduce deformation resistance to loads. Watch the video on how to properly pour a monolithic slab.
Quality Improvement Techniques
Practice shows that monolithicity is achieved by performing the following operations:
- Fill evenly at several points. If the entire mass spreads from one place, then the solidification will be uneven;
- Moisten the surface of the settling foundation for the first 12-14 days;
For casting thicknesses greater than 0.4 m, this is advisable:
- Plow the first layer of concrete with your own hands to allow the air trapped by the solution stream to escape;
- Approximately on the 10th day (no more shoe marks should appear on the concrete), holes are drilled with a non-impact drill for every 6 m². They will protect the hardening mass from cracking. After complete hardening, they must be covered with mastic.
Additions to the scheme.
If you are going to create a monolithic or prefabricated type of strip base, then, to clarify the drawings, you should accompany them with the following technical documents:
- Scheme of reinforcement of the site based on the future load of the structure on the foundation;
- An application that displays the design features of a structure;
- Advisory explanations regarding preparatory work on the site;
- Tables and diagrams that are necessary for waterproofing and thermal insulation of foundations.
- Data on load standards on foundation supports.
Strip foundation plan drawing.