Construction of a foundation for a house - everyone who starts construction faces this problem. This is a priority and quite expensive both in terms of material and work performed. And of course, every home master wants to save money without sacrificing quality.
An example of a foundation made from railway sleepers
There are different ways to save money during construction, for example, building a foundation from sleepers. It is worth noting that if you plan to build a large cottage, or a country house for permanent residence, then savings on the basis will be inappropriate, since these buildings have a significant share. And when building a small house for a summer residence, a greenhouse or building a garage, such savings are quite possible, and used railway sleepers can help with this.
Characteristics of sleeper foundations
Railway sleepers are an affordable and inexpensive solution.
They are quite easy to find, and transporting such material will not be a problem. Many have a negative attitude towards the idea of using sleepers for the foundation of a house, as they believe that they have served as a railway covering for a long time and have lost their strength. But in reality this is not the case; sleepers are specially treated with creosote and have an unlimited service life, which allows them to become a strong foundation for any building. The advantages of a base made of reinforced concrete sleepers include:
- High elasticity of the material;
- long service life thanks to creosote impregnation;
- resistance to temperature changes;
- low price;
- high level of adhesion to ballast;
- insects or rodents will not be able to harm this type of foundation.
This solution also has disadvantages. These include the large weight of the material, which can vary from 45 to 80 kg, as well as the limited size of the sleeper - up to 2.75 m.
We work in cities
Our company offers its services in the following areas of Moscow and the Moscow region:
Novomoskovsk AO (Vnukovo, Voskresenskoye, Gas Pipeline, Desna, Kokoshkino, Kommunarka, Mamyri, Marushkins, Moskovsky, Mosrentgen, Ryazanovo, Ostafyevo, Sosenki, Filimonkovskoye, Shcherbinka); Istrinsky district (Dedovsk, Istra, Snegiri, Rumyantsevo village, Manikino village, Pavlovskaya Sloboda village); Krasnogorsk district (Krasnogorsk, Nakhabino, Ilyinskoye, Arkhangelskoye, Mechnikovo, Novy village); Leninsky district (Vidnoye, Razvilka village); Mozhaisk district (Mozhaisk); Naro-Fominsk district (Naro-Fominsk, Aprelevka, Kalininets, Selyatino, Krekshino village, Sofyino village); Odintsovo district (Golitsyno, Kubinka, Odintsovo, Lesnoy Gorodok, Bakovka district, Barvikha village, Zhavoronki village, VNIISSOK village, Gorki-10, Gorki-2, Nazaryevo, Bolshie Vyazemy, Nikolina Gora, Novoivanovskoye , Zarechye, Brekhovo village, Uspenskoye village, Nemchinovka village); Podolsk district (Podolsk, Shcherbinka); Chekhov district (Chekhov); Domodedovo district (Domodedovo, Ilyinskoye); Troitsky Autonomous District (Troitsk, Zhukovka village, Pervomaiskoe village, Ptichnoye); Ruzsky district (Ruza, Tuchkovo, Dorokhovo village, Kolyubakino, Volkovskoye, Ivanovskoye, Starozuzskoye) cities - Zvenigorod, Krasnoznamensk, Vlasikha, Moskovsky, Troitsk, Podolsk, Klimovsk, Shcherbinka, Rublevo, Myakinino village, us. Arkhangelskoye, village Youth; as well as the areas of Mitino, Rublyovka, Belaya Dacha, Northern Butovo, Southern Butovo, Ramensky, Solntsevo, Peredelkino, Novoperedelkino, Rasskazovka, Vnukovo
Ryazan and Novoryazansk direction (Dzerzhinsky, Kotelniki, Lyubertsy, Lytkarino, Tomilino, Oktyabrsky, Ostrovtsy, Kraskovo, Rodniki, Malakhovka, Zhukovsky, Ilyinsky) Nosovikhinskoye and Gorkovskoye highways (Reutov, Balashikha, Zheleznodorozhny, Staraya Kupavna and Novaya, Elektrougli, Losino-Petrovsky ) Yaroslavl and Shchelkovsky direction (Mytishchi, Korolev, Pushkino, Ivanteevka, Shchelkovo, Fryazino) Dmitrovsky and Leningradsky direction (Khimki, Dolgoprudny, Lobnya, Zelenograd) Pyatnitskoye and Volokalamskoye highway (Krasnogorsk, Opalikha, Nakhabino, Dedovsk, Istra, Brekhovo, Yurlovo, Otradnoe, Svetlye Gory, Rozhdestveno, Putilkovo)
In what cases is it advisable to build a foundation from sleepers?
The time has come to directly consider the sequence of actions for constructing a bathhouse from sleepers.
It is worth following a number of suggested recommendations:
- First of all, we purchase the material. To build a bathhouse, you will need to purchase about a hundred high-quality, that is, strong, sleepers.
- After laying the foundation and its subsequent hardening, we lay a waterproofing layer. To do this, the surface of the concrete is lubricated with liquid bitumen mastic, and two layers of roofing material are laid on top.
- Now the starting ring of sleepers is being laid. The first row should be laid on slats, thanks to which the sleepers will not touch the foundation.
- Each subsequent row of sleepers is fastened to the previous one by means of a tenon joint. The gap between the first row and the foundation is filled with construction (installation) foam.
- Insulation is laid on top of the first crown, which can be tow, moss, jute, and other materials that are usually used as caulking for a log house.
- The subsequent crown is laid on the insulation. Fastening is used using the “groove-tenon” method, but experts advise resorting to an additional dowel connection. This is done by cutting holes in the sleepers at opposite ends for attaching dowels.
Finally
Formation of walls
The technology for assembling the walls is similar to laying conventional timber; here, steel brackets are driven in every 3-4 rows to connect the crowns. The joints are laid with dried moss, flax, and jute. Corners are cut using the “half-tree” method, alternating opposite directions.
In the case of a compact bath, the ceiling beams are placed simultaneously with the last 2 crowns. The overlap is formed from the cleanest sleepers divided in two. The pairs are spliced into a long piece that will cross the ceiling.
The rafters for the roof are formed and connected on the ground, then raised in pairs to the upper segment of the walls and cut into the last crown. At the same time, the sheathing is filled and covered with roofing felt. The structure must overwinter in this form for complete shrinkage to occur.
The covering of the ceiling is done from the inside of the dressing room and steam room; at the same stage, hydro- and thermal insulation is laid.
Before deciding to use this material in the construction of the foundation, you need to take into account some nuances that can play an important role in the construction of the foundation:
- the opportunity to inexpensively buy sleepers that have already served their useful life at an inexpensive price;
- transportation and delivery of material to the site, if the sleepers are located far from the construction site, then transportation and transport costs can reduce your savings to zero;
- the structure installed on a foundation made of wooden sleepers must be small and light;
- the foundation will be arranged independently, without the involvement of third-party labor.
From sleepers you can create classic types of foundation with your own hands, and it will be reliable and durable, provided that construction technologies are followed. Also, each developer has the choice to build a foundation from reinforced concrete sleepers or choose wooden ones, it all depends on the construction budget.
The process of installing a foundation made of reinforced concrete sleepers. This is what used reinforced concrete sleepers look like
In addition, you can build a foundation with your own hands, since the material does not require special processing and is quite easy to use. It is enough to have one assistant who will drag the sleepers with you from place to place and help in laying the material in the foundation trench.
The advantage of concrete bases
Compared to a foundation made of wooden sleepers, a foundation made of reinforced concrete products has undeniable advantages:
Foundation structures made of reinforced concrete products
- the service life of such foundations is 100 years;
- the cost of sleepers is much less than other materials for arranging foundations;
- waste material can be obtained free of charge, since when repairing railway tracks they are usually written off;
- The design of this material is strong and reliable.
Reinforced concrete sleepers have one drawback - during construction you will have to use heavy equipment, since one sleeper weighs 200 kg. You won't be able to put it in a trench yourself.
Options for constructing various types of concrete foundations
Installation of a columnar base
Preparation for laying a columnar base includes the involvement of a drilling rig, the search for rope, twine, and an increased supply of roofing material that will replace the formwork.
They use a rope to mark the construction site and drill vertical trenches for sleepers. The pillars will be placed at a depth of about 1.5 m, leaving a distance of at least 2 m between them.
The bottom of the pit is covered with sand and crushed stone, making dense cushions, waterproofing material is laid, and sleepers are inserted into a permanent place.
A supply of reinforcing bars remains on top of the pillar, to which the reinforcing center of the grillage is attached, roofing material is tightly wound around the sleeper as a form, and the cement mixture is poured.
Answers from experts
Raspberry Malinina:
If only I had hands and money
Shroedinger `s cat:
Well, why not? Just consider that everything is fine if no special alterations are needed.. Well, insulation will also probably be required... Communications..
BellaRom:
Can. but you will have to re-register anyway. and it is quite possible that even BEFORE the start of the “alterations”. If you change it and don’t notify anyone about it, you can live there your whole life and never have problems. and not pay money (tax on residential property, because a barn is not a RESIDENTIAL area).
Alexei:
You can live in a wooden cabin, and the sleepers won’t stink.
You will be much more interested in frost damage to the foundation that is not loaded with the weight of the house. There is a possibility that by spring it will have to be demolished and rebuilt.
Alex Mishin:
Living in a barn or any other room made of sleepers is absolutely prohibited: cancer is guaranteed, the possible location of the primary tumor is different. s otvet.mail /question/64053236 (my answer). It’s better to build something similar to a change house, only with more decently insulated walls: we are in an ordinary cheap change house, 5 cm of mineral wool between two layers of flimsy lining, in frost up to 7 degrees C The wood-burning steel stove has been used more than once.
Vladimir Petrov:
I’ll say this about sleepers. My uncle made a house out of spar in the 80s. He bought it for demolition. The house is warm and there is no smell. .And you need to look at the foundation on the spot.
Viktorij Lashhehova:
Previously, people built temporary huts in which they lived during the construction of the house. After the houses were built, these sheds were converted into summer kitchens or utility rooms. Your barn is just such a temporary building, but it is 50 square meters and the ceiling is 3 meters, this is at the level of a two-room apartment, and you can live quite well.
Dragon:
you can... sheathe the inside
Lisin.68:
Well, some barns have more louts than a residential building. Including weight. Dig the foundation from the outside on the side to check for thickness at least...
Olga:
You can't live in sleepers. Creosote is very harmful.
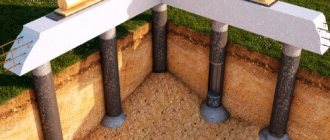
How to make a foundation from sleepers with your own hands - installing a grillage
In the foundation structure, sleepers are most often used as horizontal beams (grillage).
Well, the construction of the foundation itself, in this case, is carried out according to the following scheme:
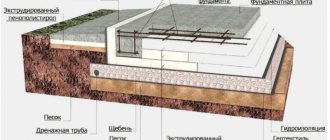
- A pit or trench is dug under the base, the depth of which is 40 centimeters.
- At the bottom of an open trench, holes are drilled for vertical supports in increments of 1.35 or 2.7 meters. To construct such wells, you can use a hand drill, the diameter of which is 30-40 centimeters. The drilling depth, in this case, is determined individually, but cannot be less than 1-1.25 meters.
- Rolled roofing material and a reinforcement frame (four vertical pins with horizontal bandaging, mounted in increments of 30-40 centimeters) are inserted into the pits. After that, concrete or a sand-cement mixture is poured into the pit.
- Having arranged the supports, you can start grilling. To do this, you need to wait for the supports to completely harden and lay the ends of the sleepers on them. If the supports were installed in increments of 2.7 meters, then the sleeper will rest on two supports. And if the step was 1.35 meters, then there will be three supports under the sleeper. The latter option is used in the construction of block garages or sheds. The first option is used as a base for small architectural forms or frame structures.
It should be noted that the foundation of wooden sleepers is built according to the same scheme. That is, the grillage can be assembled not only from reinforced concrete, but also from wooden beams.
Use of sleepers in the construction of strip foundations
In addition, using sleepers for the foundation of a block or brick structure, you can use not only the technology of assembling a beam grillage on poured supports, but also a slightly different arrangement option, which involves the construction of a full-fledged strip foundation.
And the process looks like this:
- A standard trench is dug at the site for a strip foundation. The width of the trench should not exceed twice the width of the sleeper.
- After completion of the excavation work, a 10-centimeter cushion of gravel and a 25-40-centimeter cushion of sand are added to the bottom of the trench. After which the depth of the trench should be 40-50 centimeters - this will be enough for arranging two or three layers of sleeper masonry.
- The walls and bottom of the trench are covered with a waterproofing film, on top of which sleepers are placed, stacking them on top of each other. In this case, you need to take care of the dressing by placing the element from the top layer on two lower sleepers located next to each other (it should cover the vertical joining seam).
- After laying the sleepers is completed, sand-cement mortar is poured into the free space.
The basement part of the foundation, in this case, is laid out of brick or concrete blocks. And, of course, this technology involves the use of only reinforced concrete sleepers. Wood products, in this case, can be used for the construction of walls or installation of a basement floor.
About the site
zalman
We pour the foundation and make the grillage ourselves
Under the future foundation, a large pit is dug, a trench with a depth of at least 40 cm. At the bottom of a horizontal trench, with an indentation of 1.35 - 2.7 m, holes are drilled for the installation of supports.
The pit is dug and filled so that 60–70 cm remains on top for laying 2-3 piles. The approach will strengthen the foundation and improve load distribution.
If a trench was made, the length of the piles should be as straight as individual sections of the excavated space.
A rolled-up roll of roofing material is inserted into the pit, the reinforcement frame is inserted, and the reinforcement frame is tightly fixed. To reinforce each pillar, use a bunch of four vertical pins with encircling wire, in increments of 30-40 cm.
Concreting the grillage
The next step is concreting with a mixture of water, cement, sand, leaving 20 cm of reinforcement above the poured space.
They begin to assemble the grillage, tie the reinforcing bars to the removed reserves, and pour concrete.
When the poured supports have finally hardened, the ends of the sleepers are first laid, which receive two supports (at a step of 2.7 m), or three (at a distance of 1.35 m). The second option for placing support points is preferable in the case of erecting a garage or shed made of blocks.
In order for the concrete to dry out without being exposed to external natural influences or debris, immediately after pouring it is covered with roofing material or dense polyethylene. 2-5 days after concreting, the shelter is removed and the formwork is dismantled. All you have to do is wait a week for the cement to dry completely, and you can start building.
Using alternative methods to lay a solid foundation can be beneficial when fully exploring the issue. If you get down to business without preliminary information preparation, you can make things worse and end up overpaying – the foundation will have to be completely redone.
Will it be possible to save money on used material:
Average score of ratings is more than 0
Share link
Comments There are no comments yet, but you could be the first...
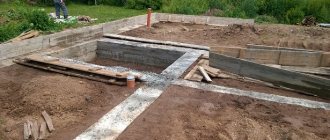
Assembling the strip structure
To lay the foundation from sleepers0, you will need to prepare the necessary things in advance and hire special equipment.
The materials you will need are: reinforced concrete products, concrete mortar, sand, crushed stone, clean water. Consumables - metal pins, staples, bitumen-based mastic, antiseptics, fittings, boards for formwork, nails.
You need few tools, just take a building level, a shovel, a hammer, a crowbar, a construction mixer, and an electric drill with an attachment.
The markings are applied with a tape measure, pegs, and rope.
A trench is dug along the perimeter of the future foundation, 80 cm deep and 30 cm wide.
The bottom is first covered with crushed stone, compacted, covered with sand in layers, periodically irrigated with water to increase density. The total size of the pillow is 30 cm minimum.
They move on to laying waterproofing made of dense polyethylene, roofing felt, and laying beams.
The length of the piles should correspond to the length of the ditch. The parts are fastened with metal staples.
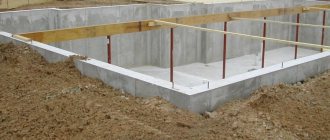
The formwork is installed, tied, a reinforcing belt is inserted, and concrete is poured.
What is needed to arrange the foundation
The foundation for a house made of reinforced concrete takes on the load from the finished structure and distributes it evenly over the entire area of the soil under the structure. If you use reinforced concrete sleepers to construct the foundation, you will get a strong, durable, reliable structure; for construction you will need materials and tools, such as:
- reinforced concrete sleepers;
- sand;
- crushed stone;
- ready-mixed concrete;
- metal staples;
- pins;
- heavy special equipment for lifting sleepers;
- bitumen mastic;
- roofing felt;
- shovels;
- formwork panels;
- level and tape measure;
- fittings;
- special impregnation that needs to be used to treat sleepers if groundwater is close to the surface.
Material selection
Capital buildings, built, as they say, to last, are built of stone or brick. Cinder blocks or foam concrete blocks are also often used. It is reliable, durable, but expensive, and when creating such a structure you cannot do without the skills of a builder, otherwise it will simply fall apart. In most cases, wood or a material based on it is chosen for a shed in a country house.
Boards and slabs
If you need to build a wooden shed with your own hands, but have financial difficulties, you can choose a budget option - a frame structure with cladding made of boards or wood-based slabs. Despite all its apparent simplicity and flimsiness, such a shed will last for decades, and if made well, it will fit perfectly into any backyard.
In this case, timber will serve as the material for the frame. It is easy to work with, and the resulting structure will have sufficient strength and reliability. This solution is perfect for wetlands, where it is impractical to build a permanent building on a foundation.
From all of the above we can conclude: wood is the best material for a shed. This is true. A wooden shed benefits from a number of characteristics:
- ease of manufacture;
- short work deadlines;
- availability of material;
- environmental cleanliness;
- the ability to build a cold and warm barn.
It is also worth noting the fact that the final finishing of a barn, like any other wooden structure, is characterized by extreme simplicity and an abundance of options. Any method is suitable here: from budget painting to original clapboard paneling.
Log
Since ancient times, logs have been used as a building material. This is an excellent choice for building a wooden shed, especially in wooded areas where this material is not in short supply. A log barn has an excellent appearance; it can be built in an ensemble, for example, with a bathhouse; it will be a good addition to a wooden house. The only significant drawback is that the work will require specific skills.
An excellent building material for the construction of any building. The characteristics of the timber are comparable to those of a log, but thanks to its rectangular profile it is much easier to work with. A barn made of timber will fit perfectly into a wooden courtyard; few people would dare to disparagingly call a masterfully built structure a barn.
Sleepers
A shed made of sleepers is an excellent budget solution, especially for villages located near the railway. Wooden sleepers are gradually being phased out, but they are a very reliable and durable material. A sleeper, even if it has served for decades, can be an excellent choice for the walls of a small shed.
The advantages of this material are obvious: the sleeper is cheap, due to its shape, even a beginner can build a wall from it, and thanks to its impregnation, the sleeper will last for many more decades. True, it is in the impregnation that the main drawback of this material lies - a characteristic odor plus an unsightly appearance.
Watch this video on YouTube
The simplest barn without a foundation
A typical situation is a new site, there are no buildings, there is nowhere to simply put equipment. It is irrational to carry tools with you; an excellent solution is to build a shed from prepared boards with your own hands. A simple temporary structure without a foundation is perfect here.
The basis of such a structure is racks made of timber. Since there is no foundation, the supporting posts must be buried in the ground. To protect the wood from moisture, it must be treated with a protective impregnation. As such, you can use used motor oil or drying oil.
Horizontal strips are attached to the vertical posts using self-tapping screws and metal corners. The material for them will be cuttings of slats of suitable length. For a small shed, it is enough to lay slats at the top and bottom. The location of the door and, if necessary, the windows are additionally reinforced. The resulting frame is sheathed with boards or wood boards. The roof is made from the same material. To provide sufficient protection from moisture, the roof is covered with roofing felt.
How to make a foundation from used reinforced concrete sleepers
Nowadays, when almost all building materials are rising in price, every person strives to save as much as possible on the construction of their own home or auxiliary building.
Construction of a foundation made of used reinforced concrete sleepers
In this article I would like to briefly present one of the many ways to save money on the construction of a shallow foundation using used (hereinafter abbreviated as used) reinforced concrete sleepers, photo 1.
Reinforced concrete sleepers can be used in foundation construction as:
- coarse aggregate (like rubble), in order to save concrete for the foundation;
- foundation for light buildings.
Photo 1. Used reinforced concrete sleepers
Used reinforced concrete sleepers can be used to construct a strip foundation for construction:
- wooden one- and two-story frame houses;
- one-story brick houses;
- light one-story cottages, sheds and greenhouses.
Construction of a strip foundation using used reinforced concrete sleepers
Here is a brief sequence of the main work on installing a strip foundation from used reinforced concrete sleepers:
- First, as usual, a trench of the required depth and width is dug.
- Then the formwork is installed and a sand cushion 10...15 cm thick is laid (we wrote more about this here).
- Used reinforced concrete sleepers are installed according to the following rules:
- First, it is recommended to lay a layer of concrete mixture 10...20 cm thick at the bottom of the trench, and then install the sleepers;
- sleepers should be laid in a similar way to brickwork, i.e. with dressing (in a checkerboard pattern);
- to ensure the strength of the entire foundation, sleepers should be laid at a distance of 50...70 cm from each other horizontally and vertically (in height) - 40...50 cm;
- To ensure the strength and solidity of the foundation, together with used reinforced concrete sleepers, a spatial reinforcement frame is used, photo 2.
- A concrete mixture is prepared (or delivered to the construction site), which is placed in the formwork, photo 3.
Photo 2. Construction of the foundation using used reinforced concrete sleepers and reinforcement cage
Photo 3. Ready-made strip foundation using used reinforced concrete sleepers
For light structures of one-story wooden frame houses, a columnar foundation can be made using used reinforced concrete sleepers.
The essence of a columnar foundation is the construction of vertical pillars made of sleepers. To do this, you need to dig holes 1.5...2 m deep in increments of 1.3...2 m, into which a layer of sand or concrete 10...20 cm thick is poured, and then sleepers are installed and filled with concrete mortar. After the concrete has hardened, work is carried out to install a grillage, after which the construction of the building itself can begin.
The main advantages of using used reinforced concrete sleepers
- Very low cost of used reinforced concrete sleepers.
- Long service life of reinforced concrete sleepers.
- High strength sleepers.
- Significant savings on building materials when constructing the foundation.
Disadvantages of used reinforced concrete sleepers
- Large dead weight of sleepers (more than 200 kg).
- When purchasing reinforced concrete sleepers, you should carefully look at their condition and refuse sleepers with deep longitudinal or through transverse cracks, because in the body of the foundation such a sleeper will weaken it.
The author of the article is an expert from GIDproekt
Konev Alexander Anatolievich
Pile-grillage foundations for sheds
Pile-grillage foundations for sheds
In some cases, the construction site has a difficult terrain, and it is difficult to level it, then a columnar structure with grillages justifies itself.
In such cases, it is possible to build a foundation using ready-made screw piles, but this is expensive. Or you can make asbestos piles with your own hands right on the site and install them in the wells. The advantages of such a foundation are obvious:
- A barn can be built even on difficult terrain;
- There is no need to use complex waterproofing of the base, because it does not touch the ground surface;
- Wells and piles can be made with your own hands;
- The technology is simple and accessible to everyone; a minimum of mechanized equipment is used;
- The cost of constructing foundations of this type is low.
The grillages on which the barn will then be built can be made from foam blocks, wood or metal sheets. It is necessary to immediately provide thermal insulation of the space under the grillage, and it is better to pour the piles into asbestos pipes or tubes twisted from roofing felt. This design will be more durable.
Thus, it is not difficult to build almost any type of foundation for a shed on heaving soils with your own hands. Even pile-grillage foundations are made in a matter of days, and immediately after pouring the piles with concrete, the grillage can be erected.
It is clear that the most labor-intensive will be a monolithic slab, and it must be poured from several concrete mixers at once. A strip design would be optimal; you can make it yourself using any available building materials.
How to build a bathhouse from black sleepers
First of all, the material purchased for the construction of a bathhouse must be sorted and the cleanest and most even sleepers selected. They will be used to lay the walls on the facade. Part of the sleeper beams will be dismantled into facing material - a homemade tongue-and-groove board, ordinary beams will be used for laying the walls, the most impregnated with phenol will be used for arranging the foundation and base of the bathhouse.
If in the area allocated for the construction of a bathhouse, the soil is too saturated with water, or the area is periodically flooded with melt or rainwater, it is best to place the room on a pile foundation. One of these options is shown in the photo.
The main difference is the use of sleepers to make piles. The frame of a sleeper bath weighs at least 8000 kg, this is much heavier than in the case of a frame or panel construction, so the pile support is made from one or two sleepers, sawn in half.
A pit is dug under the future support, into which a layer of crushed stone and sand is poured. The halves tied together with wire are re-treated with resin or bitumen, placed in a hole and covered with the same mixture of sand and screenings.
The technology for assembling bathhouse walls from sleepers is practically no different from laying timber, the only difference being that the crowns are tied together every 3-4 rows with steel brackets made of thick reinforcement. In the process of laying the next crown, the surfaces are laid with jute, flax, but more often with dried moss.
The corners of the bathhouse are cut from two sleepers with a lock “in half a tree”, while the direction of the cut changes to the opposite with each subsequent crown.
For a small bathhouse, the last two crowns are laid simultaneously with the ceiling beams. The material used is the best sleepers split in two from the available remainder. The resulting pairs are spliced into a long beam, which covers the ceiling. At the same time, the ceiling is hammered with a board.
The rafters for the roof of the bathhouse are cut and joined on the ground, then raised in pairs to the ceiling and cut into the last crown of the walls. The sheathing is immediately filled and covered with roofing felt. In this condition, the bathhouse should overwinter, the walls will gain weight, and the structure will shrink.
At the stage of finishing work, the crowns are packed and embossed with jute tow, the floors are cut out and laid inside the paired dressing room and rest room. All that remains is to cut out the window and door opening, install the frames, hang the doors and move on to finishing work inside the room.
The ceiling is hemmed from the inside of the steam room and dressing room, a waterproofing film is laid and filled with expanded clay backfill. All elements inside the bathhouse are assembled to their final dimensions, without any gaps for shrinkage or sagging.
Therefore, the outer surface of the walls is thoroughly cleaned, treated and dried before the sheathing and lining are installed.
Roof options and materials
The purpose of the roof is to protect the interior from atmospheric influences. The roof should not let water in and ensure its outflow. The roof of a wooden shed is not as important a part as the roof of a house, nevertheless it must fulfill its function.
The roof of a small building can be single-pitch or gable. The first option has the advantage of being easy to manufacture, but it is only applicable for small-width sheds. Creating a gable roof will require more material and time, but it drains water better, which will affect the durability of the structure as a whole.
Roofing felt and other rolled materials can be used as roofing material for a small shed. You can create a full-fledged roof using classic slate or modern sheet materials.
Foundation construction procedure
The construction of the base must be treated with great responsibility. It is necessary to carefully analyze the condition of the products that will be used for such work. If they are damaged, the created foundation may turn out to be of poor quality and after a certain time it will be necessary to carry out restoration procedures.
It is best to create such foundations on soil with high hardness to prevent the possibility of settlement under the load of the house. The foundation made of reinforced concrete sleepers can be of different types:
- Columnar;
- tape;
- pile;
- slab.
The optimal solution for using such material are tape and columnar varieties. For a strip base, logs must be laid around the entire perimeter. A layer of sand and crushed stone is preliminarily laid under the foundation, which will need to be thoroughly compacted and moistened. Then sleepers are placed on top, which are placed with overlapping joints. For fastening you need to use metal staples and pins.
If it was decided to use a columnar base, the logs should be placed vertically with a certain interval from each other. During preparation, it is necessary to treat the sleepers with a special antiseptic and bitumen. This type of foundation has a fairly long service life, which can last up to 50 years. The sleepers are laid on a concrete base and gradually covered. They are then connected to other sleepers installed in a similar pattern.
The following video will help you learn in more detail about the procedure for creating a foundation from sleepers with your own hands.
https://youtube.com/watch?v=JIuWi_cECt4
Tape base made from sleepers
For two-story wooden houses, it is best to create a strip base. In this case, concrete sleepers are laid in a special formwork made of wood, which allows you to save a lot on pouring cement. The whole procedure consists of the following steps:
- First, a trench is dug. Its depth must exceed the soil freezing level.
- The formwork is being created. Often boards are used for manufacturing. It must be securely fastened from the bottom of the pit to the top of the basement.
- A layer of sand is added to a height of up to 20 cm. This will help prevent damage to the foundation.
- A cement mixture or concrete is prepared.
- Concrete is poured along the entire perimeter of the pit to the required height, after which the sleepers are installed. They will be used as buta. Then a new layer of concrete is poured and the sleepers are laid again. They need to be installed not on top of each other, but in a checkerboard pattern. According to this scheme, the base is poured to the top of the formwork. This will prevent the tape from cracking. The height interval between sleepers should be about 50 cm. The distance between the edges can vary from 50 to 70 cm.
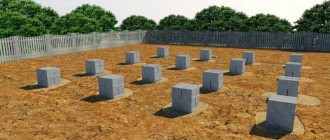
Columnar base made of sleepers
To install such material you will need to use special equipment.
This type of basis is the most economical. It can be used for frame or wooden buildings, as well as buildings made of foam concrete blocks.
A foundation made of reinforced concrete sleepers allows you to save a lot of money, but you need to take into account that such material has a fairly large mass. Not every master will be able to place it in the formwork or pit with his own hands. For these purposes, you will need to use special equipment, which will greatly simplify the work. Creating a columnar foundation consists of the following steps:
- The first step is to dig a hole for each post. The interval of their installation depends on the design of the building. The depth of the hole can vary from 1.5 to 2 m. The width should allow you to install the material and pour cement mortar around it.
- At the bottom of each pit you will need to create a cushion based on sand and fine crushed stone.
- After which the installation of reinforced concrete products is carried out.
- Each hole is filled with cement mortar.
Creating a columnar base from non-standard materials is not so difficult, the main thing is to carefully follow the work technology.
Using sleepers for bases is a good solution. Thanks to this material, you can save a lot on building a house. The main thing is to carefully select products to ensure a long service life.
Laying the foundation: what to pay attention to
The construction of a foundation for a residential building, greenhouse and any other outbuilding must be approached with the utmost responsibility. Due to the fact that the construction services market is currently developing rapidly, most contractors incorrectly prioritize the construction of residential buildings, ignoring the simplest safety rules.
Diagram of a sleeper foundation with gearing.
This subsequently results in an unscrupulous attitude towards the construction of the foundation, which as a result can turn into a real disaster for all residents of the house. When choosing sleepers for building a foundation, it is necessary to carefully analyze the road surface and control the process of purchasing material that will be used in the construction of the foundation of the house.
If the sleepers are too worn out, they will create a foundation of very poor quality, which will have to be repaired after some time. And this is a very expensive pleasure. All the savings that were achieved at the beginning of construction will simply come to naught with such a sad ending. It is necessary to carefully monitor the work of the contractor that you hired to build the foundation for a house or greenhouse from sleepers, if you are not building it yourself, but using the services of specialists.
Many developers mistakenly start work by designing a future house, greenhouse or other building. However, this is not the most optimal approach, because first it would be nice to determine the territory of the construction site. The right choice will save a significant amount of money that will be spent on the construction process. If you correctly approach the design and laying of the foundation of a future building, you can achieve the maximum service life and reliability of a residential building.
It is best to lay the foundation on soil with a high degree of strength. Otherwise, settlement will occur under the pressure of the total weight of the building. Foundations can be of different types: strip, slab, columnar, pile, base on sand cushions.
Of these types of load-bearing structures, columnar and strip foundations are best suited for using sleepers.
DIY wooden shed
A do-it-yourself shed using frame technology is a simple and economical construction option. Initially, you need to decide on the location on the site where the future shed will stand. Then we decide on the choice of foundation. All actions can be divided into several stages.
Here are the main stages of building a barn with your own hands:
- Preparing the area when building a barn with your own hands. This stage includes clearing the area of bushes, trees, stumps and large rocks;
- Preparatory work before building the foundation when building a barn with your own hands. If piles or support beams are selected, no additional ground manipulation is required. When pouring a block, strip foundation or foundation slab, it is necessary to dig a pit, the depth of which is at least half a meter;
- The bottom trim, floor joists, subfloor, bottom beam must be coated with a composition that prevents wood from rotting, keeps it dry and prevents the penetration of insects;
- Mounting piles or laying timber on roofing felt when building a barn with your own hands. If a monolithic foundation is chosen, then you must first lay geotextiles that prevent sand from washing out, pour and compact a sand cushion (minimum 300 mm thick), a crushed stone cushion (minimum 200 mm thick), and then proceed to installing the formwork. As a rule, the formwork is made from 50x100 boards, with stops every meter, spacers along the inner perimeter and with fixing bars on top of the formwork perpendicular to the length of the boards. The reinforcement is made from corrugated reinforcement rods, the thickness used is 12 mm, 10 mm, 8 mm. Next, the cement-sand mixture is poured. Cover the top with technical film until the concrete mixture has completely hardened. If the weather is hot. Then the surface must be watered, not allowing it to dry out too quickly. Under the influence of the sun, water evaporates from the surface layer of the poured foundation, which leads to a change in composition. Consequently. Cracking appears and the foundation is not suitable for use.
- Mounting the bottom frame and floor joists when building a barn with your own hands. Floor joists are laid in increments of 600 mm. This allows you to avoid sagging floors, and if necessary, the insulation can be comfortably laid in the space between the joists;
- Next, the wall frame stand made of 50x100, 40x100 bars is attached. Additionally, crossbars are installed in window and door openings to distribute loads. Jib beams are cut into the corners of the walls on each side, making the shed more stable and stronger. The lower and upper strapping of the frame posts is performed;
- The first floor ceiling is being installed. This will be the future ceiling;
- Next, the rafter system is installed using a single or double slope system. The pitch between the rafters is 600 mm;
- The roof sheathing and roof covering are being laid;
- External and internal finishing is installed. The materials can be very varied, depending on the future use of the shed;
- Before installing the interior decoration, when building a barn with your own hands, insulation is laid, if necessary. Be sure to install a wind and vapor barrier.
Which foundation scheme for a shed to choose?
Of course, the design and type of foundation for a shed depends, first of all, on the design of the shed itself, more precisely, on the degree of its “capitalization”; the heavier the construction, the larger and deeper you will have to dig a foundation pit for the shed with your own hands. Typically four construction schemes are used:
- The classic columnar version of the foundation is used for lightweight structures made of boards, plywood, siding with a simple pitched roof. This is the simplest foundation for a barn in the country;
- A pile foundation can be called a universal design; it can be used for light sheds made of timber or a frame house;
- The strip version of the foundation base is used either for a box of blocks and bricks, or when arranging a basement.
Often a shed is erected without any support or anchorage to the ground. For example, if the site has heavy rocky soil with a high content of crushed limestone or limestone, marl-dolomite “tongues” come to the surface. In this case, it is easier and faster to build a foundation with your own hands on one sand bed.
Advice! It is enough to ensure proper drainage of rain flows and compact the sand backfill. On this basis, a shed without a foundation will last longer than on a shallow concrete strip laid on quicksand or loamy soil.
Building a shed without laying a foundation is faster and without major costs. But the results of such construction are difficult to predict, especially if the barn needs to be built on virgin soil, where there are no neighbors and there is no way to clarify the composition of the soil.
This is interesting: How to beautifully combine wallpaper for the hall and living room: let’s look at the question
How to build a foundation from reinforced concrete sleepers correctly?
Corner notch and other fastening methods
The log to replace the worn out window sill is hewn in the traditional way with a broad axe. The corner superstructure is another of the characteristic features of the log design. Most scoring methods provide structural integrity by locking the ends of the magazine in place and imparting rigidity and stability to the pen.
Like the floor plan, the type of corner lettering can sometimes be a clue to the origins of a log building's ethnic craft, but it is important not to draw conclusions based on cut details alone. Numerous methods of corner cuts have been identified throughout the country.
Strip foundation made of sleepers for permanent buildings.
Most of the opponents of the use of sleepers as a material for the manufacture of foundations accuse the impregnation that is used in the production of railway tracks - creosote.
It is known that this substance, which has a characteristic odor that is quite difficult to tolerate, contains components that are toxic to humans. Some people express concern when it is recommended that they build a foundation for a private home using sleepers that are impregnated with creosote.
The notching method on some of the earliest eastern cabins and most 19th-century western cabins, especially the saddle notch, left an extended timber end or "crown". Crowns are especially pronounced or exaggerated in rustic-style structures, and sometimes they cut back as the wall rises, creating a buttress effect at the corners of the building.
Another method of attaching logs consists of lashing logs that are laid unnotched with tenons into the vertical corner posts or using tenons or pins to secure them to the vertical corner boards. Vertical logs were secured at their top and bottom ends, usually on roofs and window sills.
You should know that this is actually true. New sleepers that have just been manufactured are not recommended for construction. However, this does not apply to sleepers, the operational period of which as a railway track has come to an end.
Such sleepers spent quite a long time in the open air, therefore, the sun's rays and numerous precipitation managed to remove most of the harmful impregnation from their surface. Therefore, a foundation made of sleepers with a long service life is absolutely safe to use as the basis for the construction of private houses, which are made using frame technology. Such houses are much lighter than their analogues, which are built from materials such as blocks or bricks.
Selection of magazines and building assembly
Although the choice of wood was likely determined by availability, chestnut, white oak, cedar, and fir were preferred because these trees could provide long, straight, rot-resistant logs. Pine, which also provided long, straight logs, was also used in areas where it was abundant. The woods were often mixed, using harder, heavier, rot-resistant wood such as white oak for the foundation, "sill" and lighter, more easily hewn wood such as yellow poplar for the upper logs.
To work you will need the following elements:
- reinforced concrete sleepers;
- cement;
- crushed stone;
- sand;
- special equipment for lifting reinforced concrete sleepers;
- metal staples;
- metal pins;
- bitumen;
- composition with antiseptic properties.
Nuances of creating a foundation
Before work, you need to carefully check all materials for quality.
Many newcomers to the construction trade consider the use of sleepers to create a foundation unsafe, citing the impregnation of this material - creosote. The fact is that this substance has a rather pungent odor and contains components that can harm human health. But all these fears are not justified, since only recently made sleepers cannot be used for the construction of houses, and products that are exposed to the open air for a long time are quite suitable. Precipitation and sunlight have removed the harmful substance from the surface of the material, and now it is safe for humans.
It is recommended to use sleeper foundations for the construction of frame houses. Such a building will be much lighter than its counterparts built using standard materials.
Before you begin, you will need to prepare the following tools and materials:
- reinforced concrete products;
- cement;
- crushed stone and sand of fine or medium fraction;
- equipment for lifting sleepers;
- metal staples and pins;
- bitumen;
- antiseptic solution.
Sleepers can also be used to construct garages or sheds.
We evaluate negative and positive qualities
A competent owner, before building a bathhouse from sleepers, will try to obtain as much information as possible from available sources. First of all, find out how seriously a bathhouse made of sleepers affects your health, whether it is harmful or not.
The positive aspects of the option of building a bathhouse from sleepers with your own hands include the following:
- Extremely low price for the material; used sleepers can be purchased for 12-15% of the cost of a new product. On average, the price for model A-1, with a cross-section of 25x18 cm, ranges from $2 per piece;
- Long service life, a ten-year sleeper in a bathhouse box will easily last another 15-20 years. They practically do not rot, are not affected by microorganisms and pathogenic microflora, insects, and rodents.
The durability of the bathhouse box largely depends on how to make a bathhouse from sleepers, what kind of foundation and finishing design is planned to be used when arranging the room.
The second condition is the quality of the material. Therefore, the design of a bathhouse made of sleepers, the method of constructing any sleeper buildings, is chosen based on the actual conditions on the ground and the quality of the purchased material.
Advice! You should not completely trust reviews of bathhouses made from sleepers published by the owners of buildings. Only a few percent of respondents give an objective assessment of the emerging problems.
Negatives of building a sleeper bath from ten-year-old sleepers:
- Possibility of poisoning by vapors of creosote, phenol. Under the influence of heat, flying sleeper structures intensively release carcinogenic substances that provoke the development of oncology;
- High flammability of the sleeper box of the bathhouse. It is no longer possible to saturate the sleeper with fire retardants; the surface layer of flammable creosote interferes. And sleeper baths burn several times more often.
Video description
An example of a small chicken coop built from sleepers can be seen in the video:
How to finish
The type of finishing depends on the purpose of the building. If this is a house, barn or workshop, you need to insulate the inner surface of the sleepers as reliably as possible, having previously caulked or foamed all the cracks and joints. There are several options for such insulation:
- plaster with clay mortar;
- continuous coating with liquid glass;
- finishing with thick polyethylene film with careful gluing of the joints between the strips.
Wall insulation with foam foil film Source sense-life.com
How to build a garage from sleepers yourself, step-by-step instructions
A garage made of sleepers is a lightweight structure, so you can install the simplest shallowly buried strip foundation under it (depth 30 - 40 cm, for soft soils - 50 cm, width 3 cm greater than the width of the sleeper).
Stage one - foundation construction
We dig a trench the size of the garage and arrange a sand and gravel cushion, 10 cm thick. On wet soils, you can add expanded clay or broken red brick to the cushion for better waterproofing.
Now we lay out the first row of sleepers in the foundation
An important rule is that the ends should not touch - you need a gap of 2 - 3 mm. We fasten the sleepers with metal staples. We fill in a standard tape of a shallow foundation, but there is one caveat
You will need to fix fastening bolts (40 mm diameter) in the foundation, cemented directly into the screed in increments of one meter along the entire perimeter, excluding the gate opening
We fill in a standard tape of a shallow foundation, but there is one caveat. You will need to secure fastening bolts (40 mm diameter) in the foundation, cemented directly into the screed in increments of one meter along the entire perimeter, excluding the gate opening.
We install columnar supports, which we also embed into the foundation. We install supports at the corners of the structure, in the garage door frame and in the center of each long side of the structure.
Stage two – prepare the sleepers for installation
The first row of sleepers is attached to the foundation strip with bolts embedded in it. Therefore, it is necessary to drill holes in each sleeper so that they coincide with the pitch of the already installed bolted connections.
The bottom row of sleepers must be treated with bitumen for waterproofing, and rolled roofing felt should be laid in two layers on top of the first row. This will protect the walls from high humidity.
Stage three - installation of the first row
We install the first row of sleepers and, for the reliability of the structure, fasten them with metal staples at the junction of two sleepers and at the corners
It is important to select sleepers of equal length for each row so that the building looks neat
Important rule. Sleepers need to be laid flat, this will give stability to the structure, although it will increase material consumption
Features of installing reinforced concrete beams
To get a solid foundation, you will need to strictly follow the work technology.
Before laying, each pole is checked for integrity and quality. Beams treated with poison lose their destructive qualities when left in the fresh air for a long time. If it is ventilated for a long time, it can be used to erect buildings for living beings. New batches of material should be avoided.
New beam
It is recommended to use sleepers to form the foundation for a house only for frame structures. This is due to the weight of the future building - sleepers are not intended for heavy structures.
Due to the large weight of the columns for installation, a winch, crane, and hinges are used to simplify the task.
Depending on the construction, the piles are mounted on a sand and gravel bed or pillar supports.
If a strip foundation is chosen, a compacted cushion is poured, columnar supports are used when forming a point grillage.
You can install sleepers with a relaxed frame assembled with wire. Raw materials cannot be heated or extended. This option is applicable only to reinforced concrete up to 6 meters long. The tense frame is mounted with burnt, stretched iron wire and is suitable for beams of any length.
Mandatory stages of work are reinforcement, construction of formwork, pouring concrete mortar. Beam - foundation for external walls, plinth.
Before installing reinforced beams, metal rods are treated with anti-corrosion compounds.
Formwork for pouring is often made from wooden boards, but sheet iron can be used. If insulating material is used, the form is permanent and cannot be dismantled after the concrete has dried.
It is necessary to perform concreting so that there are no voids left that reduce the strength indicators. To compact the foundation, immediately after pouring the area, they often pierce the screed with a reinforcement bar and shrink it with a construction vibrator.
Types of sheds and soils
Before considering the types of foundations for a barn, you should decide on the type of structure itself. The following types of country sheds are distinguished:
- With a pitched roof. The roof is entirely flat and slightly inclined in relation to the rear wall. It is for this reason that when building such a shed, the area is somewhat limited. Most of these buildings have one window and doors. For this type of shed, a shallow strip foundation is suitable.
- With a gable roof. One of the popular types of construction among summer residents. The floor is made of tongue and groove boards, and the door hangs on three hinges. There can be one or several windows. Absolutely any type of foundation is suitable for such a building.
- Chest.
Very light and squat. As a rule, garden tools are stored in it. The area of such a room is minimal. The foundation for such buildings is built in the most common and simple way. Drawing of a barn type Chest - Combined greenhouse. It is built exclusively in cases where there may simply not be enough space for a barn. Such premises are perfect for germinating seeds of all kinds of plants and for growing indoor plants in pots. Here you can use a strip or column foundation.
- Temporary. In fact, this is full-fledged housing with practically no amenities. In winter, garden tools and tools or other equipment are often stored here. In summer, the temporary shelter is, in principle, suitable for habitation. For greater comfort, there is a summer shower, electricity and other benefits of civilization. The best type of foundation for a temporary structure is a strip foundation.
The type of foundation being built directly depends not only on the strength of the future building, but also on the type of soil on which it is built.
- In the case of sandy soil, which can float in wet conditions, does not compress and freezes up to half a meter, a screw, monolithic or strip foundation is suitable.
An example of a strip foundation for a barn - On sandy and loamy soil, freezing to two meters and below, prone to quicksand, only a strip base is erected. It is also suitable for clay soil, which can exert high pressure on the foundation.
- The gravel soil does not erode or undergo compression; its freezing is no more than half a meter. The simplest and most inexpensive thing in this case will be the installation of a columnar base.
- It is best to have rocky soil for construction. It is devoid of all the above disadvantages, but has its own: hardness. It can work with any type of foundation, excluding screw ones.
Let's look at the types of foundations for a barn that you can build with your own hands.