“Tape” (strip foundation) is the most popular type of foundation in the field of low-rise construction. Initially, such structures were created from large stone blocks, and with the advent of concrete, monolithic modifications gained popularity. However, prefabricated strip foundations remain in demand due to their simplicity and high speed of construction. This article will be useful to anyone who wants to create a reliable foundation for a house or other building with their own hands.
Prefabricated strip foundation: what is it, what buildings is it suitable for?
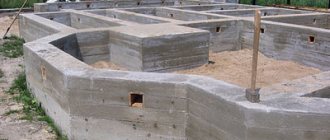
The strip foundation, as the name implies, is located under the external and internal load-bearing walls of the future building. Elements of a prefabricated strip foundation are made in the form of reinforced concrete blocks in the factory. This allows you to quickly install the structure on the construction site and proceed to the construction of walls in a short time.
Strip foundations can be shallow or deep (high). The first option involves immersing the concrete strip 40-75 cm into the soil. Strip foundations are suitable for several types of buildings.
- High- and low-rise buildings with walls made of brick, foam concrete, cinder block and other materials, the density of which is no more than 1300 kg/m3.
- Private houses, outbuildings with basements - by choosing the right depth, you will simultaneously ensure the construction of the foundation and basement walls.
- Objects built on hard (rocky) areas, when the soil itself has a high bearing capacity, and the foundation only distributes the load evenly.
It is important to know! The construction of a prefabricated strip foundation is only suitable for fairly stable soils. When building a house on soft soil, other engineering solutions are required.
Block foundation diagram
The building foundation plan in the drawing represents the entire structure in section at the foundation level, thanks to which it can be seen quite well and all the features of the structure can be understood. The support structure plan must include the following indicators:
- Parameters and dimensions of support pads or monolithic sole.
- The depth of the location of absolutely all foundation elements relative to the zero level, which is usually considered to be the floor level of the first floor of the building.
- The drawing must include an image of the cross-section of the base, which shows in detail the bedding, its type and thickness, the depth of the base and other elements, the height of the foundation above the ground level, the type of waterproofing and the use of insulation.
- The plan must necessarily show the location of all types of communications, be it water supply, gas pipes, electrical cables, sewers, etc. The diagram must contain all the holes through which this or that communication will be laid. In addition, the plan must be accompanied by an explanatory note, which should describe in detail the method of organizing all types of communications.
- The foundation drawing must necessarily contain the location of all foundation blocks, as well as pillows. If a monolithic structure is used as a sole, its location and structure must also be indicated.
- The foundation plan necessarily contains an explanatory note, which will describe in detail all the design features of the foundation, as well as the technology for the construction and installation of all elements.
The finished foundation plan is a completed document, according to which you can immediately begin to calculate the cost of all building materials, as well as the necessary construction work, and then begin purchasing everything necessary for construction.
Pros and cons of prefabricated strip structure
Before starting work, evaluate all the features inherent in prefabricated foundations.
Advantages
- High speed of construction - no need to wait for strength to gain, as is the case with a monolithic strip foundation. This allows the building to be built in one season.
- Versatility - suitable for any low-rise buildings.
- Off-season - with proper preparation, installation of a prefabricated strip foundation is possible at any time of the year.
- Simplicity - minimal preparation for laying slabs.
- Standard parameters - structural elements are manufactured in accordance with GOST 13580-85. "Reinforced concrete strip foundation slabs."
Flaws
- Waterproofing – interslab joints complicate the installation of a protective waterproofing layer and are potentially access points for moisture.
- Load-bearing capacity - the strength and durability of prefabricated foundations is somewhat lower than that of monolithic ones.
- Cost - the relatively high price is dictated by the need to rent heavy equipment for moving and installing blocks.
Types of prefabricated bases
It takes a lot of time to build a brick foundation.
The foundation can be classified according to several parameters: material of manufacture, depth of laying. Based on the first feature, the following structures are distinguished:
- Rubble. The base is natural stone (chopped or smooth). Such a foundation is rarely used, since its compressive strength is low.
- Concrete. Large size FBS blocks and slabs are used for work. The advantage of the design is the speed of construction. However, its construction is expensive. The reason for this is the use of special equipment.
- Brick. To make such a tape, clay or ceramic material is used. In this case, construction equipment is not required. The work takes a lot of time, so this material is only suitable for shallow foundations.
The depth of installation depends on how strongly the soil freezes. If the value does not exceed 6 m, such a structure is considered shallow. When constructing it, you need to take a responsible approach to calculations. Such a foundation is inexpensive, can be built quickly, but is not suitable for heavy structures. In other cases, a foundation is required to the entire depth of soil freezing.
How to calculate such a foundation?
The design of a prefabricated strip foundation begins with calculations in accordance with SP 50-101-2004 “Design and construction of foundations and foundations of buildings and structures.” It is important to immediately draw up a detailed plan, a general drawing of the layout of the house and its supporting structures (which can be walls or columns). For calculations the following data is required:
- the depth of the future foundation is determined based on the region and soil type, but is always below the freezing point;
- dimensions, configuration, characteristics of materials, building elements of load-bearing structures;
- the dimensions and location of holes for communications are determined in advance;
- installation order, number of blocks and additional elements;
- number of storeys of the building, wall and roof material.
To obtain accurate calculations, it is advisable to use special programs that already take into account all the basic parameters and safety margin. It would also be a good idea to order a drawing from an experienced structural engineer.
How to lay FBS
In any row, laying begins from the corners. Then the blocks are placed in the places where the piers are drained. They are called lighthouses, and then all others are compared to them. Their vertical alignment is checked and corrections are made if necessary. Most often, the block must be lifted again, moved and replaced.
After the beacon elements are installed, the moorings are stretched - cords along which they are guided when installing the next blocks. They mark the boundaries of the wall, and so that the FBS stand symmetrically relative to the middle of the FL block (pillow block). The maximum permissible deviation is 12 mm. All subsequent rows of blocks should also be placed exactly above the middle.
When laying blocks, you must ensure that they are stacked one above the other without much displacement
It is more convenient to pull the cords 2-3 mm from the side surfaces of the lighthouse blocks. This will make it easier to display. Intermediate blocks are placed starting from the largest: first they put everything 2.4 meters long, then 1.2 and then 0.9. The correctness of their installation is checked against the marking cords, verticality - with a plumb line.
How to choose the sizes of FBS blocks
You can determine how many blocks you need for your foundation by selection. You can do this yourself on a plan drawn to scale. On the plan, you mark each block to the same scale.
The sizes of blocks for a FBS foundation are selected based on a simple rule: to increase the strength of the structure, you need to use the largest block sizes. Therefore, first you draw the 2.4 meter blocks installed in the corners, then, if they fit, draw them in the places where the partitions adjoin. Between them, you also place the largest blocks that can fit there. Where they no longer stand, place them in a smaller size. If there are any gaps that even the smallest block (0.9 meters) cannot fit into, don’t worry - these gaps are filled with brickwork.
Two types of prefabricated FBS strip foundations - with and without a cushion (shallow strip)
Draw the second row in a similar way, not forgetting about the displacement of the seams. If necessary, draw the third one in the same way. Then count the required number of blocks of each size. Do not throw away the resulting plan: it will be useful to you when installing the prefabricated foundation already on the site.
FBS masonry mortar
For laying foundation blocks, standard cement-sand mortar M-100 is used. It can be obtained using different cement grades and amounts of sand:
- For 1 part of M300 cement take 2.5 parts of sand;
- For 1 part of M400 cement there are already 3 parts of sand;
- when using M500 sand, add 4 parts.
First, mix the dry ingredients until a homogeneous composition and color is obtained. Then gradually add 0.5 parts of water. If the solution turns out to be too thick, add water little by little in small portions. The consistency should be like thick sour cream: not lumpy, but not runny either.
Do not try to increase the amount of cement. This will not only not increase the strength of concrete, as expected, but will significantly reduce it. To gain strength, concrete requires a strictly defined amount of aggregate (in this case sand) and water. If there is a lack of one and/or the other, its strength will be lower. In the worst case, it will crack and crumble.
What materials and tools will be needed?
First of all, you will need block elements. Prefabricated strip foundations consist of two main components.
- Slabs (FL) GOST 13580 85 - are laid on the lowest level, ensuring the distribution of the load from the walls to the ground. They have the form of a volumetric trapezoid and are made of concrete class B12.5 or more.
- Foundation blocks (FBS) GOST 13579 78 - necessary for increasing the height of the foundation. They are produced in the form of large parallelepipeds with connecting grooves for pouring fastening cement-sand mortar. Made from concrete class B7.5-B15.
It is necessary to purchase materials separately:
- sand;
- gravel and/or crushed stone;
- cement;
- fittings;
- waterproofing material.
Additionally you will need the following tools:
- crowbar and shovel;
- buckets;
- precise level;
- plumb line;
- level;
- theodolite;
- rack rule (2 m);
- rope with stakes and a hammer (for marking the area);
- concrete mixer.
Installation of foundation pads
In private construction, foundation pads with a width of 1000-1400 mm are usually used.
Before installing the cushions on the base, the outer edges are marked and a cord is pulled over the hammered reinforcement pins. The foundation pads are installed along the cord; installation begins from the corners of the building.
In some cases, depending on the project, there may be spaces left unfilled with pillows. In this case, formwork with reinforcement is installed, and unfilled areas are filled with M200 concrete.
The seams between the mounted elements are sealed with cement mortar of a grade not lower than M100.
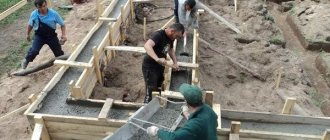
Installation of prefabricated strip foundation: step-by-step instructions
- Cutting off the top layer of soil is removed to prevent rotting of organic residues (grass, roots) within the building. Turf and grass can be saved for later landscaping. The cutting is carried out approximately 1.5 m larger than the size of the prefabricated strip foundation on each side.
- Marking out - use a theodolite and a level to mark out the main axes of the building. To mark them you will need pegs with a cord stretched between them. It is important to know! The width of the prefabricated strip foundation is not identical to the main axes of the building. To obtain accurate parameters, it is necessary to take into account the width of the walls.
- Excavation work - according to the markings, taking into account the width of the lower part of the slabs, a trench is dug. When choosing a mechanized excavation, use a level to control the dimensions and horizontality of the pit. The last 15-30 cm of depth must be completed manually. After this, the horizontalness of the bottom and compliance with the breakdown along the axes are checked. If the soil is loose, it will need to be further compacted. The walls of the pit are the sides that form the perimeter of the excavation. Slopes are walls inclined at a given angle. Depending on the type of soil and the conditions in which the work is carried out, it is determined what the walls of the pit should be: vertical or whether it is necessary to set a certain slope. The walls of the pit are often constructed with the strengthening of the soil against possible collapse SP 45.13330.2012 “Earth structures, foundations and foundations”.
- Drains or ditches are installed for pumping/disposal of groundwater and sediments in accordance with SP 250.1325800.2016 “Buildings and structures. Protection from groundwater" and SP 104.13330.2016 "Engineering protection of the territory from flooding and flooding."
- Removal - having retreated 2-3 m from the edge of the future pit, it is necessary to equip the removal of all the main dimensions of the foundation in plan. To do this, use an edged board or pegs about 4 cm thick. In addition to the alignment axes, the cross-section of the prefabricated strip foundation is indicated. Worn-out will allow you to strictly adhere to the design dimensions in the future.
- Drainage pad - one layer of sand and crushed stone/gravel 10 cm thick is laid sequentially. Each level is compacted. In some cases, these materials are mixed and a 20 cm thick preparation is poured. The cushion should be 20-30 cm wider than the slab.
- Installation of the base - concrete slabs are placed using a crane into the foundation pit, starting from the edge of the future building. The correct location is determined by casting and instrumentally (with a theodolite from a reference point taken out at the construction site - such work is carried out by surveyors).
- Construction (increase in height) of the foundation - a reinforced concrete belt is poured on top of the slabs or blocks are installed directly on the cement-sand mortar. Regardless of the technology chosen, it is important to control the level and alignment of elements aligned with the axes of the building under construction. The technology of prefabricated strip foundation requires placing the joints of the blocks at random (like brickwork).
- Consolidation of joints - to fix the elements from which the structure is erected, a classic cement-sand mortar M100 is used. Since the seams between the blocks potentially remain the weak point of the foundation, it is rational to buy CEMMIX plasticizers in Leroy Marlin or another store offering original products. Thus, the water-repellent additive CemAqua significantly increases the solution’s resistance to moisture, complementing the waterproofing. The Plastix plasticizer allows you to maintain the necessary mobility of the solution without reducing its strength. CEMMIX additives will ensure high adhesion of the mortar in the seams to the foundation blocks, reduce the shrinkage of the cement mixture during hardening, and polypropylene or basalt Fibra will provide volumetric reinforcement of the mortar in the seams.
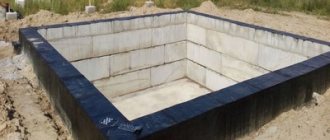
- Completion of work - after all the seams have dried, the outside of the foundation is treated with bitumen mastic or other waterproofing material. Insulation is most often made from extruded polystyrene foam. After this, the sinuses of the pit or trench are filled up.
It is important to know! If it is not possible to use a whole number of foundation blocks, the sections are monolithic with concrete of at least class FBS, sometimes reinforced according to the design. In such monolithic areas, “windows” are left for the passage of utilities through the foundation walls.
An example of calculation of materials for quick monolithic joints of FBS blocks, for which the CemFix hardening accelerator and FIBRA CEMMIX polypropylene fiber were used in the solution.
Excavation
Using a mechanized method, soil is excavated in a pit to the design mark using a sighting device. The soil is transported by dump truck outside the construction site. Sometimes, depending on the topography of the site, soil can be used for backfilling in the right places on the site.
When mechanized excavation of soil, usually about 50 mm is left for manual modification of the base of the pit. This way, a better quality of the pit bottom is achieved.
Then a sand-crushed stone cushion up to 150 mm thick is placed at the base of the pit; concrete preparation can be made from M100-M200 concrete with mesh reinforcement with a reinforcement diameter of 10-14 mm and a rod spacing of 200-250 mm. Thus, at the same time, excellent floors are installed in the basement of the house.
CemFix
A highly effective accelerator is a complex additive for concrete and mortar mixtures requiring high early strength.
More details
Basic moments
Initially, when constructing any type of foundation, it is necessary to conduct a soil analysis. With strict adherence to all the requirements of construction technology, this type of base can be built on almost all types of soil, even heaving ones. The ideal conditions for a block base are soils containing rocks and deep groundwater. If the last condition is not met, the basement will always be damp, despite the application of several layers of waterproofing.
When constructing a foundation made of concrete blocks, it is necessary to carry out the following operations:
- The top of the foundation must be covered with a monolithic layer of concrete and leveled. Only after this can brick or cinder block be laid on it.
- The gaps between the foundation blocks and the soil are filled with coarse sand.
- The outer surface of the foundation is covered with a layer of waterproofing materials. This can be bitumen mastic or resin. This will protect the foundation from moisture, which negatively affects the strength of concrete.
- The foundation must be insulated. To do this, its outer part is finished with expanded polystyrene or other insulating materials.
- It is imperative to seal the joints between the blocks.
All these additional operations significantly increase the cost estimate for foundation construction.
[my_custom_ad_shortcode4]
Polypropylene fiber
Universal polypropylene reinforcing fiber for adding to the solution.
More details
Recommended composition of masonry mortar M100:
| Batch volume Component | 1 cube | 100 l | 85 l |
| Cement | 250 kg | 25 kg | 21 kg |
| Water | 140 l | 14 l | 12 l |
| Sand | 1580 kg | 158 kg | 134 kg |
| CemFix additive | 0.5 l | 0.05 l | 0.04 l |
| FIBRA CEMMIX (polypropylene) | 900 g | 90 g | 75 g |
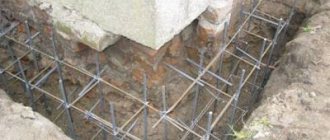
Monolithic foundation technology
Technology for reinforcing the junction angle of strip foundations.
tape consists of the following main stages.
It is planned to clear areas for the construction site and transport construction materials. The house is broken down, during which the location of the main components of the structure is fixed with pegs and lacing. If the area is flat, measurements are easy. If the terrain on the site is difficult, then it would be wise to use a staff and a level. A mandatory check of the angles is necessary, as they must be 90°. Next, the marks of the bottom of the trench are checked using a theodolite. The perimeter of the construction site must be made 3-4 m wider than the size of the building.
Digging a trench
The trench is dug using an excavator or manually. Then the bottom of the trench must be cleaned and leveled. Then the pit is fenced off. After this, a sand and gravel cushion of 12-20 cm is laid at the bottom of the trench. A plastic film is placed on the cushion so that the water released from the concrete does not leak into the ground.
Formwork installation
The installation of formwork is made from planed boards, the thickness of which should be 4-5 cm. Afterwards, it is cleared of debris and moistened generously with water. A prerequisite is the rigidity of the fixation with spacers to the walls of the trench to avoid bulging of the walls. After this, the formwork is raised 300 mm above ground level. After pouring the monolith, the upper part of the foundation is covered with a waterproofing ball to protect the building walls from moisture penetration into them.
Installation of fittings
During the installation of the formwork, reinforcement, previously assembled into frames, is laid around the entire perimeter. The frame consists of two rows of vertical reinforcement, connected to horizontal reinforcement; the quantity will depend on the depth of the foundation. should be from 10 to 25 cm.
Laying concrete in formwork
The concrete mixture is laid in stages, in 20 cm balls. To eliminate voids in the concrete mass, each ball must be compacted using a wooden tamper. The best and most reliable way to do this is to use a concrete vibrator.
Waterproofing ball device
After 10 days after laying the concrete mixture, the formwork can be dismantled. To ensure waterproofing, bitumen mastic is used, which is coated with the outer walls and a waterproofing film is glued. To ensure more reliable moisture resistance of the structure, the soils adjacent to the foundation are treated with binder polymer mixtures.
Backfill
After installing the waterproofing, backfilling is carried out. It is done using sand in a layer-by-layer method. These operations are performed manually so as not to disturb the waterproofing. At this stage it ends.
Care of the foundation after assembly
The technology for constructing a prefabricated strip foundation is good for its speed of implementation, so the support does not require special care after installation. It is only important to allow all joints between the blocks used to increase the height of the foundation to dry thoroughly. They turn out to be quite voluminous due to special grooves into which cement-sand mortar is poured. Only after this can waterproofing be done from ground and surface water.
Arrangement of openings
When constructing openings in the foundation walls, they are covered with reinforced concrete lintels. You can use metal corners with a shelf of 100 mm; in this case, the installation of brick inserts in the places where the lintels are installed is excluded, since individual places will have to be made with bricks for the design mark of the lintels.
All spaces not filled with blocks are covered with solid red brick masonry with obligatory plastering with cement mortar.
When installing blocks, you should carefully consider the arrangement of holes in the foundation walls for laying various communications. Otherwise, you cannot avoid working with a hammer drill, which increases the time and costs of constructing this design.
Disadvantages of FBS foundation
A prefabricated foundation made from large-format products cannot be reinforced using traditional methods. Meshes and reinforcing bars bend even under the weight of the FBS themselves. Therefore, a lower belt made of reinforced slabs (FL or shallow strip foundation) and an upper reinforced belt made of reinforced concrete are used, which serve to stabilize the geometry of the spatial structure made of blocks.
The main disadvantages of prefabricated foundation technology are given below.
Construction budget
The foundation is expensive due to the following costs for the owner of the site who has chosen this technology:
- rental of special equipment - products must be delivered to the construction site by truck; if they can be unloaded with a manipulator from its own side, then for installation you will need a full-fledged truck crane with normal lifting capacity at maximum boom reach;
- services of specialists - before installation, it is necessary to level the pit, compact several layers of sand and crushed stone with a vibrating plate, pour the footing, then lay out the foundation slabs, fill the voids with concrete, install the blocks, at the last stage you will need to cover the walls with tape with waterproofing.
In addition, it may be necessary to manufacture an armored belt on top of the FBS blocks. The work will take a few more days.
If FBS are included in the project initially, designers link the dimensions of the walls and the layout of the building to standard block sizes. In this case, they will not have to be pricked in a building spot using traditional methods. In practice, such projects are rare for individual developers; several pieces still have to be formed from a whole FBS.
Advantages of foundations made of FBS blocks
The popularity of FBS blocks among builders is understandable, since this building material has a number of advantages. In particular, these include the following criteria:
- frost resistance
- large selection of sizes and models
- reasonable cost
- resistance of blocks to various aggressive environments
When making blocks, manufacturers take into account the possible requirements that will be placed on them during the construction of the foundation. It is for this reason that various additives are added to concrete during the work process, which make the products more resistant to various external influences (low temperatures, humidity, etc.).
Thanks to this, with the help of blocks it is possible to build a foundation even in those areas where there are harsh climatic conditions, up to large daily temperature changes.
Very often, FBS blocks are made to specific technical conditions, so they come in different configurations, sizes, and production composition. As a result, everyone has the opportunity to choose the material for the foundation, taking into account their own needs.
When using FBS blocks in construction, the work does not take much time, and it is also easier to do.
It is also worth paying attention to the low susceptibility of blocks to aggressive environments, which is why they are often used for construction work on highly acidic soils. Soil with similar characteristics is found in many regions
Foundation materials
Having considered three types of building load-bearing structures, we will dwell on the materials from which a strip foundation can be made.
Reinforced concrete foundation
This is the simplest foundation, familiar to literally everyone, even those far from construction. It is prepared from a cement mixture, which is poured into a previously prepared formwork with a reinforcement frame installed inside. For maximum strength and reliability, experts recommend preparing a concrete mixture from cement grades M-400 or M-500. To increase the strength characteristics of the structure, in addition to tying the reinforcement, crushed stone is added to the concrete mixture.
Brick foundation
This design can also be called simple, because it is erected using building bricks installed on the mortar. A brick foundation is used in cases where it is necessary to build a multi-story cottage. It is only important that high-quality solid bricks are used (heat-resistant or acid-resistant).
Attention! Sand-lime brick is not suitable for building a foundation. Under the influence of groundwater and precipitation, such material quickly collapses, threatening the integrity of the entire building and the lives of the people living in it!
Solid brick is stronger than silicate brick, however, it is not recommended to use it for foundations if there is groundwater nearby. In addition, such a design will definitely require high-quality waterproofing of the external walls. As a result, the purchase of expensive bricks with additional investments in waterproofing makes the construction of this foundation an expensive pleasure.
Rubble circuit
This type of foundation is very similar in technology to a brick foundation, with the only difference being that instead of a brick, a flat stone (dolomite, sandstone or limestone) is used, which in the professional environment is called rubble. By analogy with bricks, a specialist lays the foundation stone using a high-quality building mixture.
The advantages of this foundation include its excellent appearance, thanks to which your house will resemble an ancient stone castle. In addition, a high-quality stone will last at least 200 years! However, there are many difficulties with this building structure. The amount of stone due to its shape is difficult to calculate. Laying it is a labor-intensive process that can only be entrusted to professionals. In addition, the rubble circuit must be laid in the ground below the freezing level. But such work can only be carried out in summer, when the temperature does not drop below +15°C.
Rubble concrete foundation
As the name suggests, this strip foundation is a hybrid of rubble and cement mixture. And if in the previous version of the supporting structure the mixture was used exclusively to fasten the stones and fill the space between them, then in the rubble concrete frame the materials are used in a 50:50 ratio. These proportions can be changed at your discretion, however, the rubble in the foundation should not be less than 40%, since in the absence of a reinforced frame, it is the stone that is the binding component.
If we talk about laying this type of foundation, then this process does not create any particular difficulties. Dolomite or limestone stones are sunk into a large layer of mortar along the entire length of the tape, after which they are filled with another layer of cement mortar.
Slab foundation for aerated concrete building
This solution for difficult ground conditions is becoming increasingly popular among developers. Its effectiveness has been proven by foreign construction experience, for example, on extremely weak and extremely wet soils in Holland. Similar conditions are found in the North-West of Russia and in some other regions.
Pouring a slab foundation.
The base for the walls has the form of a reinforced concrete slab reinforced in two layers with a height of 20 to 40 millimeters. It can be poured at surface level or buried to the freezing depth or below, which makes it possible to install a basement in the building. The resulting bending loads are redistributed in the slab mass due to the joint work of reinforcement in tension and concrete in compression. This ensures the necessary rigidity and constancy of the geometric characteristics of the surface of the slab, on which all building structures are erected.
Slab foundation with unassembled formwork.
When installing a slab foundation at the level of the design elevation, the natural soil underneath is replaced with carefully compacted bulk material with high load-bearing capacity. The bottom of the sample may be higher than the standard freezing depth in the region.