The exterior decoration of the house serves not only for decorative purposes. It helps ensure the durability and integrity of the wall material and, in particular, the basement section of the foundation. There is a wide selection of materials that allow you to create a durable and reliable protective shell for the outer surface of the facade. This article talks about the nuances and difficulties of finishing the basement of a private house with siding. The information will help you gain an understanding of the material, installation technique and other features of basement siding, which will allow you to speak knowledgeably with sellers or siding installers.
Finishing the basement of a private house Source dasdesign.ddns.net
Finishing with basement siding
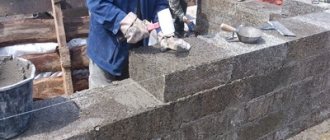
The base has to withstand heavy loads, atmospheric and mechanical, so it is one of the most vulnerable parts of the house. The basement needs protection, and sheathing siding is one way to do this. If no measures are taken, the foundation may collapse under the influence of melt water or become deformed due to temperature changes. Consequently, basement siding protects not only the basement itself, but also the foundation and load-bearing walls of the house. Moreover, they can be used to cover part of the facade or the entire facade.
Modern panels of this variety are made from polypropylene-based resins. Substances are also added to the composition to improve the performance of the siding. Thanks to such components, the facing material becomes more resistant to mechanical stress, durable, frost- and heat-resistant. The color range of basement siding panels is varied. Their texture and pattern resemble stone or brickwork. Recently, basement siding made to look like wooden shingles has begun to gain popularity. Such a wide selection of textures and shades gives scope for design imagination. The cladding can be made of siding of any one color or a composition of two or more shades can be created. Conscientious manufacturers produce very high-quality imitation. Visually, it is practically impossible to distinguish the cladding with basement siding from real stone and brick. You can determine the material only by sound, by knocking on the base. The reason for this lies in the production technology of basement siding. As a basis, take a fragment of a wall made of the material under which the basement siding is planned to be styled. A cast is taken from the wall and a mold is made from it. Material is poured into it under pressure. After hardening, a panel is obtained, on the surface of which the texture of the original is imprinted down to the smallest cracks. To ensure absolute similarity, the siding is painted accordingly.
The color and texture variety of basement siding is enormous. For example, for retro lovers they produce panels that imitate baked brick. It even shows whitish spots - efflorescence, characteristic of real old brick.
Meanwhile, the price difference between basement siding and natural facing materials is significant: installation costs 2–5 times less.
The thickness of the basement siding panels is 3 times greater than vinyl siding and is 2.5 - 3 mm. This material can withstand frost down to –40…–50 °C and heat up to +50 °C. It is not afraid of precipitation, mold, rot, or insects. Thanks to special resins and other additives, the surface of the basement siding does not fade in the sun and does not darken.
Siding of the same variety, from the same manufacturer, with the same pattern may differ noticeably in thickness and shade depending on the production series. Therefore, when purchasing components, make sure that they are suitable for your series of row panels. As for the color of the panels and components, everything is not so clear here. If the ordinary panels have a slightly different shade than the components, there is nothing to worry about. On the contrary, a play of shades can be a successful design solution and give the cladding a unique style. But it’s bad if the ordinary panels themselves have a different shade. This is only permissible if the combination of shades was planned in advance, a composition was developed where each shade was given a specific place and the required number of panels of the corresponding colors were purchased. If panels of different shades are scattered chaotically, unevenly, it looks ugly. There are two types of basement siding - “shingles” and “scales”. The names correspond to their appearance. The edges of the “scales” are rounded, and the panels themselves resemble scale plates. The “shingles” are rectangular. Minimal maintenance is required for basement siding. When darkening occurs, it is enough to wash it with soap and water.
Basement and foundation are the same thing
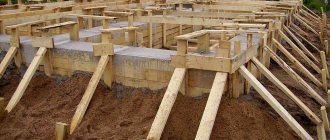
Technically, the base and the foundation are different concepts. The foundation is the lower part of the house and its support. And the base is only a continuation of the foundation, a connecting link between it and the walls. It is impossible to build a normal house without a foundation, but without a basement it is quite possible.
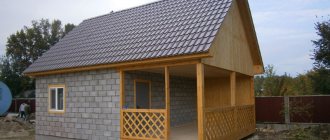
Then why do you need a base? It protects the house from moisture and cold. In addition, this part of the building serves a decorative function. The base raises the house by 50–80 cm. A house with a small base or no base at all looks too low.
To summarize: the base is part of the foundation, but not itself. However, it is customary to say that in the cladding of the lower part of the facade these concepts are no different.
Do-it-yourself basement siding installation
There are two ways to install basement siding: with snap locks and with vinyl pins. The difference between them is significant. Installation with snap locks. According to the principle of operation, such locks resemble vinyl siding fastenings, although there are noticeable design differences between them. At the bottom of the basement siding there is a hook that is bent towards the wall. At the top of the panel there is a counter part of the lock where the hook is inserted. Siding with such a lock is installed from the bottom up. Install the first panel. The hook of the second panel is inserted into the second lock element located in the upper part of the first panel. The panel is pulled upward. The procedure is similar to installing vinyl siding.
Installation on vinyl pins (tenon-to-groove mounting). This method is used to install varieties of plinth panels that do not have latches. Such panels have a different type of fastening. Instead of a hook, they have vinyl pins at the bottom. At the top of the panels there are sockets corresponding to the sizes of the pins. This material is installed in the opposite order to the order of fastening the panels with snap locks. Panels on vinyl pins are mounted from top to bottom. First, install the top panel. Then the pins of the next panel are inserted into the sockets located in its lower part.
How to properly install basement siding
Basement siding appeared later than other types of this facing material. Manufacturers have tried to modernize the panels and equip them with devices that make the installation process as easy as possible. In the upper right part of the “scale” siding there is a scale showing the ambient temperature. It has been mentioned more than once that siding, like any solid body, expands from heat and contracts when exposed to cold. This property is associated with the need to leave gaps between the panels, and also not to attach it too tightly to the base. Depending on the temperature at which the siding is installed, the width of the gaps is adjusted.
With base scale siding the task is simplified. You don't need to do the calculations yourself. Smart panels will do everything for you. The scale indicators tell you with what overlap to install the panel: you just need to align the edge of the panel with the corresponding notch on the scale. “Shingled” panels are even more perfect in this regard. In addition to the temperature scale, they have a thermometer that shows the temperature of the panel itself. This is an important addition. The fact is that the ambient temperature does not always correspond to the degree of heating or cooling of the siding itself. For example, if the panels were stored in a well-heated room, and for installation they were taken out into the cold, they simply will not have time to shrink in accordance with the ambient temperature. To adequately determine the degree of change in panel size, it is necessary to know its own temperature. This is where the corresponding scale comes to the rescue.
One more detail should be noted. Installation takes more than one hour. During this time, both the air temperature and the temperature of the siding itself change. Consequently, each panel is installed according to the scale division that the thermometer points to at that particular moment. If two scale divisions are simultaneously displayed on a thermometer, focus on which is brighter. If the brightness is the same, choose the average value between these two divisions and join the panel along it.
Accessories for attaching basement siding. Basement siding is attached only to self-tapping screws or nails made of stainless steel. It is not advisable to use staples.
What kind of material is this?
Siding is a rectangular panel with stiffening ribs at a certain distance.
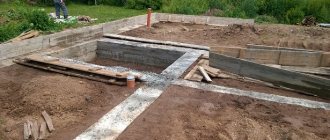
It helps protect the foundation from the effects of the external environment , increases its rigidity and strength. The base is better able to withstand mechanical damage and is not subject to rapid destruction.
Siding is made of metal, cement and polymer materials. In appearance, the material cannot be distinguished from natural material; moreover, it does not need to be painted. Siding panels are available in various colors and shades. It’s not difficult to choose the right color and realize even the most daring design ideas.
Finishing basement siding step by step instructions
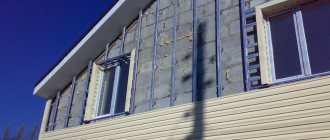
Installation of basement siding begins with standard preparatory steps. They install the sheathing, arrange heat and waterproofing, and attach the counter-lattice. As for the lathing, expert opinions differ on this issue. Some insist that it is better to make a vertical sheathing with cells 30–40 cm wide. The main argument in favor of this design is better ventilation of the space between the siding and the wall compared to horizontal sheathing. Others believe that the best option is a horizontal sheathing of bars located at a distance of about 23 - 25 cm. The direction of joining the basement siding panels depends on the location of the fastening. It can be done either from left to right or from right to left. Most often, “scales” are mounted from left to right, and “shingles” from right to left. However, this is only a tradition, and not a strict law, so the manufacturer can change this order at his discretion.
To determine where to start attaching the panel, you need to look at its nail strip. There will be three holes on it: two oval at the edges and one round between them. This round hole will be the first. Then the fasteners are inserted into adjacent oval holes, and the nails or screws are not driven in completely. The trick is to ensure that the fasteners are positioned strictly perpendicular to the wall. Any, even slight deviation from the 90° angle - and all the work will be in vain. Therefore, it is important to adhere to the order of fastening established by siding manufacturers: first the round hole, then the oval ones. This avoids distortions and bends. Sometimes the basement siding panel has to be shortened. This means that the round hole will shift and will no longer be in the center: the balancing will be disrupted. Therefore, it is necessary to determine the new center of the shortened strip and drill a new hole on the nail panel yourself.
Average prices in the Russian Federation
Estimated cost for the cities of the Russian Federation for finishing the basement with siding:
Moscow, Moscow region - from 350 rubles/m2 only finishing with materials or construction of sheathing; insulation from 50 rub. per sq.m. You will have to spend from 100 rubles on the material. per square meter and up to 1500 rubles.- St. Petersburg - from 100 rub./m2 and from 70 rub. per sq.m, respectively.
- Kazan - material costs from 150 to 1300 rubles/m2, the cost of work is identical to St. Petersburg.
Analysis of the data showed that the price category of costs for the purchase of building materials in Russian cities is approximately the same, and the cost of work in large cities is higher, which is due to high demand.
Selecting components for basement siding
The regular panels of the basement siding are joined to the components, leaving a gap between the ends that corresponds to the air temperature at the time of installation. Recommendations for the size of temperature gaps should be specified in the installation instructions. The manufacturer must provide it. If there are no instructions or they are taken from another type of siding, this is a serious reason to turn to another supplier. The components must correspond to the selected type of siding; you cannot take profiles from another manufacturer, much less a different type.
The J-profile for “shingles” and “scales” is wider, and the starting strip is both wider and more powerful. Corner profiles for basement siding are either smooth or repeat the pattern of ordinary panels. The latter are usually used when installing shingles. The difference between a smooth and textured profile is not only external. The patterned corner profile is equal to the length of one row panel and does not have a receiving gutter. It is installed after installing the ordinary panels, while the smooth profile is installed earlier. The profile with the pattern is laid overlapping on the row panels.
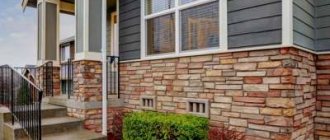
Types of raw materials for external cladding of the foundation of a private house with photos
Siding for the base varies in material and appearance. The most common materials are:
PVC – vinyl
The main advantage is low price . This material is easily installed in place and is not subject to deformation. However, it cannot withstand strong impacts, which lead to cracks and breakage.
Metal
Resistant to severe damage, withstands changes in ambient temperature. It is considered elite among sidings.
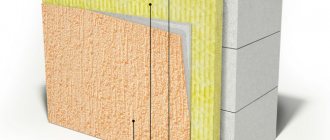
Fiber cement
Withstands all types of negative influences, but should not be dropped from a great height, as it may break into small pieces. The heavy weight causes difficulties during installation and transportation.
Wood
Rarely used in cladding due to its high cost . It has good thermal insulation properties, can withstand temperature changes, and with proper treatment lasts a long time without losing its original properties.
Installation of starting siding strip
The order of installation of the starting strips depends on the type of corner profile chosen in this case. A corner profile with a pattern is mounted after the starting strips. Therefore, first, starting strips are attached along the entire length of the sheathed surface. Then ordinary siding and corner profile are attached to them. The smooth corner profile is installed simultaneously with the starting strip. In this case, a number of rules are observed: • the required temperature gap is left between the end of the starting panel and the nail strip of the corner profile; • the lower edge of the corner profile is shifted down relative to the lower edge of the starting strip by the amount of the vertical temperature gap; • between the lower edge of the corner profile and the blind area, leave a distance equal to the vertical temperature gap. Instead of starting strips, it is permissible to use a J-profile. Typically, the bottom hooks of the latch lock are located on the inside surface of the row panel. To align the lock with the J-profile receiving channel, the row panels are shortened to the beginning of the lock hooks. The row panel should not rest against the bottom of the J-profile gutter, so a temperature gap is left between them. To prevent melt and rainwater from collecting in the J-profile gutter, drainage holes are cut in it. The method of joining the starting strips depends on whether original components are used or they are replaced with a J-profile. In the first case, when joining two or more strips, a double temperature gap is left between them. The J-profile is overlapped.
Installation of ordinary siding panels
First, measure the length of the surface that is planned to be sheathed. Then measure the length of the siding panels. By comparing the data obtained, they determine how the panels should be cut. The sheathing must be symmetrical. In this case, the length of the last panel in a row is required to be at least 30 cm. Two rows of panels are “tried on” to the wall. Subsequent rows will repeat the pattern of these two rows. By the time the installation of row panels begins, starting strips, window and door opening trims, as well as internal and external corner profiles (if a smooth profile is selected) should already be attached to the wall. The direction of installation depends on the location of the connecting strip on the plinth panel. The siding is installed so that the side joining strip is opposite the corner. As already mentioned, the “shingles” are usually installed from the right corner of the wall to the left, and the “scales” - from the left to the right. The first plinth panel is cut from the end in one line. The location of the cut is not important. However, it is advisable to ensure that the panel looks beautiful after its end is inserted into the groove of the corner profile. The prepared panel is slightly tilted and inserted into the receiving groove of the corner profile. The hook of the lower part of the panel is hooked onto the mating part of the starting strip lock. The panel is pulled up until the lock clicks into place. Then check that the panel moves freely left and right. A temperature gap is set between the end of the panel and the bottom of the receiving gutter of the corner profile. After this, the panel is attached to the sheathing, first in a round hole, then in an oval one. Subsequent panels in a row are not trimmed. They are combined with the marks of the temperature scale, which are marked on the upper corners. When the first row is completed, move on to the next. The first panel in the row is “tried on” to the wall and seen how it should be mounted so as not to disturb the seams. It is necessary to find a solution that will reduce the amount of waste.
Most often, the first panel of the second row is cut in half or in thirds. However, a different size is often required. It is important that the pattern of the panels is preserved.
In any case, the cut-off part is not sent to waste, but is mounted on the other side of the wall. All subsequent rows of basement siding are installed in a similar manner. From the ground, plinth siding with snap locks can be installed to human height. Then it will be inconvenient to check the horizontalness of the panels and the size of the temperature gaps. There will also be difficulties with latching the locks.
Therefore, further installation will have to be carried out from a ladder or scaffolding. An overlay corner profile with a pattern is mounted parallel to the ordinary panels. First, the starting strips are attached, then the first row of siding is mounted on both sides of the corner, and the corner profile is installed on top.
The angle is selected so that its pattern coincides with the pattern of the ordinary panel. The corner profile is attached to the lock of the starting strip, after which the lock is latched. Next, the profile is attached to the two upper punched holes and aligned with the regular panels.
If it is not possible to combine the pattern of a regular panel and a corner profile, the profile is trimmed. At the very end, decorative molding is installed.
Calculation of the required quantity for cladding
Calculating the required amount of building material for cladding the base is not a difficult task. Calculation steps:
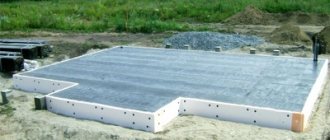
Measure the base of the foundation .
To do this, you need to measure the width, height on one side, and find the area of the entire surface. Basically, the plinth is a rectangle, meaning the area is equal to the width times the height. Measurements and calculations must be done in meters, so as not to get confused later when converting from one unit of measurement to another.Next, by analogy with the first wall, other surfaces of the plinth are measured and calculated. The obtained values are summed up to obtain the total surface area required for cladding with siding.
- Purchase of material . Knowing the value of the total area for finishing in a hardware store, you can select building materials of the desired size, quality, color, installation method, geometry. The price in the store is indicated per 1 sq.m. Knowing the values, you can quickly calculate how much siding is needed.
- Increase. To the obtained numbers you must add 10% for force majeure. There must be a small reserve, which will help out in case of damage, unexpected breakdown or finishing of complex structures that require more consumption. Next, you should calculate the elements for the frame and, taking it into account, purchase siding.
Based on the area of the base of the house, a sketch is drawn up, where the frame is drawn, based on the number of elements, the required number of parts, screws, etc. is calculated. In this case, you should pay attention to thermal insulation, whether it will be carried out or not, taking it into account, the frame is built and additional materials are purchased.
Installing basement siding around windows, doors and under eaves
Installation usually begins with trimming the panels. Measure the distance between the bottom of the J-profile receiving gutter (the boards of the lower frame of the opening) and the lock of the siding panel. The value of the vertical temperature gap is subtracted from the result obtained. A recess is cut out in the panel, the shape and size corresponding to the opening. After this, the panel is mounted. Depending on the length of the basement siding panel and the size of the opening, installation has a number of features. The base panel is longer than the width of the window. The window is located close to the center of the panel. A U-shaped cutout is made on the siding, and it should be larger than the actual size of the window by one vertical and two horizontal temperature gaps. Using a punch, notches are made along the long side of the cutout and the siding is inserted into the receiving groove of the J-profile. The base panel is longer than the width of the window. The window is significantly shifted relative to the center of the panel. An L-shaped cutout is made on the panel. It should be larger than the actual size of the window by one vertical and one horizontal temperature gap. The length of the base panel is less than the width of the window. The entire nail strip is cut off from the panel. A new hole for the nail is drilled in the upper part of the panel exactly in the center. Its diameter should be three times the diameter of the nail. The panel is secured to this new hole, as well as to the lock and notches made by the punch. When attaching basement siding under eaves, the receiving profile can be a J-profile, a J-profile with a finishing strip inserted into it, finishing strips without a J-profile, vinyl planks with J-profiles or finishing strips inserted into them. On the top of the panel, cuts are made using a punch and the siding is inserted into the engagement of the receiving profile.
Special decorative molding is produced for basement siding. When installing these elements, temperature gaps are left at the bottom (between the molding and the upper base panel) and at the top (between the molding and the soffit or cornice).
Requirements
Siding for finishing the base must meet the following requirements:
- have reliability and service life of at least 20 years;
- be produced according to international quality standards;
- from a reliable supplier with many years of experience and strict control at every stage of the production process;
- environmental safety for humans;
- the siding must be coated with a UV-resistant paint coating that will maintain the brightness of the colors throughout the entire operational period;
- affordable price;
- variety of choice, geometry, textures, thickness.
Basement siding. Tenon-to-groove installation
As is the case with vinyl, basement siding can be attached not only with snap locks. Some manufacturers replace conventional locks with mounting posts. They are located at the bottom of the panel. At the top of the panel, on a special vinyl boss, there are sockets into which pins are inserted during installation. Other manufacturers offer tongue-and-groove mounting. To secure such a panel, a nail bar (“tenon”) is inserted into the gap between the back of the panel and the post (“groove”).
In terms of variety of textures, basement siding with tongue-and-groove fastening is not inferior to classic basement panels. Siding is available in "scale", "shingle", "brick", and "stone" patterns. The last two varieties are the most popular in the domestic market. The tongue-and-groove base siding kit includes all the necessary components with a pattern that matches the regular panels. External corner and additional tongue-and-groove siding profiles for basement siding are usually called eaves additional elements.
On the front side of the basement siding with tongue-and-groove fastening there are special posts of the same height - vinyl bosses, usually cylindrical in shape. They are located between the extruded panel designs. These posts are very important elements of basement siding, performing several functions at once. First of all, thanks to them the panels fit as tightly as possible to the sheathing or wall. In addition, due to the columns, the rigidity of the panels themselves increases. Finally, the columns compensate for the thermal expansion of individual sections of the panel if it is heated unevenly. Therefore, you can cut the posts only if absolutely necessary. In addition to fastening, tongue-and-groove plinth siding also differs in panel sizes. They are shorter and wider than regular ones. The components also have the appropriate dimensions. For example, the height of the corner profile for tongue-and-groove siding is equal to the height of one row panel. This is where the differences end. Although the installation of such material has a number of features, in general the work is carried out in the same order and according to the same principles as the installation of classic siding with snap locks. First, install the starting strip, then one external corner profile. Row panels are usually mounted from left to right, so the outer corner profile is first mounted on the left corner of the wall. A temperature gap is left between the end of the starting strip and the nail strip of the outer corner profile, the size of which must correspond to the recommendations indicated on the packaging. Before finally fixing the starting strip, a regular panel is “tried” to the wall. An external corner profile is already installed on it so that the pattern on it is combined with the pattern of the ordinary panel and the starting strip. The same is done when installing window and door frames: attach the frame only after the rows of panels come close to the openings. The entire wall is not always covered with basement siding. It is often used for its intended purpose, i.e. for cladding the base. Siding of a different type is installed on the remaining part of the wall. In this case, the question arises about designing the transition from one siding to another. They do this: they do not install the starting strip, but cut the ordinary plinth panel from below. The trimmed panel from below is attached through the vinyl, choosing for this an area where the holes will be least noticeable. For example, the fastening can be installed in the seams of the pattern. Holes are drilled in the panel. Their diameter should be less than the diameter of the fastener head, but larger than the diameter of the fastener itself. It is recommended to fasten the panels with stainless steel screws or nails. It is not advisable to use staples. The head of the fastener is not recessed into the sheathing to the limit, so as not to interfere with the thermal expansion of the panels. The cap should only be in contact with the surface of the siding. It is necessary to ensure that the fasteners enter the wall or sheathing strictly perpendicular to its surface. If the fasteners bend or deviate from the 90° angle, the entire sheathing will be warped.
Before installing the first ordinary plinth panel, their number is calculated. It is necessary to determine how many panels will fit along the length of the wall. To do this, measure the length of the wall. From it, two thicknesses of the outer corner profiles and two horizontal thermal gaps are subtracted. The result obtained is divided by the length of the row panel. The last panel in a row should be no shorter than 30 cm.
Based on the calculations carried out, the left side of the first row panel is trimmed. If the base panel imitates brickwork, then it is recommended to make a cut along one of the seams between the “bricks” so as not to disturb the pattern. It’s easier with base siding made to look like masonry: the pattern on them is usually asymmetrical, so you don’t need to worry about matching the “seams” between the stones, which means the panels can be cut arbitrarily. Having decided on the number and length of the row panels of the basement siding, we begin their installation. The first panel is inserted into the receiving gutter of the corner profile, not forgetting to leave a temperature gap between the end of the panel and the bottom of the gutter. The first panel is inserted into the starting strip from top to bottom. In this case, the mounting posts (spikes) of the panel must fit into the groove of the starting strip. Do not press too hard on the panel to push it into the gutter until it stops. On the contrary, there should be a temperature gap between the ends of the posts and the bottom of the gutter. If done correctly, the spikes will fit snugly into the starting strip groove and the panel can be moved smoothly along the groove. Set the temperature gap between the bottom of the receiving gutter of the corner profile and the end of the row panel. After this, the siding is nailed to the sheathing. First install the central mount, then the outer one. As a rule, the panel is fastened in five places: one fastener is placed in the center of the panel, and two fasteners are placed on the left and right. Based on this, at the stage of preparing the walls, the distance between the laths of the sheathing is calculated. The second panel is mounted end-to-end with the first, leaving a temperature gap between them. The panel is placed on the starting strip and pushed into the grooves on the right side of the first panel.
It is very convenient to install siding panels on which manufacturers have already applied marks marking the size of the temperature gap. If there are no such marks, you have to measure the temperature gaps yourself using a regular ruler.
Having completed the installation of the first row, move on to the second. It is installed in the same way. The posts of the first panel of the second row are inserted into receiving grooves located at the top of the face of the underlying panel. If there are no grooves, the posts are engaged with the nail strip of the underlying panel in the free space between the battens. Be sure to leave a temperature gap: the panel of the second row should “ride” freely on the panel located under it. After this, combine the design on the front side of both panels and mark the cut line on the left side of the panel, where it will be inserted into the corner profile. At the same time, do not forget to leave allowances for horizontal temperature gaps. Then the second corner profile is mounted overlapping with the first. The upper profile should cover the end of the lower one. Having adjusted the drawing, install the fasteners. If necessary, the panels can be cut not vertically, but horizontally in steps, along the seams of the “brickwork” shown on the front of the siding. Internal corners, as well as window and door openings, are formed using J-profiles or additional eaves profiles. Otherwise, tongue-and-groove siding is installed in the same way as conventional panels. When covering a cornice, a triangular cutout is made on the cornice panel at the future bend, then heated with hot air using a hair dryer and bent at the corners.
We install frames of openings
Scheme for installing a siding panel near a window under the finishing strip
For most inexperienced craftsmen, difficulties arise precisely at the stage of framing window and door openings. The order of work will vary depending on how the openings are arranged in relation to the plane of the wall.
Openings in the same plane with the facade
Method of connecting near-window profiles
In this case, we do the following.
First step. We waterproof openings.
Second step. We attach platbands or J-profiles to the openings. We equip each opening using 4 platbands: a pair of vertical and a pair of horizontal.
Third step. Connecting profiles.
Method of connecting near-window profiles
To make the connection of the platbands as neat as possible, we do this:
- we create bridge cuts on each side of the upper profile;
- bend the bridges down so that precipitation is diverted into the profile below;
- remove pieces of material on the side elements that prevent connection with the casing at the top;
- We connect the side and top profiles. As a result, the bridges should be inside the profiles.
The platband at the bottom is connected in exactly the same way, only the bridges will need to be cut and bent on the side elements for their further laying on the profile below.
Openings are recessed into the facade
The location of the sheathing slats around the perimeter of the window for attaching the finishing siding profile. The location of the finishing siding profile on the frame of the window opening.
When installing near-window profiles, we follow the same recommendations as when installing platbands, i.e. We create cuts on the profile corresponding to the depth of the opening, and then bend the bridges and insert them into the finishing elements.
Take the time to understand the principles of bending such bridges. We make them so that they cover the joint of the cladding elements. As a result, moisture will not be able to penetrate inside.
A technique for creating bridges (or tongues) to remove precipitation and moisture from profiles