Not a single plot of land can do without a bathhouse, especially if it is a house for permanent residence of a family. If you don’t have large savings, you can choose cinder block .
Next, we will present in detail the step-by-step construction of a bathhouse from cinder blocks with your own hands for independent construction in order to save money.
Price
Table. Cost of cinder blocks
| Cinder block material | Number of voids | Size, mm | Price in rubles for 1 piece | Photo |
| Sand cement | 2 square, open bottom | 390x190x188 | 37 | Sand-cement wall block |
| Sand cement | 2 square, bottom closed | 390x190x188 | 39 | Sand-cement wall block |
| Sand cement | 3 square non-through | 390x190x188 | 37 | Sand-cement wall block |
| Sand cement | 7 slot voids | 390x190x188 | 41 | Sand-cement wall block |
| Expanded clay concrete | 8 slot voids | 390x190x188 | 44 | Expanded clay concrete wall block |
| Sand cement | Monolith, partition | 390x90x188 | 27 | Sand-cement partition block |
| Expanded clay concrete | 2 through slots, septal | 390x90x188 | 26 | Expanded clay concrete partition block |
| Sand cement | Full-bodied | 390x190x188 | 60 | Solid cinder block |
| Expanded clay concrete | Full-bodied | 390x190x188 | 50 | Expanded clay concrete wall block |
| Expanded clay concrete | Full-bodied | 390x120x188 | 35 | Expanded clay concrete wall block |
The price of solid building bricks of standard size M100 and M150 for 1 piece is 10-13 rubles. And if the estimate includes work on insulation, waterproofing, and finishing, then the benefit of building a cinder block bathhouse turns out to be very small.
However, savings can be achieved by making the required number of cinder blocks yourself.
Table. Brief step-by-step instructions for making cinder blocks yourself for building a bathhouse
| №№ | Process description | Photo |
| Step 1 | We make a metal/wooden mold or purchase a vibrating machine for the production of wall blocks. | Form-stretcher Metal mold |
| Step 2 | Prepare a sufficiently liquid solution for pouring into the mold. The approximate composition is as follows: - cement M400 or M500 - 1 part; — blast furnace slag 9-10 parts; - water. The compositions of slag concrete are presented in the following table. When making blocks with voids, you can use bottles, inserting them into the poured mixture with the neck up. The blocks can be tinted by adding crushed red brick to the mortar. | Form filled with solution |
| Step 3 | 24 hours after pouring, we take out (shake out) the blocks and store them for final air drying (takes from 10 to 20 days). Before each subsequent pouring of the mixture, rinse the inside of the mold with water, dry it, and wipe it with diesel fuel. | Making cinder blocks |
The compositions of slag concrete are presented in the following table.
Table. Slag concrete - number of components for different grades of block strength
| Brand of cinder concrete | Cement M400 (material per 1 m3 of slag concrete, kg/l) | Lime or clay (material per 1 m3 of slag concrete, kg/l) | Sand (material per 1 m3 of slag concrete, kg/l) | Slag (material per 1 m3 of slag concrete, kg/l) | Volumetric mass of slag concrete, kg/m3 |
| M10 | 50/45 | 50/35 | 100/60 | 700/1000 | 900 |
| M25 | 100/90 | 50/35 | 200/125 | 700/900 | 1050 |
| M35 | 150/135 | 50/35 | 300/190 | 700/800 | 1200 |
| M50 | 200/180 | 50/35 | 400/250 | 700/700 | 1350 |
Environmental friendliness and quality
Varieties of cinder block
Of course, the best material from an environmental point of view is wood.
The environmental friendliness of wall stones depends on the integrity of the manufacturer and the additives used in the manufacture of the blocks. The safest materials are considered to be: shell rock, sand, expanded clay, sawdust and crushed stone. The main binding component of the blocks is cement. Plasticizers and lime may be present. Cinder blocks made using industrial waste can hardly be called environmentally friendly.
It is advisable to purchase ready-made blocks from suppliers who can provide a license for the quality of the material and its physical composition.
Certificate for cinder block
The quality of materials made in factories is a priori higher than handicraft blocks and bricks. There are several ways to check the fragility of a wall block:
- We take one cinder block and “drop” it on the floor. If chips or cracks appear on the fallen block, and the manufacturer refuses the incident, you should reject the batch of low-grade goods;
Checking the quality of blocks
- We take a nail 15 cm long and try to drive it into the bottom cinder block of the package (the blocks are supplied in bundles on pallets). If the nail penetrates the stone quickly and easily, the product is of poor quality and is not suitable for building a bathhouse.
A good, dense cinder block can’t handle falling from a meter height, and it’s very difficult to hammer a nail into it. The walls of a high-quality product are smooth, the dimensions comply with GOST (it is worth checking several blocks of the batch at once with a tape measure).
When purchasing cinder blocks, pay attention to the markings. The set of letters in a line means the following:
- K – stone;
- C – wall;
- P – for the construction of internal walls;
- P – for laying rows;
- L – facing or decorative;
- PR – serial;
- PZ – dressing;
- UG - for decorating corners;
- PS – hollow.
Following the letter marking, the following data is indicated:
- length of the stone in centimeters (for example, 39);
- stone strength grade: lightweight concrete - 100, 75, 50, 35, 25, fine-grained and heavy concrete - 300, 250, 200, 150, 125, 75, 50. The average tensile strength of a cinder block of class 300 is 25-30 MPa/(kgf /m2). For a block of grade 25, the tensile strength is respectively 2.5 MPa/(kgf/m2);
- The frost resistance class of the stone is indicated by the letter F and one of the following numbers: 200, 150, 100, 50, 35, 25.15. Also, the frost resistance of the stone can be indicated by the manufacturer in cycles - from 15 to 50;
- the last important figure is the density of the cinder block, measured in kg/m3;
- The marking also indicates the standard in accordance with which the blocks were produced.
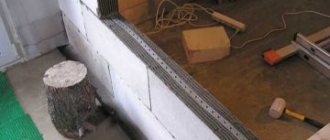
Pouring the foundation for a bathhouse
The construction of a bathhouse begins with laying the foundation. A layer of sand 25 cm thick is poured into the bottom of the trench and compacted tightly. Gravel of similar thickness is poured on top, which is also compacted. After this, wooden formwork with a waterproofing layer laid from the inside is installed in the trench. Steel reinforcing mesh with a rod diameter of 3 mm and a pitch of 5 cm is evenly laid between the walls of the formwork. They should not have contact with the external environment after pouring the solution to prevent corrosion.
Mix the concrete solution for building a bathhouse after completing the preparatory procedures. 3 parts of sand and 1 part of concrete of a grade no worse than M300 are poured into a concrete mixer and thoroughly mixed until a homogeneous mass is obtained. Then add 2 parts of water and check the thickness of the mixture. If there is insufficient viscosity, add a little water, and if there is too much, add sand-cement dry mortar.
The finished solution is slowly poured into the formwork and then mixed to remove all air bubbles inside the foundation for the bathhouse. The upper part is leveled using the rule in the horizontal direction. This is done to prepare the surface for the cinder block. If the installation of a Russian stove is required, then a hole is dug under it according to the design and a monolithic foundation is poured. Complete hardening of the solution occurs in 30 days, but laying can be done after 19 days. The surface is treated with waterproofing mastic or roofing felt is laid overlapping in one layer.
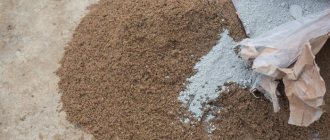
Ingredients and proportions for cooking
To prepare block stone from slag, the following components are usually used:
- cement;
- sand;
- slag;
- water.
Cement acts as a binder; usually a grade of material no lower than M400 is used, but M500 is also used. If we take the latter option, then it will be needed 15% less than M400 cement due to its density.
A slag mixture is used as a filler. The mixture usually contains sand, gravel, crushed stone, expanded clay or crushed brick. That is why the stone is called cinder block due to the presence of material in its composition that is not suitable for construction in this form.
The slag mixture usually makes up about 65% of the total mass of the stone. If the mixture is not enough, then it is diluted with sand or fine gravel. Many manufacturers use screenings or crushed concrete, which further strengthens the structure of the stone.
In the classic version, the following proportions are used:
- sand – 2 parts;
- crushed stone – 2 parts;
- slag – 7 parts;
- Portland cement - 2 parts.
Water is also added here; 0.5 parts will be needed. The finished mass should be semi-dry. To check the correct consistency, make a lump from the mixture and throw it on a hard surface. If it crumbles, but at the same time molds well back into the ball, then the consistency is correct.
Purpose of bath rooms
Locker room. The room where you will undress or change clothes must be made warm enough. Usually, cabinets for clothes and shoes are installed in the locker room, and several hangers can be attached. There must be a couple of benches. If you wish, you can hang a mirror.
Waiting room. Plays a protective role. With its help, cold air does not enter the bathhouse. Bathroom equipment and firewood are usually stored in the dressing room. Also, if the space allows, a recreation area is also made there.
Washing room. A must have in every bathhouse. Anti-slip coatings are selected for the floor. The temperature in the washing room should be room temperature, slightly higher than the dressing room and rest room.
Steam room. In this part of the bathhouse there is a stove and shelves for lying on. Their number is individual. Usually taken based on the number of vacationers. A chimney and ventilation must be installed.
Your vision of the bathhouse project may be different. You can expand the room and make it a bathroom and a swimming pool. In the recreation room, for example, install a billiard table. In general, there are many options, the main thing is that they are combined with your capabilities.
Material selection
The main task of a bathhouse is to retain heat inside for a long time.
The question of insulating a bathhouse made of foam blocks from the inside is very relevant, since this material gives off heat too readily, which makes it simply impossible to retain hot air inside.
Many people wonder how to insulate a bathhouse made of expanded clay concrete blocks from the inside, the answer to which is quite obvious - this needs to be done everywhere, in each section of the bathhouse individually.
The insulation process itself, as well as the materials required for expanded clay, aerated concrete, and slag and foam block baths are practically the same.
The following are perfect for the role of heat insulators:
- Thermal fiber. Thermal fiber is very popular for insulating bathhouse walls made of expanded clay concrete blocks from the inside, since this material is environmentally friendly and safe. It is worth noting that before laying the insulation, it is necessary to carefully prepare the walls, clean them and plaster them. By the way, plastering walls significantly improves their thermal insulation properties;
- Jute felt. Excellent insulation, made exclusively from natural materials. It has excellent thermal insulation properties and is very easy to install;
- Mineral wool and polystyrene foam. Each of these materials has remarkable heat-insulating properties, they are light in weight and low cost, and are also quite simple and convenient to install. However, if you choose between these two materials, it is better to choose mineral wool, since foam plastic needs additional protection from rodents;
- Basalt wool is also an excellent insulation material. Its advantages include fire resistance, environmental friendliness, strength, resistance to fungi and mold;
- Expanded clay. “Grandfather’s” insulation, which is still relevant. Due to its flowability, it can only be used for insulation of floors and ceilings;
- Foamed polypropylene. This para-insulating material in combination with aluminum foil will provide excellent protection against heat loss in the bathhouse. Polypropylene can withstand temperatures up to 150 degrees.
Internal insulation
The structure of cinder blocks is porous, which allows for excellent heat retention, but the same porous surface absorbs moisture. Therefore, maximum protection of the walls eliminates the accumulation of moisture inside the blocks.
Before insulation, the internal walls of the bathhouse are lathed with wooden slats at least 50 mm thick, on which a layer of mineral wool, basalt insulation, polystyrene foam or any other material is laid. The thermal insulation layer is covered with foil film or aluminum foil, which performs the function of waterproofing
Particular attention should be paid to the tightness of the joints of all layers
Aluminum foil is used as a material for insulating seams. If such insulation is insufficient, it is possible to lay one layer of non-combustible mineral wool between the wall and the vapor barrier layer.
Choosing a place to build a bathhouse
A do-it-yourself bathhouse made of cinder blocks must be built on a site that meets the following requirements:
- The distance to the local wastewater treatment system should be minimal and up to 10 m. This is due to the fact that sewer pipes must be buried and laid at a slope of 20 per linear meter. To connect to a centralized sewerage system, the distance must be more than 5 m to provide sufficient space for servicing communications.
- The nearest buildings, trees and the main house must be more than 5 meters from the bathhouse. The distance to the toilet and outbuildings must be at least 12 m.
- If the site is uneven, then the bathhouse should be located on a hill in order to prevent possible spring flooding when the groundwater level rises.
- The soil under the bathhouse should be dense to reduce foundation costs.
Furnace laying
There are a large number of sauna stoves on the modern market, with heaters, fireboxes and water tanks. It is worth considering that it is quite problematic to build stone stoves yourself without the proper experience and skill. Metal furnaces can be ordered from forges and specialized and specialized workshops.
Fans of classic brick and metal stoves should take into account that special autonomous foundations with a depth of more than 500 mm and dimensions that are 10% larger than the dimensions of the stove itself are poured under such stoves.
Installation of modern type stoves is possible after completion of interior decoration. Old-style stoves were built before the interior finishing work was completed.
For more details, read the article Brick sauna stove.
Laying the foundation
Scheme of the foundation of a bathhouse made of blocks.
To lay the foundation, it is necessary to determine the soil that is located in the area where you will build a bathhouse from cinder blocks with your own hands. The ideal option is rocky, since it does not require additional reinforcement, therefore, construction is much easier. If construction is planned on clay or sandy soil, the preliminary construction of a strip or columnar foundation will be required, with the help of which it will become much stronger.
We should also not forget that cinder blocks are made from a material that has fairly high hygroscopic properties, and therefore it must be protected from moisture. Therefore, the foundation must be built so that it is located at least 50 cm above the ground. To make the material even more reliable, it is best to cover it with a special waterproofing material. Bitumen is considered the most ideal. In order to cover a cinder block bathhouse, bitumen is melted and mixed with waste oil in a ratio of 70 to 30. The finished mixture should be applied using a roller or brush.
Floor and roof installation
The floors can be made of concrete everywhere, or only directly in the bath room, and the rest can be made of wood. In this case, it is necessary to take into account and calculate in advance the angles of inclination of the floor for the flow of water into the sewer holes.
The roof of the building can be made of any kind, depending on personal tastes and preferences. Usually it is made as a single or double slope.
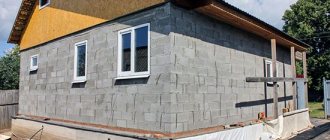
With the help of simple work, you can independently build your own bathhouse on the site. The construction of cinder blocks allows you to have a durable, fireproof and reliable structure, finished in accordance with the chosen design of the estate or cottage.
Cinder block is a durable and inexpensive material for building a bathhouse
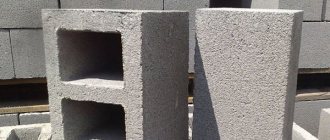
The production of cinder blocks most often occurs on an industrial scale in production - for this purpose, specialized vibrating tables and molds are used, into which a mixture is loaded, which is a concrete solution with filler - gravel, crushed stone, broken brick or expanded clay chips. The output is a rectangular block with dimensions of 390 mm * 190 mm * 188 mm, which has characteristic hollow cavities. Cinder block can also be made by hand yourself if you have the above materials and equipment.
You should approach the purchase of ready-made cinder blocks with the utmost care, be sure to read the certificate of environmental safety of the material available from the seller. However, in any case, it is recommended to keep freshly purchased cinder blocks in a separate ventilated room for at least a year - to completely remove harmful substances from them, which will come out much more intensely in a working bath at a temperature of 90 degrees.
The volume of purchased material is determined according to the design plan for the bathhouse construction. You can either develop a bathhouse project yourself, or find a ready-made one on the Internet - but be sure to consult with experienced builders.
Purpose of bath rooms
Locker room. The room where you will undress or change clothes must be made warm enough. Usually, cabinets for clothes and shoes are installed in the locker room, and several hangers can be attached. There must be a couple of benches. If you wish, you can hang a mirror.
Waiting room. Plays a protective role. With its help, cold air does not enter the bathhouse. Bathroom equipment and firewood are usually stored in the dressing room. Also, if the space allows, a recreation area is also made there.
Washing room. A must have in every bathhouse. Anti-slip coatings are selected for the floor. The temperature in the washing room should be room temperature, slightly higher than the dressing room and rest room.
Steam room. In this part of the bathhouse there is a stove and shelves for lying on. Their number is individual. Usually taken based on the number of vacationers. A chimney and ventilation must be installed.
Your vision of the bathhouse project may be different. You can expand the room and make it a bathroom and a swimming pool. In the recreation room, for example, install a billiard table. In general, there are many options, the main thing is that they are combined with your capabilities.
Advantages and disadvantages
Block building materials have their pros and cons. You definitely need to know them if you plan to use blocks in the construction of a bathhouse. To begin with, it is worth considering in more detail what advantages such elements have.
There are several advantages of such material as blocks.
- A structure built from blocks will not shrink, like, for example, buildings made of wood.
- A steam room made of blocks can be built almost immediately after the main finishing.
- The construction of such a bathhouse will take a minimum amount of time.
- All repair work can be carried out without the involvement of outside help, but experts recommend inviting at least one assistant. This way construction will go much faster.
- The final cost of a block bath will be 2-3 times lower than in the case of building a wooden steam room of exactly the same dimensions.
- Block materials are absolutely safe for human health. They do not contain hazardous chemical compounds, so even at elevated temperatures they do not emit harmful substances.
- The blocks are relatively light in weight. Thanks to this characteristic, you can significantly save effort and money on preparing a high-quality foundation.
- Many consumers choose block materials for construction because they do not support combustion.
- A bathhouse made of blocks is not subject to rotting.
- The blocks are easy to maintain. They do not need to be regularly coated with antiseptic compounds, as is the case with wooden buildings. Block materials are not susceptible to mold and mildew.
- Walls built from such raw materials are “breathable” due to their diffuse properties.
- Many types of blocks, for example, gas silicate ones, boast good heat and sound insulation properties.
- The service life of quality blocks is very long.
Currently, many owners choose block materials for the construction of baths (and not only).
However, these products also have their disadvantages.
- The blocks absorb moisture, so the bathhouse must be provided with high-quality waterproofing, otherwise the material may simply collapse.
- A bathhouse made of blocks requires a vapor barrier. This is explained by the fact that condensation almost always accumulates inside walls made of such materials, so it is impossible to do without vapor barrier materials.
- Blocks are durable materials, but in this regard they are inferior to brick.
- Popular gas silicate blocks contain aluminum powder and lime. These components reduce the positive characteristics of the material.
Many problems associated with block baths can be completely avoided if they are constructed in a high-quality manner and also take care of hydro- and vapor barrier in advance.
Features of block building materials
The main feature of the material is air cells evenly distributed inside the concrete mass.
The porous structure affects the characteristics:
- hygroscopicity. An unprotected material, actively absorbing moisture, needs effective external and internal waterproofing. When freezing, moisture crystallizes, increasing its volume. This may cause cracks to appear;
- vapor permeability. Thanks to the increased concentration of air cells and their uniform distribution in the mass, the building material is able to transmit excess steam, maintaining a comfortable level of humidity in the bathhouse;
- thermal conductivity. The block material has increased heat-saving characteristics. With high-quality thermal insulation, it maintains a comfortable temperature;
- sound insulation. Thanks to numerous air pores, occupying more than half the volume of the product, the block building material prevents the penetration of external noise into the room.
Let us dwell in detail on the advantages of a block bath.
Advantages of blocks
Expanded polystyrene concrete blocks for bathhousesConstructed from porous building materials, a block bathhouse has its advantages:
- not subject to shrinkage, unlike log buildings;
- can be used immediately after completion of construction activities;
- quickly built due to the increased size of the products;
- does not require a strong foundation due to the light weight of the building material;
- can be built on its own without outside help;
- requires low financial costs compared to timber and brick.
Maintaining favorable conditions also contributes to:
- bacteriological purity. The composition and structure of the material do not allow the development of bacteria, microorganisms and mold;
- environmental friendliness. Concrete blocks do not have a negative impact on the health of others, since the building material does not contain harmful impurities.
The block material is different:
- increased thermal insulation characteristics;
- resistance to the influence of negative temperatures;
- resistance to heat;
- long service life;
- increased safety margin;
- good workability.
Building blocks for a bath
Weaknesses of blocks
Cellular material has a number of disadvantages:
- needs reliable waterproofing protection that prevents moisture from penetrating into the array;
- differs in reduced environmental friendliness in comparison with natural wood.
Stages of building a bathhouse from cinder blocks
To build a bathhouse, you can buy a ready-made cinder block, or you can make it yourself. Because This is a small building, then homemade building material is quite suitable. Although it will take more time, you will save money. Before starting construction, you need to design your future bathhouse. Using the project, you will be able to calculate the required amount of material, as well as mark the location of windows and doors. Construction of a bathhouse involves the following processes: construction of a foundation, walls, floor and roof, interior work and insulation.
Foundation. This is the most important stage of construction. The strength of the entire structure depends on how strong it is. If you decide to make a cinder block yourself, then the time until it hardens will be enough to build the foundation.
Cinder block is lighter than brick and therefore strip and column foundations are suitable for construction. The main thing is to take into account its height. It must be at least 0.5 m above the ground. What is it for. It is known that cinder block, due to its porous structure, is able to quickly absorb moisture. During the rainy season and snowmelt, water contributes to its destruction. Based on this, the foundation is built quite high, approximately 50-60 cm. Thus, water will not reach the cinder block and destroy it. Before laying the first row of cinder blocks, a couple of layers of roofing material are laid on the frozen foundation or hot bitumen is poured. This way you ensure waterproofing. Immediately mark where your windows and doors will be located. As well as internal partitions.
Walls. Laying walls with cinder blocks will not take you much time or effort. The principle remains the same as when constructing brick walls. Pay more attention to laying the first layer, it is the most difficult. Laying of subsequent tiers occurs according to the principle of a checkerboard pattern. The only important point is that every 2-3 rows it is necessary to lay a layer of reinforcement on top of the cinder block. This makes the walls more durable. To check the evenness, each laid layer is checked with a level. Cinder blocks are laid at a distance of 1 cm from each other, and the space is filled with cement mortar. A wooden beam is laid on the last layer of the wall. It serves as the basis for the roof.
Important: usually hollow cinder blocks are covered with expanded clay when laying. If you are not going to do this, you need to lay them with the voids facing down.
Floor. It is advisable to make it concrete. Some people prefer wooden flooring. However, if certain technologies and rules are not followed, the wooden floor may rot. So, the floor is poured with concrete, insulated with expanded clay cushion and laid with tiles. Now on the construction market you can find a special floor covering, the so-called synthetic board. Outwardly, it resembles wood, but does not collapse under the influence of moisture. The main stage in the construction of a bathhouse floor is the installation of communications, namely the arrangement of a drain. A drain is prepared to the side of the bathhouse, which will be connected to the building with a plastic pipe. Don't forget to insulate the pipe if you plan to use the sauna in winter.
Roof. This is the final stage of construction. Typically, wooden beams or wood are used for the rafter structure. For a cheaper option, you can make a single-pitched structure, but to create additional space, such as an attic, a gable structure is suitable. Any material is used for roofing: slate, roofing felt, corrugated sheets, metal tiles. The roof of the bathhouse requires mandatory installation of hydro- and thermal insulation. The truss structure is assembled on the ground. Take a 60x60 cm timber. Triangular blanks are made from it. Lathing is attached to the rafters. The finished structure is lifted and attached to the beams.
What needs to be done to insulate a bathhouse
Below we will look separately at how to insulate a bathroom from expanded clay concrete blocks (concrete blocks, foam blocks), but at the same time we will talk about each floor separately. That is, it will be described separately.
We insulate the wall
To insulate a bathhouse made of foam blocks, expanded clay or cinder blocks, first of all you need to choose insulation. Let’s say right away that the most environmentally friendly product in this situation will make itself felt, but since it is not sold on the construction market, to select a material you will have to choose from what is available with it.
| Insulation type | Expanded polystyrene (polystyrene) | Extruded polystyrene foam | Mineral wool |
| Environmental friendliness of the material | Not recyclable | Not recyclable | Not recyclable. Releases phenols |
| Chemical resistance | Degradation under the influence of diesel fuel, gasoline, acetone, oil-based paints and UV rays. Resistance to weak acid bases. When exposed to water, it swells and crumbles. | When exposed to water, the material contracts as the binder is washed away. Resistant to alkalis. At high temperatures phenol is released | |
| Lifespan | 30 years | 50 years | 50 years |
| Thermal insulation | Material destruction occurs after 60⁰C | Excellent heat resistance |
Based on the data presented, we can conclude that for insulating a bathroom made of concrete blocks, expanded clay concrete, of all the listed materials, mineral wool (including mineral wool, glass wool and slag wool) is not very high. Moreover, you can choose the required thickness (from 20 to 200 mm) depending on the climate of your region. But in any case, you will need a sheet for waterproofing.
If mineral wool does not have a film layer, then it needs to be added, and film-coated polyethylene foam, which you see in the photo above, is perfect for this. The thickness of this material varies from 2 to 20 mm, and covering this layer with mineral wool significantly increases the effectiveness of thermal insulation.
For wooden cladding, that is, for cladding the steam room, you will need a lathing that will be attached to brackets or it will be thick bars between which it will be installed. The second option is simpler, but it is not so easy to mount it on a wall in a block, even if it is plastered. The fact is that if the thickness of the lathe is 100 mm, then anchor bolts will be required for its fastening, which is not entirely acceptable for a wall made of such material.
We continue to consider how to insulate a bathhouse made of concrete blocks from the inside and install the lathing. Some kind of waterproofing material is placed on the wall under the brackets, then the shelves themselves are secured with profiles. Mineral wool is threaded directly through the pads, and then carefully covered with polyethylene foam film, being careful not to leave holes.
Ceiling
Thermal insulation and waterproofing of the ceiling with your own hands occurs in principle in the same way as only the installation plan changes.
Floor
Almost all materials are suitable for the floor in the bathroom, for example those that are used to insulate the loggia, that is, extruded polyethylene foam or expanded clay. After all, you will still be pouring a concrete screed, either way, but expanded clay is much cheaper. The thickness of the insulation layer will depend on the degree of soil freezing and the general temperature in your area.
Insulation goals
A cinder block house must be protected not only to reduce heat loss, but also to maintain a comfortable temperature during the summer heat. When the wall thickness is 300 mm, the use of insulation becomes mandatory. Goals:
- Reducing heat loss in winter cold.
- Protecting the walls of the house from negative external influences. Finishing with thermal insulation materials will extend the life of the building.
- The ability of cinder blocks to accumulate heat when using insulation increases. In this case, the walls will transfer the accumulated thermal energy inside the rooms, and not outside.
The influence of wall insulation on room temperature There are two types of laying insulating materials: outside and inside. Professionals prefer the first method. There are many advantages:
- Finishing allows you to move the dew point outside the walls. This means that condensation will accumulate not in the room, but outside, that is, dampness will not appear in the room.
- Inexpensive but high-quality materials used for insulation are not always healthy, for example, polystyrene foam. And laying it outside will not harm the body, so insulation will be budget-friendly and absolutely safe.
- A thick layer of insulation from the inside takes up a lot of usable space.
But external insulation is not always possible, for example, if the house is already covered with siding, so you only have to consider insulating a cinder block house from the inside.
Siding house
What types of blocks are suitable?
Block baths began to be built relatively recently, but experienced craftsmen have already left feedback on which blocks are best to use for the construction of the structure. Foam concrete blocks have different sizes and different densities - the strength of the material depends on this indicator. The more air that was used to create the foam during the production of the blocks, the less dense they will be.
Foam concrete blocks with a density of D600-D800 are suitable for the construction of a bathhouse. Blocks of this brand are perfect for building a sauna due to their good strength and thermal insulation. They will become the optimal raw material for the construction of load-bearing walls of the structure.
Blocks of the D900-D1200 brand will be irrelevant here, as they require additional high-quality thermal insulation. Grade D1300-D1600 will be redundant due to its excessive strength: such material is used for multi-story construction. The most popular stone size is 600x200x300 mm.
Ceiling boards
They are subject to special requirements, because they are load-bearing and must be durable. The most common use for upholstering the ceiling of a bathhouse is wood from trees such as larch, aspen, cedar and conifers. For the ceiling, you can use a 50 mm thick tongue and groove, then the ceiling will be suitable for the attic.
When selecting material for a bathhouse ceiling, you need to carefully inspect it for flaws (knots, cracks, and other damage), then treat the boards with protective antiseptic agents that are designed to protect the wood from insects, rot, and fire.
Construction stages
You can build a bathhouse from cinder blocks with your own hands. All work is divided into several stages, which need to be considered in more detail.
Construction of the foundation
The foundation is selected depending on the type of mineral blocks used. For example, a columnar foundation is suitable for a lightweight hollow material, and a monolithic one for a solid one. To build a columnar base, pegs are taken and placed in the corners of the future bathhouse, and the cords are tensioned between them. Next, holes are made around the perimeter and in areas where the walls intersect. In this case, the distance should not exceed 1.5 m.
To install a monolithic base, you will need to dig trenches and make a bed of gravel and sand. The next stage includes the construction of timber formwork (its height must be at least half a meter). Next, a frame made of reinforcement is mounted, after which the formwork is poured with concrete mortar. When the concrete dries, the formwork is dismantled.
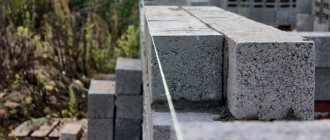
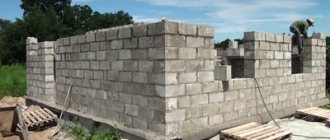
Wall masonry
Laying out walls from mineral blocks is done by analogy with brickwork
Work must begin by installing 2 cinder blocks in one of the corners (it is important to ensure that it is located strictly at a right angle). After this, the remaining 3 corners and the entire first row are laid out
The subsequent block line is laid with an offset. In this case, the concrete mixture should be applied to the vertical and horizontal sides of the cinder block. Experienced builders advise using a mesh of reinforcement when laying (install it in every 3rd row). This will make the structure more reliable and durable.
When laying, it is necessary to leave areas for window and door openings (according to the design documentation). On top you need to remember to make a ceiling of timber. Hollow cinder blocks are not suitable for laying out the perimeter of windows. For these purposes, only monolithic blocks are used.
Insulation
Bath boxes made of mineral blocks are quite cold, which is why such structures need to be properly insulated. To do this, the outside of the wall surfaces are coated with a primer, and the joints are rubbed using a plastering mixture.
To insulate the walls from the inside, the seams are also rubbed down, after which a frame slatted wooden base is installed. Larch, aspen or spruce treated with moisture-protective compounds based on oils are suitable for these purposes.
Roof construction
The basis of the roof is wooden beams, the diameter of which must be at least 10 cm. They are laid on the erected walls. Depending on the design, roofs can have one or two slopes. Single-pitch variations are simpler to perform. They are often chosen when building small structures.
By choosing a gable roof, it becomes possible to equip both the attic area and the attic. To install it, you will need to install a rafter system, and a roof on it. Popular roofing materials are slate and roofing felt, and modern ones are ondulin.
Building walls
The process of constructing them from the material we have chosen is similar to brickwork: the initial row is made of bonded ones, and the next three are made of spoons. The first row is placed so that they lie across the wall, one after another. The spoon principle is based on the arrangement of blocks along the direction of the wall parallel to it. The division of this building material is carried out with a trowel or the pointed part of a hammer. Laying must be done in such a way that the seams on adjacent rows do not overlap, as this may lead to cracks in the future. The bonded rows are reinforced with a reinforcing mesh placed on them.
Useful video
Below is a video that describes in detail the insulation process of a block bath. Before you begin installation yourself, you should carefully read both theoretical materials and video broadcasts on this topic. This video will also answer questions about how to insulate a foam block bathhouse and how to insulate a cinder block bathhouse.
With a responsible approach to insulating a bath structure, you can provide yourself with a real health resort on the territory of your summer cottage.
In the 5th century, the Slavs did not just wash in a steam bath, it was of great importance in many rituals. On Saturdays, both simple peasants and noble princes went to home or public soaps. European scientists and ambassadors to their sovereigns spoke about this tradition more than 400 years ago. Thus, the Russian people became known as the purest among the peoples of European countries.
In addition, Russians are hospitable people who first treated their visiting guests to a bathhouse. The traditions have not changed; the modern Russian bathhouse also combines the French parliament, a gentlemen's club, and a German beer garden.
Until now, the bath remains the most pleasant healing and health procedure. It calms the nerves, rejuvenates, gives freshness, vigor, and clarity of mind. But for this, a good steam room must be heated quickly and keep warm for a long time. Here, insulating the walls of the bathhouse from the outside with your own hands plays an important role, because drafts are not allowed.
BATH PROJECT AT THE DACHA
Building a bathhouse is the dream of almost every country property owner. When the design is simple, you can sketch out its design yourself. As a rule, the basis for building a bathhouse in the countryside with your own hands is taken to be small in size.
For example, a building 6x4 m and 2.5-3 m high is quite enough for 3-4 people to visit the bathhouse at the same time. A sauna made of cinder blocks with impressive dimensions always requires long-term heating and its construction is associated with additional costs.
The given dimensions of the bathhouse allow us to divide its internal space into primary sections: a dressing room, a rest room, a washing room and a steam room. To prevent drafts and store household supplies, a vestibule or hallway would not hurt.
Creating a veranda or terrace is a big advantage of a bathhouse, which can be attached to one of the side walls of the bathhouse. As an alternative, three garage walls can be added using the same cinder blocks.
Ultimately, it is rational to bring such an almost square structure of the building and the extension under a single roof, then it becomes possible to use the space directly under the roof as an attic.
The project should take into account all similar nuances, including the type of foundation of the structure, sewerage features and type of roof. At the same stage, it is appropriate to provide for the introduction of other communications, for example, water supply and electricity.
Drawing up a bathhouse project does not pose any particular difficulties, since the Internet is full of special programs that are easy to use and will instantly create any project based on the initial data.
As an example, below is a sketch of a design option for a bathhouse made of cinder blocks, available for manual conversion. In a real project, taking into account the taste of the owner, of course, the dimensions may differ, but the essence of the approach remains the same.
Construction
The construction of a cinder block bathhouse is preceded by mandatory site preparation. It is cleaned and, if possible, leveled:
- they pull out bushes and grass;
- trees are uprooted;
- filling up the holes;
- strongly protruding tubercles are cut off.
After this, the type of soil is determined.
Laying the foundation
Using a cinder block to build a bathhouse ensures the light weight of the structure. On quartz, rocky or fine sandy soils, this makes it possible to lay any type of foundation.
If the soil consists of loam, coarse sand, gravel or is very uneven, then you should choose a columnar type of bathhouse base. It is laid out quite quickly and does not require too much investment.
Strip foundation for a cinder block bathhouse
On earthen soil, a strip foundation is selected for a bathhouse made of cinder blocks. Working on it is more complex and costly. In terms of time (including drying of the concrete) it takes about a month.
However, there is a general requirement for the foundation, under which a do-it-yourself cinder block bathhouse will be strong and reliable. It must be at least 50 centimeters above the ground. In this case, the danger of destruction of the material, which loves to absorb moisture, is reduced to zero.
Construction of a building
After the foundation is completely ready, they begin to lay the walls. You can use a purchased cinder block for this. However, it is possible to do it yourself.
To build a bathhouse with your own hands correctly, you need to know what type of cinder block is used for what:
- corpulent - during the construction of a basement;
- with voids up to 30% - for the construction of self-supporting walls.
If necessary, the blocks can be cut.
Construction is carried out in compliance with simple rules.
- The foundation is waterproofed. To do this, bitumen mastic is applied to it. Then the roofing material is laid in two layers. Instead, you can use waterproofing.
- Any angle is displayed. To do this, lay the first row - two cinder blocks. They should fit tightly at 90 degrees relative to each other. Then one block is placed “in a dressing” with an offset of half the length in the second row.
- Lay out the other three corners in the same way.
- Using tools, check the width and length of the future bathhouse. Measure the diagonals and height of the corners.
- After checking and correction (in case of discrepancy), the cords are pulled from the corners. The walls of the bathhouse are built using them.
- Cinder blocks are laid on a special solution. Its thickness should be from 20 to 25 millimeters. The vertical walls of the blocks are also coated with the solution.
- Each subsequent row is placed on top of the previous one “in a dressing” with an offset.
- The cinder block must be tapped with a rubber hammer or the handle of a trowel. This helps him sit down and take the correct position.
- The evenness of the masonry must be checked periodically. This is done using a building level.
- If the solution protrudes beyond the cinder blocks, it is removed using a trowel. It is suitable for coating the next row or sealing cracks.
- When laying walls, openings are immediately left for future doors and windows. Solid cinder blocks are used along their perimeter. If there are none, then the voids are filled with concrete.
Construction of a roof for a cinder block bathhouse
A DIY sauna will be very durable if you put reinforcement every three rows of blocks. The optimal diameter of the rods is twelve millimeters. This will help further strengthen the structure.
Roof
The construction of the roof of the bathhouse is the next stage after laying the walls. To do this, you need to prepare logs or beams. Their diameter should not be less than ten centimeters.
For cinder block baths, experts recommend making gable roofs. Their advantage is the presence of an attic, which simultaneously performs two functions:
- insulates (due to the air gap);
- acts as a storage and dryer for bath accessories.
If desired, you can also make a pitched roof. In this case, this must be taken into account when constructing cinder block walls, since their masonry will end at different heights.
The rafter system of beams and roof boards of any type is covered with roofing material. It can be roofing felt, ondulin or slate. Depends on the desire and financial capabilities of the bathhouse owner.
Lathing walls in a cinder block bathhouse
LAYING CLASS BLOCKS
Building a bathhouse from cinder blocks is no different from creating buildings from ordinary brick, and their installation does not require any special techniques. The main difference is the hygroscopicity of the block, and it also predominates in volume, is harder, more fragile and has voids.
The main thing in laying blocks is to regularly have a plumb level “at hand” and not allow the walls to bend, but to increase the rigidity of the structure, a metal masonry mesh should be laid every 2 rows, and in critical places it is better to fill the voids in the sides with concrete.
At the beginning of the process of laying cinder blocks, so that the masonry of the lower rows does not collapse prematurely, it is necessary to reliably isolate the walls from the foundation. For this purpose, bitumen mastic is usually used, and on top there are 2-3 layers of roofing material laid on a heated base.
Preparation of masonry mortar
The key to the strength of creating cinder block walls is the preparation of good masonry mortar and ease of handling. Particular attention is paid to its viscosity, strength after hardening, spreadability over the surface, absence of lumps and solid inclusions.
A sand-cement mixture in a ratio of 3:1 is considered optimal, but with an increase in the proportion of cement, the strength of the solution increases.
The masonry mortar is prepared from Portland cement, no lower than grade M400, and sifted sand, and clay inclusions improve its plasticity. You must add water to the mixture carefully, since a liquid solution only creates difficulties in work.
The mass of the solution must be plastic and not spread over the surface. To increase plasticity, plasticizers are added to it, which are supplied by the retail chain and are easy to use.
Along with natural plasticizers, there is another way to increase the plasticity of a solution, which is cheaper. Plasticizers can be clay or detergents, for example, for dishes or surfaces, but they must not contain chlorine or its components.
For 50 kg of cement or one bag, you will need only 10 ml of concentrated substance, but pre-diluted with water before use. This proportion of it does not have a significant impact on the reliability of the masonry.
The consumption of masonry mortar is approximately 30-40 kg per cubic meter of masonry, which needs to be prepared in small volumes, as it quickly sets and loses its plasticity.
Wall masonry
The most common methods in the construction of walls are the spoon and butt masonry methods, as well as their combinations. In the first case, cinder blocks are placed parallel along the direction of the wall.
In the bathhouse project under consideration, this is exactly the type of block laying that is assumed. If a thicker wall is needed, then the indicated masonry techniques alternate, but the consumption of blocks also doubles.
It is important to adhere to the “checkerboard” order of the seams so that they have a shift of more than 1/3 of the size of the block, and if the cinder blocks are not intended to be filled with expanded clay, then they should be laid with voids down.
The sequence of laying the walls is as follows.
- After waterproofing the foundation, the locations of door and window openings, internal walls, partitions and holes for floor beams are marked.
- The laying of walls begins with monolithic cinder blocks, which are first placed in the corners of the structure. In the initial row of each corner, two blocks are laid, and on top they are overlapped “in a dressing” with another block of the second row.
- The building level controls the equal height of the stacked blocks in the corners, and the tape measure controls the correctness of the rectangle of the building by the equality of its diagonals.
- After carefully checking the orientation to align the blocks, a cord is stretched between the corners of the structure, along which the blocks are laid out using mortar.
- The solution is applied with a trowel to the surface of the foundation for the bottom row or to the previous row in a layer of 20-25 mm, as well as to the end parts of the cinder blocks. If there are no monolithic cinder blocks, then their voids in the masonry of the initial rows are also filled with mortar.
- Each cinder block is installed at an angle of 90 degrees and pressed into the mortar mixture so that the entire mass sits at once, then the block is leveled by tapping it with a rubber mallet or the handle of a trowel. Some of the mortar will protrude from the seams, so it must be removed immediately and ensure that the seam thickness does not exceed 10-15 mm.
- Subsequent rows of blocks are also laid out from the corner and aligned horizontally. If large distortions of the blocks are observed, then their bottoms should be filed a little.
- For the strength of the structure, reinforcement or masonry mesh is laid every 2-3 rows, and reinforcement of some shafts is often used, in particular, the side shafts of door and window openings and corners and filled with concrete.
- One row before the window opening, a masonry mesh is placed on the wall, and the voids in the blocks above it are also filled with mortar.
- The ceilings of door and window openings are equipped with steel angles, welded reinforcement rods and masonry mesh, then the lintels are enclosed in formwork and filled with concrete.
- On top of the walls, so as not to damage the surface of the upper blocks and strengthen the upper trim, a light belt of concrete with reinforcement 100-150 mm high is usually mounted, which is also a Mauerlat and provides for fastening the roof.
Features of laying hollow cinder blocks
Voids in cinder blocks, on the one hand, reduce their thermal conductivity, but, on the other hand, the area of their adhesion to each other is reduced, so some of their features should be taken into account when laying walls, which boil down to the following.
- In the process of laying walls, the need to cut cinder blocks inevitably arises. Such an operation is usually carried out with the sharp side of a construction hammer or a trowel, but unlike brick, a cinder block is characterized by increased hardness and crumbles easily, so it is more practical to use a “grinder” with a special cutter for working on stone.
- The type of block determines the technology for its installation. So, when laying hollow blocks, the mortar is applied along the edges, and excess masonry mortar is not allowed because, falling into the shaft under its own weight, it disrupts the valuable air gap and increases the thermal conductivity of the walls.
- The formation of cracks in masonry joints should not be allowed, and each time after laying a cinder block, the mortar on the outside and inside is leveled flush with the block.
- Unlike monolithic blocks, reinforcement of hollow cinder blocks is mandatory, since the small area of their contact does not provide sufficient strength to the walls.
- Reinforcement is required for blocks located in the first row, in every 2-3 rows, under window openings, in the area of lintel support and near the insulation. To place the reinforcing rod in the cinder blocks, special recesses are provided, but instead of reinforcement, the use of metal masonry mesh is allowed.
- If you install lintels only made of metal over door and window openings, then there is no need for formwork and a pause when the concrete gains sufficient strength.
- On top of the walls, a concrete belt can be created from hollow cinder blocks, having previously laid a masonry mesh underneath them so that the concrete does not fall through when filling the voids.
- Due to the hygroscopicity of the material, it is not recommended to erect walls in inclement weather, and also during long breaks in work, the building box should be protected from adverse weather conditions.
Do you need insulation inside and outside?
It is necessary to insulate a cinder block bathhouse both from the inside and from the outside. If in residential buildings made of such material there is no need for internal thermal insulation, then such a procedure cannot be avoided. External insulation occurs at the stage of wall finishing.
To do this, create a sheathing on the facade. Thermal insulation material is inserted into the frame and then sewn up with finishing materials. Before making the frame, be sure to lay waterproofing in rolls along the outside of the wall.
Insulation of a bathhouse from the outside:
Internal insulation is done according to a different principle. Here you first need to install waterproofing, then make lathing, and then use a vapor barrier. After this, apply insulation and finishing interior trim.
Internal thermal insulation:
Waterproofing
Waterproofing the foundation is a mandatory measure if you choose strip or column options. This does not apply to a pile screw foundation for a bathhouse made of foam blocks.
Most often, bitumen mastic (for vertical insulation) and roofing felt (for horizontal insulation) are used to waterproof the foundation. First, it is coated with mastic up to the sole, then roofing material is laid on top in two or three layers, and the overlap of the sheets at the joints should be offset in the layers, which provides additional protection from moisture.
Horizontal insulation is considered mandatory, vertical insulation - if there is a danger of destruction by soil moisture.
IMPORTANT! The joints between horizontal and vertical waterproofing must be sealed with special care.
In especially “neglected” cases, insulation begins immediately after the trenches have been dug - a drainage cushion is poured into them, geotextiles are laid, and only after that they begin formwork and pouring concrete.
In addition to roofing felt with mastic, there are also more modern materials, for example, membranes consisting of many layers of bitumen films. They successfully protect the surface covered with them from water. Gluing such membranes is simple: they need to be pressed to the surface to be protected and heated from the outside with a gas burner. True, you will additionally have to take care of pressure walls or ties.
Finishing
If we talk about finishing a bath, there are many nuances. They are associated with both internal and external decoration of surfaces.
Internal
The simplest option for interior decoration is clapboard cladding. Execution of work:
- Stuff the frame from slats on top of the insulation.
- Impregnate the lining with compounds that protect the wood from the destructive effects of moisture.
- Cut individual boards, fasten them using a tongue-and-groove system, and nail them to a frame prepared in advance.
It is important not to pack the clapboards too tightly together. It is necessary to leave a small distance between the individual boards so that the tree can shrink and expand freely
How to insulate a bath ceiling
Panel ceiling
Panels for such a ceiling are usually sold with all the necessary layers of waterproofing, insulation and moisture resistance. The standard width of the mineral wool layer contained in ceiling tiles is about ten centimeters.
Since such panels have considerable weight, it is better to lift them first and then connect them in parts at the top.
Fixed ceiling
The basis for insulating a false ceiling is the attic frame. A waterproofing layer should be placed in these floor beams, which will eventually cover the entire internal surface. The next layer is the installation of wooden flooring. Then the required amount of insulation, such as mineral wool, is placed in the spaces between the beams.
After insulation, it is necessary to ensure moisture insulation using foil material. Now you can cover the ceiling with wood paneling.
Flat ceiling
Deck ceilings are independent of the attic frame. Because they are mounted directly to the walls. For its construction, wooden boards about thirty centimeters wide are used.
Insulation is carried out from the attic side. All necessary materials (vapor barrier, insulation, waterproofing, as well as plywood flooring) are placed on top of the floor ceiling. This method of ceiling insulation is the fastest, but is only suitable for a small bathhouse.