SHARE ON SOCIAL NETWORKS
FacebookTwitterOkGoogle+PinterestVk
The construction industry does not stand still. Manufacturers strive to produce improved materials and offer new technologies, thanks to which they can not only reduce the cost of construction, but also improve the technical performance of the final product. One of the latest developments, which originated in Sweden, is the USP foundation - a technology for economical and quick construction of the foundation for a private house or two-story cottage.
A monolithic foundation made from an insulated Swedish slab is an excellent alternative to a traditional tile foundation
Types of slab foundations, their characteristics
Currently, there are three types of slab foundations, each of which has its own distinctive features. The Russian version, which was designed by domestic designers, is considered traditional. The product is a thick monolithic reinforced concrete slab with massive ribs. The foundation is characterized by a large strength reserve and lack of deformation, due to which it can be used under extreme operating conditions.
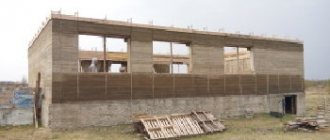
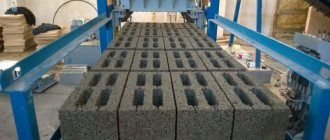
Finnish slab manufacturing technology step by step
The disadvantages of the design include insufficient insulation and the need to pour concrete twice: the first - to create stiffeners, the second - to form the slab itself. However, this increases the service life.
The foundation is in the form of an insulated Finnish slab, originally from Finland. The design has a smaller thickness, but is characterized by sufficient strength. It is well insulated and adapted to a heated floor system. Such a foundation is a cold circuit. Thermal insulation with a thickness of at least 150 mm is mounted on the slab, cutting off the cold contour of the foundation from the warm floor of the first floor of the building, which is installed in an additional reinforced screed.
Less energy-saving, but more economical compared to the Finnish version, is the insulated Swedish stove. USHP does not require additional screed, since the heated floor system is mounted directly into the slab, the thickness of which reaches a minimum size.
Communications - water, electricity, sewerage
Here we will skip a little and move on to point 9. In addition to the heated floor, all the necessary communications are laid inside the slab - these are electrical cables (they can be routed to any place, for example into future walls), pipes for cold/hot water, sewer pipes, water drains for a future shower, you can install a central vacuum cleaner according to your taste and any other cables\air ducts.
Standard set: heated floors, sewerage, cold water/hot water supply and electrical cables
The USHP slab is not created for an abstract house, say, 10*10 in size. You need at least a preliminary design, then you can immediately install heating in the rooms, run pipes to future bathrooms and the kitchen, install underfloor heating and water supply manifolds in the technical room, etc.
Outputs of hot and cold water pipes, there will be a collector here
This is what the “filling” of a standard slab looks like (the first part of the video):
What is USP: areas of use
The insulated Swedish foundation slab is represented by a shallow monolithic slab foundation. It has insulation along the entire perimeter and sole area. This is a finished rough floor surface of the first floor with built-in heated floor and utilities.
The high strength and heat resistance of the USHP foundation allows it to be used in difficult climatic conditions for buildings made of any material
This type of foundation is used in building projects without a basement or basement. It is advisable to use USHP technology for structures with a side size of 15 m in the following cases:
- for cold regions where, thanks to such a foundation, heat loss from the house is reduced;
- in areas with high groundwater levels;
- in projects of private houses where heated floors are used;
- in the case of using half-timbered technology, as well as in the process of creating a panel, panel or frame house;
- when choosing block or brick masonry;
- on heaving and weak soils that are not characterized by good bearing capacity, which requires the construction of bored or screw foundations.
Final Recommendations
The Swedish slab foundation ensures the stability of buildings and has increased energy-saving properties. Waterproofing under the foundation slab will ensure reliable protection of the base from moisture. According to the Swedish method, a monolithic slab with a grillage can also be poured. To build a house on an insulated base, aerated concrete blocks and slabs are suitable. When building a house, to reduce heat loss, you should pay attention to the layout of the floor slabs. An important point is sealing the seams on the ceiling between the slabs.
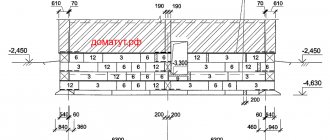
USHP foundation design: cross-sectional photo of the product
The structure consists of the following layers, which are clearly shown in the cross-sectional drawing of a Swedish foundation slab:
- concrete pouring;
Swedish slab foundation in section
- reinforced layer;
- depreciation layer;
- insulating layers.
A concrete pour, or monolith, is represented by a conventional foundation with a thickness of only 10 cm, thanks to which the structure is created in one day. This has a positive effect on the quality of the slab, namely: layering is eliminated and the cost of work is reduced. A heated floor system is laid in this layer. The base is insulated from the ground with insulation, which is represented by extruded slab polystyrene foam.
Reinforcement is also carried out in a short time due to the use of a small number of metal rods. A tightly knit reinforced mesh prevents cracking of concrete and prevents damage to the foundation due to natural soil movement.
The traditional depreciation layer, consisting of sand and crushed stone, which is used in a conventional foundation, is supplemented using this USP technology with a layer of clay. Thanks to this, geotextiles laid between mineral layers are not exposed to moisture. An additional waterproofing layer in the foundation is necessary in order to protect the structure from the influence of groundwater, which can erode the layers. In the thickness of the sand under a layer of insulation, sewerage and a water supply system are installed, the nature of which affects the price of the USP.
Reinforced mesh prevents cracking of concrete and prevents damage to the foundation
To create a durable and strong structure, it should be insulated, so that the foundation will not crack and heave during temperature fluctuations. The process is carried out using styrene derivatives, as a result of which the service life increases several times. The insulation is laid not only from below, but also vertically along the perimeter of the slab, duplicating the base formwork. Also, the layer is located under the blind area of the building horizontally at the depth of the base of the reinforced concrete structure. This technology increases the cost of USHP, but reduces further costs for heating the room.
Drainage communications are necessary to create a system for removing moisture from the foundation, which prevents it from damage. A waterproofing layer with vapor barrier properties protects concrete from moisture.
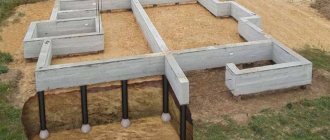
We install formwork from PSB\EPS
Next, on the prepared site, permanent polystyrene foam formwork is leveled. This is not at all the fragile foam plastic that you are used to seeing in a TV box, PSB 25/50 (PPS 14/35 according to the new GOST) or, moreover, EPS is much denser and more durable. It turns out that between the ground and concrete there will be a thick layer of excellent, dense insulation. This will allow us to heat your home rather than warm the ground underneath it.
In addition, the foam plastic will not allow the soil under the house to freeze, therefore, there will be no frost heaving, there will be no dangerous movements of the foundation, cracks in the walls and other troubles.
At this stage, sewer pipes are also laid, water and electrical cables and grounding are introduced (number 9 in the picture). Most often, along with the foundation, I immediately install a septic tank or VOC, so the sewerage issue is resolved at this stage.
It’s also worth adding that I usually line the outer part of the formwork (the so-called L-block) with flat slate. During the construction stage, it reliably protects the PSB from damage, and can also be used in the future - you can simply paint it in the desired color or cover it with mosaic plaster and the finishing of the base is ready. It is also convenient to attach plinth panels to flat slate.
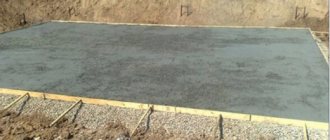
This is what the finished base looks like:
By the way, regarding the height of the USP base (height from the ground to the edge of the slab). It turns out to be small - about 20 centimeters, but this is rather a plus - there is no need to make a porch with steps at the entrance to the house. However, at the request of the customer, the height can easily be increased. Firstly, an extra 10 centimeters can be added by additionally filling the pillow, and secondly, the same amount can be added by using an additional layer of insulation under the slab.
Advantages and disadvantages of USP foundation
The USHP foundation, which can be ordered from any large construction company, is characterized by a number of distinctive advantages:
- low cost of work, which is associated with a small amount of building materials and the involvement of a small number of workers;
Heating (warm water floor system) and other utilities are built into the Swedish stove
- high speed performance;
- thanks to the additional layer of insulation, the possibility of freezing of the soil under the base of the foundation is eliminated, which will save the slab from heaving and shrinkage of the base;
- the foundation slab is a full-fledged subfloor on which tiles can be laid without first leveling the surface;
- installing a heated floor in the foundation will reduce heating costs in the future due to lower thermal energy consumption;
- the insulation is characterized by high compressive strength and shrinks the building by 2%;
- the thermal insulation layer is not affected by moisture, which increases its service life;
- due to the fact that the foundation is insulated, dampness and mold will not form in the house;
- the appearance of insects and rodents is excluded in the insulating layer;
- the small thickness of the thermal insulation layer provides the required thermal conductivity coefficient;
- the presence of edges on the thermal insulation slabs eliminates the creation of cold bridges;
- the plate simultaneously performs heating, thermal insulation and load-bearing functions;
The base of the USHP foundation is already a subfloor, ready for any floor covering
- has a durable design while maintaining all technical and economic characteristics;
- due to its high heat capacity, it can be used in regions with cold climates.
Disadvantages of USP:
- the foundation slab is created exclusively on a reliable foundation, which excludes its installation on muddy, peaty or vegetative soils;
- a significant part of the engineering communications is located in the thickness of the slab, as a result of which access to them is limited;
- USHP cannot be used in the construction of heavy multi-story buildings;
- the foundation excludes the creation of a basement in the house.
Areas of application of the plate
USHP is a type of foundation that has served reliably for decades. Used in the construction of low-rise residential buildings. You can build auxiliary outbuildings and premises for the production needs of small and medium-sized businesses. The difference between the structure and the usual ones is the absence of a basement. Compensating for the shortcoming is significantly lower heating costs (30-40% per season).
Pouring concrete
Useful tips when installing a foundation
The Swedish foundation consists of several layers, each of which has an important functional purpose. It is very important to properly organize each layer in order to obtain a reliable, strong and durable structure. There are important points to consider here. The thickness of the sand or gravel substrate is determined based on the type of soil, that is, it depends on its bearing capacity. This value is in the range of 300-600 mm, which affects the price of the USP foundation. For the hardest, densest soils, the minimum value is used, and for heaving soils, the maximum value is used.
USP is a combination of a strip base and a concrete floor, which is why this type of base requires precision calculations and adherence to clear technology during construction
Before building a slab foundation, the top layer of soil should be removed. Using a level and a building level, the verticality and horizontality of the surface is checked. The pit must have larger dimensions than the perimeter of the slab. For this purpose, it is necessary to retreat 50-70 cm from the edges of the base markings on each side.
Plates of insulating material should be laid over the entire surface of the foundation. It is not recommended to fasten them with additional adhesive. To create a uniform, dense layer, concrete pouring must be done in one go. Therefore, it is important to correctly calculate the amount of material required to fill the formwork.
Helpful advice! The best option for installing USHP is considered to be concrete of class B20-B25.
Before starting construction, pipes for all communications should be prepared and a diagram of their location should be developed. It is necessary to provide a drainage system along the perimeter of the foundation, which ensures the removal of moisture from the base of the building.
It is important that communications are buried below the soil freezing mark in winter
Insulated slab foundation: construction instructions
Users of our portal have accumulated vast experience in foundation construction. Starting from strip, pile, monolithic slabs and ending with the popular type - USHP, and they willingly share their knowledge with novice developers. Turkish945 was no exception. The user spoke in detail about all the stages of constructing an insulated slab foundation for a garage-workshop-boiler room, measuring 7500x7500 mm.
Turkish945FORUMHOUSE Member
I spent a long time analyzing which foundation to choose. In the end, I settled on the USHP type. At first I thought of making a slab with stiffening ribs, then without ribs. But I was worried about one point - whether a 10 cm thick slab would withstand the point load from the TA (heat accumulator). Therefore, I decided not to engage in amateur activities, but to order a foundation project.
After calculations, it turned out that the thickness of the slab must be increased to 20 cm, otherwise there is no guarantee that it will withstand the expected load. Considering that the savings are 30 thousand rubles. (the difference between the slab thickness of 100 and 200 mm) is an unjustified risk, the user settled on the second foundation option.
The foundation is a layer between the building and the foundation, which redistributes the load from the house to the ground. The foundation should not be built by eye and not according to the “neighbor did this” principle, but should be designed based on data from a geological study of the soil (this will make it possible to determine its load-bearing capacity) and with the further collection of all loads from the building.
Having decided on the foundation design, the user hired an excavator to dig a pit. In total, about 50 cubic meters of soil were selected and removed. In addition, we managed to come to an agreement with the excavator operator and at the same time uproot the bushes and trees on the site. For this work they paid 15 thousand rubles (at prices in the Moscow Region for 2015).
The error in heights at the bottom of the pit did not exceed 50 mm. Turkish945 also asked portal users what to do with the grooves at the bottom of the pit formed after the bucket was used: remove it or compact it as is, and then pour a “cushion”?
FORUMHOUSE participants advised to completely remove all loosened soil.
The user also decided, with the help of hired workers, to dig a trench (400x600 mm) around the perimeter of the foundation for drainage. Then lay the geotextile and begin compacting the sand cushion. It was not possible to dig a trench due to the lack of laborers willing to do this work.
Because Turkish945 doubted the need for drainage from the very beginning, but he decided to completely abandon it, saving 40 thousand rubles. Although this decision, according to our users, is very controversial, work continued. Over the weekend, the user, with the help of a friend, removed all the loosened soil from the pit using a garden wheelbarrow.
Turkish945
When you look at the pit from above, it seems that there is very little loosened soil, but for two it is an easy job. As a result, we worked for 4 hours without a break and were very tired.
This is what happened after removing the soil.
Also, along the way, we unloaded extruded polystyrene foam (19 packs measuring 120x60x10 cm for insulating the slab and 2 packs 1160x580x50 mm for the sides of the slab), which was brought to the site.
Having completed the preparatory stage, the user spread geotextiles at the bottom of the pit and began forming a sand cushion. To do this, he needed a vibrating plate (Turkish945 rented it), but there was a hitch with the sand.
Turkish945 ordered sand from one “local” seller, who promised that he would bring eight cubes of clean sand at a price of 5 thousand rubles for a KamAZ. As a result, sand with a large amount of stones and clay was brought to the construction site.
I had to manually sort through and throw out foreign inclusions. The work dragged on until the evening. The user also agreed with two laborers that they would come to lay sand on Sunday.
Because The ordered sand is not enough, Turkish945, having received a discount for substandard conditions for the first truck, ordered a second truck from the same seller, and ordered a third KamAZ with sand, just in case, from another supplier.
On Sunday morning it turned out that the laborers who had been hired the day before were delayed. In order not to waste a day, the user got to work.
Turkish945
I compacted the sand with a vibrating plate weighing 85 kg. I made 4 passes in total. One passage took 30-40 minutes. The sand was spilling water.
By this time two trucks with sand arrived. The first - with sand from the seller, who deceived us on quality, but gave a discount and swore that this would not happen again. The second truck is from a new supplier. Having unloaded two piles side by side, Turkish945 saw that the sand was again mixed with clay. In addition, the pile, which according to the first seller should be 8 cubic meters in volume, looks exactly the same as the pile from the second seller, but who brought 6 cubic meters of excellent sand.
Result: the first supplier completely exhausted the credit of trust and said goodbye to him. Without waiting for the unskilled workers, who promised to arrive by this time, the user and his father-in-law independently began to take away the rest of the sand.
To bring the layer thickness to “0”, pegs were driven in with marks of the required level.
Having become tired, Turkish945 decided to call the laborers again and find out where they were. Having received the answer that they were already on their way, they continued their work. As a result, the “helpers” arrived in the evening, and in ordinary clothes, and when asked how they were going to work in this form, they answered: “we only came to see the front of the work.”
Having looked around, the guys immediately announced a price of 1000 rubles for 1 cubic meter of sand. This is approximately 30 thousand rubles. for two, for 2 days of work. Having said “goodbye”, the developer refused their services.
After all the ordeals, Turkish945 found guys who quickly scattered and compacted sand at a price of 1,500 rubles. per day per person. In total, 40 cubic meters of sand were used for the sand cushion.
Turkish945
We compacted the sand to form a slab. The result was a smooth and solid base.
The next stage is marking routes for utilities. For ease of use, the user made a simple device - “beacons”, driving a “weaving” nail into the caps of plastic bottles.
The “beacon” is stuck into the sand, and a tape measure ring clings to the head of the nail.
This allows you to mark routes without outside help.
The lines of the tracks in the sand were marked with paint sprayed from an aerosol can along a stretched thread.
Having marked the routes, we dug trenches for utilities.
The main thing is to observe all the necessary slopes for sewer pipes. 2 cm per 1 linear meter for a pipe with a diameter of 110 mm and 3 cm per 1 linear meter for a pipe with a diameter of 50 mm.
Pipes (for water and heating mains) enter the body of the foundation in a sleeve - a pipe of larger diameter. In this case, 110 and 160 mm. Moreover, the pipe entrance is deliberately made not at 90, but at 60 degrees. To do this, we took and connected two elbows with an angle of 30 degrees.
To check the tightness of communications, you can plug the outlets and pour water into the pipes. If the liquid level does not change, and there are no leaks at the joints, then the routes can be buried.
Having filled the communications with sand and compacted it, the developer laid out the insulation with the displacement of the slabs.
Final version.
Now we move on to knitting the reinforcement cage. To speed up the work, Turkish945 ordered reinforcement already cut to the required dimensions.
Turkish945
When I saw the amount of reinforcement delivered, I knew I had made the right decision. I saved both time and tools, because... I’m not sure that my “grinder” would withstand such a volume of work.
To tie the reinforcement, we rented a special gun, despite skepticism from portal users about this expensive equipment.
The most common complaints: the battery does not hold, does not knit well, the wire gets tangled, but Turkish945 was pleased with the performance of the pistol. According to him, the wire got tangled only at the very beginning - the first 10 minutes of work, then, “having gotten better at it,” he knitted with a gun without defects.
As for the speed of work, it took about one hour to tie the reinforcement cage in increments of 25 cm, including smoke breaks. A spool of wire, costing 120 rubles, is enough for about 170 knots.
When engaged in independent construction, you need to be prepared for various force majeure circumstances - sudden changes in weather conditions, etc. Arriving at the site one day to finish tying the reinforcement frame, the developer saw the following picture.
Due to the drop in temperature at night, frost appeared on the grass and dew formed inside the formwork.
In the morning the thermometer showed only + 2 °C, and the so-called. “winter” conditions for concreting a foundation are when the temperature during the day does not exceed +5 °C, and at night it drops below 0 °C. Solution: use special antifreeze additives. However, Turkish945, having completed the reinforcement of the slab, moved on to the most important stage - pouring concrete.
Turkish945
I calculated the volume of concrete very carefully, because... I couldn’t order the mixture with a small reserve (as recommended when pouring the foundation), there was nowhere to drain the excess. As a result, after several measurements of the thickness of the side and excluding the volume of used reinforcement and sleeves, I ordered 10.5 cubic meters of concrete.
The concrete was delivered on two mixers.
There are 7 cubes in the first car, the rest in the second. The concrete was pulled apart with the help of assistants, not forgetting to vibrate the mixture.
There was enough concrete exactly as calculated for the entire foundation.
At the end of the article, we present the costs for the stove:
- foundation design – 20,390 rubles;
- earthworks - 15,000 rubles;
- transportation costs (delivery) - 15,600 rubles;
- wages for unskilled workers - 10,500 rubles;
- tool rental – 11,000 rubles;
- concrete – 38,500 rubles;
- sand – 30,000 rubles;
- fittings - 26,810 rubles;
- EPPS - 28,615 rubles;
- engineering communications (pipes) - 11,940 rubles;
- other expenses - approximately 14,000 rubles.
Total: (about) 222,452 rubles, or (approximately) - 4,120 rubles. for 1 sq. m slabs.
You can learn more about the construction of an insulated slab foundation in the topic on FORUMHOUSE. We recommend reading articles that tell you how to calculate the formwork so that it does not burst when pouring concrete, and whether it is necessary to add sand under the foundation. And from the video you will learn the nuances of constructing a new type of slab foundation “box slab”.
Survey work, USP calculation and terrain tracing
Survey activities precede the start of construction. They are carried out to determine the nature of the soil and its bearing capacity. The level of groundwater in the area, the composition of the soil and possible fluctuations in the lower layers of the soil are clarified. These indicators must be as correct and accurate as possible in order to subsequently provide a solid foundation. Therefore, here you should use the services of specialists.
The main difference between the calculation of an insulated foundation slab is the sequential determination of the parameters of each layer during construction, taking into account actual loads and impacts. For this purpose, special computer programs are used that determine the individual characteristics of the foundation.
Helpful advice! It is better to design a Swedish foundation with the involvement of professionals, which will avoid many errors in the calculations.
After all the preparatory measures have been completed, they begin directly to build the foundation. To do this, you should mark the territory, which is the drawing of full-scale axes. The contours of the pit are outlined along the ground, cast-offs are installed along which the cords necessary for installing the formwork are pulled. The main advantage of cast-offs (compared to conventional pegs) is the convenient U-shaped design, the position of which is leveled once in the horizontal plane. If the cord is temporarily removed when necessary, no adjustments are required once it is in place.
Before laying the foundation, survey work is carried out, which is aimed at determining the type of soil and its bearing capacity
The pit should be planned larger than the foundation slab. An allowance of about 1 m should be left on each side. Such indents will be used for installing drainage. This can be a ring drainage to lower the groundwater level or a wall drainage used to drain high water, which is formed with the constant accumulation of rain and flood waters of the underlying layer in technogenic zones.
Related article:
How to build your own house with your own hands and how to do it cheaper
Main stages of construction, important nuances. Budget projects based on various materials and the right ways to save.
Now let's compare
If you compare USHP with screw piles or with a regular concrete slab or with MZLF... The comparison will not be entirely in favor of these types of foundation. That is, piles, of course, will cost less. And you can build exactly the same good house on them. BUT how much work will need to be done later? Who will make them? How much is it?
When assessing and comparing the cost of different types of foundations, please consider all of the above. USHP is a ready-made zero cycle, a turnkey foundation. Although I don't like this definition, it really is true.
On USHP you just need to put a box at home, and everything else is already inside - heating, communications, insulation. And on the same screw piles you need to make a lower floor, insulate it, install communications, route them around the house, fill in the screed, install heating, do something fancy with the finishing of the high base... In general, it’s up to you.
You can view detailed reports on the foundations I recently built in the “Constructed USP” section.
Contact me if you want to calculate the cost of constructing a USP on your site or ask any questions.
Don't forget to subscribe to my news on social networks! Links to them are at the bottom of each page.
List of required materials and tools
Doing USP with your own hands is not as difficult as it seems at first glance. Before starting work, it is necessary to have a design for a new building and determine the location for construction. You can, of course, use the services of specialists and order a turnkey USHP foundation. However, strict adherence to technology and the use of high-quality materials will allow you to independently create a solid and reliable foundation for subsequent construction.
Before pouring concrete, it is necessary to prepare a flat area and compact it properly with a special machine.
List of materials required for the construction of the USHP foundation:
- medium sand;
- medium-sized crushed stone;
- geotextiles;
- extruded polystyrene foam 100 mm thick;
- drainage pipes;
- wooden boards;
- reinforcement bars;
- knitting wire;
- pipes of different diameters for utilities and water heated floors;
- nylon clamps;
To work you will need the following tools:
- scoop and bayonet blades;
- wheelbarrow;
- level;
L-blocks are lined with flat slate for laying the foundation
- building level;
- screwdriver;
- knife;
- Bulgarian;
- vibrating plate;
- deep vibrator;
- hacksaw;
- concrete mixer;
- trowel;
- protective clothing.
Where is it recommended and when is it advisable to use USP
Insulated Swedish slab at the stage of constructing a reinforcement frame and laying a heated floor system.
The construction of a USP is justified in the construction of lightweight buildings and structures, when there is no technical possibility or desire to build a ground floor or basement. It should be borne in mind that the Swedish slab is not just an alternative to a shallow strip foundation for a house, it is an engineering solution for the simultaneous installation of internal communications of the heating system and the basement of the building. When a different heating system or a different method of laying pipes is envisaged, there is no point in resorting to such technology. The Swedes developed it precisely to speed up, facilitate and reduce the cost of the listed construction stages.
Excavation work and creation of a drainage system
A warm foundation cannot be laid on a plant layer whose thickness does not exceed 0.3-0.5 m, so it should be removed completely. To do this, you can use bayonet shovels. If the foundation is laid on a fertile layer, it will inevitably shrink, which will be a consequence of rotting organic matter.
Before pouring the USHP foundation, you need to remove the fertile layer, fill it with sand and compact it
Helpful advice! To be safe, it is recommended to treat the area cleared of vegetation with chemicals that stop further plant growth.
After removing the soil, the surface must be compacted using clay, which, in dry crushed form, is poured into the pit, moistened and compacted. Next, geotextiles are laid. The ends of the woven fabric should protrude beyond the future foundation by at least 30 cm.
In order for the slab to always remain dry, it is important to properly organize the drainage system, thanks to which groundwater, storm water and melt water will be drained from the base of the foundation. For this purpose, it is necessary to make a trench along the entire perimeter of the pit with a depth equal to the diameter of the perforated pipes that will be used for drainage. Here you should slope away from the building by 3-4 degrees, which will ensure gravity flow. It is necessary to install vertical wells in the corners of the building, which will provide access to the drainage system for periodic cleaning.
In order for the slab to always remain dry, it is important to properly organize the foundation drainage system
The sequence of actions is as follows:
- a layer of crushed stone is laid on the geotextile;
- in the corners of the structure, wells are installed, which are created from solid smooth or corrugated pipes with a diameter of 20-30 cm, installed vertically;
- installation of corrugated pipes along the perimeter of the building with the ends entering adjacent wells, where the corresponding holes are made;
- filling the trench with crushed stone, which is covered with geotextile on top.
3,4,5. We make storm drainage, drainage, blind area
When it rains, streams of water run from the roof through the drainpipes and this water needs to go somewhere. For this purpose, storm drains and storm inlets are made, these are something like hatches under drainpipes where all the rainwater flows. And she goes into a ditch or a well. Believe me, this is much better than puddles around the house.
In most areas, due to dampness, drainage is also needed, you can read about it in detail on the Internet, but in a nutshell - this is needed to drain water away from the house, so that it is dry. And this is also done immediately, along with all other earthworks.
Around the foundation, along the perimeter, sheets of expanded polystyrene are buried, covered with a thick film - this is an insulated blind area. It is needed to prevent freezing and frost heaving of the soil around the foundation. You can fill it with sand and, subsequently, decorative stone, or you can immediately beautifully concrete it.
So, it turns out that we have removed all excess moisture from under and around the house, and also insulated the foundation and its perimeter. This means that there is no opportunity for frost heaving of the soil - dry sand, protected from frost by foam plastic, will no longer move.
Laying out utilities and creating a shock-absorbing cushion
Next, they begin to arrange a shock-absorbing cushion about 15 cm thick from gravel or crushed stone with fractions of 20-40 mm in size. The base is filled with fine sand, which is compacted every 20 cm with a hand tamper or vibrator until the design mark is reached.
All utilities must be laid before creating a monolithic foundation, so they are placed on a sand cushion with compaction according to the wiring plan below the freezing level. All ends of the pipes must be brought to the surface for further connection of the system. To increase the maintainability of networks, it is better to lay pipes in cases of larger diameter. For the sewer system, a well should be provided outside so that sewer inspection and repair can be carried out.
All existing pipes from under the foundation must be brought to the surface for further connection of systems
Helpful advice! As a backup option in case of failure of the main communications, a duplication of the engineering system is created, which can be switched to when repairing the old one.
After laying all utilities, the surface is covered with a small layer of gravel up to 15 cm thick, followed by compaction. For good waterproofing, the base is covered with waterproof material. Here you can use both inexpensive roofing felt and more modern products. The canvases are laid with an overlap of 10 cm and the joints are sealed. The edges of the waterproofing material must protrude beyond the foundation by at least 15 cm.
Video description
The process of laying and knitting reinforcement for USHP can be seen more clearly in the video:
Warm floor
There are several rules that should be followed when installing a warm water floor pipeline:
- Near the external walls, pipes should be laid more densely than in the internal space of the room.
- The minimum pipe laying step should not be less than 10 cm, and the maximum should not be more than 25 cm.
- The distance from the external wall is at least 15 cm, in this case heat loss will be avoided.
The pipes are attached to the reinforcing mesh with plastic tie clamps in increments of 30-50 cm in a straight line and 15-25 cm in a bend.
Pouring concrete
When pouring, ready-mixed concrete produced at the plant should be used. The process of filling the formwork with concrete must occur in one go. Sectional filling is allowed, but not less than 1 hour after filling adjacent sections. Layer-by-layer filling is unacceptable. Concrete definitely needs to be compacted using a vibrating screed or vibrating plate. The use of submersible vibrators is not recommended, as they can damage the thermal insulation layer.
Installation of a thermal insulation layer for a USHP foundation
Insulation of the foundation is an important measure, thanks to which heat does not escape from the building into the ground, and cold does not penetrate from the soil into the room. The insulation must have high strength. Therefore, in USP technology it is recommended to use slabs made of extruded polystyrene foam, which (due to the presence of graphite in their composition) are characterized by increased compressive strength.
Helpful advice! Expanded polystyrene can harbor ants and other insects. Therefore, the material needs additional protection. Here it is recommended to use broken glass, metal mesh or ceramic foam slabs.
Extruded polystyrene foam slabs for the blind area were laid and covered with film
The material in the form of slabs 10 cm thick must be laid in two layers. The first should cover the entire perimeter of the base and the blind area. The second layer should be laid offset from the edge by at least 45 cm, which will create stiffening ribs. In the middle of the slab, in the thermal insulation layer, grooves 20-30 cm wide are made for future load-bearing walls, under which the insulation does not fit.
When using flat sheets of insulating material, special plastic nails with wide heads are used to fasten them. The contact points can be treated with an adhesive composition. It is recommended to arrange the elements in a checkerboard pattern, which will help to avoid the formation of cold bridges at their junction points. You can also use l blocks for USHP, which are mounted at the ends of the structure. Having a special design, they do not require additional fastening during installation.
Which insulation is better to choose for the foundation?
Today, the construction market offers a wide range of insulation materials from the well-known Stirex, Technoplex, Penoplex and URSA. The PSB-S material is not suitable for these works, since it is produced without a pressing stage.
The thickness of the foundation insulation is determined by many different factors.
Among all the proposed options, extruded polystyrene foam Penoplex occupies a leading position. The cost of the product is 1200 rubles/pack. The material is characterized by a number of distinctive advantages:
- durability;
- multifunctionality, since it simultaneously creates hydro- and thermal insulation;
- environmental safety;
- increased resistance to moisture;
- not prone to the emergence of various microorganisms in the thickness of the layer.
Also no less popular is the insulation for USHP TechnoNIKOL. The material does not absorb moisture, does not shrink, does not swell, is characterized by a low thermal conductivity coefficient, exhibits chemical resistance and does not rot. To produce extruded polystyrene foam, TechnoNIKOL uses nano-sized carbohydrate particles, which increases the strength of the material, reducing its thermal conductivity, thereby increasing energy efficiency.
Insulating the foundation is a very important task, therefore, when choosing a suitable material, it is necessary to take into account its characteristics
The material is characterized by high compressive strength and stable thickness under load, as a result of which it can be used for loaded structures. You can buy the material from 1400 rubles/pack, the cost of l blocks for USP is on average 1300 rubles/pack.
At this stage, wooden formwork is laid under the future monolithic tile. To do this, racks are mounted to which the edged boards are attached using self-tapping screws and a screwdriver. The wooden frame is additionally reinforced with braces to give the structure greater strength. The formwork is lined with heat-insulating material from the inside. After the slab has gained sufficient strength, the fence is dismantled, and the insulation remains as protective sides for the lower part of the building.
The value of a double layer of thermal insulation and a heated floor system for a home at USHP
Due to the fact that USHP technology requires laying thermal insulation material in two layers, all the heat will remain in the house. The first layer of 10 cm along the entire perimeter of the base prevents the penetration of moisture. Another 10 cm of thermal insulation creates a good barrier against the cold that comes from the ground.
Since the heated floor is poured into concrete, the monolithic slab serves as an excellent heat accumulator
Thanks to the underfloor heating system, which is installed in separate circuits in each room, uniform heat distribution in the room is ensured and climate zones are adjusted. If you create the necessary insulation of the walls and roof of the building, it will be enough to maintain the temperature in the heating system no more than 28 degrees, which corresponds to the temperature of the circulating fluid (31-32 degrees), in order to create a comfortable microclimate in the house. However, this also depends on the finishing floor covering. Such measures will provide an additional benefit when using low temperature heat sources such as gas condensing boilers and heat pumps.
Thanks to the foundation in the form of a warm Swedish stove, you can save about 30% on heating. This is possible due to the fact that the underfloor heating system heats the concrete slab, and the concrete accumulates heat into the room. The thermal conductivity coefficient is 0.17 W/m²K, and for non-insulated concrete bases it is 0.4 W/m²K.
How long will it last?
USP blocks
According to the developers of the Swedish company Dorocell, such buildings can serve faithfully for more than 50 years; the same guarantee (sometimes more) is given by manufacturers of high-quality building materials for their products.
Such terms are quite realistic, especially considering that more than 50,000 houses built in Sweden in 1978 on such a foundation are still perfectly preserved. After carefully studying the technology and the possibility of soil freezing, the Norwegians also built more than a million similar buildings at the end of the 20th century.
Therefore, with timely care, such buildings can constitute a serious alternative to traditional buildings.
Reinforcement of the Swedish slab foundation and installation of heated floors
Foundation reinforcement is performed to allow the structure to absorb tensile loads. The technology is performed according to the following scheme:
- creation of stiffening ribs for the grillage: frames are laid from reinforcement 10-16 mm thick, connected with rectangular clamps 6-8 mm in increments of 300 mm, taking into account the protective layer of concrete;
Cutting reinforcement for USHP foundation
- slab reinforcement: installation between the stiffeners of two reinforcing mesh with cells 150x150 mm from rods 10-14 mm thick, cell width 15 cm with tying structural elements with twisted wire every 25-30 cm.
The thickness of the rods is selected taking into account structural, snow and operational loads on the surface. Utilities should not be installed in stiffeners. In order not to damage the insulation, it is recommended to assemble the spatial reinforcement frame separately, and then you need to lay it ready-made on special clamps in the grillage area where the frames are connected to each other. The mesh for the slab is tied on site. The lower structure is installed on PVC clamps.
The technology of the Swedish insulated slab involves the installation of a heated floor in the thickness of a monolithic foundation. The heated floor contour is laid on the upper mesh and secured with nylon clamps. In this regard, the thickness of the upper protective layer of concrete should be taken into account, which should be 50-70 mm. In places where load-bearing walls or doorways are located, pipes should be placed in sleeves made of durable material. There must be a distance of at least 10 cm between the pipes.
It is better to fasten the reinforcement with a special gun
If the laying is more dense, this will not affect the efficiency, but will result in excess consumption of material. A distance exceeding 25 cm will impair the uniform distribution of heat over the surface. Near the walls, pipes must be placed more densely than in the central part of future premises. An indentation of about 15 cm should be made from the wall.
Important! The heating pipes of a water heated floor should be arranged in an insulated circuit for each room separately, which will allow each room to be heated independently of the others.
The distribution elements of the system are brought up and fixed on rods hammered vertically. The collector should be located in the place provided for by the design at a given height. To install it, four reinforcing bars 1.5 m long are driven into the foundation. A board is fixed to them and the collector is temporarily fixed. Heated floor pipes are connected to it. Where flexible pipes rise to the collector, they must be protected using a special corrugated pipe.
Important! The heating system must be tested for leaks by filling it with coolant.
In a USHP foundation, the entire area is covered with welded reinforcing mesh, and reinforcement bars are used in the stiffeners
Pros and cons of the Swedish scheme
USP is not a panacea; it has negative aspects. Advantages:
- Affordability: compared to traditional slab and strip foundations
- Versatility: can be built on weak, heaving, water-logged soils
- Effective thermal insulation: no cold bridges or expansion joints
- Simplicity of design.
- Construction without construction equipment.
- High level of surface finish.
- There is no need to install an additional heating system or supply communications.
Knitting reinforcement
Cons:
- Difficulty in construction in areas with a height difference of more than 25-30 cm
- The need for accurate calculations
- Constant control of construction
- Impossibility of building a house with a basement or ground floor
USHP foundation: foundation concreting technology
The final stage of installing an insulated foundation slab is pouring the base with concrete mortar. The important thing here is to do the process one time. To do this, you can use a concrete mixer truck with an installed concrete pump. The solution is evenly distributed over the surface using shovels and trowels. To obtain a uniform surface, the fill should not spread over a distance of more than 1.5 m in diameter.
Batch filling can be done at intervals of 1 hour. If it is necessary to interrupt for a longer period of time, work seams should be arranged. After resuming work, they are moistened with water and treated with a cement laitance primer. The solution should be compacted using a vibrating plate or deep vibrator.
To ensure that the final surface is smooth, the base is sanded. This is an important undertaking because the concrete slab is the floor of the first floor. Otherwise, you will have to spend additional money on a leveling screed.
Helpful advice! It is recommended to build a USP foundation at the end of summer, when the groundwater level drops.
The work on the USP foundation is being completed by pouring concrete and grouting/grinding it
During the hardening period of the base, proper care of the concrete surface should be provided. In hot weather, it is necessary to moisten the foundation and cover it from precipitation with plastic film. Stripping can be carried out after 48 hours at a temperature of 30 degrees, and after 5-7 days - in cold weather at a temperature of 10-12 degrees.
Potential problems and ways to prevent them
Proper calculation of the thickness of a monolithic USHP foundation determines the durability and stability of the structure. A massive option will cause shrinkage; too thin will cause cracks and warping of the walls. In the case of difficult soils, it is better to entrust the design to professionals.
If there is a high groundwater level on the site, careful drainage of the foundation will be required during construction in the off-season. The perimeter of the future foundation is surrounded by a trench through which drainage is arranged. Complicated conditions involve laying drainage pipes directly under the slab.
When pouring concrete for a USP device, you need to make sure that the spreading solution does not put pressure on the formwork, otherwise it will be damaged or bent. A mandatory preventive measure is the installation of wooden supports made of spacer bars in the ground along the outer perimeter in increments of 50 cm.
It is better to fill the slab at a time, otherwise, due to non-compliance with the solidity of the structure, cracks may appear at the border of different portions of concrete. If the dimensions of the base imply dividing the process into several stages, each layer must be strictly horizontal.
When creating a reinforcing frame, you need to cover the metal rods with a layer of mortar of at least 3 cm, otherwise moisture can get into the reinforced concrete structure and cause its premature destruction. All stages of work require accuracy and scrupulousness - this is the key to success in the construction of a Scandinavian slab foundation.