The construction of a strip foundation often begins with the installation of formwork - a form for pouring concrete. It can be removable or non-removable, but in most cases preference is given to the first option.
All mistakes made during the installation of a temporary panel structure ultimately affect the quality of the foundation.
Of particular importance is the correct strengthening of the strip foundation formwork (do-it-yourself formwork for a strip foundation): after all, during the pouring process, its walls are subjected to high pressure.
Pouring formwork: which design is better
Not a single construction site is complete without concreting, and where there is concrete mortar, there is formwork.
The design used in the manufacture of the foundation deserves special attention. After all, the quality of the foundation for the house largely depends on its reliability. Pouring formwork can cause the following problems:
- expansion during concreting;
- partial destruction;
- local leaks of concrete mixture.
To avoid this and find out what to make a structure from reliably and cheaply and what the requirements are, take advantage of the practical experience of experts at the FORUMHOUSE website.
How to make a structure from boards
Forum members advise how to make formwork panels. To assemble horizontal panels, it is recommended to use an edged board measuring 100x25 mm and 150x30 mm, and for vertical panels, take a 100x50 mm beam, resting it against the panel with its edge .
The vertical installation step is transverse (beam 50x100 mm) - from 70 to 100 cm. To make the formwork more rigid, two 50x100 mm beams are installed horizontally on each side, top and bottom.
With a well-thought-out design and competent execution, the strength of boards of these standard sizes is sufficient to withstand the pressure of large volumes of concrete mixture on the walls of the structure.
When choosing boards for this design, you must immediately consider the option of their further use. Because formwork for the foundation will require more than one cube; it is irrational to use boards only once. In order for the boards to remain “industrial wood” after dismantling, it is necessary to protect them from direct contact with concrete.
How to attach the film
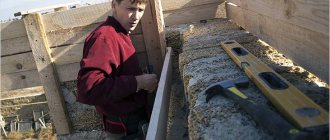
Before concreting, the inside of the structure is lined with a durable polyethylene film for formwork, which must be secured with a stapler. Construction is best done using self-tapping screws. In this case, it can be easily disassembled, minimizing damage to the formwork boards.
After dismantling the formwork, I put a 30x120 mm board on the sheathing. Before this, I cleaned the surface of the boards from staples. The main thing is to disassemble everything carefully.
My house roof is assembled from 40-gauge boards left over after pouring and dismantling the formwork. Before pouring, I covered it with film, I didn’t saw the boards sticking out in the corners, I assembled everything with self-tapping screws. After disassembling the boards were like new!
Materials and technologies
When building a proper structure, first of all, it is necessary to think through its structure and all the necessary strength elements (spacers, jibs, ties). After all, it’s one thing to pour a tape 30-40 cm high from the ground, and quite another to pour the walls of a basement 2.5 meters high. Especially if the concrete is supplied using a concrete pump.
I built the formwork from 25 boards. I didn’t do any ties; I thought it would hold up, because... Every 30 cm I placed wooden spacers. When pouring concrete, the formwork burst open, so much so that twice I had to scoop out the spilled mixture, then fasten the formwork again and manually throw the concrete back in. Taught by very bitter experience, I will now definitely tighten the walls with zip ties.
There are often cases when, without bothering to strengthen at the proper level, we find that when pouring or vibrating, the formwork structure simply breaks. All concrete is poured onto the ground. The structure has to be urgently patched, which leads to large financial losses. Hence the rule: the formwork must be additionally secured.
Strengthening the formwork
Many novice developers may not realize what enormous pushing forces act on the formwork when pouring concrete. Let's look at the numbers.
I recently poured a slab 25 cm high. The structure simply lay on the ground, was fastened in the corners with self-tapping screws, in some places it was supported by stones and bricks - nothing squeezed out or moved anywhere. But what works in my case will not work when casting a high foundation strip.
Such an example. According to SNiP III-15-76, pressure on the wall = PxH. Hence: 2500x0.25=625kgf/sq.m. If 1 linear meter of formwork has an area of 0.25x1=0.25 sq.m, then the pressure per 1 linear meter will be 625x0.25=156 kg/m.p., taking into account concrete vibration 200 kgf/m.p.
Fastening the formwork for the foundation.
If the height of the shield is 0.9 m and the concrete is unloaded from a concrete pump, then, according to the same SNIP, the pressure will be 2500x0.9+400=2650 kgf/m2. Hence: the pressure per 1 linear meter will be 2385 kgf/m.p. The difference is simply huge!
But it happens that a structure, even if properly tightened with metal pins, “leaks.” Moreover, the threaded element of the stud cannot withstand it. The thread either crushes or “shoots off” the nut. This happens because when tightening industrial formwork, special types of studs are used, with reinforced nuts and an increased washer diameter.
In private house construction, ordinary threaded rods are used - M8/M10/M12 and nuts purchased at the nearest construction market. A stud of class 8.8, with a diameter of 10 mm, according to GOST, is required to withstand a load of 6.7 tons, but in regular sale, mainly, there are studs with “failed” diameters and thread shapes not in accordance with GOST. The quality of the metal is also low; at best, such a pin will withstand a working load of 1.5 tons.
For the foundation I bought M8 studs. I wanted to check what actual load they could withstand. I tested them on a tensile testing machine. Result: with one nut screwed on, with a load of approximately 100 kg, the thread of the stud was cut off (collapsed). With two nuts screwed on, the stud could withstand a load (the thread was broken, but the stud itself remained intact) of 500 kg.
Conclusion: for the stud to “work”, you need to screw two nuts on each side. Or use special nuts of increased length.
True, this does not yet guarantee that the hairpin will “start working” 100%. It is necessary to arrange the pins so that they give maximum effect.
I “ran through” two options for placing studs in the formwork in a special program. And this is what happened: take a wooden vertical stand 50x100 mm. We place it edge-on to the shield, height 2.3 meters. We set the load - 10 kNm (4 kN - from the deep vibrator, 6 kN - the pressure of the concrete column is 2.3 meters). We tighten the formwork with three pins, with a distance of 70 cm. The first pin from the bottom is at a height of 50 cm. We get a picture of deflections and stresses in the beam.
The screenshot shows that the lower end of the beam will deviate the most (by 5 mm). Those. there is a high probability that the support beam will break here. Let's arrange the studs differently. The lower one is now laid at a height of 30 cm.
Now the loads are distributed differently. The maximum stress is reduced by almost 3 times (5.4), and the deflection is reduced by 10 times.
My advice is that if you are going to fasten the formwork with studs, then they need to be installed between two vertical beams (the distance between them is equal to the diameter of the stud). But finding high-quality studs and nuts is difficult, and they are expensive, and then there is nowhere to put all this metal. If only for installation of the rafter system.
To reduce costs, a small threaded part of the stud is attached to the fittings of the required length. And a jumper should be welded to the opposite end to form the letter T.
It is much simpler and cheaper to strengthen the formwork frame with a “pigtail” of knitting wire with a diameter of 1.2 mm, weaving it from 6-7 threads. This type of tie is stronger than a “pigtail” woven from wire with a diameter of 2 mm in 3 strands.
The “pigtail” is inserted into the cracks between the formwork boards or into pre-drilled holes. It tightens two supporting vertical beams of the structure. To prevent the walls of the formwork from being deformed during the process of twisting the “pigtail”, it is recommended to install a reinforcing rod-limiter with a diameter of 10-12 mm inside the formwork, which helps to fix it.
The formwork for the ground floor deserves special attention.
What materials can formwork be made from?
Formwork can be made from various materials. Among them are:
- Metal. This type of material is very expensive, but at the same time the most versatile. It is made from steel sheets, the thickness of which is about 1-2 mm. The main disadvantage of this material is its high cost, so it is used extremely rarely.
- Reinforced concrete. This type of formwork is also expensive. It is made of concrete slabs of different thicknesses. When using it, the consumption of concrete for pouring is significantly reduced. However, the main disadvantage of this material is its high weight, which requires the use of special heavy equipment.
- Expanded polystyrene. This type of formwork is also not cheap, but there is no need to remove it after the concrete has gained strength. It is made from ready-made polystyrene foam blocks and is quite easy to install. The main disadvantage of this material is its high cost and possible difficulties in the process of selecting some complex elements.
- Available materials. Formwork can also be made from slate, corrugated sheets and other suitable materials. The advantage of such formwork is its low price, however, among the disadvantages one can note the complexity of assembling the structure, there is a risk of concrete mortar leaking through the formed cracks, it is necessary to use additional wedges and supports.
- Wood. This type of formwork material is widespread and inexpensive. Most often, cut boards or sheet plywood are used to create formwork. It is easy to assemble, but additional reinforcement elements must be installed. This type of formwork is best used for beginners in construction.
How to pour formwork
Forum members recommend how to pour the formwork: if the height of the walls is more than 2 meters, the pouring should be divided into two stages and no more than 1-1.2 meters should be concreted at a time. Then move the formwork higher. In addition to the fact that this homemade removable formwork is cheaper (in terms of materials) than one mounted immediately to the full height, the risk that it will withstand the loads when pouring concrete is significantly reduced.
Moreover, such an amount of concrete must be poured into the formwork and vibrated in layers 50 cm thick, circle by circle, until the required height of the foundation is poured. This will avoid excessive load at one point of the formwork, because The height of pouring the formwork with concrete increases gradually. And by the time the given height is reached, the lower layer of concrete will have already set, which, accordingly, will reduce the pressure on the walls of the formwork.
And in conclusion, a few tips from members of the forum on accepting concrete:
- Concrete of any grade for pouring the foundation must be ordered with a small margin - approximately 1 m3 plus. If some of the concrete “runs away” during pouring or the concrete unit is “underfilled” with solution, there will be a reserve;
- A place where excess concrete can be drained is determined in advance. This could be a driveway;
- The concrete pump needs a platform of approximately 6x8 m to operate;
- Pouring concrete into the formwork does not begin until the repair kit is prepared - this condition is mandatory. Supports, stakes, boards, hammer, nails, sledgehammer, buckets, shovel, container where you can temporarily drain spilled concrete, spare wooden board. If the formwork “explodes” when pouring concrete, then there simply won’t be time to run around the area and look for a way to fill the gap;
- When pouring the foundation with a concrete pump, you need to immediately agree on the concrete unit so that the mixers with concrete go one after another, without interruption. This will avoid downtime and, as a result, additional fees for renting expensive equipment;
- When accepting concrete, be sure to wear safety glasses and disposable medical gloves on your hands. Concrete if it comes into contact with exposed skin can cause a chemical burn;
- A hat and thick clothing are required. Moreover, the clothes are selected in such a way that you won’t mind throwing them away later.
You can pour the foundation “into the ground” if you take the advice of a forum member. After reading this topic: you will understand how to make formwork correctly. You can also familiarize yourself with the results of the dispute: “Is wooden formwork necessary at all?” Additionally, watch a video with a master class from FORUMHOUSE on installing reusable formwork.
Protection of foundations from weathering
It is performed during chemical and physical weathering of the foundation material. This usually happens with foundations made of brick or rubble masonry, which have low water resistance and strength. Chemical weathering occurs when cement is insufficiently resistant to the aggressive properties of the environment.
Figure 7. Increase in base area: 1 – reinforced concrete frame; 2 – keys; 3 – fittings.
To restore the surface, plastering with cement mortar (shotcrete) on the prepared side surface or plastering on a metal mesh is used. If weathering has affected the entire thickness of the foundation, you need to cement the masonry by strengthening the foundation or reinforce it with clips by restoring the load-bearing functions of the foundation.
carried out by drilling wells into the foundation masonry from the surface of the first or basement floor. Next, cement mortar is injected into them. Wells are drilled with hammer drills at a distance of 50 cm from one another with a diameter of 20-30 mm and to a depth of about 2/3 of the thickness of the base. Tubes are inserted into the wells and cement slurry is injected through them. At the wellheads, the tubes are sealed with a thick solution of 10 cm. The injection pressure is set at 0.3-0.6 MPa. After carrying out test injections, it is necessary to dig out test areas, check the results, and clarify the scope of work and technology.
In cases where, due to the destruction of foundation masonry and weathering, cracks have appeared in the above-foundation part, filling the cracks with cement mortar alone may not be enough. Increasing the strength of a building can be achieved by additional constructive measures.
Methods for strengthening strip foundation formwork
The construction of a strip foundation often begins with the installation of formwork - a form for pouring concrete. It can be removable or non-removable, but in most cases preference is given to the first option.
All mistakes made during the installation of a temporary panel structure ultimately affect the quality of the foundation.
Of particular importance is the correct strengthening of the strip foundation formwork (do-it-yourself formwork for a strip foundation): after all, during the pouring process, its walls are subjected to high pressure.
Installation of formwork on unstable ground
This technology for creating formwork for strip foundations is suitable for working on loose soil prone to collapse . To understand the technology of how to make formwork for a strip foundation on an unstable foundation, you can rely on the installation method described above, but pay special attention to additional reinforcement. The structure is installed at the full height of the belt and includes the following elements:
- Frame made of bars;
- Plywood sheet (formwork panel);
- Stops in the form of stakes;
- Steel pipes;
- Tension pin;
- Worn items;
- Bruschi;
- Upper connection bar;
- Anchors;
- Gravel-sand mixture;
- Concrete base with reinforcement.
The step-by-step technique for constructing such formwork looks like this:
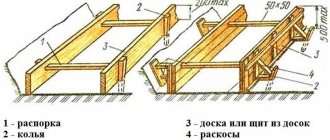
Ways to strengthen formwork
You can strengthen the formwork in several ways (how to make formwork for the foundation correctly):
- installation of struts;
- using wooden clamps;
- by tightening opposite elements with pins.
Wooden clamps are made immediately after installing the panels in their working position. They are U-shaped structures, the “legs” of which are half the height of the shield.
The internal size of the clamp crossbar must correspond to the external size of the formwork in width - the distance between the panels plus two board thicknesses.
After installation, the clamps are nailed to the boards or screwed with self-tapping screws.
But such ties are rarely used alone. Most often they are used in combination with struts.
Struts
A strut is a bar installed at the locations of the vertical posts of the shield. In the working position it is 45 degrees with the plane of the formwork.
The strut is attached at two points:
- at the top - to the vertical post of the shield using fasteners;
- below - using pegs that are driven into the ground 150 mm.
The clamps are located between the struts.
Finishing work on formwork installation
After the formwork has been strengthened, it is necessary to check the correct horizontal and vertical position of the walls of the structure. An uneven formwork surface can result in uneven pressure. If such a defect is detected, the structure is leveled in two ways:
- by rearranging the support pegs;
- by replacing uneven boards.
Before pouring cement mortar, the formwork is checked for various damages. Cracked boards must be replaced. They may not be able to withstand the load, and the concrete will spill beyond the formwork. All pegs should be firmly placed in the ground. If there are loose supporting elements, they are reinstalled.
Video on strengthening formwork:
Strengthening formwork with studs: nuances
The tightening of opposite formwork elements is carried out as follows:
- a piece of pipe is placed between the panels, the length of which is equal to the width of the future foundation;
- a pin is threaded through the pre-drilled holes in the formwork and the pipe, onto the threaded ends of which the nuts are screwed;
- after the concrete hardens, the studs are removed, and the pipes remaining inside the monolith - spacers - are filled with cement mortar.
As you can see, the technology for strengthening the formwork with pins is very simple. However, there are a number of nuances that need to be taken into account. Otherwise, when pouring, either the thread on the stud will be crushed, or the nut will “shoot off”. What explains this incident?
The fact is that private builders buy fasteners at the first hardware store they come across (or on the market). They are often manufactured in violation of GOST requirements - low-quality metal is used, and the thread shape may differ from the standard one.
As a result, the most popular studs with a diameter of 10 mm can withstand no more than 1.5 ton load. And a standard product of class 8.8 according to GOST must withstand 6.7 tons.
In addition, for tightening industrial formwork, special studs are used, complete with reinforced nuts and washers of increased diameter.
Some craftsmen get out of the situation by screwing two nuts onto the ends of the studs. In this case, the thread may also be crushed, but the nuts will remain in place.
Another option: a crossbar is welded to one of the ends of the stud, which forms the letter “T” with the body of the fastener. The nuts are screwed onto the opposite end. This way you will save on the number of nuts - you will need half as many of them.
Below are articles useful for those who are engaged in the manufacture of formwork for the foundation:
Video about errors when installing formwork, strengthening the formwork of a strip foundation.
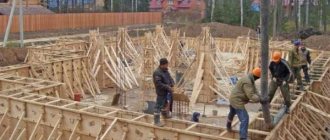
Installation of foundation formwork
Installation of foundation formwork
The installation of formwork is the most important and necessary stage. The strength of the house and its service life depend on the quality of the formwork. Formwork is a form into which concrete is subsequently poured. It has two types: removable and non-removable. Removable formwork is used when there is no need to remove material from the foundation during work. The more popular type is removable. This type is used for strip foundations. It is made from heavy metals, boards and plywood. The formwork is done very simply, but there are some nuances during installation.
The most important criteria are:
- It must be very strong to withstand the pressure of concrete.
- There should be no holes in it where foundation leakage could occur.
- It should be tight.
- The material from which it will be mounted depends on the height of the formwork.
- The formwork is installed strictly after preparatory work on the site.
Preparing the site area
Preparing the site for installation of formwork
An important stage in construction is preparing sizing calculations, completely leveling the area and clearing the area for further work.
If necessary, you will need to level the soil for further pouring of the foundation. A practical way is to mark the outlines using string and pegs. This procedure will help you correctly calculate the depth of the trench. After the trench is dug, a cushion is made, which is covered with crushed stone. These are all the requirements before starting work on the site.
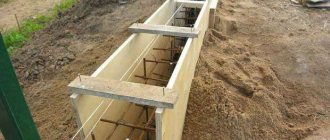
Installation and reinforcement of board formwork
Installation and reinforcement of formwork
For a strip foundation, formwork assembly begins with choosing the most practical material. The most practical material is a board. It is better to choose a board from pine or spruce. These two rocks are most suitable for formwork construction. For a high-quality installation, you need to drive in wooden blocks strictly according to the design; the main parts will rest on them. This structure should be secured with nails. Along the entire perimeter, every 40-60 cm, you will need to fasten the boards with wire, and every meter, support the boards with more boards. It is imperative to check the entire formwork with a level to eliminate any deviations.
Next, the fittings are installed. As a rule, 4 rods are installed, located at a uniform level along the entire length of the formwork. The corners are additionally reinforced with vertical rods.
The reinforcement must be connected with wire; welding should not be used. When metal is exposed to a welding arc, the surface and internal structure is damaged. This compromises its strength and rigidity.
Preparatory work
Before you make the formwork at home, you need to complete the preparatory work. The area needs to be leveled; it must be a continuous horizontal plane without holes or bulges; this can be achieved with the help of a bulldozer or on your own using a shovel and a construction wheelbarrow. However, there is another option - a trench can be dug without being tied to the surface, however, it is important that the depth of the foundation, as well as the height of the formwork (working part) are the same.
How to strengthen the finished formwork?
After installing the structure, the next step is its strengthening. This stage is necessary to ensure that your formwork is of high quality and strong. To strengthen, you will need wooden pegs or reinforcing rods. They must be driven into the ground along the entire perimeter of the formwork in increments of 40 centimeters, depending on the height of the panels. You can also install additional supports.
Screeds must be installed along the top of the structure. which will keep the formwork panels from diverging under the weight of concrete. The boards are secured to stakes driven into the ground using nails or self-cuts.
Turnkey price
To evaluate the benefits of self-construction, the master should have an idea of the average market cost of the service in Russia:
| City | Cost of laying 1 m3 of formwork |
| Moscow | 1000-1200 |
| Saint Petersburg | 1000-1200 |
| Ekaterinburg | 600-1100 |
| Novosibirsk | 600-900 |
| Nizhny Novgorod | 500-800 |
How to prepare formwork for pouring a foundation
Preparing formwork for pouring concrete
When installing the formwork, you should ensure that the walls are positioned so that they are strictly vertical. When preparing internal walls for pouring, you need to cover them with film. Lay the film tightly and secure it with a stapler. This procedure will greatly simplify further work. In this preparatory stage, you can use roofing felt; it will serve perfectly for such functions. After this, you need to mark the concrete pouring level and stretch the wire around the entire perimeter.
Panel removable formwork
Panel formwork is a prefabricated structure consisting of panels. This type is highly valued and is used in various building elements. It has many positive characteristics, especially the following:
- Does not deform under the influence of concrete.
- Excellent withstands large volumes.
- High dimensional accuracy ensures high efficiency of the finished work.
- Easy to use.
- Durable and reliable.
- Reduces installation time.
The panel formwork is installed by fixing the panels around the entire perimeter with spacers. The installation of panels occurs according to diagrams, which has a positive effect on accuracy. Such design elements allow you to create any degree of complexity.
The blind area around the house is a strip located around the entire perimeter of the room. Its main role is to drain surface water from the foundation.
The foundation is the most important part of the building. Its production should be taken especially seriously. There are several types of formwork for this. Kinds .
There are many types of foundations. However, they all perform one important task - they serve as the basis for the entire structure. For this reason .
To perform a job efficiently, a builder needs to know all the intricacies when working with a material such as concrete. You need to know the hardening time.
What piles are used to strengthen foundations?
To eliminate problems with foundations, cast-in-place piles are most often used, driven into pre-drilled holes. After all, strengthening foundations with cast-in-place piles allows you to maintain the integrity of the existing foundation during the process of immersing additional support. In addition, a screw pile, which is simply screwed into the ground, without any accompanying vibrations, also gives good results.
In fact, this is why neither vibration-pressed nor driven supports are ever used in the strengthening process.
Technology for strengthening the foundation of a structure with piles
Well, now that the principle of strengthening the foundation with piles is already clear to you, we can move on to a review of the technology that interests us. And further in the text we will introduce you to the basis of the process of strengthening a load-bearing structure with some types of piles. So..
Strengthening the foundation with bored piles
This is the simplest way and is done as follows:
- You simply drill out the base and immerse the drill into the supporting soil 1.5-2 meters. After this, all you have to do is insert the formwork (casing pipe) into the hole.
- Next, we introduce reinforcement into the pipe (four or three corrugated rods with horizontal ligation).
- After which the reinforcing frame of the support is connected to the frame of the foundation itself (using foundation bolts, reinforcement outlets, beams or other solutions).
- Finally, the formwork pipe is filled with concrete and after the mixture hardens, the foundation “grows” a new support rod.
The advantages of this method are high speed of work and ease of implementation of the technology. The disadvantage is the high probability of destruction of the foundation structure during installation of the support.
Therefore, additional bored piles are most often installed in pairs, outside the perimeter of the base. By connecting such a pair with a beam mounted on the pile heads and passed through a hole in the foundation being strengthened (or under its base), a fairly reliable support is obtained.
Strengthening foundations with drilled injection piles
Bored injection piles are introduced into the structure of the foundation to be strengthened in pairs, resulting in an X-shaped beam.
Such work is performed as follows:
- A puncture is made from the outside of the foundation wall.
- A puncture is made from the inside of the foundation wall.
- Reinforcement (sleeves) are inserted into the punctures.
- Concrete is injected into the punctures, forming an X-shaped beam.
The foundation can rest with its sole on the upper triangle of the beam or simply be pierced by reinforcing beams. The main advantage of this solution is its versatility. This technology can be used to strengthen any foundation: from block to monolithic structures. The main disadvantage is the complexity of implementing the amplification process.
Strengthening the foundation with screw piles
Screw piles are screwed into the ground next to the foundation, creating a base for a support beam or a new grillage.
The amplification process itself goes like this:
- The problem area is surrounded by a pile field - a line of supports located at a pre-calculated pitch.
- The structure is raised with jacks over the old grillage. Old beams are dismantled and replaced with new elements with large dimensions, laid on the heads of new supports.
- The building is lowered onto a new grillage.
This technique is practiced when strengthening pile foundations. However, with the help of screw piles and beams, both strip and slab structures can be strengthened.
Let's sum it up
The process of strengthening an old foundation or a foundation with structural defects is quite complicated. Only an experienced designer can calculate the location of reinforcing piles, their length and the dimensions of the beams.
And if you have problems with the quality or characteristics of the base, then it is better to contact professionals. Moreover, most amplification technologies require the presence of complex and expensive equipment on site, which cannot be found in the garages of home craftsmen.
About the site
zalman
Installation of formwork for strip foundations
The shape of the future foundation is determined by the formwork. Installation of formwork for strip foundations will be the main topic of this article. From it you will learn:
- how to build a foundation with your own hands;
- how the formwork is constructed;
- how to assemble a reinforcement cage.
The advantage of a strip foundation is that its installation does not require the use of heavy construction equipment. The closed contour of the strip foundation, reinforced with a metal structure, will have to withstand the weight of the heavy material from which your future home will be built. The thrifty owner will be pleased with the price-quality ratio.
Before installing the formwork for a strip foundation, geotechnical surveys should be carried out. To do this, you need to contact your local capital construction department, they will help you find out important information about your soil. Please note that the future foundation
- cannot be located below the upper groundwater level;
- 0.3 m should be below the freezing level.
Despite the fact that it is quite easy to make formwork for a strip foundation with your own hands, do not risk designing the foundation yourself. In case of unprofessional actions, you may find cracks in the constructed walls, encounter deformation of the base and other troubles.
When designing a strip foundation, a number of features should be taken into account
- dimensions of the future building;
- number of internal partitions;
- number of load-bearing walls and their sizes.
Keep in mind that the thicker the walls, the more they weigh, and therefore the foundation will be more impressive.
Construction can begin only when the issue regarding the size and geometry of the foundation has been resolved. The first thing to do is to apply markings in the place intended for the foundation.
Causes of foundation deformations
The appearance of cracks in the base or its deformation is a common occurrence. It occurs during long-term operation of a structure without regular preventive repair work or due to the action of factors beyond human control. From the foundation, faults and wall shifts are transmitted to the structure. If this process is not stopped in a timely manner, the building will collapse.
Crack in the foundation
The destruction of the foundation strip occurs for the following main reasons:
- vibrations (movements) of the soil caused by an earthquake or blasting operations near the building;
- an increase in the weight of the structure during its reconstruction (due to the use of heavier materials) or the addition of floors;
- use of low-quality materials for the construction of a supporting structure for a building;
- the location of the building on a sloping site, which can result in a landslide or slow sliding of the soil;
- digging pits and trenches at a close distance from the structure;
- deviation from construction standards and technology of work during the construction of a building;
- changes in the load-bearing properties of the soil under the building caused by rising groundwater, severe freezing and other factors;
- failure to comply with operating rules, failure to carry out timely repairs;
- flooding of the area around the building and the absence of a drainage system;
- incorrect calculation of the bearing capacity of the foundation;
- significant shrinkage of the structure.
For some reasons, in addition to restoring the foundation strip, it will be necessary to carry out additional work aimed directly at eliminating them. An example of such measures is the creation of a drainage system, strengthening of nearby soil (even a slope), waterproofing the base. Without such work, the destruction of the foundation will continue even after repairs.
Regardless of the reason that caused the destruction, repairs should begin as quickly as possible. Postponing it can lead to more serious problems, as well as a significant increase in costs associated with this: when the cracks move from the foundation to the walls of the house, then we will be talking about saving the entire building.
We mark the area for the strip foundation.
Before you start marking, you should remove vegetation from the entire perimeter of the area allocated for future construction. After this, we will mark the outer edges of one of the outer walls of the foundation with two U-shaped structures, consisting of two pegs driven vertically into the ground and one block nailed on top of the pegs. Stretch a rope between these structures.
Other external sides of the foundation are designated in a similar way.
The perimeter has been marked, it's time to tackle the internal partitions. The ropes should be pulled parallel to the threads marking the edge of the foundation. Observe the angles, they should all be 90 degrees. The distance between the threads should be equal to the width of the walls of the future foundation.
Now it’s time to take up the shovel - we will dig trenches along the lines marked with ropes. The width of the dug trenches must exceed the width of the walls of the future foundation; compliance with this condition will allow us to construct the strip foundation formwork according to the rules.
The trench should go deep to the amount made up of compacted layers of sand and crushed stone, 15 cm each, and the depth of the foundation.
Site preparation and marking
Strip formwork does not involve work over the entire area of the future building, but only along its perimeter. Despite this, it is recommended to level the entire area ; to do this, remove the turf with the top layer of soil, approximately 10-15 centimeters deep. A thread is pulled along the perimeter of the site on small pegs , and then a second one, retreating from the first at a distance equal in width to the future strip formwork and, accordingly, the foundation itself. If it is necessary to mark complex curved shapes, use a larger number of pegs, which are driven in according to the plan.
For convenience, you can draw the outline of the future foundation right on the ground, and then make precise markings along it.
We build formwork
The formwork for the strip foundation is built after the compaction procedure using a vibrating plate of the above-mentioned layers. It is recommended to moisten the sand with water - then it will be possible to achieve more dense shrinkage.
Standard planed boards with a thickness of 25 mm are considered the best material for formwork. It is this thickness that will allow the boards to withstand the pressure of concrete. Give preference to boards made from coniferous trees - they are characterized by natural strength and elasticity.
We will also need:
- wooden blocks 50*50 mm - we will use them for spacers;
- for fixing the shields - pegs.
When assembling the formwork, it is recommended to use edged boards; they will allow you to avoid unnecessary gaps. The width of the boards should be 15 cm. Select raw wood before work. Dry boards take moisture from the concrete, thereby disrupting its hardening process and reducing its strength.
Check the boards for any gaps - a gap of more than 3 mm may allow cement mortar to pass through. Small cracks will not cause significant damage - they will disappear on their own after the wood is saturated with moisture.
- put together shields from wooden boards, the width of which should be equal to the sum of the depth of the trench and the base of the foundation;
- drive vertical wedges in 1 m increments;
- screw the pre-prepared shields to the wedges using self-tapping screws;
- strengthen the resulting structure with spacers and crossbars;
- make sure that the shields are strictly level;
- measure the diagonals - the measurement results should match.
If gaps of more than 3 mm have formed between the boards, fill them with slats or caulk them with tow. Pay due attention to fixing the formwork; if you do not pay due attention to this now, in the future you will experience deformation of the foundation, which can lead to the inability to withstand the design loads.
Don’t be lazy to install additional supports; remember that the foundation walls must be perfectly smooth.
If you plan to use the shields multiple times, pay due attention to their cleanliness. Otherwise, they will have to be cleaned for a long time before subsequent use.
If you use nails instead of self-tapping screws, make sure that the caps are on the inside of the formwork, and the points are facing outward, which must subsequently be bent down.
Inspection of the base before repair work
Repair of a shallow strip foundation (or another type) begins with an underground and external inspection. The first is aimed at accurately determining the dimensions of the foundation and the material used for its construction, as well as assessing the strength of the supporting structure. Using an external inspection, existing cracks and chips are found.
Detection of cracks by external inspection
The nature of the destruction and the location of its occurrence on the supporting structure under the building make it possible to determine the cause of the process. Before carrying out work to strengthen the foundation, you should install beacons on the cracks (it is enough to do this in two places). If after a month they have not burst or fallen off, this indicates that the shrinkage of the structure has completed. You can begin the main work, in some cases simply by sealing the cracks.
When the beacons fly off or break, then it is necessary to strengthen the base. Those who have not previously had to carry out such work on their own are recommended to seek help from professional builders so that they do everything efficiently.
A preliminary inspection allows you to determine the scope of the upcoming repairs, as well as establish the cause of the damage and select the additional work necessary to eliminate it. Thanks to this, you can calculate upcoming expenses.
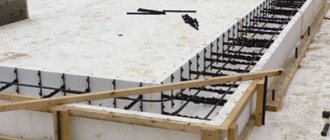
Reinforcement cage
Now it’s time for reinforcement cages; they are needed to give the foundation reliability. They should be assembled from reinforcement of the diameter specified in the foundation design. It is strictly prohibited to use welding to install the reinforcement cage. All connections must be made directly in the formwork using tying wire.
Make sure that there is about 5 cm on each side from the frame to the walls of the formwork. This way, you will be able to protect the reinforcement from contact with excess moisture that can seep through the soil. Place at least three reinforcements in the longitudinal direction, the laying floor spacing is no more than 250 mm.
It is necessary to lay openings where ventilation and communications will lie. Lay asbestos-cement pipes between the panels; they will allow the formation of through holes in the future foundation. The installation of the formwork for the strip foundation can be considered complete; it’s time to pour concrete into our structure.
Strengthening the foundation with bored piles
Bored piles consist of drilled holes into which reinforcement cages are placed and concreting is carried out with thorough compaction using deep vibrators. Drilling is performed with special equipment or manually using hand or motorized drills. Piles work as stand-up piles, resting on strong solid rock, or as hanging piles, working due to the frictional forces of the side surfaces with the contacting soils. The immersion depth in all cases is ≥ the seasonal freezing mark.
Scope of work for strengthening columnar foundations:
- development of a trench along the perimeter of the foundation structure to a depth of ≥ 0.5 m;
- drilling in unstable soil rocks or to great depths is carried out in casing pipes;
- production of reinforcement frames. Longitudinal rods from periodic reinforcement A-II or A-III with diameters from 12 to 22 mm. Transverse reinforcement is performed with smooth wire rod with a cross-section of 6...10 mm. The placement step is 20...30 cm. Connecting elements of thin knitting wire, softened by firing, using reinforcing hooks or wire cutters;
- installation of the frame. To provide a protective layer of ≥ 2.5 cm, plastic clamps or rectangular cement “crackers” are attached to the frame, and a 10 cm layer of lean concrete is preliminarily laid in the well. If the well is without casing, for additional insulation it is recommended to protect it with 2 layers of roofing material twisted into a cylinder. Longitudinal rods must be released from the well to enter the grillage to 2/3 of its thickness;
- laying the concrete mixture, if there is water, it must be pumped out. Concrete compaction;
- drilling holes in an existing structure, laying pieces of reinforcement into them and fixing them with cement mortar;
- installation of a compacted sand 20 cm cushion;
- installation of formwork and reinforcement frame of a monolithic grillage, with joining to reinforcement outlets of piles;
- laying and vibration compaction of concrete.
Strengthening the strip foundation with piles is carried out in a similar way. A trench along the perimeter of the belt is developed at the level of its sole from the outside, and, if possible, from the inside, which will significantly increase the support area. To prevent the strip structure from moving, it is fixed with side stops made of wooden logs resting against the walls of the trench.
Visible defects in the existing foundation must first be eliminated: jointing and sealing cracks, repairing damaged areas.
If there are difficulties with pumping water, laying a plastic concrete mixture using the vertical lifting pipe (VLT) method is used. The VPT consists of concrete pipe links and a receiving hopper. The hopper mixture flows out of the hopper through the bottom cavity of the pipe and displaces water. After concreting is completed, it is enough to remove the layer of weak concrete (sludge) that has formed at the top. But to lift the VPT, crane equipment will be required.
Instead of bored piles, you can reinforce the foundation with screw piles, consisting of a hollow steel pipe equipped with blades at the end to allow screwing into the ground. Such products have reliable anti-corrosion protection applied in the factory.
The spacing of the pillars, their required diameter and the order of reinforcement and concreting are indicated in the project.
These progressive methods make it possible to increase the load-bearing capacity of the foundation with a minimum amount of excavation work and low labor costs.
In some cases, drilling near an existing structure is impossible due to its severe destruction or extreme dilapidation of the house. The way out is pressed piles. When installing special technical equipment, they are pressed into the ground using powerful jacks. This is a complex and expensive method, so it is used when other amplification options are impossible.