Due to the introduction of advanced technologies and the use of new building materials, the requirements for the stability of buildings and their durability have increased. To strengthen the building structure and increase the strength of load-bearing external walls, a load-bearing belt is made in the upper part of the box in the form of a concrete contour, reinforced with reinforcement. The reinforced belt evenly distributes the pressure of the roof and transfers the load to the foundation through the walls. The strength properties are affected by the height and thickness of the reinforced belt, as well as the design features of the reinforcement frame and the grade of concrete.
Armored belt design
To smooth out the loads from the weight of the roof and interfloor panels, a special reinforced concrete belt is constructed on the end plane of the main walls. It is also performed during the process of pouring a monolithic foundation.
When planning to build a basement, interfloor or foundation reinforced belt, you must perform the following steps:
- think over the design features of the reinforced concrete reinforcement circuit;
- select the optimal size of the reinforcement and determine the height of the reinforcement belt;
- purchase the building materials necessary for the construction of the armored belt.
When deciding on the design, dimensions and materials used, one should take into account the current forces at the floor level, as well as the load capacity of the walls for the manufacture of which porous blocks were used. When using lightweight floor slabs, it is allowed to use a less powerful reinforced belt. In this case, the width should be equal to the thickness of the walls. Let us dwell in more detail on the design features and dimensions.
In order to increase the strength of load-bearing external walls, it is necessary to make an armored belt
What is the armored belt made of?
The design of the reinforced belt is regulated by building codes. This is a power circuit that prevents deformation of the building frame.
The following building materials are used for the manufacture of reinforced belts:
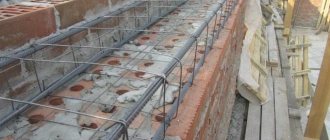
- concrete mortar marked M400 and higher. The mixture is filled with a formwork frame, inside of which there is a reinforcement grid. After the concrete hardens, a force contour is formed around the perimeter of the load-bearing walls. The concrete mixture is made according to a standard recipe based on Portland cement, crushed stone and sand. It is important to carry out concreting in one go with further compaction of the concrete mass using vibration equipment. It is important to prevent the formation of air cavities inside the monolith;
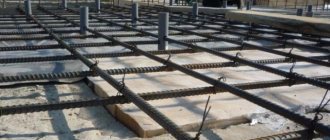
- steel rods with a cross-sectional size of 0.8-1 cm. Corrugated reinforcement is cut into blanks of the required sizes, which are connected with knitting wire into a spatial frame. The structure consists of four longitudinally located rods connected by transverse rods. The diameter of the transverse elements is 0.6 cm. The metal lattice, which increases the load capacity of the concrete mass, has a square or rectangular cross-section in the transverse plane.
Depending on the design of the formwork, various materials are used for its manufacture:
- wood panels are used for collapsible formwork;
- the stationary structure is made of polystyrene.
It is important to ensure the rigidity and tightness of the formwork structure.
The purpose of the reinforced belt is to help the building resist deforming loads
Height and thickness of armored belt
The dimensions of the reinforced belt are regulated by the design documentation:
- the height of the power contour is equal to its thickness in the manufacture of a reinforced belt with a square section. For a rectangular structure, the height exceeds the width by 1.5-1.6 times;
- The thickness of the armored belt usually corresponds to the width of the load-bearing walls of the building. The construction technology allows for a reduced thickness of the belt, at the level of 0.7-0.8 wall thickness.
The dimensions of the power circuit are determined at the development stage of the building project.
Supporting floor slabs in panel houses
Lecture. Floors and floors for multi-storey panel residential buildings
.In large-panel residential buildings, prefabricated reinforced concrete floors of the following types are used:
- from solid reinforced concrete slabs;
- made of solid slabs with edges along the contour (Fig.);
- two-layer ribbed slabs (slabs with false ceiling);
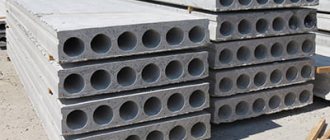
- from hollow-core floorings (fig.)
Multi-hollow floor panels: a - with round voids; b - produced on installations with concreting combines (1 - top layer; 2 - bottom layer; 3 - middle layer); c - with oval voids
In industrial housing construction, solid-section floor panels with a thickness of 140, 160 mm and hollow-core panels with a thickness of 220 mm are used.
Reinforced concrete solid floor slabs for large-panel buildings.
The panels are used in a cross-wall structural system of buildings with a pitch of transverse walls (multiple of 300 mm) of 2.4 - 4.2 m, the length of the slabs reaches 7.2 m (multiple of 600 mm), thickness is taken from 100 to 200 mm.
Reinforced concrete solid floor slabs for large-panel buildings are divided into types according to their thickness and the pattern of support on the wall panels:
- 100 mm thick, supported on 4 sides;
- 120 mm thick, supported on 2 or 4 sides;
- thickness 140, 160, 180, 200 mm, supported on 2, 3 or 4 sides.
In modern construction, slabs of heavy concrete with a thickness of 160 mm are most widespread.
The slabs are supported on the walls along the contour (4 sides) with a small pitch of the transverse walls, on three sides - with a small pitch of the transverse walls, or on two opposite sides with a large pitch of the transverse walls. Thus, the working reinforcement of the slabs is placed in two or three directions.
Slabs with a length of L≥ 4.8 m are designed to be supported on 2 sides and have prestressed reinforcement.
Coordination slab dimensions:
- length - 3.0 - 7.2 m (every 0.3);
- width – 1.2 – 6.6 m (every 0.3).
The length of the slab is taken to be:
- the smaller size of the slab in plan when supported on 4 sides,
- the size of the side of the slab that is not supported by supporting structures when supported on 2 or 3 sides.
According to operating conditions, one of the dimensions should not exceed 3.6 m.
- steel embedded parts, reinforcement outlets and other structural elements for connection with other building structures;
- channels for hidden electrical wiring, sockets for boxes and sockets, plastic boxes with anchors for fastening lamps;
- holes and openings for the passage of utilities.
The side faces on the sides of the slabs, intended for connection in the span (without resting on the walls), are made with closed or open recesses, the shape of which ensures the joint operation of the connected slabs for shear in the horizontal and vertical directions after grouting the seams between the slabs. The slabs may have recesses to form dowels on the sides that rest on the wall panels.
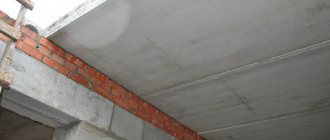
The depth of the platform for supporting the slabs on the external walls is 90 mm. The nominal size of the depth of the support area on the internal walls is half the thickness of the wall panel minus 10 mm. Supporting the slabs on the walls of the staircase - the entire thickness of the wall. The floor slabs are supported using cement-sand mortar. All steel connections between the floor slabs and the external wall panels are welded. There are at least two connections on each side of the floor slab.
The panels are made from heavy concrete of class B15 or higher, or from lightweight concrete with porous aggregates of class B12.5. The protective layer is at least 15 mm.
The 120 mm thick floor panel has two lifting loops on one long side, and on the other side there are embedded parts for welding to the lifting loops of the panel, which is laid side by side in the floor. At each beveled corner of the panel there are reinforcement outlets connected by welding to the outlets of adjacent floor panels. The lifting loop, placed parallel to the surface of the panel, protrudes 70 mm beyond the edge of the panel. Accordingly, the embedded part from the steel angle is recessed by 80 mm. The reinforcement outlet at the corner of the panel is curved at an angle of 90˚.
Solid panels have cutouts or recesses to form dowels. Channels with a diameter of 25 mm are installed in solid panels for hidden replaceable electrical wiring.
Solid floor panels with a thickness of 160 mm are used for residential buildings with small and large spacing of transverse walls. The panels are used in conjunction with thermal insulation floors. These panels in Kyiv have 6 lifting loops and 2 embedded parts on each side.
When is it necessary to strengthen building structures with a reinforced belt?
The reinforced belt is a critical element of residential buildings, which is formed at different heights from the zero level. The armored belt is designed to solve the following problems:
- forming a level base for the installation of interfloor panels;
- smoothing various types of loads created by roof beams;
- preventing cracking of load-bearing walls as a result of frame deformation;
- proportional distribution of loads acting on the end plane of the walls;
- reducing the likelihood of wall deformation under the influence of increased forces;
- reducing the influence of loads caused by gusts of wind;
- ensuring the stability of buildings built in sloping terrain;
- maintaining the integrity of the frames of buildings built in seismically active areas;
- increasing the safety margin of building structures that are affected by the reaction of frost heaving of the soil.
The absence of a reinforced belt erected at the upper level of load-bearing walls reduces the stability of the building.
Armopoyas is a concrete layer laid along the external walls of a house under construction along the entire perimeter
It is necessary to construct an armored belt in the following situations:
- when using cellular blocks for the construction of walls;
- during the construction of houses in seismically active zones;
- when constructing buildings on problem soils.
There may be situations where you can do without a reinforced concrete belt - this is the use of bricks for the construction of capital walls, as well as pouring the foundation below the freezing level of the soil. In other cases, a reinforced belt is a mandatory element of the building.
Reinforced belt under prefabricated and monolithic reinforced concrete floors
There is no need to doubt whether an armored belt is needed for floor slabs. The armored belt constructed under the floor panels performs a number of serious tasks:
- increases the load capacity of walls made of cellular blocks. After all, porous concrete is prone to deformation under increased load;
- proportionally distributes the loads from the interfloor ceiling and roof onto the walls. Local forces can cause cracks to form;
- protects the building frame from cracking. The belt smooths out temperature fluctuations and increases the durability of the structure.
A reinforced edging made of reinforced concrete connects the building frame and floor slabs into a common power contour.
The reinforced belt for floor slabs has a closed appearance
Types of reinforced concrete floor slabs
There are several types of floor slabs. The main ones are:
Ribbed ones were previously used to cover industrial buildings. Today, they can only be found in used condition after dismantling industrial buildings, which are then sold to private owners to cover spans in their homes.
Hollow core slabs are produced using formwork and formless technology. In formwork technology, a frame is made in the form of formwork, reinforcement is laid and concrete is poured. With formless technology, reinforcement is laid along the entire workshop and then an extruder runs along it, which forms a long slab of several tens of meters and subsequently a cutting machine forms slabs of the required length.
Regardless of whether the slab is hollow or ribbed, they both work according to a single-span beam scheme: a simply supported beam of length l, with a distributed load q acting on top.
The diagram of bending moments will be in the form of a parabolic curve with a maximum at the midpoint with a moment ql 2 /8. The transverse force will have a triangular shape and the maximum will be at the supports ql/2. And accordingly, the reinforcement of each slab is selected in accordance with these efforts.
Getting ready to make a reinforced belt for slabs - building materials and tools
When planning to independently manufacture an armored belt intended for installing floor panels, prepare the necessary building materials:
- plywood, planed boards or polystyrene sheets for formwork assembly;
- Portland cement, gravel and fine sand for making concrete mix;
- steel reinforcement and binding wire for assembling the load-bearing frame;
- polyethylene film for sealing the formwork structure;
- fasteners (screws, screws, nails) for formwork assembly.
The amount of materials is determined based on the design documentation.
To perform the work you will also need special equipment and tools:
- concrete mixer, which facilitates the preparation of large volumes of concrete mixture;
- grinder with a metal circle, used for cutting steel reinforcement;
- manual hook for tying reinforcement or semi-automatic device;
- building level and plumb line required when taking measurements.
When using reinforcing bars with an increased diameter, a bending device will also be required.
In order for the layers of concrete to dry evenly, it is necessary to fill the armored belt in one stage
Reinforced belt construction technology - main stages
The technological process of manufacturing an armored belt provides for the following sequence of actions:
- Preparation of blanks for assembling the formwork frame.
- Assembling formwork from plywood sheets, wooden panels or polystyrene sheets.
- Cutting reinforcing bars into pieces of appropriate sizes.
- Assembling a load-bearing frame by connecting the rods using annealed wire.
- Mixing components intended for preparing concrete mortar.
- Continuous filling of the formwork structure with mortar.
- Removing air inclusions using a deep or surface vibrator.
- Maintaining the moisture content of the concrete mass by periodic wetting.
- Dismantling the formwork after the concrete solution has hardened.
Having carefully studied the technology of constructing an armored belt, it is not difficult to carry out all the operations with your own hands.
What formwork materials can be used?
Traditionally, planed wood is used to make formwork, from which the panel structure is made. The height of the wooden edging is usually 0.3 m, and the width corresponds to the thickness of the walls. The boards are fastened with self-tapping screws. The side edge of the formwork board is fixed using threaded rods or strips. The horizontalness of the upper plane of the formwork should be controlled using a level. It is important to securely fasten the boards and seal all cracks.
Planed wood is used for formwork
In addition to boards, the following materials are used for the manufacture of formwork:
- moisture resistant plywood. Before pouring concrete, it is impregnated with waste oil to facilitate dismantling;
- extruded polystyrene. Polystyrene sheets are an integral element of thermally insulated formwork.
The choice of material for the manufacture of formwork structures is made individually depending on the requirements of the design documentation.
Everything with your own hands
Posted By: YanaShi 01/21/2020
The walls of the first floor of the house are standing, the armored belt is in place, all preparatory work has been completed. It's time to move on to the next stage of our construction - laying floor slabs between floors.
Finally, we are almost waiting for our floor slabs from, through whose fault we lost more than one summer month of work and a certain amount of money. But still, we are about to have them, which is good news... By the way, keep in mind that the size indicated in the order for floor slabs may not match in reality, as happened with us. The discrepancies could be 5-8 cm minus from those indicated by us when placing the order. At the same time, we were completely satisfied with the quality of the slabs. But the service, attitude towards the company’s clients and the ability to solve problems and admit mistakes are absolutely not. The price of floor slabs for our house was about 100 thousand rubles.
So let's get back to the point. Before we begin installing the floor slabs at home, we have to make markings on the reinforced belt where each slab will be located. We carried out this work before the crane arrived to simplify the installation of the slabs. The layout of the floor slabs of the house can be seen in the photo. We take it from our individual house project, which we have talked about many times before.
How should concrete be poured?
Preparation and pouring of concrete mortar is carried out in the following sequence:
- Prepare the concrete mixture in the required volume.
- Perform continuous concreting.
- Compact the concrete using rebar or a vibrator.
- Plan the surface of the concrete mass.
- Place plastic sheeting over the concrete.
- Periodically moisten the concrete surface.
After the concrete reaches operational hardness, disassemble the formwork. The thickness of the armored belt for the floor slabs is determined by the dimensions of the formwork structure.
Installation of PC panels
Laying the floor slabs begins from the corner closest to the faucet or from the wall with the ventilation duct. In any case, two installers are enough for slinging. Work is usually carried out from the vehicle that delivered the PC product to the site in order to reduce unloading time. To ensure design support, the length of the spans is pre-measured with a tape measure.
The TTK maps detail how to correctly lay slabs on the foundation with minimal time investment:
- slinging by mounting loops - with sling hooks or special lifting devices;
- supplying the product to the installation site - workers are at a safe distance, unfolding the panel into the design position using hooks in weight;
- laying - after leveling the mortar bed, longitudinal reinforcement is sunk into it in the middle of the supporting surface (3 cm from the edge for reinforced concrete, 6 cm for masonry), the floor slab is leveled on both sides, smoothly lowered into place, the slings remain taut.
If necessary, the reinforced concrete product is adjusted with crowbars during the first 10 minutes relative to the axis of the wall. Then the slings are loosened completely, the lower worker controls the horizontal in two directions.
Attention! Leveling with mortar is carried out by lifting the slab by all mounting loops, and not by one side. If you lift the PC by two loops, spontaneous movement is possible, squeezing out the solution from under the second edge.
When installing the first slab, the foundation cannot be used for workers to walk on, regardless of the width of the tape. It is necessary to use scaffolding, stepladders, and scaffolding. Then the prefabricated floor is mounted according to the layout diagram, the slabs are laid close to each other with their long sides. Concrete (less often polystyrene foam) plugs are usually placed in the voids at the ends after the entire prefabricated basement floor has been installed.