Lintels over building openings are traditionally prefabricated concrete blocks or elements manufactured directly on site. For a house made of aerated concrete, there are certain restrictions and requirements.
Construction from piece materials is a procedure carried out according to a single methodology, regardless of the type of building material used. The technology has been developed over centuries and is based on the principles of working with brick. When block materials appeared in the arsenal of builders, the basic techniques of the basic methodology were used. This fully justified itself and made it possible to speed up construction work, since the size of the blocks made it possible to increase the height of the building much faster. However, it was necessary to take into account the characteristics of the materials used and make adjustments to technological processes taking into account the capabilities of the blocks used. One of the most demanding materials turned out to be aerated concrete, a popular but very capricious material. For example, the design of the upper part of wall openings is carried out in several ways, and the most common of them are lintels from a corner in a wall made of aerated concrete. This is a very simple, non-controversial approach to solving the issue. Let's take a closer look at it.
What are jumpers for?
Installing lintels over window or door openings is a common construction procedure used when working with piece materials. The width of the opening does not allow you to simply block it with ordinary blocks, and you have to use additional construction parts. Initially, the openings were decorated with arched elements, where individual blocks were wedged and created a stable load-bearing dome. However, in modern construction conditions this technique is considered too labor-intensive and is quite rare. In addition, under the arched opening you need windows or doors of the appropriate shape, which further complicates the work. Therefore, to speed up and simplify construction, methods have been developed for designing openings using direct load-bearing lintels.
Most often, these are ready-made building blocks of a standard size, which are laid on a certain row of masonry above the opening. The lintel not only provides the strength of the walls and supports the upper rows of masonry, but also becomes an element of the opening - it forms its upper part. To some extent, it also becomes an element of the facade, since the lintels are clearly visible on the unfinished brickwork.
Preparation of the solution.
Plastering window slopes with your own hands will not do without a mortar with a binder.
As such, clay, cement or building gypsum plus fillers (usually simple sand) are used. What is the composition of the solution? It can be simple or complex depending on the proportions of cement, clay, lime and gypsum used. Do-it-yourself plastering of window slopes is carried out both using a mixture made with your own hands, and with a mixture purchased at a hardware store. Buying a high-quality mixture is preferable; you don’t have to worry about maintaining the proportions that are important when mixing the composition.
Plastering window slopes with your own hands will be successful with the correct proportion of the binder and filler. Without this, the solution will either be too “greasy” and will quickly crack when drying, or it will be “skinny” and fragile.
We offer several criteria by which you can navigate the degree of fat content of the solution:
- a high-quality mixture clings a little to the spatula;
- oily – clings too much;
- skinny - does not cling to the instrument at all.
Jumper requirements
The parameters of the jumpers are a matter of the reliability of the entire building and the safety of people. Therefore, the quality and technical characteristics of these elements are strictly regulated by construction standards - GOST, SNiP or SP. Primary requirements:
- strength, high load-bearing capacity. The lintel is a supporting structure for the masonry sections located above it, therefore, it must be able to withstand heavy loads;
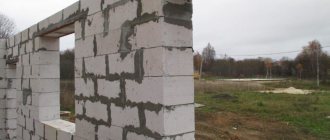
- correct size. The lintel in the aerated concrete masonry should not protrude from the plane of the wall or create a ledge inward. In addition, it is important to maintain the depth of support - the width of the lintels should be 30 cm greater than the width of the opening on each side;
- the quality and parameters of the elements should not change during the entire service life of the building.
The material for walls and lintels can be uniform or radically different. The main condition is to ensure compliance with technical requirements and building regulations. Many novice builders believe that the lintel is affected only by a small part of the masonry located between it and the ceiling. This is true, but only partly - the load from the weight of all the upper sections of the building is somehow transferred to all building parts located in the lower tiers. In addition, we must not forget that lintels are installed on load-bearing (external) walls, which automatically increases the requirements for their strength. A frivolous attitude to the parameters of the lintel can cause deformations or even collapse of load-bearing walls.
Advantages of using steel angle
To install lintels in structures with high loads or to strengthen individual structures, angle bars are used. There are several reasons for this:
- quick and easy installation;
- almost immediately after installation is completed, you can continue laying bricks or blocks;
- a corner lintel is suitable for aerated concrete, as it is strong and durable;
- The corner provides adequate support to the brick or block masonry of a door or window opening until the cement mortar hardens.
Features of aerated concrete
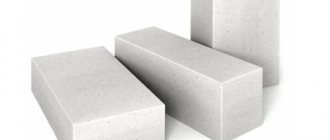
Aerated concrete is a fashionable and in-demand building material, used primarily in private housing construction. It belongs to the family of cellular concrete, porous materials with specific parameters. In this group, aerated concrete stands out for its most balanced set of qualities, which make it a leader among all alternative types. The reason for this success was the composition - the components for making aerated concrete are the same as for ordinary, traditional material. The basic components used are Portland cement and sand, to which lime and aluminum powder (gassing agent) are added. When water is added, a chemical reaction begins (aluminum powder and lime in the presence of water), during which active gas evolution is observed. The structure of the material becomes porous, replete with small (2-4 mm) bubbles of carbon dioxide. This is the fundamental difference between aerated concrete and other cellular concrete, which is a mixture of ordinary concrete with porous granules from one or another additional component.
The pores of aerated concrete make it a light and warm material, optimal for building a private house. However, it is not suitable for the construction of multi-storey buildings or industrial structures. This was one of the reasons for the rejection of aerated concrete when it appeared on the market. Builders are accustomed to working with durable and reliable materials and treated aerated concrete as ordinary rigid insulation. Only in the 90s of the last century, when active construction of private houses and cottages began, aerated concrete again became of interest to developers. Its working qualities turned out to be the most balanced and allow for considerable savings during construction and further operation.
Advantages and disadvantages of aerated concrete
The advantages of aerated concrete are:
- light weight, making it possible to reduce the power and size of the foundation and reduce construction costs;
- laying aerated blocks can be done with your own hands, without the participation of lifting equipment;
- low thermal conductivity, providing savings on heating the house;
- smooth and precise block geometry with minimal tolerances, ensuring fine-seam masonry (joint thickness 2-5 mm),
These advantages (except for the geometry of the blocks) are also characteristic of other cellular concrete. However, aerated concrete is superior to them in terms of a combination of parameters. In addition, it is cheaper than other materials, which becomes an important selection criterion for developers.
However, aerated concrete has many disadvantages:
- low strength and load-bearing capacity. This fundamentally distinguishes the material from traditional concrete, which can withstand enormous loads. The pores of aerated concrete collapse under pressure, and the material sags. This is unacceptable when carrying out serious and responsible work, therefore, a restriction on the height of buildings has been introduced for aerated concrete (up to 3 floors);
- hygroscopicity. This quality is common to all types of concrete. However, the porous structure here becomes the main risk factor - moisture is absorbed into the array and begins to accumulate in the pores. When the temperature drops, it freezes and begins to expand, destroying aerated concrete from the inside like a slow explosion;
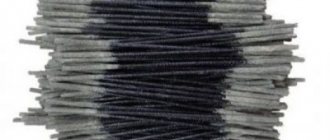
- inability to resist multidirectional loads (bending and stretching). This is a common disadvantage of concrete, requiring reinforcement of building structures.
Often, the advantages of a material simultaneously become its disadvantages. For example, the low thermal conductivity of aerated concrete, which provides a comfortable microclimate and savings on heating, often becomes the cause of harmful phenomena - the appearance of cold bridges. These are areas whose temperature is lower than the rest of the wall. Cold bridges can be seams that are too thick (hence the importance of precision and care during installation), masonry elements made of ordinary concrete or metal, and other parts with high thermal conductivity. The appearance of such an area is an extremely undesirable event, since condensation begins to settle on it. Aerated concrete gets wet, and the consequences of this process can be very sad.
How to make and strengthen openings in load-bearing walls
When remodeling, it may be necessary to make an opening in a load-bearing wall. Such actions in the public sector can only be carried out in agreement with the housing stock, while private developers can act at their own peril and risk.
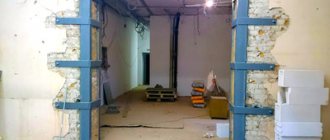
According to the project, the boundaries of the future opening are marked on both sides of the load-bearing wall. To ensure complete coincidence, after marking, four strictly perpendicular holes are drilled on one side in the corners of the opening and connected with lines.
Along the upper border of the opening, a horizontal trim is made about 10 mm wide and 20 cm longer than the opening in both directions. A piece of angle steel is placed into the resulting groove on each side. Its cross-section can be determined by bending calculations, but more often the embedded parts are made with great excess strength. In general, a steel angle 100x100x8 mm will be more than enough.
Lintels for aerated concrete walls
Having understood the properties of aerated concrete, you can determine the optimal type of lintels for it. The following types can be used:
- standard aerated concrete lintels with reinforcement inside;
- filling lintels in place using U-blocks;
- casting concrete lintels on site using removable formwork;
- use of standard reinforced concrete lintels;
- the use of conventional gas blocks laid on angle steel supports.
All lintels for aerated concrete blocks have their own advantages and disadvantages. Some of them are rarely used (for example, casting a reinforced concrete lintel directly on site, with the production of reinforcement cage and formwork). The reason for this is unnecessary labor costs and loss of time.
The most preferred option is a standard aerated concrete part that matches the wall material in all respects. It can be laid with the same glue, providing a thin seam, as when laying gas blocks. In addition, aerated concrete lintels are manufactured at enterprises in serious production conditions. They are unlikely to be handled by various garage-level companies, which allows us to count on compliance with all technical requirements and standards. However, the cost of such jumpers is quite high. In addition, they are not always on sale.
The option of filling jumpers from U-blocks is often used. Armored belts under the ceilings are made in a similar way, ensuring the strength of the supporting row and uniform distribution of the load throughout the entire volume of the masonry. The only drawback of this option is the length of the procedure - you need to install a support board to temporarily support the U-blocks, lay and align them along their axes, make a reinforcement frame, pour the lintel and hold it for the required time (until it gains structural strength). For many builders (especially for workers in informal teams), such a loss of time seems undesirable. Therefore, they prefer to use other methods for assembling jumpers.
Support depth and maximum opening length
Depending on the design features, the installation technology, the depth of support of the lintels on aerated concrete blocks, and the basic operating rules may vary.
| Jumper type | Maximum opening length | Support on masonry | Design features |
| Reinforced aerated concrete load-bearing structure | 174 cm | 25 cm | Does not require additional insulation |
| Load-bearing structure made of reinforced concrete using permanent formwork in the form of U-shaped blocks | 300 cm | 25 cm | Does not require additional insulation |
| Monolithic reinforced concrete load-bearing structure | According to beam length | 35 cm | Needs additional insulation |
| Execution by reinforcement | 120 cm | Inserting reinforcement behind the opening by 0.5 m | It is advisable to carry out ordinary reinforcement over openings |
| Monolithic non-load-bearing reinforced concrete structure | 200 cm | 35 cm | Needs additional insulation |
| Non-load-bearing design based on metal corners | 120 cm | 20 cm | Needs to be buried in the masonry |
Metal jumper
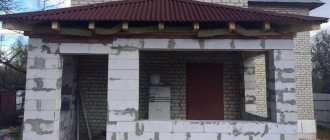
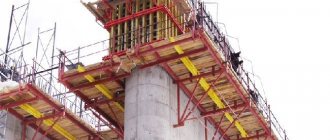
One of the simplest and most popular ways to make a lintel is to use a support from a steel angle. This option is borrowed from brickwork technology, where metal lintels are quite common. They are used for small buildings or service structures where installing standard concrete blocks is impractical.
Metal lintels belong to the group of prefabricated parts. They are not installed ready-made, but are done in stages. At the same time, the assembly process does not take as much time as when using U-blocks, which makes this option more popular. Installation takes a little more time than installing a finished jumper. Considering that the length of standard elements is not always suitable for installation in a given location, and prefabricated elements are made individually for each opening, the advantages of metal lintels are quite convincing. In addition, you can continue work immediately after installing the jumper, which becomes a decisive factor when choosing the optimal option.
However, there are also disadvantages. The first is metal corrosion. The corner (or reinforcing bars) must be protected from contact with moisture using polymer coatings. The second drawback is the high thermal conductivity of the metal, which does not combine well with the low performance of aerated concrete. A cold bridge appears above the opening, which creates the danger of the gas blocks under the ceiling getting wet. To protect against this, use ventilation to remove moist air from the opening.
How to use a corner to create a protective pad
Let's consider three options for using a corner as a protective element for wall corners.
The first is when the walls in the room are already plastered, leveled and everything is ready for repair.
- If the walls are prepared for finishing work, then you just need to secure the corners with ordinary putty, as described above. Without fixing the corner too much. We only need it to maintain an even appearance and begin gluing or painting the walls.
The second, for example, when the repair has already been done, but the corner is damaged and needs to be strengthened. Or, if there is no repair and it is not planned, but the corners need to be tightened, etc.
- Here it is worth taking precise measurements, initially plastering the wall near the corner and the corner itself, and then using gypsum plaster and cement to make a corner for the lighthouse.
The third option is when you need to secure and align the corners of an arch, box, or partition.
- In this case, ordinary plaster is sufficient, but sometimes, in cases where it is necessary, a mesh is used to strengthen the corners.
Such actions are necessary to align and strengthen the corners.
For thin items or hard-to-reach corners, you can use construction adhesive.
There are also self-adhesive corners on sale, but they are used only for such corners as, for example, an arch made of durable plasterboard, boxes in the wall, etc.
To join corners, it is necessary to select identical corners and suitable sizes.
Plastic corners are perfect for residential premises, where necessary. But, for example, for office, shop and other non-residential premises, where there is a lot of traffic and activity, it is better to use aluminum corners.
Slopes using a corner
Making slopes yourself is very difficult if you are not a professional craftsman, but it is possible. Keep in mind that attention always falls on the slopes, and they must be strong, perfectly level, and smooth. The future condition of the window also depends on how the slopes are made. If putty is applied incorrectly, the window may begin to fog up, cracks may appear, and there will be a draft from the window.
Initially, you need to thoroughly putty the entire window and prepare it for working with the corners. It is necessary to constantly measure the slopes and measure them with a construction ruler to ensure that they do not have unevenness. The same applies to door slopes. Then proceed to the corners, here the lighthouse technology is used. You need to securely fasten the corners, and at the same time very evenly. Because the inside will be without finishing materials. In order for the angle to be very even, you need to slowly apply the mixture, stroke by stroke, 10 cm at a time and immediately level it with a spatula.
Advice. Prepare two spatulas, new ones, so that there are no stuck or dried mixtures, paint, etc. on them. With their help it will be easier to make a perfectly even angle. Having leveled, immediately apply two spatulas on both sides, pressing them tightly, and hold for about 20-30 seconds. Actions for every 10 cm should not take more than 1.5 minutes, otherwise the mixture will dry out and you will not have time to trim the lines between strokes!
Or buy a spatula like this.
Having completed everything, wait until the corner dries. Then check with a clean hand by lightly rubbing it and then using a ruler. If small unevenness or roughness is found, then do not panic, you will just have to work a little more. Take the grout (sandpaper) and, without being too zealous, slowly, in a circular motion, like a mechanical device, rub out the defects from top to bottom. And so on both sides, then measure again. Then you can walk a little with a roller dipped in plaster. As a result, the slope is painted inside with a special paint, preferably with a roller.
Methods of creating products
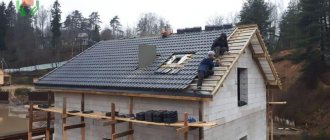
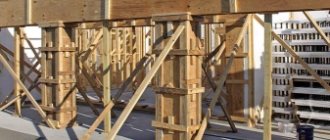
Window lintels can be either our own production or purchased ready-made factory designs. What distinguishes them is the way they are mounted on the wall: the factory model will have to be installed using a crane, because it is simply impossible to lift a heavy concrete element without its participation. You can fill the structure on site: in this case, you will not need to lift the window lintels yourself. First, the formwork is created, then cement is poured into it. When it dries, it will be enough to simply remove the boards, the heavy element will take its place.
Formwork at the site of the future lintel
To make a structure yourself, you will need to know what proportions it should have. Usually the thickness of the part is at least 15 cm. To create the formwork, use a board whose thickness does not exceed 25 mm; 20 mm is also suitable if a thicker structure is not available. To make it easy to assemble the formwork, it is recommended to fasten it with self-tapping screws. After this, the boards that have become unnecessary can be easily removed.
Measurements
What it is?
Experts call a lintel a structural element involved in covering openings, which carries the bulk of the masonry and distributes the loads of materials (bricks, cement mortar, floors).
Instead, you can independently make monolithic reinforced lintels that correspond to the dimensions of the opening and the distributed load.
The difference between factory-made and self-made is that a finished product can cost more than a home-made one and has a quality mark. Regardless of the manufacturing method, it is customary to distinguish between the following types of jumpers:
- Bearers. They have a beam type, with reinforcement, which is used to support floor slabs.
- Non-load-bearing. Needed to distribute the load of the masonry.
- Runs. Available in very large sizes. Used for grandiose buildings.
- Pencils. Thin structures for doorways, with a partition thickness of 120 mm.
- Rigel. Made with a shelf, which is needed to support the structure located above.
The most common are the first two types of structures (load-bearing and non-load-bearing), carried out using technology, in accordance with established regulatory rules. For example, they are divided into block (PB) and slab (PP). Lintels help keep the laid bricks from moving and the wall from collapsing.
Consequences of errors
To avoid problems in the form of consequences during the construction process, it is better to entrust the selection of lintels to a professional construction engineer.
Based on an examination of the load-bearing capacity of the wall, the depth of support, and a number of mandatory characteristics, he will carry out the necessary calculations and determine exactly what material, shape and size the lintel will be suitable for in this particular case (length, width, thickness).
The consequences of errors are destruction, cracks, and displacement of bricks. To prevent them from arising, you must observe the following nuances:
- lintels must comply with the design, taking into account their load-bearing capacity;
- it is not advisable to use materials or their remains that are at hand to create structures in the form of lintels;
- it is necessary to reinforce the opening or recess in the wall;
- It is necessary to make cement mortar, taking into account the class of concrete;
- on the surface on which the structure is laid there should be no chips, cracks, or exposed reinforcement;
- it is necessary to take into account the fulcrum (norm 15-25 cm);
- the length of support should be evenly distributed on both sides of the opening, indicating the midpoint (central node);
- products that are involved in the arrangement of the lintel must be marked and classed.
Work on arranging openings must be carried out with the preparation of a Hidden Work Report. It must be accompanied by a quality certificate for each product used. It is necessary to properly prepare the walls for installation, since the health, safety and lives of the people who will live in the house depend on their arrangement.