The ceiling of a private house is a horizontal building element that divides the building in height. It is at the same time the floor of the upper floor and takes on its load along with the furnishings and people. Floors provide the structure with the necessary rigidity, so their construction is very demanding. Structures separating residential floors from attics and basements also perform an energy-saving function. What is the best flooring for a private house made of foam blocks? How to install it yourself? Let's sort out the questions together.
Advantages of wooden floors
Installation of wooden building elements does not require the use of special construction equipment and hired labor.
This compares favorably with laying heavy concrete slabs. Moreover, such an interfloor ceiling in a wooden house with a second floor or attic is the only correct solution. An important quality parameter for the wooden elements of a building is the absence of cold bridges. If sheet materials (foam plastic, mineral wool boards) are used for insulation, the sheets are cut strictly to the size of the openings between the beams. If the construction of a wooden floor between floors involves the use of bulk or fibrous materials, it is necessary to ensure that all cracks are filled.
It is extremely important to ensure high-quality vapor permeability. Therefore, when laying polyethylene on the insulation, and not a special hydro-vapour-permeable membrane, gaps are left
The installation of the wooden floor is completed by laying the finished floor and finishing work.
More articles on this topic:
Correct design of the walls of a frame house
How to decorate walls with wood yourself
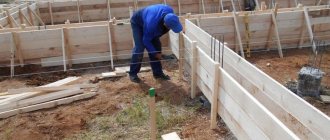
Formation and installation of formwork
Do-it-yourself interfloor ceilings begin with the formation of formwork. It is installed between floors and is designed to securely secure cross beams. If you have old wooden boards, it would be appropriate to use them. Having initially formed the covering from the boards, it is necessary to install a support. Stable logs are often used. A layer of waterproof plywood is laid on top of the formed structure. Next, the quality of the structure is checked for sagging. When eliminating defects and bends, they must be corrected immediately. In the future, the structure must be stable, able to withstand the additional load of furniture, distributing the load.
The interfloor covering device is divided into several main types:
- Reinforced concrete;
- Monolithic;
- Prefabricated;
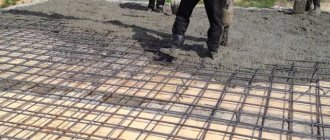
Do-it-yourself reinforced concrete interfloor slabs are popular in buildings made of stone and brick. A special feature of the design is the laying of hollow panels. When seams are formed, they are completely filled with mortar. The disadvantage of forming reinforced concrete type floors is the massive weight and the need to use lifting equipment. In addition, the slabs have a standard size. If the perimeter of the house differs from the standard design, it will be difficult to correctly install the support of each slab.
a wooden interfloor ceiling yourself if you want to save money and time on construction. At the same time, it is important to correctly determine the type of ceiling and the ability to carry out installation without the involvement of additional equipment, renting forklifts and a team of specialists.
Wooden interfloor covering of the first floor
The wooden floor between the first and second floors must meet certain established requirements:
The floor structure must be very strong and withstand the expected loads from above; it is recommended to calculate the magnitude of the loads with a margin. Wooden floor beams must be rigid for arranging the floor on the second floor and the ceiling on the first. The ceiling must have the same service life as the entire wooden house as a whole
Reliable covering during the construction phase will ensure safety and prevent repair work. It is very important to equip the floor with additional heat and sound insulation. Scheme of a wooden floor with separated beams
Wooden floor plan with split beams.
Wooden beams as a floor perform all the main functions, and they differ from reinforced concrete slabs in that they are easier to install. Human power is sufficient; there is no need to use heavy equipment. Using beams, you can significantly reduce the overall load on the foundation. The advantages of wooden floors include their low price. And with proper processing and installation, such a structure will last for decades.
The disadvantages of wood include such a harmful process as rotting. In addition, the disadvantage of wood products is their high flammability in a fire.
In order to minimize the likelihood of such processes, it is very important to prepare the beams immediately before installation work. It is best to use coniferous wood for covering
In order to avoid deflection of the beam, it is not recommended to make a span of more than 5 m. If the span is larger, it is necessary to make additional supports in the form of columns or crossbars.
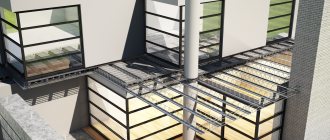
Monolithic ceiling on corrugated sheets: what to look for
The difference between creating a ceiling using corrugated sheets and concrete is the fact that in the first case, special formwork is not required, and as a result they have a finished ceiling. In addition, the technology using corrugated sheets does not require finishing or modification.
The profiled configuration of the material creates the necessary strength and rigidity of the floor, thereby reducing the need for reinforcement and concrete. This is possible due to the fact that the solution fills only the voids of the ribs, and does not occupy the entire surface of the sheet.
To create such an overlap, it is important to use exclusively sheets intended for roofing. The essence of the technology is to use corrugated sheeting as formwork, which is not dismantled after pouring concrete. The resulting structure has a special structure consisting of metal columns, beams, and joists as load-bearing supports. As a result, the load is redistributed from the floor to the supports, while the walls are not loaded. This design solution makes it possible to construct lightweight walls.
Overlapping with corrugated sheets
In addition, the organization of the support system allows you to use a glass-type support instead of an expensive strip foundation. This will significantly reduce construction costs.
Rolling flooring recommendations
In order to make the ceiling of the first floor, it is necessary to roll up. This stage of work can be carried out using a wide variety of materials.
Skating plan.
In the most common version, skull blocks are nailed along the side of the beam. Such bars should have a cross-section of 40*40 or 50*50 mm. They should not protrude below the main beam. It is on them that smooth boards will subsequently be attached, the thickness of which should be in the range of 10-25 mm. In order to line the ceiling, you can use sheets of plywood. Using sheet material, you can get a perfectly flat ceiling. The minimum thickness of plywood in this case should be at least 8 mm
It is very important to ensure that the edges of the sheets lie exactly in the middle of the beam
Instead of using cranial bars, you can make special grooves in the beams. In order to use this method, the cross-section of the beam must be thought out in advance.
As an option for flooring, the lower part of the floor elements can remain open; for this, the cranial elements are nailed not flush, but slightly higher. Thus, the flooring is carried out between the beams.
After the rolling is done, you can begin laying the floor of the second floor. If instead of the second floor there is an attic, then a subfloor is sufficient. If there is a room on the second floor, then the floor must be made of high-quality material. Wooden boards will be laid directly on the joists.
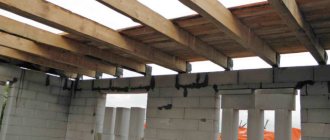
Technology for laying beams on wooden walls: the method of inserting into the upper crown
If we talk about buildings with load-bearing walls made of wood, in this case a beam is inserted between the two parts of the upper tier of the frame crown. To install the structure, it is necessary to first treat the material with an antiseptic and provide the beams themselves with sufficient time to dry. If the beam has a rectangular cross-section, the edge of the wider side should be placed along the vertical axis, thus increasing the rigidity of the structure. The end of the beam is cut at an angle of 60°. In addition, the end is coated with special solutions (bitumen mastic) and placed between layers of roofing material. Beams should be laid out from the walls to the center of the span. The location of the outer beams is adjusted using a level; the perpendicularity of the surfaces is controlled using a long bar, which rests with an edge on the surface. If the unevenness is higher than the permissible values, adjustments can be made by laying boards of the required thickness. The latter must be lubricated with bitumen mastic and placed in the nest. The beams lying between them can already be aligned according to the model of the outer beams.
Advantages and disadvantages of wooden floors between floors
An interfloor wooden floor made of beams is installed on the condition that the span width is no more than 8 m. Between floors there are also load-bearing structures, and these are beams for which beams with a section of 150x100 mm or 150x150 mm are used. To determine the distance between the beams, you can do the calculation yourself. As a rule, this parameter varies 0.6-1 m.
Among the advantages of wooden floors between floors, it is worth noting long service life and reliability
In any case, a water vapor barrier film is required, which prevents the penetration and formation of excess moisture.
The surface of the floor, both the attic and the basement, must be treated with special antiseptics for wood. Wooden floors are the lightest and therefore are installed in residential buildings, especially used for attics.
- Environmentally friendly;
- Has good thermal insulation;
- It looks very aesthetically pleasing.
There are disadvantages to wood canvas and they include the tendency to form microorganisms, fungi and mold, rot and destruction, and deformation of the canvas if they are initially chosen of low quality.
Waterproofing and vapor barrier
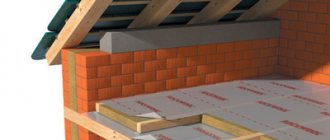
The next level after the subfloor is a waterproofing film material. The layers of waterproofing film overlap, the joints between the layers are secured with tape. Insulation material is placed on the vapor barrier film. The insulation can be presented both in the form of roll material and in the form of individual slabs. The thickness of the insulation is calculated with the expectation that the ceiling at the top mark should not exceed the level of the beams. Sometimes the design solution of the ceiling allows the use of other materials as insulation, taking into account fire resistance indicators: expanded clay, ecowool, expanded polystyrene.
In what cases is it recommended to lay cold floors on the second floor?
To answer this question convincingly, we need to recall a few elementary rules of heating engineering.
- Heated air rises and accumulates under the ceiling. This is the warmest zone in the room, the air temperature here is about 5–8°C higher than at the level of 1.5 m from the floor and 9–11°C higher than on the floor. From the point of view of heating engineering, space heating by heating the floor is considered the most effective; to ensure the most comfortable temperature at a height of 1.5 m, a minimum amount of thermal energy is required. This is an axiom; there is no need to prove its correctness.
- Warm air from the ceiling of the room on the first floor automatically heats the floor of the second floor. The heat is not lost anywhere, but warms up additional rooms. Of course, if they are residential and not cold attic spaces. The question arises: why build insulated structures and, at your own expense, worsen the comfort of living, lose additional funds to heat the second floor, and remove heat from the first floor using ventilation?
Most professional builders strongly do not recommend installing insulated floors on the second floor if its premises are used as residential premises. You need to know that in addition to unnecessary losses of money and thermal energy, another problem may arise. If the technology is violated, the heat-insulating material increases its humidity, and all wooden elements are used in very difficult conditions. Heat plus moisture is an excellent environment for the development of fungi and rot on load-bearing wooden elements, and no modern impregnation can protect them for a long time. Over time, you have to deal with very unpleasant premature repairs. We hope that this information will help you make the best decisions in each specific case.
Wooden floor insulation scheme
Possible difficulties and errors in the process
The most significant mistakes are made by developers if they carry out work on building a house and erecting partitions without a design . After all, it is in the process of developing this document that the structures are linked together so that they work in the overall scheme of the house for many decades.
Therefore, in order to avoid mistakes during the construction of a house, the developer must carry out all design decisions exactly.
When producing floors, mistakes are most often made when performing the following mandatory procedures:
Special openings in the wall or armored belts for laying load-bearing beams were not made.- The logs were not waterproofed before installation in the walls.
- A layer of steam and water protection has not been laid.
- Violation of the technology for laying membranes, an overlap of 100 mm was not made and the seams were not sealed with construction tape.
- The heat insulator is incorrectly selected according to the brand and thickness of more than 100 mm. It is not allowed to install dense foam plastic in the interfloor ceiling due to its complete vapor permeability. Since wood breathes, such a layer will lead to its rotting.
- For interfloor ceilings, insulation without acoustic characteristics was chosen.
- The flooring and ceiling were made without 5x5 cm cranial bars.
Technology for installing wooden floors
To complete the work you will need the following tools:
- axe;
- a circular saw;
- hacksaw;
- hammer;
- screwdriver;
- screws and nails;
- plane;
- waterproofing and thermal insulation materials;
- building level at least 80 cm long.
- When erecting walls, special openings or recesses for beams are formed in their upper part. Before starting work, these nests are cleaned of dust and debris and waterproofing material is laid in them. Roofing felt is most often used. If the walls are made of brick, the nests can be treated with bitumen or mastics based on it.
- The ends of the beams are coated with bitumen.
- Place the supports in pre-prepared openings.
If the structure is made of wood, the beams are cut into the upper crown. There is a way to attach support elements to the wall, like a dovetail. It is used in houses built from logs or timber. This connection method is simple and reliable. Metal brackets are required to secure the beams.
Insulation of interfloor solid wood floors
Wooden floors in the house are installed according to the following rules:
- the timber laid in the nest must be at least 4 cm away from the walls of the recess;
- the beams should be located at a distance of 40-50 cm from the chimney;
- every 3-4 beams are attached to the wall with anchors;
- The space between the timber and the walls of the nest is filled with tow or glass wool.
The installation scheme for interfloor ceilings provides for heat and sound insulation. Therefore, the gaps remaining after laying the beams are filled with polyurethane foam.
Flooring technology
Depending on the location of the observer, the wooden floors between floors may represent either the floor or the ceiling of the room. There are special requirements for floor construction. Before proceeding with the installation of the flooring, each beam is hemmed on both sides with cranial bars with a section of 40x40 cm or 50x50 cm.
They will serve as support for the subfloor. The same can be done with the installation of the flooring that forms the ceiling. But the installation technology of this structural element does not have special requirements for performing such work.
Flooring device on wooden beams
The installation of floors on wooden beams begins by attaching unplaned boards with a thickness of 15 mm or more to the bottom of the supports. They will subsequently serve as a rough ceiling. A waterproofing material is laid on top of the flooring obtained during the filing process: roofing material, a special membrane or dense polyethylene. There is insulation on it.
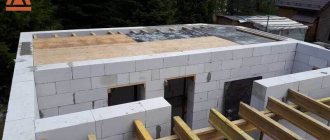
The sheathing of the upper part of the floor is mounted on wooden beams. The boards are secured with nails or self-tapping screws. Knowing the sequence of work, it’s easy to do it yourself. The roof of the house must be a sealed, durable, high-quality insulated structure. This element of the building experiences the greatest weight loads, so only high-quality materials are chosen for its construction.
Prefabricated monolithic type floors and their differences
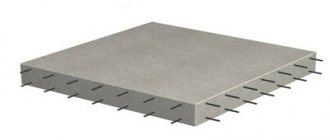
The prefabricated monolithic type of flooring is the most relevant and in demand in the cottage-type construction market. The combination of support beams on one side and hollow blocks on the other has many advantages. The structure of the interfloor floor beams must be evenly filled with concrete and the interfloor structure is ready. The weight of a typical design is quite low and amounts to no more than 19 kg per square meter. In terms of time, it is somewhat more difficult to produce a prefabricated monolithic floor, but there is no need to rent lifting equipment and all stages can be carried out independently. The entire structure is reinforced with wire no more than 6 mm in diameter.
Technical requirements for floors
Interfloor structures consist of the following elements:
- beams;
- bars;
- layer of board;
- heat and sound insulation layer;
- waterproofing film;
- finishing board;
- ventilation slot;
- baseboards.
The following requirements are recommended for floor structures:
- If the floors between which the floors are installed have a temperature difference of more than 10 degrees, then it is necessary to lay thermal insulation materials. Most often this happens between residential floors and the basement or attic. In such rooms it is impossible to do without a heat insulator.
- Regardless of the type of wood, the beams of the structure must have high strength. They need to withstand the load of the structure, the interior of the room and people. But in addition to this weight, there must be a certain reserve. It should be remembered that the minimum load on such floors is 210 kg/sq.m. m. For attics, the figure starts from 100 kg.
- The deflection value is applied to wooden structures. It should be less than 4 mm per meter. The indicator is calculated as follows: the length of the board is divided by 250 and the maximum deflection value is obtained. For the surface on which it is planned to lay tiles, the figure is divided not by 250, but by 400. For attics, the figure is divided by 200.
- The sound limit for materials should not exceed 50 decibels. This is worth considering when choosing sound insulation. Thermal insulators can significantly reduce noise. Sounds should not pass through ceilings and communications.
- When calculating floor materials, it is also important to take into account the length of wooden beams. It should not be more than 5 meters. For attics - 6. However, it is rare to find wooden structures more than 6 meters. If the area of the rooms exceeds 6 meters, supports are installed under the beams.
Note! Wood belongs to the class of highly flammable materials. In addition, it is susceptible to putrefaction, fungi and various bacteria. Therefore, materials for floors must be processed before installation. The minimum set of impregnations consists of fire retardants and antiseptics.
Membrane sound insulation of floors in a wooden house along the ceiling
The technology of membrane soundproofing of house floors appeared recently, but has already managed to gain popularity due to its quality, efficiency and reliability, which is good news. The technique was developed not by specialists, but by ordinary people who tried to think through all the details and test it in practice.
Sound insulation of beam floors is created using mineral or basalt wool, which combines not only strength, but also lightness, making all the work not difficult to complete. Acoustic material is available in a wide range, so you can always choose the best quality and most practical option.
@Derevyanniidom
The advantage of acoustic wool is that it has a high level of sound absorption, so even the largest sound waves will be muffled without inconvenience to residents.
Installation of a membrane sound absorber
The “pie” of sound insulation requires careful attention not only to the choice of raw materials, but also to compliance with technological features, since this is the only way to count on practicality and ease of subsequent use. It is important to consider the following points:
- Initially, a frame is created with relatively small cells, where sound insulation is installed. It is important to mount it not only on top of the beams, but also between them.
- And after this, plasterboard is installed, which not only acts as a membrane, but also creates space for the subsequent decoration of the ceiling covering.
Methods for attaching beams
To prevent the floor from being unsteady, the beams are not laid pointwise, but in grooves approximately 70 mm deep, cut into the walls.
Option for fastening floor beams
The number of load-bearing beams must be sufficient to ensure the strength of the entire interfloor structure. You can put insulating material between the recess and the end, which will prevent squeaking.
The upper floor beams can be attached to the wall using the so-called dovetail method. To do this, at their ends you need to make a double-sided diagonal hem, which is inserted into a socket of the same shape. True, this reduces the cross-section of the logs, and longitudinal cracks may also appear in the cutting area. The rigidity of the support decreases, the service life of the ceiling is reduced, and, therefore, repairs are approaching.
Beam load calculation table
When using planks for flooring, care should be taken to ensure that they do not twist when exposed to various loads.
To ensure this, they should be installed at a distance of no more than 60 cm from each other, and they should also be covered with rigid sheet or slab material, the thickness of which will be more than 1.2 cm.
Here you can use plywood, chipboards, DSP or OSB. The role of the cladding is to provide a load-bearing frame and, consequently, to increase the load-bearing capacity of wooden floors. At the same time, do not forget that the location of the short side of the slabs should be perpendicular in comparison with the installed floor beams, and the location of the connections parallel to the beams should be staggered.
To ensure convenient fastening of the sheathing material to the beams, the following is pre-stuffed:
- On the bottom side there is a sheathing;
- From the top there are logs.
Under the sheathing, choose wooden boards with a cross-section of at least 2 by 9 cm; they are fixed at an angle of 90 degrees to the beams, and the distance between them should be about 60 cm. With the sheathing already ready, you can use plasterboard sheets as a backing, the thickness of which is approximately 1.2 cm. the location of all edges in slabs or sheets must be on top of the supporting elements in the sheathing or frame.
When installing, use self-tapping screws that are 4 cm longer than the thickness of the drywall or other board material you use. The fastening step should be equal to 20 cm. The sheathing may not be laid on top of the installed joists.
Alternatively, instead of logs, you can install boards with ready-made vertical struts, the cross-section of which is 10 by 4 cm. With their help, the rigidity of the floors increases depending on the height of the boards you use.
The installation of spacers is carried out in the spans between the beams, and the distance between the spacers should not exceed 210 cm in relation to the supports of the beams and the nearest vertical connections. When fastening, use nails or metal brackets. In the case of using timber as beams, strengthening the floor structure is not necessary.
Well, that’s all, the main provisions for installing attic floors are outlined. However, remember, the services of specialists are a guarantee of quality, so if you want to carry out this work as quickly and efficiently as possible, it is better to use the services of professionals.
Cold attic design
When building the roof of a house, many people think about making a cold attic or attic underneath it? The easiest way to organize a roof is with a cold attic space. Construction of an attic will cost several times more and require more labor.
. Although, it is undeniable that the attic will significantly expand the living space.
Cold attic roofs have the following main components in their pie:
:
- roofing;
- attic external walls (applicable for gable roofs with gables);
- insulated ceiling between the living space and the attic.
Ventilation is provided by eaves and ridge vents. The air passing through the eaves openings is called supply air, and the air leaving through the ridge is called exhaust air. Additionally, ventilation can be done through dormer windows on the gables or roof slopes. The windows are equipped with louvered grilles to allow the ventilation intensity to be adjusted.
Dormer windows are located on opposite slopes of the roof so that there are no unventilated areas.
Dormer windows can be rectangular, triangular and semicircular in shape. Their lower part should be at a height of no more than 0.8-1.0 m from the floor of the attic, and the upper part should not be lower than 1.75 m from the floor in the attic. They can also serve as an exit to the roof of the house to inspect the roof, ventilation and chimney elements.