Floors in construction are called horizontal enclosing structures that separate residential floors from each other, from the attic or basement space. There are many design solutions in which, in addition to their own weight and operational loads, they can support the weight of overlying structures, and even ensure the rigidity of the building as a whole.
If necessary, the ceiling in a house made of aerated concrete can be made according to any of the existing schemes - the main thing is that in the end the load for aerated concrete with a low strength class does not turn out to be excessive.
Advantages and disadvantages compared to floor slabs
Wooden beams boast of being lightweight and easy to install. There is a misconception that light wooden floors do not require a reinforcing layer. This is fundamentally wrong.
Important!
For aerated concrete walls, regardless of the type of flooring, an armored belt is always required!
In the case of wooden floors, its construction will distribute the load from the beams along the entire perimeter of the walls and prevent cracking of aerated concrete from point loads.
The advantages of wooden beams are:
- Environmentally friendly, since wood is a renewable natural material.
- Small mass.
- Low thermal conductivity compared to concrete structures.
- Low price compared to other types of floors.
- Large assortment to choose from.
- Easy to install beams.
Wood also has its downsides:
- Fragility. Sooner or later, even the best floors can begin to rot.
- Low strength - wood will not be able to withstand as much weight as a concrete floor could.
- Flammability (natural materials are highly flammable).
Important!
Despite such significant negative qualities, wood is still chosen much more often, and here’s why: special compositions for impregnating wood can extend its service life and protect it from rotting and fire. And low strength is eradicated by using more beams and reducing the laying step.
Now let's look at concrete floors and their disadvantages:
- The first and most significant disadvantage is the high cost of concrete flooring. Not only are the floors themselves expensive, but their installation and transportation also requires special equipment (a crane). So you will have to pay a certain amount of money for installation. Wooden floors do not have this disadvantage - you can install them yourself. If the beams are small, then two or three people will be enough. The heavier and more massive they are, the more people will have to be involved.
- High weight. We have already said that installation will require special equipment. You will also need a more expensive foundation.
As you can see, all the disadvantages are related only to the price. To make your final decision, read the article about floor slabs in an aerated concrete house.
What is a monolithic floor?
First, let's understand the properties of aerated concrete and the principles of constructing houses from this material.
Cellular concrete blocks are made from a mixture of lime, cement and sand, into which an aluminum-based chemical, a foaming composition, is added. Aerated concrete is made both by an autoclave method by actively influencing the solution poured into block molds using steam and pressure, and by a non-autoclave method. The gradation of its quality and price depends on this.
Help: Such a block weighs relatively little, retains heat well, is also fire-resistant and environmentally friendly, allowing you to build a house in the shortest possible time.
Aerated concrete requires a special approach, because the cellular structure of the blocks minimizes the strength properties and the ceiling is constructed taking this circumstance into account.
It is necessary that the weight of the structure pressing on the load-bearing supports be compensated by belt-type reinforcement, creating the rigidity of the load-bearing walls. The reinforcement is placed at the bottom, at the top and in the center, protecting the aerated concrete blocks from the pushing effect from the ceiling. The ceiling itself is also supplemented with reinforcement.
Sections of load-bearing walls must be accurately measured for deviation from a strictly horizontal line, but if such a problem does occur, then aerated concrete makes it easy to correct the situation by sawing the material.
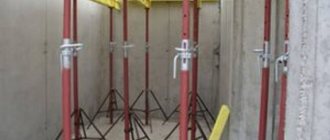
Monolithic slab
A monolithic floor in a house made of aerated concrete is placed on beams with different cross-sectional sizes covering the entire surface area. Its most important part is a frame with a reinforcing function. Metal rods with a small cross-section are fastened with wire into a single reinforcing system. It is this that will bear the greatest load, giving the concrete literally “iron strength.”
Concrete is ordered ready-made from companies specializing in the sale of building materials, or it is made independently. When manufactured independently, mixers of small dimensions are used, which reduces the quality of the design, since there is a high risk of mixing volumes of concrete with different composition ratios, which will create heterogeneity of pouring and reduce strength.
Attention! In such an important task, poor quality filling puts people’s lives at risk, so you should not experiment with the manual method of preparing the solution.
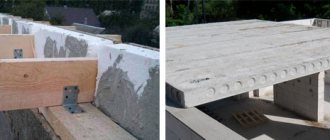
Prefabricated monolithic floor
You can use both the monolithic covering method and the method of covering aerated concrete using the prefabricated principle. This is a subtype of the monolithic method. It is suitable for a building consisting of one or two floors. The interfloor space is “stitched with beams” at intervals of 60 cm. Polystyrene concrete or expanded clay blocks are laid out on them, acting as both formwork and part of the floor. Concrete solution reinforced with reinforcement is poured on top and left until completely dry.
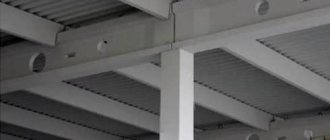
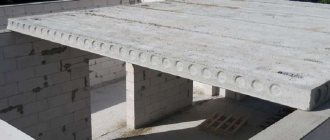
Finished slabs
Flooring made from slabs with voids is suitable if you are willing to spend a lot of money, since both the slabs themselves and their installation, which requires renting equipment for lifting, are more expensive. In terms of price, the situation becomes less burdensome if there is a factory nearby that produces such slabs, since you can order directly from the manufacturer, and the delivery budget will be quite acceptable. In this case, the project will cost even less than a monolithic one.
In what cases are monolithic and prefabricated-monolithic methods combined?
Prefabricated monolithic type ceilings impose certain regulations on the parameters of the building itself in terms of length and width, and the location of load-bearing walls.
This is dictated by the standard dimensions of the slabs and the fact that the slabs require support on supporting structures. That is, it is necessary to adjust the house plan and the arrangement of rooms in accordance with the standard dimensions of hollow-core slabs.
The support is made by the opposite sides of the slabs on the load-bearing walls. It is unacceptable to lay slabs on three walls, since this circumstance will incorrectly distribute the load on the foundation of the house, which is categorically unacceptable in the case of aerated concrete.
In overlap areas where it is not possible to place slabs, monolithic fragments are constructed. This usually happens due to the reduced area of the house, or in places where the ventilation system shafts from the bathroom or kitchen area are located.
The monolithic method of creating an interfloor divider is more convenient and multifunctional; it does not limit the planning of rooms and the ratio of the length and width of the building.
Types of beams, advantages and disadvantages of each type
To build floors between floors of a building, I usually use only three types of wooden beams:
- Whole.
- Glued.
- I-beams.
Let's figure out which of them are most suitable specifically for each design, highlight the disadvantages and advantages of each type.
Made from solid timber
Beams made from solid timber are distinguished by their strength, but are inferior in terms of the maximum possible length. To prevent the beam from bending over time, it is recommended not to install it longer than 5 meters . That is, timber floors are only suitable for small houses.
One of the significant disadvantages is that without proper treatment, floors may begin to rot and become moldy over time. The risk of fire should not be excluded.
Attention!
For large structures, experts recommend using floors made from other types of beams.
From laminated veneer lumber
Beams made of laminated veneer lumber have one undeniable advantage - their length without deflection can reach 12 meters .
Glued beams have the following advantages:
- Particular strength.
- Ability to cover spans up to 12 meters.
- Small mass.
- Longer service life.
- Do not deform over time.
- Relatively fireproof compared to conventional timber.
However, such material costs much more.
Wooden I-beams
I-beams are considered one of the most durable and reliable due to their profile shape , because they consist of several layers, each of which is protected by various impregnations.
The advantages of I-beams include:
- High strength and rigidity due to its shape.
- No deflections.
- Quiet operation - structures do not creak when pressure is applied to them, unlike other types of floors.
- The material does not crack or dry out over time.
- Easy to install.
In what cases is it necessary to install monolithic floors?
Monolithic reinforced concrete flooring is the most reliable, but also the most expensive of all existing options. Therefore, it is necessary to determine the criteria for the feasibility of its design. In what cases is it advisable to install monolithic floors?
- Impossibility of delivery/installation of prefabricated reinforced concrete slabs. Subject to conscious refusal of other options (wooden, lightweight Terriva, etc.).
- Complex configuration in plan with “unsuccessful” arrangement of internal walls. This, in turn, does not allow laying out a sufficient number of serial floor slabs. That is, a large number of monolithic sections are required. The costs of a crane and formwork are not rational. In this case, it is better to immediately move on to the monolith.
- Unfavorable operating conditions. Very heavy loads, extremely high humidity values, which cannot be completely solved by waterproofing (car washes, swimming pools, etc.). Modern floor slabs are usually prestressed. Tensile steel cables are used as reinforcement. Due to their very high tensile strength, their cross-section is very small. Such slabs are extremely vulnerable to corrosion processes and are characterized by a brittle rather than ductile nature of destruction.
- Combining the functions of overlap with the function of a monolithic belt. Supporting precast concrete slabs directly on lightweight block masonry is generally not permitted. A monolithic belt is required. In cases where the cost of the belt and prefabricated floor is identical to or exceeds the price of a monolith, it is advisable to focus on it. When resting it on masonry with a depth equal to the width of the belt, the installation of the latter is usually not required. An exception may be difficult soil conditions: type 2 subsidence, seismic activity, karst formation, etc.
Calculation of the required cross-section depending on the span length and loads, laying pitch
The number of beams, their dimensions, and installation pitch depend directly on the area of the room and the expected loads. Most experts believe that the optimal load on floors is 0.4 tons per square meter of area (400 kg/m2) . This load includes the weight of the beam itself, the weight of the rough and finishing floor covering on top and the ceiling below, insulation, communications, as well as furniture and people.
Advice
The best cross-section for rectangular wooden beams is considered to have a height to width ratio of 1.4:1.
The cross-section also depends on what kind of wood the floors are made of. Now we present the average recommended values for a laying step of 60 cm :
- If the span is 2 meters, then the minimum cross-section should be 7.5 by 10 cm.
- With a span length of 2 and a half meters, the beam should have dimensions of 7.5 by 15 cm.
- If the span is three meters, then it is customary to use beams 7.5 by 20 cm.
- With a beam length of 4 and 4.5 m, it is customary to use them with a section of 10 by 20 cm.
- To build a five-meter floor, crossbars with a section of 125 by 200 mm are used.
- The six-meter ceiling is made of beams measuring 15 by 20 cm.
If the step increases, then the size of the beam section should also be increased.
Here is a table of sections of wooden floor beams depending on the span and installation pitch, with a load of 400 kg/m2:
| span (m)/installation pitch (m) | 2,0 | 2,5 | 3,0 | 4,0 | 4,5 | 5,0 | 6,0 |
| 0,6 | 75x100 | 75x150 | 75x200 | 100x200 | 100x200 | 125x200 | 150x225 |
| 1,0 | 75x150 | 100x150 | 100x175 | 125x200 | 150x200 | 150x225 | 175x250 |
If you do not plan to load the floors (in the case of a non-residential attic for storing light items), then lower load values from 150 to 350 kg/m2 are acceptable. Here are the values for an installation pitch of 60 cm:
| Loads, kg/linear m | Section of beams with span length, m | ||||||
| 3,0 | 3,5 | 4,0 | 4,5 | 5,0 | 5,5 | 6,0 | |
| 150 | 50x140 | 50x160 | 60x180 | 80x180 | 80x200 | 100x200 | 100x220 |
| 200 | 50x160 | 50x180 | 70x180 | 70x200 | 100x200 | 120x220 | 140x220 |
| 250 | 60x160 | 60x180 | 70x200 | 100x200 | 120x200 | 140x220 | 160x220 |
| 350 | 70x160 | 70x180 | 80x200 | 100x220 | 120x220 | 160x220 | 200x220 |
On the Internet you can find online calculators for calculating the load-bearing capacity of wooden beams. I will give a link to one of them: https://vladirom.narod.ru/stoves/beamcalc.html
Also, for example, you can replace one beam with a section of 100x200 with two boards 50x200, sewn together with bolts or nails every meter. They do this for various reasons:
- beams with the required cross-section are not available for sale;
- boards with a smaller cross-section weigh lighter, so they can be lifted to the top alone and fastened there.
It is recommended to sew the boards together so that the wood fibers are in different directions. This increases the strength of the structure.
Installation of floor beams in aerated concrete house
Aerated concrete is a modern energy-saving material for the construction of summer houses, houses and cottages.
These are lightweight slabs for building walls that can crack from excessive pressure.
It is for this reason that wooden floors in a house made of aerated concrete are the best way with the least load. The only disadvantage of this material is its low strength.
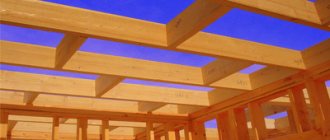
Types of wooden floors
Wooden floors are laid on load-bearing beams. They are usually made from glued or solid timber.
There are three types of floors:
- beam;
- ribbed;
- beam-ribbed.
Beam floors can consist of beams on which a subfloor is laid, then insulation and decorative flooring materials.
Advice! Recommended size for load-bearing beams: up to 0.4 m high * up to 0.2 m wide * up to 15 m long (but not less than 5 meters).
Ribbed ones are rarely used. This type of flooring is used if the house is built from a wooden frame. A distinctive feature is the frequent laying of ribs and sheathing.
Acceptable 0.3 - 0.5 m. Acceptable fin sizes: up to 5 m length, up to 0.3 m width. The floors are sheathed using OSB boards, chipboard or plywood.
Mineral wool is used as sound insulation.
Beam-ribbed floors consist of beams and ribs. In this case, the ribs are laid over the beams. The number of beams in this method will be required significantly less. Wood consumption is reduced, but installation becomes more complicated.
Wooden floor construction
The crossbars are installed at the construction stage, simultaneously with the construction of the walls.
The height and cross-section of the beam for the ceiling depend on:
- step frequency;
- beam thickness;
- the size of the load on the load-bearing floors;
- type of wood beams.
Important! For a span of 5 m in length, use a beam measuring 18*10cm or 20*7.5cm. Such beams are laid every 60 cm
Under increased loads, such a cross-section can cause deflection. Therefore, you should increase the frequency of laying beams, but do not overload the structure.
Installation of crossbars into the wall is sealed to 12 cm. The end of the beam, which is attached to the wall, must be treated with waterproofing. Air space must be left around the beam.
To prevent the crossbar from sitting too rigidly, its end is cut down at a slope of 70 degrees. Wooden spacers 2 cm thick are installed under the beam to distribute the weight evenly.
When wood comes into contact with various materials, a waterproofing layer is laid from:
- bitumen agents, primer;
- rolled roofing felt, bitumen or roofing felt;
- liquid waterproofing agent based on bitumen;
- linochrome
The crossbar is extended in the form of a lock. Two bars are connected with an overlap of 50-100 cm and fastened with bolts
It is very important to make the joints above the support
Then the structure is supplemented with heat and sound insulation. The insulating layer must adhere closely to the ceilings.
Therefore, a roll is made in their lower part to secure the cranial bars with a cross section of 5*5 cm.
The bottom of the floor is hemmed with OSB, chipboard, plywood or plasterboard.
Logs are laid along the constructed beams, and a plank floor is placed on top of them. Vibration- and noise-absorbing pads are laid under the rough coating.
To avoid sagging of the ceiling due to excessive loads on the flooring of the upper floor, the ceiling can be installed using separated crossbars.
Why divide the floor structure, for which supporting beams are installed separately.
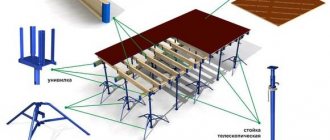
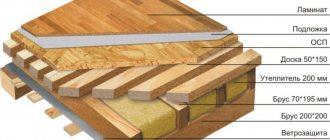
In general, the structure of a wooden attic floor pie consists of layers:
- load-bearing beams;
- logs, insulation, sound insulation, vapor barrier;
- rough board flooring;
- facing floor covering.
Installation work
The main stage is, of course, the installation of beams. It implies competent preparation at the stage of construction of the first floor.
First, the wood should be pre-treated with a fire-retardant compound, as well as an anti-rotting liquid (this must be done with the entire crossbar). This must be done immediately after purchase. If the material will lie for some time before laying, it needs to be rearranged: a row of beams, then 3-4 bars across, then the next row. This will allow the board to ventilate and dry out. This will prevent mold from appearing.
The part of the beam embedded in the wall should also be coated:
- Bitumen or primer.
- Ruberoid, roofing felt or glassine.
- Liquid waterproofing agent consisting of bitumen.
- Linocrom.
This is done due to the fact that wood, when in contact with concrete and blocks, can absorb moisture and begin to rot over time .
Reference
For aerated concrete, an operating humidity content of 3-5% is considered normal. No matter how dry the blocks may seem, direct contact of wood with this material is unacceptable.
The beam must be embedded into the load-bearing wall at least 12 cm. The ends are cut at an angle of 70 degrees in order to ensure the removal of moisture.
Attention!
There is no need to cut off the end of the beam with waterproofing material. Otherwise, access to moisture evaporation will be blocked. It is required to leave a small air gap between the end of the beam and the wall.
Beams are laid on a reinforced surface (to enhance the strength of the structure). Instead of an armored belt, some manufacturers in small houses allow a 6x60 mm metal strip to be supported on aerated concrete with a lining.
The beams are fastened to the reinforced belt in houses made of gas silicate using anchor bolts.
To insulate the street side, insulation can be placed in front of the beam. As a rule, the outer ends of the beams are insulated from the outside with expanded polystyrene.
Filling the voids between the laid beams is done with gas blocks. Gaps of 2–3 cm are left between the gas silicate and the timber. They are tightly packed with mineral wool, thus preventing the formation of condensation and dampening of the beams.
Do not forget to think about the placement of the stairs to the second floor , since the opening must be provided immediately:
Well, that's all, the floors are ready. Now you can begin the subsequent finishing.
DIY Installation Guide
For interfloor and attic floors, work begins after laying the reinforced belt on top of aerated concrete blocks along the entire perimeter of the walls.
1. Preparation of the material. Elements of the required length are cut at an angle of 60-70° in the area where the aerated concrete is approached from the top side and wrapped with roofing felt or roofing felt.
2. Preparation. Pieces of insulation are placed between the future beam and the outer wall and a gap is left for free air circulation.
3. Installation of supports, starting from the outermost elements according to the selected scheme. For fixation to the armored belt (U-shaped blocks or reinforced reinforced concrete tape), metal corners or studs treated with anti-corrosion compounds are used. This stage should not be carried out by yourself; level placement requires the strength of at least two people; the level of each support is carefully checked.
4. Fixing the vapor barrier taking into account the recommended overlap. This layer is mandatory when separating two floors or an attic; when assembling the floor of the first floor in a house made of aerated concrete, films or membranes are replaced with denser and more reliable roll waterproofing.
5. Installation of a roll-up that serves as a ceiling. Boards with a thickness of 25 cm or more or sheet materials, such as plasterboard, are attached to the underside of the beams. At this stage, you need to make a ventilation gap of 1-2 cm between them and the vapor barrier.
6. Placement of insulation between wooden elements. To determine the thickness of this layer, it is advisable to make a thermal engineering calculation; in the absence of data, the minimum is taken equal to 10 cm. Thermal insulation is laid without gaps, tightly adjacent to the beams; mineral wool slabs or mats with springy edges are best suited for these purposes; they are easy to use and preserve the ability of wood and aerated concrete blocks to pass air.
7. Protection of insulation from getting wet. In this case, thin waterproofing membranes and films have optimal characteristics; roofing felt is used mainly in attics.
8. Covering with logs and laying the future floor. When laying interfloor floors, it can be made from tongue-and-groove boards, plywood or chipboard sheets; the final version depends on the type of flooring. When arranging unused attics, in order to save money, this stage is skipped; laying over the beams of the bridges for moving is enough.
9. Decorative finishing of the ceiling. Large beams are sometimes left open, but such an interior will not be appropriate everywhere; in residential buildings, the lower flooring is lined with clapboard, plaster or covered with tensile structures.
The instructions given are suitable for installing floors of any configuration over aerated concrete with a density of at least 400 kg/m 3 and expanded clay concrete. The main risk area is the contact areas of wood, blocks and metal. Direct abutment is avoided; insulation or synthetic materials are laid in these areas of the walls and gaps are left. Mandatory conditions include choosing the right wood: without large knots, cracks and weak areas and with a moisture content not exceeding 15%. Glued or dried timber and ready-made I-beams have the necessary characteristics.
To ensure maximum operational reliability of the ceiling during its assembly, it is recommended:
- Connect beams using screws rather than nails.
- Take into account fire safety requirements and impregnate materials not only with antiseptics, but also with fire retardants. All elements are processed in advance; only dry timber is laid on the aerated concrete walls. To save money, you can carry out this stage yourself.
- Carry out an accurate calculation of the thickness and coordinate the obtained data with the parameters of the armored belt. In order to prevent the formation of cold bridges in houses in these areas, a thin layer of thermal insulation is laid, ideally protecting both of these structures. Laying mineral wool or foam plastic only on the side of the reinforced belt or ceiling is a violation; an exception is made only when using U-shaped blocks to increase the load-bearing capacity of walls.
- Treat metal fasteners with anti-corrosion compounds.
Modern private houses often have more than one floor. The reason for this is simple - a smaller foundation area, and therefore a lower construction cost, with a decent total area of the entire house. The presence of more than one floor in a house requires the arrangement of interfloor ceilings. And this is in addition to the attic, if you are not going to build an attic instead of an attic.
Houses built from different building materials require an individual approach. Therefore, there are several methods for installing floors. And thanks to new materials, new types of them have arisen.
How wooden floors are attached
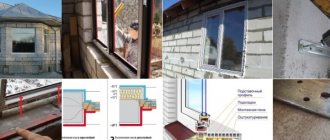
For proper fastening of wooden blocks, special open or closed nests are formed in aerated concrete walls. You also need to be sure that the wood can “breathe”, for which the end of each beam is cut at an angle of 60-75 degrees. The cut is carefully treated with antiseptic agents.
The end of the beam that was treated with an antiseptic (with the exception of the cut edge) should subsequently be wrapped with roofing felt or other waterproofing material. In addition to protecting the wood, this is also done so that the beam “sits” tightly in the socket.
Methods for embedding beams in walls; processing the ends of the beam protects against the formation of condensation and rotting of materials Source sdelaipotolok.com Having completely processed, wrapped and installed the beam, it is necessary to additionally inspect the nests - there may be cracks in them that need to be covered with special solutions and sealants to prevent moist and warm air from entering the nests . In any case, additional protection of the nests will not be superfluous and will extend the service life of the beams.
Post-installation finishing
After completing the construction of the floor, it is recommended to wait before starting finishing work to allow the beams to shrink. It is recommended to “hide” the ceilings behind a fine finish before the onset of cold weather so that they are not exposed to wet weather factors.
It is also necessary to make a roof. If this cannot be accomplished before winter, then the entire structure should be covered with film or awning material, including the windows, so that moisture does not enter the building. But it is still recommended to leave small through gaps so that there is an optimal level of humidity inside the room.
Now directly to the post-installation finishing. First, a rough ceiling is made from the bottom of the ceiling. It can also be made from plywood if, for example, a suspended ceiling is to be erected in the future.
After installing the ceiling, insulation and vapor barrier (if necessary) are placed on top. For example, if the upper and lower floors will be constantly heated, then insulation is not necessary. But it should be noted that insulation also works as sound insulation. If the second floor is an attic, then you definitely need to insulate it - otherwise the heat will escape.
After laying the insulation, you can lay the subfloor (it will help in the further construction of the building, since you will not have to install scaffolding).
Finishing must be done after windows appear in the house and it shrinks.
Wooden interfloor ceilings are one of the most optimal solutions. After all, wooden beams are strong, lightweight and at the same time cheap. They are easy to install and do not put unnecessary pressure on the walls. The main thing is to make the calculation correctly and be sure to process the wooden structure.
To increase the strength of the structure, you can use metal I-beams instead of wood. In this case, you will need a crane for installation. And metal costs more than wood. And if you are ready for such expenses, then isn’t it easier to opt for hollow-core floor slabs? Since the main advantage of overlapping wooden beams in an aerated concrete house is cost savings.