Currently, the overwhelming number of construction projects for the construction of low-rise real estate, multi-story industrial and civil buildings include the use of floors. At the same time, floor slabs act as one of the elements of reliability and strength of buildings, the installation technology of which determines the strength of the structure and its durability.
Types of floors
Depending on the type and material from which the floor is constructed, the following types are distinguished:
- slab;
- monolithic;
- wooden.
The most practical and cost-effective is a floor made of ready-made reinforced concrete slabs. According to their design, they are divided into:
- products with longitudinal ribs;
- tent-type panels with ribs along the edging;
- flat slabs;
- multi-hollow reinforced concrete products.
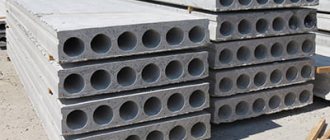
The last two categories can be made in a hollow or solid version. Most often, during construction, products with a hollow-core structure are used, which are divided into two categories:
- PB - continuous formless molding;
- PCs are round-hollow.
Hollow-core slabs are characterized by mass production and have minimal cost. At the same time, the technical characteristics of products are divided in accordance with serial numbers, which creates a certain inconvenience when using slabs for private individual construction.
Technological methods used in the production of this type of product are based on the use of multiple filling molds. At the same time, the production of non-standard products requires large costs, which are associated with the preparation of forms or formwork with given dimensions. Typical reinforced concrete floor slabs have a wide range of lengths, which vary from 2.7 to 9 meters in increments of 300 mm. Products manufactured according to industrial standards have a number of advantages, including strength and reliability due to compliance with the technological process and high-quality filler composition, as well as high durability and effective sound insulation.
Pros and cons of using tongue-and-groove blocks for partitions
A partition serves to delimit space into rooms in a house or apartment, while it is not a protective barrier between the street and the living space. For this reason, thermal resistance takes a back seat, and more attention is paid to sound insulation and weight of the structure. Let's consider whether tongue-and-groove slabs meet these requirements.
Insulation of the PGP is possible in the case of a two-layer installation; in this case, a niche is formed between the two slabs where the heat insulator is placed.
- Safety - gypsum boards are fire resistant, they do not contain synthetic additives that could be released into the air.
- Sound insulation - a hollow slab 80 mm wide can provide sound insulation up to 43 dB, a solid slab 100 mm wide - up to 45 dB. For comparison, a solid brick partition provides up to 47 dB.
- Ease of installation - PGP is faster and easier to install when compared with partitions made of aerated blocks or bricks.
- The low weight of the products makes it easier to work with them during installation, and the load on the foundation and floors is also reduced.
Now we need to talk about the disadvantages that are important to consider before starting work.
- Low resistance to moisture - even slabs that are called moisture resistant are highly hygroscopic, that is, they easily absorb water. For this reason, the process of installing partitions should begin at the stage when all “wet” processes have already been completed.
- Fragility on a movable base - to install a partition made of PGP, you will need a low-moving and flat surface, since the material will not be able to absorb deformations and will crack due to the stress that arises.
The length of the partition made of PGP should not exceed 6 m, and the height - 3.6 m.
Aspects of design of buildings and structures
At the design stage, it is important to take into account the permissible dimensions of the slabs and make calculations based on their dimensions. In practice, there are often cases when the construction process is carried out according to someone else’s design with the most convenient layout. For the successful implementation of such projects, it is necessary to adhere to strict compliance with the materials included in the project estimate. It is unacceptable to use projects for other types of materials using concrete floors that, due to their geometric dimensions, do not provide the required amount of overlap. In the event that the calculated data turns out to be incorrect and the length of the reinforced concrete products does not correspond to the actual ones, the available slabs for installation and installation must be chopped or sawed.
Ideally, in order to reduce construction costs to a minimum, it is necessary to install slabs of the required length and dimensions directly from the machine. At the same time, the costs of loading and unloading operations are reduced, and there is no need to equip a site for storing and stacking building materials. According to the storage rules, reinforced concrete products can only be laid on flat ground with wooden pads installed at a distance of 400 mm from the edge. The height of the stack cannot exceed 2.5 meters, and reinforced concrete products must be separated from each other by slats with a thickness of at least 25 mm. The slabs are stored under a canopy to prevent precipitation from getting onto the surface of future floors. Storage locations are selected based on accessibility during crane operation.
Installation of slabs - difficulties encountered
If the rules for transporting and storing panels are violated, unforeseen situations associated with the formation of cracks may occur.
The following recommendations will help prevent cracking:
- store reinforced concrete products on a level surface;
- install wooden spacers of equal thickness between the slabs;
- place the bars strictly vertically;
- Do not allow the hollow core slabs to touch.
In case of minor defects and small cracks, it is allowed to install panels in unloaded areas with sealing of cracks with cement mortar. Slabs with through cracks must be cut into separate pieces and used as short sections.
Preparation stage before installation
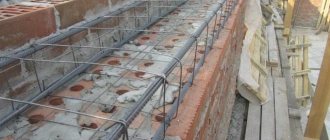
In order to lay the floor slab correctly and evenly, it is necessary to form a flat surface of the upper edge of the supporting structure even at the stage of wall construction. For this purpose, special and precise construction equipment in the form of a laser level is used. During construction, position marks are installed on the walls 300 - 400 mm before the top edge and the last rows of blocks or bricks are laid with an accuracy of millimeters according to the level readings. In the case of using expanded clay concrete blocks for the construction of walls, in order to uniformly distribute the mass of the floor, the technology of arranging a monolithic belt is used.
Before laying, the slab is prepared. The holes at its end must be sealed. As a rule, for this purpose the empty space is filled with bricks and concreted in the gaps. It is possible to fill the holes with mineral wool.
How to seal joints and seams between floor slabs
Since the technology of laying slabs itself involves creating a certain distance between them (rusts), there is a need for their subsequent sealing. If the gap between the slabs is insignificant, then filling them with cement-sand mortar is not particularly difficult.
If the seams between the slabs are relatively large, then two techniques can be used:
- Arrange the formwork and pour the mortar into it.
- Use reinforcement made from wire, broken bricks, or the like. materials. This work is greatly simplified by the design of the slabs themselves, at the ends of which the manufacturer creates special recesses. It is very convenient to place reinforcing elements in these recesses. The resulting monolithic section between the floor slabs gives the entire structure an additional degree of strength.
The end holes in the hollow-core floor slabs are sealed with broken bricks and covered with mortar; this will protect the voids from mortar getting into them during subsequent work.
Laying
To carry out the installation work, a team of three working installers is required. The responsibilities of two include the tasks of slinging and correctly laying the slabs, the third ensures their connection and adjustment when lowering. Most reinforced concrete products are designed for installation using hinge technology. Its essence is that the support should be carried out exclusively from the short ends. In this case, a solution with a thickness of at least 20 mm in a thick consistency is laid under the slab, and the crane operator provides tension on the cables, allowing the position to be adjusted using a crowbar. Conventional slabs are ready to withstand vertical loads for a long time. Working on transverse bending, the design of the slab provides reinforcement in the lower part of the product. The value of the overlap depth for a stable position can vary on average from 70 mm to 120 mm. The minimum amount of support for PC and PB grade slabs on the wall depends on the length of the floor, including:
- 70 mm for reinforced concrete floors with a length of up to 4 meters;
- 90 mm for reinforced concrete products with a length of over 4 meters.
In some cases, the overlap can reach 250 mm, providing rigid fixation to the supporting structure. When calculating the distance between the walls, the length of the slab minus 240 mm is taken into account, which provides 120 mm of support on each side, which guarantees reliable installation even if there are slight deviations when installing products.
For products of the PT brand, the minimum required support according to the technical documentation is 80 mm. In this case, the support points must be placed on all four sides of the product.
If the depth of support is insufficient, structural defects may appear over time in the form of cracks in the wall or on the floor slab, which may subsequently lead to their complete destruction.
When laying bricks, the optimal thickness for walls is considered to be 380 mm. This parameter is also formed based on the load, which is implemented by floor slabs on both sides at a length of 240 mm. Another 140 mm of wall space is required to build a standard ventilation duct. Thus, the walls allow the installation of subsequent floors with the comfortable installation of floors.
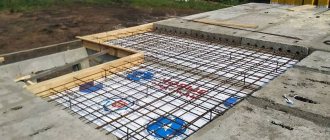
If the width dimensions of the building being constructed do not correspond to the width dimensions of the slabs, the best solution would be to reduce the gaps into one common gap, which is covered by using monolithic technology. Sometimes it is difficult or simply impossible to do without monolithic sections in floors. Even in cases where projects provide all the required dimensions of the slabs and the ratio of dimensions between the walls, it may be necessary to install additional ventilation ducts and other systems that correct the dimensions. In this case, reinforcement is produced, for which curved meshes are used. Mostly for monolithic type floors, concrete of a grade no lower than B25 is used.
Required tools and materials
Crane-manipulator for installation of floor slabs
Floor elements made of reinforced concrete are heavy, so truck or tower cranes are used to lift and install them. Electromechanical units are selected taking into account the mass of the panels, the load capacity of the machines, the position of the structures, the type of equipment and devices.
The cranes must be in working order and the mechanical equipment must be in good working order. The condition of machines and devices is confirmed by regulated periodic testing reports. The ceilings can be installed by workers and crane operators of appropriate qualifications, confirmed by certificates. High-altitude installers are equipped with safety belts and shoes with non-slip soles.
Tools and materials:
- electric welding machine, compressor, jackhammer, scaffolding;
- hammers, trowels, levels, hacksaws, crowbars, shovels;
- troughs for mortar to fill joints and areas where slabs are supported;
- sand, gravel, cement, floor panels.
One mounting fixture can be used to work with multiple prefabricated structures to reduce installation time. This will reduce the labor intensity of the process and increase productivity. A four-strand rope sling is used to evenly distribute lifting forces.
People should not be on the slabs while they are being lifted and moved in the air. The installation area is fenced off so that there are no unauthorized workers in it who are not involved in the installation of the floors. The laying of the next floor is done after the installation of the ceiling on the previous tier is completed.
Slab cutting
When it becomes necessary to shorten reinforced concrete products, they are cut down. The technology involves a sequence of operations:
- the cutting point is fixed on the block so that the part to be separated is located in the canopy;
- for an even seam, the separation contour is marked and sawed using an angle grinder;
- concrete located above voids is broken using impact tools;
- partitions in the slab are destroyed;
- The reinforcement is sawn using a special tool and gradually separated from the unnecessary part.
Plates of PT and PC grades are not allowed to be cut lengthwise due to design features. Since reinforced reinforcement of products is located in places of installation and concentration of force, cutting them lengthwise can lead to a significant reduction in load capacity and cause subsequent destruction. It is recommended to divide the slabs along the length according to the weakened section - along the hole. This cutting option is acceptable for PC type products, however, due to the small width of the walls between the holes, it is not recommended for PB grade slabs.
In some cases, when implementing construction according to individual building plans, it may be necessary to cut a square, rectangular or round hole in the slab. Its purpose could be a hatch or, for example, a transition along the stairs from the lower floor to the upper one. Considering the variety of shapes and designs of small-sized spiral staircases, the size of such windows in slabs can be quite small. The long side of such a cutout, as a rule, can reach a size of 1400 mm. In this case, the same tools and rules are used for cutting out the hole, allowing the load-bearing strength and reliability of the structure to be maintained.
Reinforced concrete slabs of great length, which exceed 4780 mm with a thickness of 220 mm, are subject to the maximum risk of loss of load-bearing strength during felling. It is also undesirable to cut and chop reinforced concrete products, the design of which provides for the presence of anchors located in the end part of the products.
Cutting and chopping slabs is a time-consuming and labor-intensive process, in which you will need an angle grinder and discs for cutting concrete, an impact tool in the form of a sledgehammer, and even an autogen, with which you can remove reinforcement that gets in the way of the cut.
Cracks
Is it possible and how to lay floor slabs with cracks?
It is possible if the concrete in the crack zone is not broken, is not crumbling, and the reinforcement is not exposed. It must be taken into account that the defective slab should not be loaded, and heavy building materials should not be stored. The PC can be strengthened: cut through several voids at the top 1-1.5 m to the sides of the crack, reinforced and monolithized. monolithic belt, from 5 cm wide. Tie the reinforcement cage from two rods and place it vertically. The gaps between the PCs in the internal load-bearing walls are also sealed.
Anchoring
After laying, the slabs must be anchored. To begin with, reinforced concrete products must be tightened, for which a wire is used that is threaded through the mounting holes. Welding is used to secure the wire. The schematic solution for anchoring the slabs is provided by the developer in the design documentation. In its absence, they resort to a standard set of solutions. According to the technology, the gaps that appear between the floor slabs must be filled with concrete. In this case, the rustications are filled and leveled to a monolithic surface. Due to the use of concrete mixture around the perimeter, the structure gains additional strength and rigidity, which has a positive effect on the service life and trouble-free operation of buildings. Any liquid that gets inside the product during installation must be removed using a hammer drill by drilling holes in the surface of the ceiling. In this case, holes with a diameter of up to 140 mm are drilled in the locations of voids. Punching can be carried out in places that exclude the location of stiffeners. Otherwise, there is a danger of water crystallization and ice formation in the cold season, which can disrupt the integrity of reinforced concrete, lead to its destruction and cause premature failure. It is prohibited to make technological holes in PB series slabs. By drilling the plates, electrical wiring can also be laid in a number of cases. In this case, the wires must also be laid in empty cavities. As a necessary tool for the work, you will need durable drills with a diamond attachment, as well as a hammer drill, the use of which is important for heavy grades of concrete.
How to anchor floor slabs
Related:
Concreting a monolithic floor slab:...
Marking of reinforced concrete floor slabs and its interpretation
The technology of anchoring slabs is used in all cases of arranging floors using reinforced concrete slabs. The main purpose of the anchor is to prevent loosening of the reinforced concrete structure during operation. Anchoring must be done after each stage of laying slabs, be it an interfloor ceiling, a basement floor, or a ceiling connecting to the attic. In this case, the slabs are connected by anchors to the load-bearing frames and to each other at a distance of no more than 3 m.
To increase the reliability of the connection with load-bearing walls, L-shaped metal anchors are used. At the points of connection between floors and partitions and internal walls, composite anchors are used, manufactured directly on site by welding.
The anchor can be attached to the structures being connected in two ways:
- Emphasis . In this option, the anchor holds the load due to the resistance of reinforced concrete slabs to fracture. In this case, the load, due to the internal resistance forces of the anchor metal, is transferred to a stop point located deep inside the reinforced concrete structure. Examples of such anchors are metal collet anchors, foundation bolts, etc.;
- Friction . Here the anchor gains the ability to support the weight of the slab due to the significant frictional forces that arise between it and the material. To increase the friction force, the anchors are additionally equipped with metal collets.
In relation to individual construction, both methods and their combination can be used. The sequence of actions for anchoring will be as follows:
- A thick metal wire is threaded into the mounting eyes of the plates and welded to them.
- The ends of the wire are brought out to the walls, where they are securely embedded.
- On the outermost pairs of floor slabs, diagonal anchors are additionally welded, to create which the wire is welded to the eyes of not adjacent slabs, but those connecting at the corners.
After anchoring is completed, the mounting eyes are carefully sealed with mortar. If there is a possibility that water could get into the cavities of the slabs during storage or transportation, then before sealing the lugs, it is recommended to first drill out the slabs from below in the area of the lugs. After the water drains, the holes are sealed with mortar.
Why do you need an armored belt?
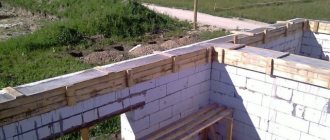
A structure made of gas silicate blocks cannot withstand high loads (shrinkage of the building, settlement of the soil underneath, daily temperature changes, seasonal changes). As a result, the material cracks and collapses. To avoid various types of deformations, monolithic reinforced concrete belts are installed. The armored belt takes these loads upon itself, distributes them evenly, ensuring the reliability of the structure.
It is also capable of evenly distributing vertical loads. Giving the structure rigidity, it prevents movement of the floor slabs (porous blocks expand with the movement of moisture and steam). For what else did it get the name - unloading. Another purpose of the armored belt is to protect the edges of the upper blocks from destruction (installation of interfloor ceilings). Remove point loads of wooden beams during roof construction. Considering these qualities, an armored belt is simply necessary when supporting the floor slabs of the second (subsequent, roof) floors in a house made of gas silicate blocks.
Manufacturing method, advantages and disadvantages of ribbed panels
Ribbed floors are made from light and heavy concrete - they are distinguished by their U-shaped section and stiffening ribs. Heated reinforcement is placed into the mold, mounting loops are placed and concrete is poured, after which vibrations are created to shake the solution and provide higher rigidity.
Among the advantages of U-shaped products are the following factors:
- high strength;
- small weight;
- affordable price;
- resistance to corrosion and rotting;
- moisture resistance;
- reusable;
- Possibility of adjustment to the required size.
Disadvantages include unattractive appearance and installation difficulties.
How long does it take to lay tiles?
To plan the repair and correctly set the task, please tell me how much time it will take a normal (professional) tiler to lay 120 square meters of tiles on the walls and floor. The tiles vary from 10x10 (7 sq.m.) to 45x45 (25 sq.m.), the rest are 20x20 and 20x30. The tiles are Spanish and Polish. Laying in a new building, the floor and walls are smooth and perpendicular to each other. There is a preliminary layout of tiles in the premises.
Plan for 12 person days. Plus a couple of days because the tiles are different. Plus add to your harmfulness. The norm, I remember, was 10 m2 per person when laying “without complaints.”
7 working days if he is a real professional.
fast-cheap-quality. Choose
88 meters days 8. TOTAL-12 DAYS + 3 days grouting In general, in my opinion, a couple of weeks, 8 hours a day
A couple of years ago, my partner worked in the construction department of the Wild Orchid company, the tiler’s norm was 6 squares per day, 60*60 per comb on a flat floor, around a piece per day, it seemed like they were covering jobs, LAFA, 18 tiles per day!
How much can this pleasure cost? At least approximately.
If for a week, then approximately 60 thousand rubles. If from 3 weeks, 100 thousand (IMHO)
If I understand correctly, it turns out that the period depends on my pickiness and the complexity of the relief of the rooms, but in any case no less than 5 thousand rubles. in an 8-hour working day. Is not it?
It’s unlikely, because you can’t jump higher, for example, I can’t do better for you than others, it turns out that I did worse for others, the hands are the same
in this area, you don’t have to do it every once in a while, at the shopping center if you get stuck you can earn 8-10 a day, but then declofenac and milgamma will become the master’s best friends for the next week
Let's argue! I see you are from Moscow, but come to me at the MOSGAZ facility that there are a couple of small bathrooms on Kurskaya
I can personally handle 30m2 of walls in 6 hours.
I can personally handle 30m2 of walls in 6 hours.
cool, if it’s not a bluff, I’ll give out such a volume on a 60*60 floor, but there’s no cladding
No, it's not a bluff at all. 8 years of continuous experience. I'll take a video and post it here.
This is not a bluff. This is a show off.
What is the quality of the output?
I would like to see how the lightning man works.
Once a very well-known citizen on the forum threatened to do the same, but for money. To my innocent question: “How much?” I received a very vague answer. I have little experience working with tiles compared to local gurus, but I don’t believe that it’s possible to lay such a volume so quickly and HIGHLY.
Eh, he's probably Spider-Man.
I can personally handle 30m2 of walls in 6 hours.
What seam? If, according to SNiP approvals, it is possible (but 6 hours is too much) If according to the personal requirements of the apartment owner, it is unrealistic.
z645 wrote: Eh, he's Spider-Man
Uhhh. yes, drive it MAN-TURBO
7x1000+113x500 = 63500. + holes, + baseboards, + external. corners, + thresholds. (Prices, in my opinion, are close to the minimum for normal quality, taking into account your volume.)
TURBOMAN will work in 24 hours
In theory, up to ten days, but in practice – from two weeks to infinity
It's not really as simple as it seems. And here's why. It’s easy to say: 120 meters of tiles, or say I can install two bathrooms in six hours. (If you paste it if there are no gaps and no grout (We’ve seen this) anyway: grout in a day! Then on the floors. You can ensure conditions so that no one walks there, doesn’t litter, doesn’t raise dust, and so on.) In reality, when you start work, you start encounter millions of circumstances that are consistent with quality but not consistent with time allocated. As a person who is not new to construction, I am telling you: in nature there are no even walls, both in plane and in perpendicularity (personally, I immediately leave clients with such statements). If there are no justifications (and “I have them”), then as a person who thinks in real categories, I say: allocate four months for this matter. If they do it for you in two, then it will take four more to eliminate defects and redo pop-up defects. If my recommendations seem implausible to you, then talk to those who have already done repairs of similar volumes. Best wishes.