Parquet is valued for its wear resistance, durability and attractive appearance, and at the same time it is one of the most expensive and capricious floor coverings. Its professional installation will also be expensive, so many people decide to install the parquet floor themselves. Strict adherence to the instructions will allow you to avoid mistakes in work and ensure the perfect condition of this luxurious coating for many years. Let's look at the most commonly used technology and find out how parquet is laid on a concrete screed
Parquet and its budget alternative
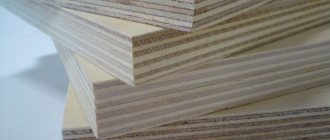
Parquet is called planed, perfectly smooth boards made of solid wood. This material is considered to be elite, and accordingly its price is quite high. The planks have the following dimensions:
- length – from 15 to 90 cm;
- width – from 3 to 12 cm;
- thickness - from 1.5 to 2.5 cm.
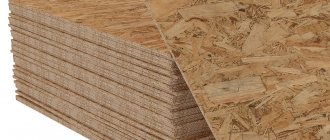
A more affordable material and less picky in relation to the subfloor is parquet board. It is a multi-layer coating, the top layer of which is made of valuable wood veneer, and the 2 lower layers are made of coniferous wood. The length of such boards is up to 220 cm, and the width is up to 25 cm.
Parquet board structure
Parquet board with ash veneer
What is the difference between parquet and parquet boards?
Although the names are quite similar, parquet and parquet boards are not the same thing. The only similarity between them is that both are made from natural wood. But they differ significantly from each other in their design:
- Parquet is made from solid wood, and not the most wasteful varieties are used. The thickness of the finished product ranges from 17-20 mm.
- Parquet board is a three-layer material in which the bottom and middle layers are made from the least valuable types of wood. But valuable wood species are used to create the top layer. The average thickness of the finished product is 14-15 mm, of which only 4-5 are valuable species, therefore the cost of the material is lower compared to parquet.
Operational differences should also be noted:
- Parquet reacts sensitively to any changes in the external environment. Therefore, in the room where parquet is installed, it is necessary to regularly monitor the level of humidity and temperature. Direct contact with water should be completely avoided.
- Parquet is more repairable than parquet boards. It can be sanded and varnished several times, so it returns to its original appearance. In the case of a parquet board, such a maneuver can happen, but no more than twice. It all depends on the thickness of the decorative layer.
- Due to the fact that the top layer of the parquet board is too thin, it quickly wears off due to intense loads.
- Parquet boards are practically maintenance-free. It can be washed with a wet cloth, but parquet cannot.
- The process of laying parquet is more labor-intensive than parquet boards, although parquet is easier to repair and restore.
- The parquet board does not require any work after installation, as it is already equipped with a decorative coating. Parquet, on the contrary, needs sanding and varnishing.
- The service life of parquet is 70 years or more, while parquet boards will completely wear out after 15-20 years.
Is parquet suitable for your apartment?
Laying parquet on a screed is an effective solution for flooring installations. However, before making it, the reasonableness of such a decision should be carefully assessed. After all, wood is a natural material, very susceptible to temperature fluctuations and high humidity. Therefore, it is reasonable to use it only in rooms with guaranteed suitable temperature and humidity conditions.
If it is too dry, the parquet dries out, loses its shape and appearance, cracks form, and if you lay it in a damp room, the parquet planks will rise when saturated with moisture. Optimal parameters:
- Humidity 40–60%;
- Temperature not less than +18°C, but not more than +24°C.
USEFUL INFORMATION: Welding linoleum at home with your own hands
Final work after gluing
After all installation work is completed, it is necessary to roughly sand the parquet using a parquet sanding machine with a drum attachment with a grain size of 40-60 units. Before this, minor defects and chips should be covered with a putty compound and the space should be refined using surface and angle grinders with a grit size of 120 units and above.
Important: You cannot artificially dry the screed yourself using a fan or heating device, otherwise the drying of the base will be uneven, as a result it will crack and sag.
How is parquet installed?
The technology of laying parquet on a concrete screed, provided all the necessary nuances are observed, is not particularly complicated. Conventionally, the process can be divided into several stages.
- Checking the quality of the screed or installing a new one.
- Waterproofing.
- Plywood flooring (chipboard, OSB).
Important! Parquet can be laid directly on the screed only if the conditions of low humidity of the base are met - up to 6%, or even better - up to 3%. It is highly recommended to use an additional layer of plywood, chipboard or OSB.
- Laying parquet planks.
It is recommended to lay parquet on a screed without plywood in two ways - using brackets or using the tension method. It is not worth gluing the planks due to the large difference in the thermal expansion of the materials. If you still decide to use an adhesive composition, it must be elastic.
- If necessary, sanding and varnishing the parquet.
Parquet boards can be safely laid on a concrete floor without using a plywood backing. To learn how to lay a parquet board, we recommend watching the instructional video:
Material requirements
The installation process determines the quality and reliability of the parquet flooring. Regardless of the quality of the parquet board, adhesives, installation and fixation methods, the concrete base must be level (height differences no more than 2 mm per 1 linear meter). The slope of the screed surface to the horizontal plane should be no more than 0.2% of the length of the room, within 0.5 cm of the total difference.
If the defects are not eliminated, the coating will begin to creak and the locking system will wear out prematurely. Low humidity (no more than 5%) of the screed is important. The optimum humidity in the installation room is 40–60% at temperatures of 18–23 degrees. The parquet board is stored unpacked for 2 days in the room where it will be laid; the packaging is removed before installing the covering.
Return to contents
Preparatory stage
Cases when the surface of the base (concrete slab) is perfectly flat (permissible difference is no more than 1 mm per m2), hard and dry, are extremely rare. Therefore, the laying of block parquet is carried out not on concrete, but on a cement-sand screed, or its equivalent - a self-leveling floor on a gypsum or cement-gypsum base.
Additionally, the subfloor is inspected for cracks and other imperfections, which are filled with putty or cement mortar.
Please note that before laying parquet, it is necessary to completely clean the surface of the base from the remains of old coatings, oil stains, construction and household waste. It must be removed from dust, carefully cleaned, and treated with a primer.
Important! A freshly poured screed should be given time to dry. If its thickness is up to 5 cm, then it will take 4–6 weeks.
Step by step guide
First, let's list the materials and tools that will be required for work:
- Polyethylene waterproofing film 0.2 mm thick;
- The backing is made of polyethylene foam, cork, extruded polystyrene foam or spruce. Section – no more than 3 mm;
- Impact block required for tight fit of planks;
- Metal bracket or wringer for installing the last row;
- Mallet;
- Carpenter's glue or PVA for gluing sections of board when forming pipe contours, etc.;
- Mounting wedges;
- Hacksaw, jigsaw or miter circular saw;
- Tape measure, square ruler, pencil;
- Level and moisture meter;
- Primer composition;
- Polymer adhesive for gluing parquet boards to the base and a notched trowel.
Laying the flooring is the final, final stage of repair, so all other work must be completed by this time. Recommended air temperature is from +18 to +24 °C, relative humidity level is 40-60%. The floor heating system turns on in 14 days and turns off in 2-3 hours.
In this case, it is necessary to comply with the acclimatization conditions: the parquet in packaging should be delivered to the premises 2-3 days before the start of work, and opened immediately before installation.
Laying boards with glue is most often carried out in cases where the risk of changes in linear dimensions is very high (consistently increased humidity levels, serious changes in climatic conditions). Or if the assembly area exceeds 120-200 m². The maximum permissible width of the coating laid in a single, continuous sheet is up to 15 m.
Advice! It is strictly not recommended to lay the boards on electric “warm floors”, since the spot heating is too high, this leads to deformation of the planks.
The floating installation technology is as follows:
Preparing the base
Absolutely all manufacturers require that the concrete floor be smooth, dry, durable, free of debris, old coatings, oil and other stains. The permissible level of differences is up to 2 mm for every 2 meters of the base. A 2-meter control rod is used for checking.
If the sand “crawls out” from the screed layer, then it is necessary to prime the floor with a strengthening compound. You can also use special reinforcing canvases (Multimol from Wuqing, etc.).
The humidity of a cement-sand mixture screed or concrete floor should not exceed 2.5%, anhydrite - up to 0.5%. The percentage of moisture content must be checked with a contact moisture meter.
The next step is the waterproofing deck. The film is spread over the entire surface with an overlap of 15-20 cm, the joints are taped. Next you need to lay the backing end-to-end. If a coniferous variety is used, then, according to the recommendations of the manufacturers, it is laid diagonally with trimming of the outer plates.
Before assembly, you must carefully measure the room again and draw a layout diagram to scale on a sheet of paper. This is done in order to accurately calculate the dimensions of the extreme strips. Their width should not be less than 50 mm. Otherwise, the first row is shifted by the missing centimeters.
Laying flooring material
Parquet slats are removed from the packaging and laid out on the floor. Since the top layer is made of natural wood, the surface may vary in tone or pattern.
Laying of wooden coverings must be done in the longitudinal direction. This is the best option, since the percentage of longitudinal shrinkage of wood products is significantly lower than transverse shrinkage.
Floating way
Installation starts from the length of the wall from left to right. A tenon is cut off at the end plank, the board is laid in place and plastic or wooden wedges are installed to provide a gap between the wall and the covering. The first row is assembled, the second begins with the trimmed lamella. If necessary, the connection is compacted using a tamping block.
The last row is cut to the specified dimensions with a miter saw, assembled along the end, then inserted into the gap and pressed with a metal bracket.
To form a pipe outline, you need to “cut” the strip with a pencil, cut it and cut out the required hole in compliance with the rules for expansion joints. The board is installed, the section along the edge is coated with glue and put in place.
On glue
The installation method using the adhesive method repeats the first stage (preparing the base). But the installation itself proceeds as follows:
- A suitable one- or two-component polymer adhesive is applied to the screed and carefully spread using a notched trowel.
- The tenon is cut off from the first row plank and installed in place, observing the thermal expansion joints.
- Subsequent strips must be laid in a standard manner, with dense interlocking.
- The last row is also trimmed and secured with a mounting bracket.
- After assembling the coating, it is necessary to place a weight on it for better adhesion to the base for 1-3 days.
Installation of baseboards and other moldings
Remove all wedges around the perimeter and activate the “warm floors”. Screw a decorative strip that matches the tone and texture to the wall, and install transition strips in the doorways. For columns and the like, flexible PVC thresholds can be used.
Waterproofing
After the base has been prepared, a special film with waterproofing properties should be laid on it. The strips are laid with an overlap of approximately 20 cm. The edges are secured using tape, and the film supply is placed on the wall for laying under the baseboard. The underlay used during the installation of laminate or parquet boards is not suitable for parquet.
The role of restrictive wedges is performed by a special self-adhesive rubber cord, which is installed around the perimeter of the room. The same element compensates for possible thermal expansion of the slats.
Board installation
So, we figured out the preparation of the base. Next, we’ll look at how to lay parquet boards on a concrete floor.
There are two installation technologies:
- floating floor;
- rigid connection with glue.
Below we will take a closer look at each installation method.
Floating floor
Laying parquet boards using the “floating floor” technology can be used for small rooms up to 50 square meters.
The installation process is carried out in the following sequence:
- First of all, a substrate (cork, composite or synthetic) is laid on the floor. The backing protects the wooden board from moisture and also provides sound insulation;
- then the first row of boards is laid. The top of the lock should be facing the wall. In this case, you should leave a gap between the wall and the board of about 10 mm. The bottom board that does not fit must be cut;
In the photo - laying the coating on the substrate
- Laying the second row should begin with the remainder of the cut wooden board so that the material is staggered. As a rule, boards are connected to each other using a tongue-and-groove joint. To finish the boards after joining, you can use a rubber or wooden mallet, or a wooden block;
- all other rows are laid according to this principle;
- After covering the floor, felt or cork expansion joint should be placed in the space between the covering and the wall.
Advice! You can decorate with wood not only the concrete floor, but also the walls. There are several ways to attach a board to a concrete wall. Most often, the frame is first installed using dowels, to which the lining or other material is attached with self-tapping screws.
This completes the coating installation process.
Parquet adhesive
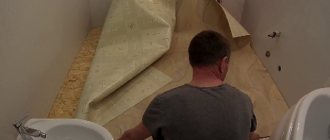
Plywood flooring
If you decide not to take risks and lay a stabilizing plywood layer on the screed, which will protect the parquet from swelling and damage, do the following:
- Thick plywood sheets (the thickness should be 2/3 of the thickness of the parquet) are sawn into squares (40 × 40 or 70 × 70).
- The screed is treated with a primer.
- Special glue is applied to the surface.
- After such processing, the plywood squares are laid, and it is done with an offset, and gaps of 3 mm are left between the sheets.
- The gap between the laid plywood and the wall should be approximately 1 cm. Upon completion of the work, it must be filled with sealant.
- Before installing the parquet, the plywood is sanded to eliminate possible differences.
USEFUL INFORMATION: Waterproofing a bathroom under tiles: which is better?
Laying features
To prevent illiterate installation from leading to damage to building materials, it is recommended to carefully understand the nuances of installation technology and only then begin work. Parquet board is a complex coating consisting of at least 4 layers. Therefore, it is not afraid of dampness and tolerates wet cleaning well.
Board structure
The top layer of such a coating is made of natural veneer, and it is the value of the wood from which it is made that affects the cost of the parquet board. This layer is coated with special oils or varnish to increase service life and improve performance characteristics. The bottom layer is also made from wood treated with moisture-repellent agents, but less valuable coniferous species are used for this.
To ensure that there are no gaps between the covering panels and for ease of installation, the boards are connected to each other using specially designed locks. These connection methods make it possible, if necessary, to dismantle the covering, which would be impossible when attaching it to the floor with glue or self-tapping screws.
Installation of parquet with brackets
If we lay planks on a screed using steel brackets, then the procedure is approximately as follows:
- To the wrong side of each plank, with the exception of the last row, at a distance of 15–40 cm from each other, we stuff special staples, which can be purchased at hardware stores. This manipulation is performed in such a way that half the length of the staple remains free.
- We coat the ends of the parquet planks with adhesive (you can use PVA) and lay them in a row.
- The second row is installed in such a way that the remaining free edge of the bracket fits securely into the adjacent plank.
- We repeat this process by analogy for the required number of rows.
- The final row of planks is glued to the previous one without using staples.
Tools and installation methods
To properly lay boards without plywood, tools are used that will not damage the material during installation:
- a hammer with a rubber tip or a mallet;
- tape measure at least 5 m long;
- two-meter level;
- jigsaw;
- wedges for leveling deviations in level and a bar for better joining of parts;
- carpenter's knife for adjusting the edges of panels;
- drill with a variety of cutting attachments.
Before laying, be sure to measure the humidity of the material and the base on which installation is being carried out. The results obtained should not exceed the parameters specified in the instructions. Before installation, you will need to make a project and determine how to correctly position the panels in the room. Thanks to the correct placement of the texture, you can visually align the room.
- In a square room, the boards are laid out in the direction of the light, that is, towards the window.
- When laying the coating diagonally, an original pattern is obtained, but the consumption of building materials increases.
- Usually the material is installed from the door in the direction of the step.
Laying diagonally
Tension parquet
If we are talking about stretched parquet laid on a screed, then the procedure is as follows:
- A hole 1 cm in diameter is drilled in each plank.
- The central row is assembled, which will later become the basis for the entire canvas.
- The tenons of the parquet planks are mounted in grooves offset by a quarter or half the length, so the holes made in the body of the parquet flooring must coincide.
- After assembling the floor, it is necessary to stretch special fastening cords made of plastic, which have the necessary elasticity to withstand possible seasonal changes in the geometry of the material.
Laying on an adhesive backing
Installation is carried out quickly using adhesive backings for parquet boards and parquet. This material makes it possible for people without special skills to do styling, who have never performed such work before. A characteristic feature of this substrate is its elasticity and elasticity. Plus, it also has other characteristics of such building materials:
- surface waterproofing;
- soundproofing properties, which reduce the noise level from neighboring rooms several times;
- strong adhesion of the board to the floor;
- an adhesive layer that prevents the panels from coming apart and prevents cracks from forming;
- The flooring can be laid directly on a concrete base.
Installation using this material takes place in several stages:
- First, check that the moisture content of the screed does not exceed 3%. If a plank floor is used as a base, it must be level, without sagging.
- A plastic film or moisture-proof material is laid on the base with an overlap of 10-15 cm.
- Then the underlay is laid perpendicular to the planned laying of parquet boards. It is placed with the adhesive side up.
- The joints of the material are taped with adhesive tape.
- The protective layer on the adhesive side is folded to a distance of no more than 20 cm, and the floor covering is laid on the substrate.
- Having laid out the next row of parquet boards, the protective layer is carefully pulled out from under them.
The coating laid out on an adhesive backing can be easily disassembled if necessary.
Laying on an adhesive base
Fastening parquet to plywood
When using plywood flooring laid on a screed, the planks are attached to it using parquet glue applied with a special spatula. Next, it is recommended to shoot the parquet flooring along the edge - several pins or nails per element. This will not only make the fastening more reliable, but will also allow you to squeeze out excess glue and ensure a more uniform fit of the planks.
USEFUL INFORMATION: How to make 3D floors with your own hands (video): step-by-step instructions
Which method should you prefer?
Each method of installing parquet boards on concrete has the right to life. The method using fasteners is one of the longest. Its implementation provides the best thermal and waterproofing, somewhat reduces the requirements for the quality of the base, and also makes it possible to covertly lay communications. The small thickness of the manufactured dies forces the installation of logs with small pitches, which is not entirely justified. The most labor-intensive and time-consuming is the adhesive method.
The glue helps to further reduce deformations in the coating; however, replacing defective boards is extremely difficult. The floating method is the fastest. Allows floors to change area without deformation depending on changes in temperature and humidity conditions.
Defective dies can be easily replaced with new ones. Thin planks can be used to install heated floors. The laying method contributes to deflections of the coating, leading to wear of the locking joints.
Final processing of parquet
After installation, the floor covering must undergo a rough sanding procedure. Before it, all minor defects, cracks and chips are covered with putty. Then the base is refined using fine-grained grinding machine attachments.
Upon completion of sanding, a primer and protective coating are applied to the parquet, and the gaps near the walls are closed with baseboards.
Having laid parquet on the floor, to extend its service life, do not forget about the need for appropriate care: treatment with special care products, annual application of wax protection, and careful handling. Then the noble floor covering will delight you with its attractiveness, reliability and convenience for a long time.
Glue selection
When preparing the adhesive mixture, you need to choose the optimal type depending on the type of surface.
Dispersive – suitable for beech and oak parquet. The advantage of this mixture is its affordable price.
The disadvantages are: the maximum drying time is 5 days.
Solvent-based - its advantage is the ability to make changes to an already glued surface within 25 minutes. Drying time is 3–5 days.
Reactive hardening mixtures. Suitable for all types of wood. Drying speed – 2 days. Expensive modern adhesive based on a polyurethane composition. The highest strength and reliability indicators are provided by two-component adhesives.
Any adhesive is applied to the board using a notched trowel.
Notched trowel
It allows you to avoid unevenness of the glue layer.
For installation you need to prepare the following tools:
- fine-toothed saw;
- hammer;
- drill;
- roulette;
- construction pencil;
- cord;
- square;
- screwdriver;
- construction knife;
- wedges, block, wedges;
- putty knife;
- parquet sanding machine;
- construction vacuum cleaner;
- corner grinder.
Corner grinder
Glue method
A more solid floor construction involves gluing the boards to the screed. True, the requirements for the evenness and strength of the base in this case are increased. A layer of primer (usually reactive) is applied over the screed to provide vapor barrier and increase the adhesion of the adhesive to the base. It is recommended to sprinkle the primer with quartz sand (about 1 kg per 1 m²) so that the surface becomes rough and the adhesion of the glue to it becomes even better. Next, lay the parquet board. To compensate for different changes in linear dimensions between wood and concrete surfaces, highly elastic adhesive compositions are used - either one- or two-component polyurethane, or based on MS polymers, but in any case not containing any moisture (water or solvents). A high-quality coating made using this technology can be sanded. There is no need for overhead thresholds.
When installing a floor using the adhesive method, difficulties may arise. In particular, for reliable and uniform gluing, a weight must be placed on each board. This is easy to do in a small room, but problematic in a spacious room.
4