I ask for your advice on how to properly and safely make an opening for the stairs in the floor slab. Panel type PC 40-15-8. Option 1 (advised by the person who will make the stairs): as shown in the diagram - cut an opening 80 x 280 cm.
I ask for your advice on how to properly and safely make an opening for the stairs in the floor slab. Panel type PC 40-15-8. Option 1 (advised by the person who will make the stairs): as shown in the diagram - cut an opening 80 x 280 cm.
Option 2. Cut an 80 cm wide opening along the entire length of the panel. Fill the area that will be the platform for the stairs. Thanks for answers.
In practice, I hauled 12 tons of cargo up a 200 meter tower. By the way, why do you need a 24th channel for a span of 4 meters? Did you like the size? Like, is it similar to the size of the void? But there shouldn’t be any problems with the nests. However. There are other ways to secure it. Yes, by the way, GIP BU. Do you have any real experience in actual installation? or is everything just on paper?
For reference. An hour of work by a Chinese a la Liebherr costs about 2500. They charge immediately for 4 hours. In total, putting a couple of channels out the window (if you have no imagination) costs 10 thousand.
GFS GFS Users
GFS GFS Users
Good afternoon Tell me how to secure a monolithic staircase to the floor slab at the junction? Initially, they did not release the fittings for this matter, they screwed it up.
Stolyarov F Stolyarov F Users
Drill holes at the end of the floor slab and hammer F12 reinforcement into it. The pitch is approximately 80-100 mm.
Installation of load-bearing wooden beams in a staircase made of brick or other piece wall materials
Where and why are openings made in ceilings?
Residents of cottages, panel and brick houses in most cases ask to make an opening in the floor slab to arrange flights of stairs, not originally included in the project, to the lower floor. Less often - in the attic. Sometimes they order to drill an opening in the floor slab into the basement.
In addition, the corresponding openings are cut during redevelopment with the combination of rooms vertically, as well as for the installation of additional communications between floors.
In commercial premises, an opening in a tiled floor is sometimes necessary to install elevators and escalators.
Some tips for processing hollow core slabs
Tip one: it’s better not to cut hollow-core floor slabs yourself. This is a labor-intensive, painstaking process that does not tolerate mistakes due to inexperience. Many factories for the production of concrete products provide services for sawing floor slabs. The cost of such work is low, so it is better to trust the professionals.
Tip two: when cutting concrete, it is better to use a circular saw rather than a grinder.
Tip three: carry out work wearing glasses and overalls. Protect your eyes from concrete dust. If possible, wear gloves and a respirator.
Safety when cutting an opening in a ceiling
As a rule, the type of work described above is very labor-intensive and requires strict compliance with a number of safety conditions.
The location of the future opening and the method of strengthening it are determined by the type of floors and the structural design of the building as a whole. For example, if we are dealing with a floor with prestressed reinforcement, cutting it can reduce the load-bearing capacity of the structure to zero. In this case, to construct the opening, the ceiling must be dismantled altogether.
To avoid accidents and other “force majeure”, reinforcement with metal structures is initially carried out at the edge of the future cut. It is necessary to ensure that no section of the floor is left unsupported during the cutting of the opening. It is recommended to frame the cut-out area with special reinforcing structures: corners, I-beams or channels. Metal beams are placed along the floor slab, fastened together by welding. In this case, the frame constructed from metal profiles must rest firmly on the wall.
In addition, the fragment cut out in the slab is fixed with supports and cables. And only after cutting is completed, it is carefully removed using a winch, then, before being taken out of the room, it is additionally cut and crushed.
We warn owners against unauthorized and unskilled work on constructing an opening in the floor slab. There have been documented cases where such irresponsibility led to the most serious consequences, including the collapse of interfloor ceilings.
Where can you make a hatch in a slab?
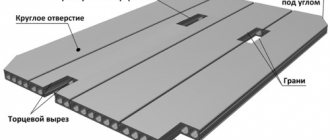
Before we begin to describe the process of how to cut a hatch, it is worth saying a few words about where the hatch can be cut. So the hatch should be cut at the junction of two slabs in order to minimally weaken the structure of each of them. Thus, a hole in the slab can be punched no more than 1/3 of its width, and the selected part should be on one of the sides of the slab. And lastly, if you have a hatch with different dimensions of the hatch walls, then the larger side must be cut along the length, and the smaller side, respectively, across.
Tools for making an opening in the ceiling
Complex, labor-intensive work is associated with a lot of noise and vibration loads on the building structure as a whole. Too strong, they are unacceptable by any building regulations, since they can even lead to the collapse of structures.
Accordingly, it is better to prefer modern innovative technology to “rough” percussion instruments. The ideal option in our case is the use of so-called diamond cutting. Diamond circular saws have proven themselves to be excellent for making openings in reinforced concrete floors. These tools operate with a low noise level and virtually eliminate the occurrence of dangerous vibration loads and cracks - frequent “companions” when working with jackhammers and rotary hammers.
For high-precision and safe cutting of floors, a universal joint cutter is often used. This device consists of a frame with a trolley and a motor with a belt drive, which rotates the cutting disc at a given speed. The tool has a variable cutting depth and does not need to be fixed on special guides. Diamond discs are used as the working surface.
Specifics of installing an opening for a staircase
As already noted, cutting an opening in a floor slab is in most cases used for arranging stairs, so let’s look at this type of work in more detail.
Here, for the convenience of your movement, it is important to take into account the width of the steps and the size of the structure as a whole. It is most convenient to place the stairs so that the opening in the floor slab is located along the beams.
Experts have calculated that the optimal height between the outer beam enclosing the opening in the floor slab and the steps should be at least two meters. The greater the clearance, the more convenient it is to use the ladder. Especially if you need it to carry furniture.
The size of the opening in the slab also depends on the type of staircase. A screw or folding one will require less space than a regular straight one. Having determined the dimensions, you should add at least 5 cm to them on all sides for subsequent finishing of the opening.
Where can you make a hatch in a slab?
Before we begin to describe the process of how to cut a hatch, it is worth saying a few words about where the hatch can be cut. So the hatch should be cut at the junction of two slabs in order to minimally weaken the structure of each of them. Thus, a hole in the slab can be punched no more than 1/3 of its width, and the selected part should be on one of the sides of the slab. And lastly, if you have a hatch with different dimensions of the hatch walls, then the larger side must be cut along the length, and the smaller side, respectively, across.
Documents for redevelopment with the construction of an opening in the floor slab
The design documentation must reflect not only the order in which all work is performed, but also the scheme for reinforcing the opening in the ceiling.
The key official document, on the basis of which, in fact, a project for such a redevelopment will be developed, is the technical conclusion from the author of the house project.
After receiving this document, only an organization with SRO approval should prepare the project. A package of documents, including a technical report and a redevelopment project, along with the application is submitted to the Housing Inspectorate through the one-stop service.
Coordination of the arrangement of the opening for the stairs
As with most redevelopments, it all starts with collecting documents for the Moscow Housing Inspectorate. So, stock up:
- registration certificate for the apartment (issued at the regional BTI);
- certificate of ownership of real estate;
- redevelopment project (it can only be developed by an organization with SRO approval);
- a technical conclusion indicating that all planned work is permissible and safe (in most cases, when working with floors, it is issued by the author of the building project);
- statement about the upcoming work.
The technical conclusion in this list of documents is paramount. Only on its basis, taking into account all its nuances, will specialists begin developing a project for specific work.
The latter, in turn, should be ordered only from organizations with SRO approval, for example, from our company. Organizations without the appropriate permission, as a rule, do not care that all work is carried out in strict accordance with the project, and, therefore, can, in modern terms, mess up. And you will have to answer. In addition, cutting out the ceiling of the opening for the stairs involves carrying out a number of so-called hidden works - for example, to strengthen structures. And they require other official papers - inspection reports, which offices without SRO permission do not have the right to draw up.
Techniques and methods for installing stairs
The flight of stairs of the main staircase must be at least 1 m wide. When designing such a spectacular structure in any interior, it is important to maintain the required slope: for residential premises it should be no more than 38°, the norms allow a slope of up to 45°. This standard regulates the design of stairs only in houses where a small number of people live.
Main parameters and dimensions of a flight of stairs:
- LK - horizontal projection of a flight of stairs;
- H - vertical projection of a flight of stairs;
- h is the “clear” distance between two adjacent steps, the height of the riser;
- b - tread width;
- B - width of the flight of stairs;
- B 1 - the width of the flight of stairs “in the clear”;
- α is the angle of inclination of the flight of stairs.
A slope of a flight of stairs equal to 60° is permissible only for auxiliary stairs: basement, attic, attic; it must be constant along its entire length
The height of the passage, that is, the distance between the step and the ceiling or beam, should be at least 2 m. The intermediate platform is planned to be at least 1 m wide and not less than the width of the flight. For fire safety purposes, the stairs require free passage. If there are doors next to it, then the direction of their opening should be taken into account: the staircase ends in front of the door - the door opens inward, and the depth of the area in front of the door should be increased by 0.5 m.
Stairs must be well lit, especially the first and last steps. Proper lighting of a stepped structure not only solves the safety problem, but also largely affects the aesthetic perception of the staircase. Lighting can enhance the spatial effect of the staircase, for example, connecting the staircase volume with the surrounding rooms or, conversely, dividing them.
Before you begin constructing a staircase, you should calculate how much space it will take up and whether it will fit into the designated area, taking into account the following rules for staircase construction :
- the minimum width of a flight of stairs is 1000 mm;
- maximum riser height - 200 mm;
- minimum tread width - 200 mm;
- minimum passage height - 2000 mm;
- The minimum width of the intermediate landing is 1000 mm.
Openings for installing stairs
When designing a house, it is necessary to plan in advance the opening for installing the stairs. The following describes the technology for constructing a staircase opening.
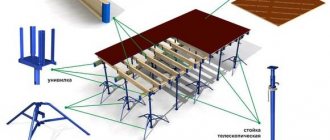
Installation of load-bearing platform beams in the walls of the house.
If the staircase is located in a stairwell, then the load-bearing beams supporting the landing must be installed after the walls of the house have been erected. To place load-bearing platform beams in the masonry and concrete walls of the house, grooves or niches must be left.
Installation of load-bearing wooden beams in a staircase made of brick or other piece wall materials
Before installing wooden load-bearing beams into the walls of a building, their side surfaces should be coated with hot mastic on bitumen or wrapped with roofing felt, which will protect the latter from the moisture of the walls. The beams are made with a bevel to improve the release of water vapor. There is no need to coat the end; it should be left open. At the same time, the end of the supporting beam should not touch the wall.
In order for the top level of the load-bearing beams to exactly coincide with the design level, wooden blocks coated with an antiseptic are placed under the beams, with which their height can be adjusted. In addition, wooden spacers prevent the wood of the load-bearing beams from collapsing, and also increase the area of support of the beams themselves on the walls. Between the end of the beam and the bottom of the wooden spacer there must be a roll of waterproofing, for example roofing felt.
After the supporting beams of the platform have been installed and leveled, the niches are filled with bricks. Do not skimp on the roll lining waterproofing, it should protrude from the wall. It is better to trim the protruding edge afterwards than to allow the landing beams to rot and, as a result, the possible destruction of the entire staircase structure.
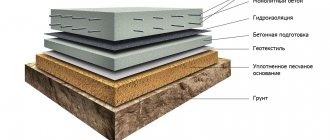
Features and rules for installing floor slabs
During construction, floor slabs must be laid in compliance with the standards that require the installation of slabs with a supporting surface size in the range from 100 mm to 120 mm. At the same time, depending on the materials used for the construction of walls, the size of the support may vary, amounting to:
- 70 mm – for metal structures;
- from 80 mm to 180 mm in case of support on a wall made of brick;
- from 70 mm to 160 mm for reinforced concrete walls;
- from 100 mm to 150 mm for foam and aerated concrete structures.
The values given are indicative only. The exact amount of support is made at the calculation stage, based on the specifically selected materials and individual conditions.
Installation of PC floor slabs is most often carried out by sealing technological voids, which are foamed and plastered to prevent damaging moisture from entering the panels. The embedment depth, as a rule, coincides with the amount of support. Otherwise, open cavities may be exposed to moisture and frost, resulting in cracks appearing in the slab, reducing the service life of the reinforced concrete product. Operation of PC slabs with open technological voids is not allowed.
Storage and transportation rules impose requirements for storing PC floor slabs, which are arranged in stacks with wooden spacers. The location of their installation must coincide with the stiffening ribs, which are located in the locations of the slinging loops. The maximum possible stack height is no more than five products.
Before starting installation work, you need to prepare a drawing of the future structure. It shows all the structural elements with their dimensions. The following requirements apply to the dimensions of individual parts:
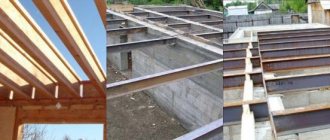
Installation of a staircase in a wooden floor
The sequence of manufacturing a staircase opening in a wooden floor is as follows.
Construction of a staircase in a wooden floor:
- a - in the middle of the ceiling;
- b - near the wall;
- c - device for connecting beams.
- First, in the place where the staircase opening is planned, it is necessary to trim the ordinary floor beam. If the dimensions of the staircase opening should be larger than the hole formed after trimming one beam, you can shorten another beam, but no more than two.
- Two paired beams are installed parallel to the row floor beams.
- Short paired beams are attached to the paired beams, which form the staircase opening.
- Short, cut ones are fixed to the already installed beams: they will provide additional rigidity to the opening.
The thickness and height of the paired beams must be equal to the dimensions of the main beams. The beams are connected to each other using metal corners and self-tapping screws or using a special fastening profile.
If the staircase opening is located near a brick wall, the beams must be secured at one end to the wall using the technology discussed above.
Construction of a staircase in a reinforced concrete floor
The opening for the stairs in the interfloor ceiling, consisting of standard reinforced concrete slabs, must be thought out in advance before the manufacture of the floor.
Construction of a staircase opening in a reinforced concrete floor:
- a - in the middle of the ceiling;
- b - near the wall; c - arrangement of formwork for monolithic sections.
The staircase opening in this ceiling is framed with steel profiles (angles, channels, I-beams). Usually, when constructing a building, a gap is left under it, the size of which is equal to the width of a standard reinforced concrete slab. The staircase opening takes up much less space than planned, so the remaining holes on one or both sides are sealed.
It is necessary to place metal beams along the floor slabs, fastening them together by welding. The frame formed from metal profiles should rest on the walls in the same way as the floor slabs. After its installation, you can begin to reinforce monolithic sections.
In order to hide the metal of the structure, you need to raise the frame 2-3 cm relative to the bottom line of the floor slabs. During the manufacturing process of a monolithic section, the concrete solution will flow under the steel profiles and hide the metal. The monolithic fastening will be reliable if short pieces are welded onto the lower shelf of the metal profile and a poppy mesh with a rod thickness of at least 3 mm is attached to them.
Floor slab installation technology
For installation you need:
Construction of the floor slab.
- round hollow-core reinforced concrete slabs;
- truck crane;
- cement mortar (cement, water, sand);
- Master OK;
- grinder or autogen;
- sledgehammers;
- level;
- scrap;
- steel brush;
- tow;
- gypsum mortar;
- lime-gypsum mortar;
- thermal insulation material;
- welding machine.
This is not to say that installing floor slabs is an easy process; on the contrary, it is considered quite labor-intensive and risky.
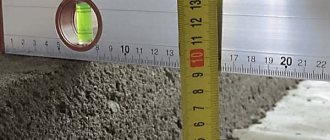
Any foundation is not level and smooth, therefore, before installing reinforced concrete floor slabs, it would be correct and advisable to make the foundation level, for example, lay a brick row on a concrete base. You can check how smooth the surface is using a level. Floor slabs can only be laid on the most flat surface possible; the future service life of the entire building depends on this.
It is necessary to take care of the strength of the foundation, because due to heaving of the soil, its deformation can occur, and regardless of how responsibly the builders approach the installation and how they lay the floor slabs, the building will sag over time.
Calculation of floor slabs.
The foundation can be secured with a regular reinforced mesh, onto which concrete mortar is subsequently applied and floor slabs are installed. The cement must be at least grade 100. The height of the cement layer must be at least 20 cm.
Before installing reinforced concrete floor slabs, you need to prepare them.
If there are flaws, protrusions or chips on the surface, they must be eliminated.
To understand how to lay slabs, before installing and assembling reinforced concrete floor structures, you need to calculate the width so that they occupy the entire perimeter and there are no uncovered parts left. The calculation scheme is quite simple.
Scheme of laying floor slabs.
Floor slabs should only be laid on the main walls of the future premises. Installation of internal partitions and walls is carried out after installing the floor slabs, and they should rest 12 cm on the wall. Adjacent slabs must be secured to each other with mounting loops. For installation, it is better to use a cement-sand mortar; it must be liquid, the sand must be thoroughly sifted, otherwise even if small debris gets in, it can lead to deformation of the floor and ceiling.
After the floor slabs have been installed, there are seams between them that must be sealed. All seams must be cleaned using a steel brush. The gaps between the elements of the reinforced concrete structure are filled with tow, previously soaked in gypsum mortar. The tow layer must be compacted. When the gypsum mixture dries, its volume increases, thus, the tow will be pressed against the walls as much as possible. After this, the cracks are covered with lime-gypsum mortar.
The existing ends also need to be sealed so that the slabs do not freeze during the cold season.
Floor slab formwork.
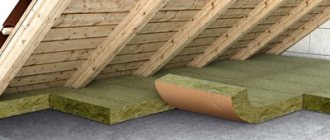
To do this, you can use mineral wool, concrete mortar or backfill brick.
In any construction process, force majeure situations may arise, for example, slabs may burst if unloading rules are violated or they were stored incorrectly.
But it is not advisable to throw away such expensive building material. They can be installed on 3 main walls. Or use them to install the attic space, in this place the load is minimal.
• A storage area is being prepared, and if necessary, the area around it is leveled so that truck cranes and construction equipment can pass through
Before installing hollow core slabs in the design position, reinforced concrete products are stored in stacks, and the quality of the panels depends on compliance with storage conditions. Concrete is a porous material that can absorb moisture if it lies on the ground or is exposed to precipitation. Irreversible damage and deformation often occur during periods of temperature fluctuations (freezing - thawing) if reinforced concrete slabs are stored outdoors.
Another harmful factor is leaching of reinforced concrete slabs (the process of corrosion of cement stone), which changes the appearance and load-bearing capacity of the products. Therefore, when storing many hollow core slabs, moisture-proof materials are used to protect reinforced concrete products:
Warehousing procedure for storing hollow core slabs
• A location is selected on the construction site where reinforced concrete slabs (hollow-core or monolithic) will be stored.
• A storage area is being prepared, and if necessary, the area around it is leveled so that truck cranes and construction equipment can pass through
• Wooden spacers and material are selected to protect the hollow core slabs from moisture.
When storing hollow-core floor slabs in stacks, they are sorted by length and width, laid in even tiers. At the top are the slabs that are supposed to be used first (foundation, flooring of the first floor), and at the bottom are the slabs that are used last.
Construction of an opening for a spiral staircase
The opening for a spiral staircase can be square, rectangular or round. It is provided at least 20 cm larger than the diameter of the staircase itself.
First, draw a circle on the floor surface, then use a plumb line to transfer the markings and similarly mark a second circle on the ceiling. Next, two jack stands are installed and a through hole is drilled in the center of the opening in the interfloor ceiling - from bottom to top. After this, on the upper floor, a pin is inserted into the resulting hole and a circle is drawn on the floor surface using a pencil and rope.
Marking the staircase opening for a spiral staircase
It must be remembered that the diameter of the circle must be drawn taking into account the thickness of the beam that will frame the opening. Next, they cut out the floor along the contour of the staircase opening and knock out unnecessary pieces of floor boards without affecting the load-bearing floor beams.
Afterwards, a glued beam is installed into the frame of the ceiling, cutting out the remaining load-bearing beams and securing it with metal toothed plates or corner plates.
Decoration of the staircase:
- a - sawing out floor beams;
- b - installation of a bent structure and framing it with plinths.
The staircase can be given an interesting shape or various decorative railings and finishing elements can be used.
Opening in the floor slab under the stairs
Good day. What is the right thing to do? It is necessary to make an opening for the stairs in the floor slab between the 1st and 2nd floors. How to calculate this? The slab rests on load-bearing walls on three sides.
A difficult question, however. )) Was it unplanned?! ))
If there was a project, but without it, go to the designer to make changes. And if it wasn’t, then it’s more difficult. ) But also to the designer, so that he can count it. ))
You need to think about supporting the perimeter of the future opening somehow with beams. Otherwise I don't recommend it.
Good day. What is the right thing to do? It is necessary to make an opening for the stairs in the floor slab between the 1st and 2nd floors. How to calculate this? The slab rests on load-bearing walls on three sides.
You should contact your home designer.
Residential complex Magnifika Lifestyle
15 minutes from the metro station "Novocherkasskaya". Apartments on the Okhta embankment. Mortgage from 5.1%. Installments 10/10/80
Rublevo Business Park
Office sales start from 8.2 million rubles. Parking space as a gift. Class A business park. 500 m to the metro station "Linden Roshcha". Call!
Start of sales! Apartments from 14.5 million rubles. 5 minutes walk to Maryina Roshcha metro station. Call!
Residential complex "Izmailovsky Park".
Business class apartments from 5.5 million rubles. with decoration, furniture and appliances. Panoramic windows.
Apartments with white box finishing. 38 sq m from 14.4 million rubles. 10 minutes to Alekseevskaya metro station. Mortgage from 4.8%
Club house Shabolovsky
Premium apartments with registration from 24.5 million rubles. Near Gorky Park and Danilovsky Market.
Residential complex New Sertolovo. Comfort class
New line on sale! Finished apartments from RUB 3.1 million Low-rise area surrounded by greenery
Residential island Nagatino i-Land
Business class apartments with a 3% discount with 100% payment. 5 minutes. to metro station Technopark. Call!
Start of sales of apartments with finishing! In September there is a 12% discount. 18 minutes to Komsomolskaya metro station.
Residential complex GloraX City Zanevsky
Finished apartments near the metro for 7 million rubles. Full and pre-finishing. 2 minutes to Ladozhskaya metro station
Business class apartments from 9.1 million rubles with panoramic views of Sokolniki Park. 15 minutes to the metro.
Business class apartments in a club house from 15 million rubles. Private project, only 89 apartments. 5 minutes from Vasileostrovets Park!
Apartments House Chkalov
Premium class apartments from 19.2 million rubles. Promotion until the end of the month - from 495,000 ₽ per sq.m.
Residential complex "City Stories".
Installment plan 0% for 6 months. Apartments with and without white box finishing. Occupancy in 2023
View apartments in the Central Administrative District from 15.3 million rubles. 450 meters to Moscow City. 2 minutes to the metro. Installment plan. Mortgage from 4.8%.
The last stage of the business class residential complex Magnifika Residence is on sale. View apartments on the embankment
Benefits up to 1.1 million rubles! Delivery this year. Prestigious area. Mortgage 4.3%. There are 5 large parks nearby.
Club house VITALITY
Construction readiness 99% Keys this fall! Closed courtyard, panoramic windows. 2 minutes. from metro station Dubrovka
Residential complex "Colors of the Rainbow"
Apartments near Devyatkino metro station! Green courtyards and playgrounds! An ideal place to live.
Views of the Meshchersky forest. Convenient access to the Moscow Ring Road. 20 minutes to Moscow City.
Comfort class apartments. M. Devyatkino - 10 minutes. Enclosed yard without cars.
from 4.5 million ₽. 7 minutes to metro station Pyatnitskoe highway. Apartments with finishing. Completion in 2023. Area with developed infrastructure.
Business class apartments. The monolith is ready - façade work is underway! We are building ahead of schedule. Closed yard.
Residential complex "Silver Fountain"
Apartments from 14.5 million rubles in a finished house! Installment plan for rent until December 2023 Mortgage from 4.3%
A whole block of apartments with designer decoration. Chamber quarter near the Central Administrative District, park at the entrance
A complex of apartments in the north-west of Moscow with terraces 100 meters from the Moscow Canal.
Business class apartments from 5.2 million within the Third Transport Ring. Own sports. infrastructure 20,000+ m2.
Business class apartments from 16.86 million rubles. Panoramic views of Victory Park, Moscow State University and Moscow City
View apartments near nature reserves and the river. Large selection of layouts.
Business Class. For residents: spa, hammam, yoga, fitness, restaurant. 7 parks nearby.
New apartments for sale. 2-room apartments from 10.6 million rubles. European-style quarter. Nearby is a nature reserve
Residential complex "Seliger City"
Apartments with finishing from 11 million rubles. Stages 1 and 2 have been completed. The yard-park with a pond is ready for walks.
The house is surrounded by forest. Apartments from 97 thousand/m2. European level of comfort. 30 minutes to Kuntsevskaya metro station.
"Happiness on Semenovskaya"
Business class apartments from 22.5 million rubles. The monolith is ready! 2% discount with 100% payment and mortgage.
Luxurious penthouses with swimming pools and views of the Kremlin. Silence and space. Your own yard park.
Business class house surrounded by a park! 700 meters from metro station Olkhovaya.
Residential complex "Festival Park"
Family format of business class apartments. Closed landscaped yard. Near schools and children. gardens.
Apartments from 4.1 million rubles. 2 kindergartens and a school. 10 minutes to metro station Komendantsky Prospekt. View of the park.
Apartments House Chkalov
Premium class apartments from 19.2 million rubles. Promotion until the end of the month - from 495,000 ₽ per sq.m.
Residential complex "Lilac Park"
Start of sales! Apartments from 6.5 million. Subsidized mortgage from 0.8%. m. Rokossovsky Boulevard.
AFI Park Vorontsovsky!
Apartments with designer finishing, White box and without finishing. Panoramic view of Moscow State University and Vorontsovsky Park
Residential area Shagal
Apartments on the Marc Chagall embankment from 12.1 million rubles. Near metro station "Technopark". Call!
Dimensions and prices for flights of stairs:
| product name | Length (L) mm | Width (B) mm | Height (H) mm | Weight (kg) | Price (RUB including VAT) |
| Flights of stairs LM 15-12 | 3160 | 1150 | 1500 | 1,65 | 11600 |
| Flights of stairs LM 18-12 | 3760 | 1150 | 1800 | 1,97 | 15300 |
| Flights of stairs LM 28-12 | 3261 | 1200 | 1400 | 1,2 | 6200 |
| Flights of stairs ML 24-60-10 | 2934 | 1050 | 1200 | 1420 | 7900 |
| Flights of stairs ML 24-60-12 | 2934 | 1200 | 1200 | 1620 | 8400 |
| Flights of stairs ML 24-60-13 | 2934 | 1350 | 1200 | 1800 | 8900 |
| Flights of stairs ML 27-60-10 | 3269 | 1050 | 1200 | 1530 | 8400 |
| Flights of stairs ML 27-60-12 | 3269 | 1200 | 1200 | 1740 | 9400 |
| Flights of stairs ML 27-60-13 | 3269 | 1350 | 1200 | 1940 | 9 900 |
| Flights of stairs ML 30-60-10 | 3605 | 1050 | 1500 | 1700 | 9 900 |
| Flights of stairs ML 30-60-12 | 3605 | 1200 | 1500 | 1850 | 11400 |
| Flights of stairs ML 30-60-13 | 3605 | 1350 | 1500 | 2000 | 12 400 |
| Flights of stairs ML-33-60-10 | 3940 | 1050 | 1650 | 1800 | 10 900 |
| Flights of stairs ML-33-60-12 | 3940 | 1200 | 1650 | 2200 | 11 900 |
| Flights of stairs ML-33-60-13 | 3940 | 1350 | 1650 | 2500 | 12 900 |
| Flights of stairs ML-36-60-10 | 427 | 1050 | 1800 | 2050 | 15 900 |
| Flights of stairs ML-36-60-12 | 4275 | 1200 | 1800 | 2360 | 16 900 |
| Flights of stairs ML-36-60-13 | 4200 | 1350 | 1800 | 2500 | 18 900 |
| Flights of stairs 1 LM 30.11.15-4 | 3030 | 1050 | 2500 | 1480 | negotiable |
| Flights of stairs 1 LM 30.12.15-4 | 3030 | 1200 | 2500 | 1700 | negotiable |
| Flights of stairs 1 LM 27.11.14-4 | 2720 | 1050 | 1400 | 1330 | 6300 |
| Flights of stairs 1 LM 27.12.14-4 | 2720 | 1200 | 1400 | 1520 | 7100 |
| Flights of stairs LM 30.54-10 | 5160 | 1050 | 1500 | 2900 | 16 400 |
| Flights of stairs LM 27.54-10 | 5360 | 1050 | 1600 | 2850 | 15 900 |
Z-shaped flights of stairs
| product name | Length (L) mm | Width (B) mm | Height (H) mm | Weight (kg) | Price (RUB including VAT) |
| LM 30.54-10 pr. | 5160 | 1050 | 1500 | 2900 | 16 900 |
| LM 30.54-10 p. | 5160 | 1050 | 1500 | 2920 | 15 900 |
| LM 30.60-10 pr. | 5760 | 1050 | 1500 | 3150 | 17 900 |
| LM 30.60-10 p. | 5760 | 1050 | 1500 | 3180 | 16 900 |
| LM 30.56-10 pr. | 5360 | 1050 | 1500 | 2900 | 19 900 |
| LM 30.53-12 pr. | 5060 | 1200 | 1600 | 3280 | 18 900 |
| LM 33.53-10 pr. | 5060 | 1050 | 1600 | 3050 | 19 900 |
| LM 30.56-12 pr. | 5360 | 1200 | 1600 | 3700 | 20 900 |
| LM 33.56-12 pr. | 5760 | 1200 | 1600 | 3900 | 21 900 |
| LM 33.56-13 pr. | 5760 | 1350 | 1600 | 4100 | 22 900 |
| LM 33.60-13 pr. | 5760 | 1350 | 1650 | 4250 | 23 900 |
Production technology
In our company you can purchase reinforced concrete structures of the highest quality at very reasonable prices. But what does this quality depend on? Naturally, from compliance with production technology. And here it is very important to control quality at four main stages.
1. Knitting reinforcement. There are certain standards, compliance with which guarantees the strength of the future structure. Also at this stage, the quality control department must clearly track the location of the mortgages so that the marches can be installed correctly and without problems in the future.
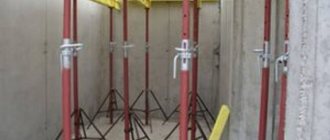
Installation of metal beams for the opening in the ceiling under the stairs
When creating an opening for the stairs, steel beams are placed along the interfloor slabs. They are installed in the same way as when making a staircase opening in a wooden ceiling. Metal beams are welded together. The metal frame obtained in this way should rest on the walls of the building, just like the reinforced concrete interfloor slabs. When the frame of the profiles is installed in its place, they begin to reinforce the areas to be poured with a monolith. The lower surface of the formwork is formed by a shield, which is made on the floor of the lower floor and lifted to the installation site using ropes. Already at the installation site, this shield is attached to the beams supporting the formwork. Such beams can be made from boards placed on edge, or from thick reinforcing bars.
Wire loops are placed on the beams, and mounts are inserted between their branches. After this, they begin to twist the wire, thereby attracting and pressing the formwork panel to the adjacent floor slabs. To prevent the possibility of laitance leakage, the shield is covered with plastic film. When the formwork is secured, they begin to reinforce and pour the concrete mixture. The assembly wire twists of the formwork are left inside the concrete monolith.
Dismantling floor slabs Openings in floors
Expansion of a monolithic floor with reinforcement from 27 channels
Partial dismantling of the floor slab. The channel is placed under the walls.
Installation of reinforcement of the floor slab according to the project
Reinforcement of the floor with 24 channels according to the project
Dismantling of the floor slab with reinforcement according to the project (1)
Partial dismantling of the floor slab with reinforcement according to the project. (2)
Dismantling of the floor slab with reinforcement according to the project (2)
Dismantling floor slabs on the first floor
An opening with reinforcement in a monolithic 20 cm ceiling according to the project. Cutting with a wall saw as close as possible to the wall 3 cm, after which, at the customer’s request, knocking down the side with a jackhammer.
Expansion of the monolithic ceiling by 20 cm, increase in the flight of stairs. The project requirement is to preserve the lower reinforcement.
Holes are drilled for the opening and preparation for reinforcement of the floor begins. Four heels are placed on a non-shrinking mortar and secured with anchors.
The reinforcement units are assembled below and all dimensions are checked.
Racks are placed level
The nodes are assembled on the columns. The I-beam with the overlap is wedged. The reinforcement is scalded and you can cut the opening in the ceiling for the stairs.
Openings in ceilings using diamond drilling without impact noise and dust are more expensive
ATTENTION!
We do not have other sites, but on many Runet sites, the topics of which are:
diamond cutting, redevelopment of apartments, strengthening of openings and drilling holes
, photographs of work done by the Slom Service company are posted, as well as information from the site
slom-servis.ru.
Installation of a metal frame for an opening in the ceiling under the stairs
When making a metal frame from profiles, it is recommended that their “horns”, that is, the shelves of the profiles lying lengthwise, be placed in the middle of the ceiling. Then it will be easier to produce a monolithic section. For transversely lying profiles, it does not matter where the horns are directed. But if the opening in the ceiling under the stairs is planned to be finished with wood or other material, then it is also better to direct these horns inside the areas being poured with concrete.
To hide the metal frame, it must be raised relative to the bottom surface of the floor slabs by twenty to thirty millimeters. Then the cement poured into the formwork will flow under the metal profile, covering the steel frame. To ensure that the cement does not begin to fall off over time, it is recommended to weld several short pieces of metal to the bottom flange of the profile and attach a special plaster mesh to them.
Construction of a beamless structure for an opening in the ceiling under a staircase
There is also a more economical option for constructing a staircase opening when, instead of a welded structure, a so-called beamless structure is used. It does not include longitudinal beams, and the opening itself is framed with metal corners. These corners rest on the edges of adjacent floor slabs with their shelves. In this case, the entire weight of the monolithic section and the staircase itself will be transferred directly to the interfloor slabs. This method is only suitable for fairly narrow stairs, and this method is not suitable for constructing a wide staircase opening.
The technique for making openings in the ceiling along the stairs on bowstrings and on stringers is almost identical. That is, the openings themselves, the options for supporting the bowstring on the lower and upper beams are the same as for stairs on stringers.
Stairs are complex structures, the function of which is not only to decorate the house, but also to ensure safe descent and ascent. If you have started construction of a new house, then the location of the stairs is most likely already taken into account in the building design. In this case, an opening is left in advance in the ceiling, where the stairs will be placed in the future. However, it happens that when designing a building some details were not taken into account, so openings in the floors for a new staircase have to be made in the already finished floor.
The decision to cut an opening in the ceiling must be accompanied by careful calculation, otherwise the most unpredictable consequences are possible.
This happens if, for example, the project did not provide for an entrance to the attic, there is no staircase to go down to the basement or subfloor, the staircase to the second floor leads not from the hall, but from the bedroom. In such cases, it is necessary to make an opening in the floor slab and place new beams on its boundaries.
When starting to make a hole, carefully consider its location, and you need to know that the floor area will change significantly. For a normal turn on the stairs when entering and exiting from it, there must be a space between the lower and upper steps and the wall that is no less wide than the width of the stairs. It is most convenient to place the stairs so that the opening in the floor slab is located along the beams.
When building a staircase, one should not neglect the building codes that determine the minimum width and clearance of the staircase.
If the opening is made in a wooden floor, then the ideal option would be if it is cut along the beams.
The width of the staircase leading to one room should be at least 60 cm; if the staircase is used to access several rooms, for example, several bedrooms located on the top floor, then it should be wider. The length of a standard hole for a staircase should be such that there is sufficient space between the steps and the ceiling.
Building rules state that the height between the outer beam enclosing the opening in the floor slab and the steps should not be less than 2 m. The larger the clearance, the more convenient it is to use the ladder, for example, for carrying furniture. The dimensions of the hole in the slab also depend on the types of stairs. A spiral or folding staircase will require less space than a straight one. Having determined the dimensions, you should add 5 cm to them on all sides for subsequent finishing of the opening. In order to make a hole in the ceiling, it is necessary to remove part of the floor covering, cut the beams and remove part of the ceiling. Boards removed from the floor or ceiling can be used for finishing work. With their help you can hide protruding longitudinal and transverse beams.
Preparing for the arrangement of the staircase
Before you start work, you need to think through some important points on which the success of the entire enterprise will directly depend:
Location of the hole. The location of the opening should be carefully considered, at the same time taking into account that the floor will become noticeably smaller, because In order to turn normally when walking up the stairs, you need to leave a space between the wall and the upper and lower steps that is not narrower than the stairs themselves. Its optimal location is considered to be one in which the hole in the slab runs along the beams.
Width of the stairs. If there is one room on the floor to which the staircase leads, then it is made at least 60 cm in width. But if there are several rooms on the floor, then it is made wider.
The staircase opening cut into the slab must be of a length that leaves sufficient space between the ceiling and the steps.
The distance between the edge beam limiting the hole in the ceiling and the steps must be at least 2 m. This determines the ease of use of the staircase.
The size of the staircase opening. When deciding on the dimensions, you should take into account the type and design of the staircase that will subsequently be installed. To install a straight staircase you will need much more space than, for example, a spiral staircase. Having decided on the length and width of the staircase opening, you need to add 5 cm on each side for finishing.
Before you start making a hole in the ceiling, you need to partially dismantle the floor covering, cut the beams and remove the ceiling section. Flooring boards should not be thrown away because... they may be useful in further work.