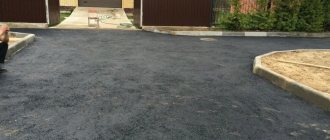
Asphalt laying work is carried out using a certain technology, which may vary slightly depending on the type of area that is being asphalted. In any case, it is necessary to adhere to the asphalt laying technology, otherwise the coating will not meet modern requirements.
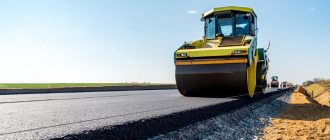
“In addition to following the technological process, the use of special equipment plays an important role. This allows the process to be as mechanized as possible, which ensures high efficiency with minimal labor and time costs.”
Asphalt laying work always begins with theoretical calculations, preparation and reconnaissance of the area, after which the foundation is constructed from several technological layers. Only after this does paving begin, which is also carried out in several stages.
Theoretical and preparatory part
As part of this stage, the following activities are carried out:
- 1. Terrain reconnaissance, geodetic surveys.
- 2. Development of a plan, design documentation with design and economic calculations.
- 3. Marking the area for work.
- 4. Soil development: 4.1. Removing the top layer;
- 4.2. Elimination of obstacles, cleaning;
- 4.3. Construction of a drainage system;
- 4.4. Leveling and compacting the soil base.
As part of the theoretical stage, an assessment is also made of the future congestion of the territory, taking into account the growth of traffic flow for at least several years in the future. This is necessary to correctly determine the required strength and other characteristics of the asphalt concrete pavement.
Cold asphalt laying technology
Cold asphalt is laid easier and faster than hot asphalt, but the cost of asphalt paving with this method will be higher. It is especially convenient to use cold laying technology when carrying out repair work in Moscow and the region.
Cold asphalt is a specific substance, the main purpose of which is paving small areas, as well as carrying out repair work to “seal” road potholes.
- The area for asphalt paving is cleared and freed from debris.
- The cleared area is filled with crushed stone.
- A special bonding emulsion is poured over the crushed stone.
- A layer of bitumen and dry crushed stone is applied to the emulsion.
- The surface for asphalting is leveled and compacted.
If it is necessary to raise the surface , add more asphalt mixture and compact it again. As soon as the asphalt acquires the required density and hardness, the road section is ready for use.
We asphalt roads of any type, using hot and cold asphalt technology. Call to order the construction of a Moscow highway. Our roads are guaranteed to last for a long time without major or pothole repairs, delighting users with the smoothness and evenness of the road surface.
High-quality road work, carried out in strict compliance with all technological requirements, extends the service life of the road surface, which allows you to save on ordering road repairs and reconstruction.
What layers are used to create the base for asphalt pavement?
| Material | Description |
| Geotextiles | A synthetic material made of strong threads and fibers, which has fairly high strength combined with elasticity. What functions does it perform:
|
| sand layer | The sand layer must be even and at least 40 cm thick after compaction. What functions does it perform:
|
| Geogrid | A material made of polymer strips fastened together in certain places, which forms a mesh structure. What functions does it perform:
|
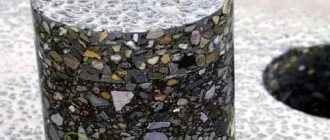
| Crushed stone layer | First of all, crushed stone of large fractions (40-70 mm) is laid and compacted, and then small crushed stone (5-20 mm) is laid and compacted, followed by treatment with bitumen emulsion. In some cases, fine-grained crushed stone can be replaced with “black crushed stone” of the same fractions. Black crushed stone is faceted mountain crushed stone treated with bitumen in a certain proportion. What functions does it perform:
|
How to organize the installation process step by step
As mentioned earlier, asphalt is laid on a specially prepared base consisting of several layers. It's called a "pie".
This is what this pie looks like:
- Bottom layer. Its composition depends on the characteristics of the original soil. If, for example, there is clay soil under the fertile soil layer on your site, then it will act as the bottom layer.
- Geotextile lining. It holds the top layers, preventing them from mixing with the soil. In general, to create a reliable coating, geotextiles are laid on top of each layer of the cake. However, this is not required for the installation of garden paths and platforms.
- Pillow. It can be made of sand, screenings or PSH. Pillow thickness – 15 cm
- A layer of crushed stone. It is the basis for laying asphalt. You need a little more crushed stone than sand - 20 cm.
- Bitumen impregnation. It provides adhesion between layers of crushed stone and asphalt. Its concentration per square meter depends on the height of the asphalt layer.
- Top layer of asphalt.
All this in cross section looks something like this:
Next, we will talk in detail about how to properly prepare the base and how to lay each of the layers.
Step 1 – Preparing the Bottom Layer
The first step is to conduct a geodetic soil analysis. It will cost you about 30,000 rubles if you order from specialists. In particular, you need to know what the groundwater level (GWL) is in your area. Otherwise, no matter how strong the foundation, underground water will flood it and the asphalt will deform.
If the groundwater level is less than 1.5 meters, it is strongly recommended to arrange deep drainage. You can find out how to do this in the article Do-it-yourself drainage.
Regardless of whether you require drainage or not, the soil must be compacted before laying asphalt. To do this, remove its top layer. This can be done manually, but the process is quite labor-intensive. Therefore, it is logical to rent a bulldozer that will quickly get the job done. The removal depth is approximately 35-40 centimeters.
The top layer must be removed in two stages:
- The fertile layer is removed first
- Next, the rest of the soil is removed
In accordance with GOST 17. 4.3.02-85 “Nature Conservation (SSOP). Soils. Requirements for the protection of the fertile soil layer during excavation work", the fertile layer must either be immediately used to improve the properties of the soil on the site, or stored in piles. In the latter case, it can be stored for up to 20 years, provided that the surface and slopes of the pile have been sown with perennial plants. Without sowing, the soil retains its fertile properties for two years. It is prohibited to sell this material, even if you do not need it!
You can use non-fertile soil for filling holes and ditches for various construction works.
The bottom of the resulting pit must be well compacted and leveled. If you are going to lay asphalt on an inclined surface, make sure that the angle of inclination does not exceed 3 cm for every 3 m. To do this, use a level to measure the angle of inclination.
Step 2 - laying geotextiles
If the coating will experience heavy loads (for example, cars will move along it), it is advisable to lay a layer of geotextile on the compacted soil.
Before starting work, make sure once again that there are no stones or other foreign objects on the ground surface. The smoother the base, the better.
Then proceed directly to installation. Geotextiles should be covered in one layer, avoiding the appearance of folds and irregularities. You cannot walk on the material or drag it around.
The individual pieces are laid on top of each other with an overlap of 30 cm. The width can be increased to 50 cm. As a rule, geotextiles are not required to be fastened. However, if you are afraid that the pieces of canvas will move during the process of laying the top layers, you can fasten them together using a construction stapler.
To prevent the canvas from being blown away by the wind, light boards or bricks can be laid on it. The main thing is that they do not scratch or tear the material.
The edges of the geotextile should protrude 20-30 cm beyond the pit. If curbs are to be installed, then the curb stone must be laid in the pit on top of the geotextile.
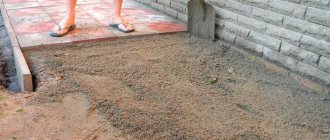
Step 3 – Pillow Equipment
At this stage, it is necessary to make the so-called road pavement, or a cushion for the future asphalt.
Since the layer height will be 15 cm, then for each square meter of future coating there will be 0.15 m3 of sand or screenings.
For example, for a site measuring 30 m2 you will need 4.5 cubes.
To calculate the required volume for your area, use our Calculator.
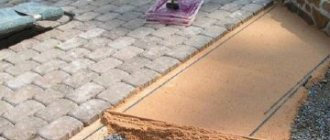
The sand layer must be compacted and leveled. To do this, you can use either a manual tamper or a vibrating plate.
Step 4 – crushed stone layer equipment
The next layer is filled with crushed stone. You need more of it than sand - 0.2 cubic meters per square meter.
Thus, a site of 30 m2 will require 6 cubes of crushed stone.
For an accurate calculation, use the Calculator.
From above, the crushed stone is compacted and leveled. If possible, it is better to go over the crushed stone several times with a roller or vibrating plate.
Step 5 – bitumen impregnation
As we have already said, this step is not mandatory, but it can improve the quality and reliability of the asphalt pavement. Of course, without special equipment (bitumen sprayers) you are unlikely to be able to apply uniform impregnation over the entire surface.
Impregnation should be done 1-6 hours before laying the asphalt. According to building standards, bitumen consumption per 1 m2 of crushed stone should be 0.5-0.9 liters. However, we repeat: without a sprayer it is not possible to evenly distribute the bitumen. Perhaps the only thing that can be done here is to pour bitumen from homemade containers.
Below is a method of pouring crushed stone using a plastic bottle:
Step 6 - laying asphalt pavement
Next comes the installation itself. To do this, asphalt is distributed in small piles over the surface of the future coating and then leveled. If there is an excavator at the site, it can partially level the asphalt with its bucket. But you still have to completely level it manually.
Here's what the process looks like:
It is most convenient to perform alignment using a special device. It is called a rake, asphalt rake or trowel. Outwardly, it looks like a mop used to wash floors. At the end of it there is a transverse board, which is used to level the asphalt layer.
As for consumption: usually asphalt is sold not in cubes, but in tons. Therefore, to calculate consumption, you will first need to know the volume and then convert it into weight.
Here are examples of calculating volume per square meter:
- For a layer of 20 mm – 0.02 m3
- For a layer of 40 mm – 0.04 m3
- For a layer of 6 0 mm – 0.06 m3
- For a layer of 80 mm – 0.08 m3
And so on.
But to convert cubes into tons, you will need to know the bulk density. For hot asphalt it is 2,440 kg/m3.
Next, we multiply the cubic capacity by the bulk density and get the weight:
- For a layer of 20 mm (0.02 m3 * 2 440 kg/m3) – 48.8 kg.
- For a layer of 40 mm (0.04 m3 * 2 440 kg/m3) – 97.6 kg.
- For a layer of 60 mm (0.06 m3 * 2 440 kg/m3) – 146.4 kg.
- For a layer of 80 mm (0.08 m3 * 2 440 kg/m3) – 195.2 kg.
We have given several examples of calculating the consumption of hot asphalt per 1 m2.
To find out the specific consumption, you need to multiply the cubic capacity by the area that you need to pave:
For 10 m2:
- A layer of 20 mm (10 m2 * 48.8 kg) – 488 kg.
- A layer of 40 mm (10 m2 * 97.6 kg) – 976 kg.
- A layer of 60 mm (10 m2 * 146, 4 kg) – 1,464 kg.
- A layer of 80 mm (10 m2 * 195.2 kg) – 1,952 kg.
For 30 m2:
- A layer of 20 mm (30 m2 * 48.8 kg) – 1,464 kg.
- A layer of 40 mm (30 m2 * 97.6 kg) – 2,928 kg.
- A layer of 60 mm (30 m2 * 146.4 kg) – 4,392 kg.
- A layer of 80 mm (30 m2 * 195.2 kg) – 5,856 kg.
For 50 m2:
- A layer of 20 mm (50 m2 * 48.8 kg) – 2,440 kg.
- A layer of 40 mm (50 m2 * 97.6 kg) – 4,880 kg.
- A layer of 60 mm (50 m2 * 146.4 kg) – 7,320 kg.
- A layer of 80 mm (50 m2 * 195.2 kg) – 9,760 kg.
You can make similar calculations for your area on the Calculator page. To convert cubes to tons, use a bulk density of 2,440 kg/m3.
There are two more very important points when laying:
- How to prevent asphalt from cooling down
- How to make the coating even
Let's deal with each point in order.
How to prevent asphalt from cooling down
We already said above that asphalt is sensitive to weather conditions. Therefore, it is laid in dry and (preferably) warm weather. The optimal temperature of hot asphalt at the time of laying is 120-130°C. It should not fall below 100°C.
And here the main risk is that the asphalt does not cool down throughout the entire process - from shipment at the factory and delivery to installation. Otherwise, you will end up with rock-hard pieces that will be impossible to use.
The recommendations here are:
- If there is a lot of asphalt and it will be delivered in several trips, you need to plan the work so that the delivery of a new batch occurs when the previous batch has already been laid.
- If it is not possible to quickly lay all the asphalt, its excess should be collected in a heap. It is advisable to place it in some container. A wooden box or even an excavator bucket will do. It is important that there is as little heat loss as possible.
- When storing asphalt in a heap, its walls periodically crumble. Individual grains that have rolled down must be raked into a general pile with a shovel so that they do not freeze ahead of time.
Below we invite you to familiarize yourself with the table of asphalt temperature changes.
For example, we took the following conditions:
- Air temperature: +10 degrees
- Initial asphalt temperature: +160 degrees
- Final asphalt temperature: +80 degrees
Let's demonstrate this on 4 layers of asphalt of different heights (20 mm, 40 mm, 60 mm and 80 mm):
As you can see, there is a clear connection between the height of the asphalt layer and the rate of its cooling. Thus, a layer of 20 mm cooled the fastest (in 8 minutes). But the 80 mm layer lasted a full 40 minutes. And this is on the condition that it is +10 degrees outside. It is for this reason that asphalt can be laid at a temperature of 0⁰C, but only if the layer height exceeds 40 mm. Otherwise, it will cool down during installation.
How to make the coating even
The second important point is alignment during installation.
There are different ways here. We will look at the most common ones.
- With a rope
- Using wooden slats
- Using a level
With a rope
The essence of the method is that a cord is periodically stretched across the entire width of the asphalt being laid, tautly, but so that it touches the surface. In places where it sags, you need to add asphalt. If, on the contrary, slides form, they need to be leveled. The method is not very convenient, since you have to constantly stretch this cord.
Using wooden slats
This method is more complicated, but more effective. You will need to prepare the wooden slats in advance. Their length can be any, and their height must correspond to the height of the asphalt in its unrolled state.
These slats are laid out on a layer of crushed stone, after which asphalt is poured and leveled so that it does not exceed the height of the bars. Then the slats are removed, and the ditches from them are filled with asphalt.
Using a level
This method will allow you to achieve the most even coverage. True, an ordinary building level will not work here - it is too short. You will need a special road rail. The principle of its operation is the same as that of the level, but the length is much longer - 3 meters. This strip is installed across the covering, after which measurements are taken.
Step 4 – rolling
After laying, the asphalt must be compacted. To do this, you can use vibrating plates, hand rollers, as well as full-fledged rollers.
The vibrating plate needs to go over the entire coating several times - first along and then across. Periodically check the inside of the slab: pieces of asphalt may stick to it, which will lead to the formation of ruts.
In general, according to technology, after laying the asphalt, a roller should be rolled over it. Moreover, for each section - at least 32 times. Given the speed of the roller and the possible compaction area, it is rarely possible to carry out this process so thoroughly. But, regardless of the number of penetrations, the rollers of the roller must be regularly watered. Water displaces bitumen from asphalt, so the coating is well compacted.
Another important point is sprinkling with a sand-cement mixture. The fact is that after laying, asphalt has a certain stickiness and softness. Even a passenger car can easily catch a piece of asphalt with its treads and destroy the coating. To avoid this, the surface is covered with a mixture of sand and cement. It fills the pores of asphalt and reduces stickiness.
Once the asphalt pavement is laid, it needs to be given 1-2 days to harden. After this, people and vehicles can walk on the road.
We also recommend that you watch a video of laying hot asphalt using this technology.
The above method of laying hot asphalt is suitable for simple work. You can organize them yourself. Loaders, graders and rollers with operators can be hired on an hourly basis. Construction equipment stores rent vibrating plates and other tools.
However, this technology is not suitable for more serious and critical road surfaces.
And in conclusion, let’s say a few words about asphalt in our region.
Asphalt laying works
Asphalt concrete should be laid in one or several layers, depending on the design load on the pavement:
- For pedestrian areas, one layer about 4 cm thick is sufficient;
- For a parking space or personal driveway you need about 6-7 centimeters of asphalt;
- For highways, the required coating thickness will be from 10 to 30 or more centimeters.
Also, different asphalt concretes are used for different surfaces. Walking areas can be paved with a sand-based asphalt mixture, while highways require asphalt concrete with a sufficiently high content of rocky aggregate (crushed stone or gravel).
When laying is carried out using a multi-layer principle (if the coating thickness is 6 or more centimeters), each layer must be separately compacted with road rollers or a vibrating plate (for small areas) in order to minimize residual porosity.
Also, each layer is treated with bitumen emulsion, and to increase reinforcement, additional geogrid can be placed between the layers.
The multilayer coating is installed in the following order:
- 1. Installation of coarse asphalt concrete (grain size 20-40 mm) to stabilize and prevent deformation.
- 2. Construction of fine-grained asphalt concrete (grain size 10-20 mm) to ensure wear resistance and strength.
For areas with increased traffic load, another surface layer of crushed stone-mastic asphalt concrete is added.
When can installation be done?
Hot asphalt is sensitive to weather conditions, so the optimal time for laying it would be spring and summer. The air temperature should not be below 5 degrees. Laying in autumn is also allowed, but at temperatures above 10 degrees. In winter, hot asphalt can only be laid at temperatures up to 0 degrees and with a layer thickness of at least 4 cm. In addition, the mixture must contain surfactants (surfactants) or activated mineral powders.
The surface on which asphalt will be laid must be dry and clean. It is not allowed near the masonry if there are puddles.
Thus, the warmer it is outside, the better. During the rains, it is generally inconvenient to work, let alone lay asphalt.
Specifics of the asphalt paving process
Asphalt is never laid “just on the ground”: first, the top soil layer must be removed and disposed of on site. Next, in the formed “earth trough”, a “cushion” is poured for the future covering. The composition and thickness of the “cushion” layers depend both on the load-bearing properties of the underlying soil and on the requirements for the load-bearing capacity of the coating: in the simplest case (for example, a pedestrian sidewalk), a “cushion” of several centimeters of compacted sand will be sufficient, while under the canvas highway “cushion” will consist of at least sand and a couple of layers of compacted gravel of varying degrees of coarseness. After laying on the “cushion”, the asphalt is leveled and compacted - manually or with mechanized rollers.
Private clients, as a rule, order asphalt paving for a country house or cottage - that is, we are talking mainly about lightly loaded pedestrian paths and manual work almost without the use of special equipment. Selecting an earth trough (zero cycle) here typically costs from 200 rubles , and filling an underlying/leveling sand layer 10 cm thick costs from 100 rubles per square meter . Prices for a single-layer asphalt coating with a thickness of 4-5 centimeters laid on top of the sand “cushion” start somewhere from 400-450 rubles per square meter .