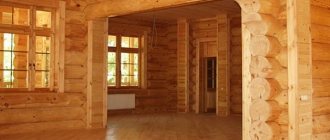
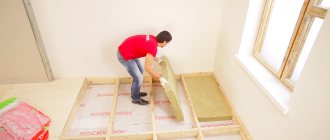
The wooden structure is valued for its excellent breathability. Such a structure is environmentally friendly, the material is plastic, allowing residents to breathe easily. But sometimes there is a need to pour a concrete floor in a wooden house, “making friends” with incompatible materials. This action is relevant for bathrooms in which it is planned to drain directly into the floor, in utility rooms, and basement floors, where there is a lot of dirt. Let's look in detail at how to install a concrete screed on a wooden floor for a private home.
Figure 1. Concrete floor in a wooden house
Advantages and disadvantages of the material
Whether it is advisable to make a screed over a wooden floor is a controversial issue. It is much more common to install a wooden floor on a concrete screed, since in the opposite situation the fragility of the base will cause cracking of the concrete and deformation of the coating laid on it. But there are several factors that indicate the benefits of this particular option:
- The screed on top of the wood is poured using a special technology that takes into account the specifics of the base. You can lay concrete screed over wooden beams in a private house, using a principle that neutralizes the likelihood of deformation.
- It is advisable to pour concrete onto a wooden base if it is necessary to strengthen the floor for laying a hard covering on it.
- The concrete option is ideal for installing heated floors.
To prevent the negative impact of pouring concrete on a wooden floor, it is necessary to scrupulously follow the recommendations regarding the technology for performing the work. The main step in the preparatory process is priming the wood to ensure its moisture resistance. To ensure waterproofing, craftsmen advise using a film made of durable polyethylene. If there is no whole canvas, individual pieces must be overlapped.
Since concrete is a heavy product, it can cause subsidence in the weakest areas of the old floor. Therefore, it is necessary to add plasticizers to the mixture. They make the solution fluid, durable and waterproof - the screed stands firmly for a long time.
Reinforcement
The two most popular methods of reinforcement are metal mesh and fiberglass:
- The technology for arranging the reinforcing mesh is carried out using an unconventional method. A layer of concrete without beacons is immediately poured. A break of 1 month is taken for hardening. Then the mesh is laid, beacons are installed and the second layer is poured. This technology avoids unwanted punctures of the waterproofing film.
- Fiber reinforcement differs from the above method. The strengthening material is added directly to the concrete solution at the stage of its preparation. The peculiarity of fiber fiber: its molecules are located in a chaotic order, therefore, when interacting with the molecules of the cement mixture, the material is strengthened in all directions. The use of fiberglass significantly reduces the overall weight of the concrete covering, therefore reducing the pressure on the wooden flooring.
Return to contents
Tools and materials needed to fill the floor
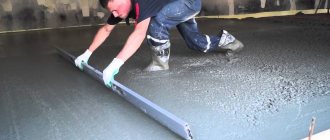
Figure 2. Tools required for pouring a concrete floor
When a wooden base is to be poured with concrete, the calculation of the necessary materials must be carried out, taking into account all the nuances and making a margin of 10%, taking into account unforeseen circumstances. Let's consider what tools and materials will be needed:
- fastening hardware to further strengthen the boards;
- hydrophobic impregnation;
- polyethylene film;
- damper tape;
- reinforcing mesh;
- concrete mixture;
- screwdriver;
- building level;
- rule;
- shovel;
- beacons.
Preparing the base
Preparing a wooden floor for screeding.
First of all, the board covering is carefully inspected. If there are damaged joists, they should be replaced, and partially destroyed ones can be turned over. The boards are secured back with nails. When installing logs in increments of more than 40 cm, it is recommended to additionally use support bars. To prevent the nails from tearing the plastic film in the future, their heads are sunk into the boards to a depth of 2-3 mm.
Old skirting boards need to be removed. It is recommended to seal the cracks that appear at the junction of the floor and the wall with thin wooden boards. After filling they will need to be removed. This will ensure natural ventilation of the wooden base and prevent it from rotting.
If the wooden base has small cracks, a sealant or parquet putty based on wood dust is used for sealing. To prepare your own putty, take 4 volumes of sawdust and 1 part of oil paint.
If the cracks are deeper, it is better to resort to polyurethane foam.
Return to contents
Specifics of the wooden base
Wood and concrete behave completely differently. The first material remains alive throughout its operation. The second one becomes a static base after obtaining maximum strength. Wooden flooring is especially active approximately 4 years after installation. At this time, you shouldn’t even dream of pouring a concrete screed on a wooden floor.
Additionally, wood is affected by humidity and temperature fluctuations. Therefore, when pouring your wood floor with concrete, it is necessary to ensure that such different materials are completely in contact during operation.
Preparation for pouring
First you need to examine the structure of the old floor. When the boards are attached to joists lying on concrete, it is better to remove all the wood and then perform a rough screed. Then the screed will be more durable, and no problems will appear in the future.
To fill the board you need to prepare:
- securely fasten the playing elements;
- when the flooring sags, it must be strengthened by placing cross members;
- the boards should not have height differences;
- Before pouring, damaged parts must be replaced.
Since concrete is heavy, it is advisable to increase the strength of the joists by adding additional supports, if necessary. The next stage is treatment with a primer containing antibacterial as well as waterproofing properties to prevent future structural damage.
Waterproofing
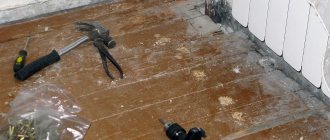
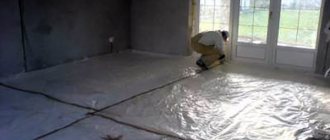
Figure 3. Waterproofing before pouring concrete
Carrying out such an activity increases the chance of insulating materials between themselves. A good solution is plastic film. It is advisable to cover it so that the entire area is covered with one sheet.
The film is laid out, releasing onto all walls, gluing the perimeter with damper tape. Then, after pouring, you will receive a concrete slab that does not come into contact with the walls and base. The wood will continue to live actively, the concrete will remain unaffected by it, will retain its linearity, and will not crack.
Many people do not understand why it is recommended to install film rather than modern waterproofing products. But the film is needed for concrete, which does not adhere to it at all. The result is a triple “pie”, where everyone is autonomous:
- insulation does not interfere with the movement of boards and screed;
- polyethylene will not allow moisture to be drawn from concrete to wood;
- the concrete will not pull the film, so it will not damage it.
Pouring technology
Having understood the basic prerequisites for how to make a concrete floor in a wooden house, we proceed directly to pouring. First you need to mark the desired zero level on the walls. It is convenient to do this using a building level. You need to set an equal distance down from the drawn line and mark the height of the screed along it. At this point, it is advisable to take into account the thickness of the future flooring and the mass of concrete.
Isolation measures
It is necessary to eliminate the slightest chance of contact between concrete and wood. To do this, before pouring, you need to stick a damper tape around the perimeter. After installing the decorative layer, its protruding excess is cut off. The remaining technological gap is covered with a plinth.
After preparing the old floor and setting the level, cover the boards with film, applying it to the walls. It is important to lay the film evenly so that there are no folds. Punctures, which are often performed by the hand of a master armed with a tool, are unacceptable. If the film breaks, you need to apply a patch to the hole.
Reinforcement
When reinforcing, it is undesirable to use a metal mesh for the following reasons:
- such reinforcement can damage polyethylene;
- heavy steel - the mesh will increase the weight of the structure;
- It is necessary to strengthen the middle layer of the fill, so it is better to do it in three steps: pouring, then reinforcement and final screed.
It is recommended to use fiberglass instead of metal. It is convenient to mix it into the solution before pouring. Polymers arranged randomly will reliably bind the solution and reduce its mass.
Pouring the solution
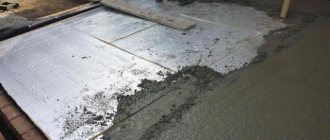
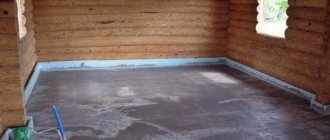
Figure 4. Pouring the floor with concrete
If pouring is carried out along beams, it is organized in a similar way to a regular rough screed. The main principles are as follows: each room must be poured separately, the entire layer must be poured at a time, work must begin from the most distant corner and move towards the exit. If the room area is large, it needs to be divided with guides and formwork placed.
To level the screed, pre-installed beacons are used:
- they are attached to the solution;
- gypsum composition cannot be used for installation;
- one day after pouring, the beacon profiles must be removed, repairing the unevenness;
- the coating should not be allowed to dry out quickly, so periodically moisten it with water to prevent cracks from appearing;
- The screed effectively gains strength if it is covered with plastic film.
It is recommended to maintain a constant microclimate indoors: humidity level and stable temperature.
Waterproofing
The waterproofing layer is created in two stages:
- Gluing a damper tape 10-20 mm thick and 2-3 times wider than the screed. Scotch tape is used for fastening.
- Laying polyethylene with an overlap of 10 cm and overlapping the walls by 20 cm. If during the work the film is torn or punctured, it should be carefully patched and taped.
It is better to avoid a large number of joints and damage, since the tightness of the entire structure depends on the quality of waterproofing.
Return to contents
Concrete volume calculator
When figuring out how to pour a concrete floor in a wooden house, you cannot miss the need to accurately determine the amount of mixture used and the time to complete the procedure. To do this, you must perform certain calculations. A calculator will come to the aid of the builder, allowing you to accurately calculate the required volume of concrete. The online calculator will accurately indicate the required amount of mixture, providing accurate information.
Calculation of concrete composition
Another calculator will help you prepare the concrete mixture correctly. He calculates the composition of concrete components. As a result of using such a convenient online service, it will be possible to determine in advance the required amount of cement, sand with crushed stone and water. At the same time, the developer will receive the final cost of materials by entering only the value of the required grade of concrete and its required volume.
Installation of beacons
The beacons are mounds of concrete for the screed, which are formed along the entire perimeter of the future floor at a distance of 15 cm from each other, provided that the 120 cm rule is used. The distance from the wall should be 25-30 cm. A metal profile is laid on the formed beacons. It should be recessed along the marks corresponding to the leveling layer. Installation must be carried out within the first hour after mixing the solution. Otherwise it will be difficult to work with.
Return to contents
Tips for working
Recommendations to avoid complications during the work process:
- It is better to make a heavy layer for screed on a wooden floor.
- Waterproofing is a must.
- It is not recommended to pour concrete onto fresh wooden boards, as they are still subject to deformation under the significant weight of the screed.
- The solution must be prepared an hour before pouring.
- It is not recommended to dry fresh concrete flooring with heating devices. Drying should be natural.
- It is important to follow the care requirements for fresh screed - moisturizing, insulating with film.
- Drafts should be avoided in rooms with fresh concrete surfaces.
- The sequence of concrete pouring should be strictly monitored.
Return to contents
Method 1. Dry leveling
This method is called dry, since it uses sheet materials attached to the frame or surface of the old floor (depending on the situation) mechanically, using nails or self-tapping screws.
When dry leveling, sheet materials are used
Note! Alternatively, the sheets can also be attached with glue, but for this the base must be perfectly flat. And this method will no longer be dry, but combined.
- If you are not sure of the integrity of the internal frame, you will have to remove several floorboards and, if necessary, replace rotten joists. Perhaps the repairs will turn out to be quite large-scale, and if you have to change the entire structure, then the leveling can be done immediately along the joists, removing the old floor boards completely.
Wood floor repair
- But if the problem is only differences in the surface of the floor, which will not allow a high-quality laying of the new covering, it will be enough just to strengthen the floorboards so that they do not “play” or creak - and you can begin installing plywood or other material directly on top of the plank flooring.
Gaps in the wooden floor
- Each master uses his own tricks in his work, and the materials used are different, which brings its own nuances to the technology. But in general, it consists in the fact that a new frame is created on top of the wooden floor, which will serve as the basis for installing sheet material. In addition, this will also help to further insulate the floor.
Dry screed installation options
Here are the materials mounted on the frame that can be used in a dry screed.
Table. Review of materials for dry floor screed.
| Materials for dry screed | A comment |
| Plywood | To align it with the frame, use moisture-resistant plywood with a thickness of at least 16 mm, and preferably 20. Thinner ones will sag. It is very convenient to work with sheets measuring 1250x2500 mm. |
| OSB boards | Wood-polymer OSB boards are almost as strong as plywood. For installation on joists, you need to take slabs with a minimum thickness of 18 mm. The sheet format is the same as that of plywood. |
| DSP | Cement particle boards are one of the best solutions for leveling wooden floors. The sheets are non-flammable, have sufficient strength and good adhesion. Therefore, they are most often used to prepare the base for laying ceramic tiles. |
| tongue and groove chipboard | Moisture-resistant chipboard sheets with a tongue around the perimeter are very convenient for leveling the floor. Moreover, there are also options on sale with a decorative coating, so with their help you can make not only a subfloor, but also a finishing one. In any case, when installing on joists, you need to take slabs with a thickness of 16 mm and higher. The size of the sheets for the subfloor is 1830 or 2440 mm in length and 600 mm in width. Decorative options - the so-called QuickDeck slabs, have dimensions of 900 by 1200 or 900 by 800 mm. |
| GVL | The thickness of any material that does not rest on the base over the entire area determines the loads that the coating will have to withstand. If you are making a floor on a loggia where there is no furniture, a thickness of 10 mm gypsum plasterboard is sufficient. But in general, floor elements are produced in a smaller format than for walls and in greater thickness - 1200x600x20 mm. |
Plywood structure
Expert opinion
Afanasyev E.V.
Chief editor of the pol-exp.com project Engineer.
In most cases, sheet materials are mounted on wooden joists, but this material tends to rot and is highly susceptible to linear expansion. Therefore, some craftsmen prefer to use a galvanized steel profile for the frame instead of wooden beams, which is usually used when installing drywall.
Using galvanized steel profile
Only here, to compensate for unevenness of the base and provide the necessary indentation, instead of straight hangers, steel angles 3 mm thick are used, as shown in the photo. This frame turns out to be more rigid and, importantly, does not creak like a wooden one. This method can be used to install not only gypsum fiber boards, but also, as you can see, plywood. You just need to use self-tapping screws with conical heads so that they are well recessed into the thickness of the sheet.
What other ways can you attach GVL for a dry screed?
Note! As for the gypsum fiber sheet, this material can be mounted on both expanded clay backing and expanded polystyrene sheets. Bedding, of course, is not so convenient for a wooden base, because it may simply be too heavy for it, but as for PPS slabs, this is an excellent option. However, if the old floor has large unevenness, it is impossible to properly level it using this method.
GVL under warm floor
Calculator for calculating the required materials for dry screed
Go to calculations
Calculator for calculating expanded clay backfill for dry screed
Adjustable systems for dry floor leveling
Speaking about dry leveling methods, one cannot fail to mention the relatively recent technology for installing an adjustable floor base. The bottom line is that the sheet material is installed not on the frame, but on vertical threaded elements, with the help of which you can level the floors both on slabs and on joists.
Adjustable leg
This method has many advantages, so its popularity is only increasing. This is low labor intensity and, accordingly, high speed of work; the ability to level fairly large differences; high leveling accuracy; low loads on the base, which is especially important in the case of old beam floors.
Adjustable plywood floors can be installed even on uneven surfaces
But the most important thing is that any communications can be hidden in such a structure and elements of a heated floor can be installed. There is one minus, the same as with all other options - the floor can creak. A sound insulator placed inside also does not solve the problem, so you will either have to be prepared to endure unpleasant sounds, or choose a different alignment method.
Construction of adjustable floors on joists
How difficult is installation?
When work is carried out on a concrete base, it is relatively easy to pour, because the base is distinguished by its strength. A wooden surface cannot boast of the same property.
The boards do not form a single base, and if they are poorly secured to the surface, they can dangle. They are subject to the influence of microclimatic conditions, humidity and temperature indicators can lead to their deformation; an individual board may differ in size from another. Final drying causes cracks to appear, and over time the boards may begin to creak.
Wood is distinguished by its ability to rot, so care must be taken to exclude an atmosphere conducive to the process. It is also undesirable to overdry the material, as this provokes the formation of cracks.
It is also undesirable to overdry the material, as this provokes the formation of cracks.
Mixing the solution
The solution is prepared at home in containers with a volume of at least 50 liters. To do this, it is advisable to buy 2 containers to ensure continuity of filling. While 2 workers pour the solution from the container onto the floor and level it with needle rollers, the third one mixes the next portion of the solution for pouring.
First, a clearly measured amount of water is poured into the container, recommended by the manufacturer of the dry mixture for the screed or specified in the recipe for preparing the solution yourself. No DIY or cooking by eye!
The concrete pouring technology, proven over decades, is aimed at achieving the highest possible strength. An excess of any component leads to a weakening of the solution or its extreme brittleness.
First, fill the container with water. Then cement is added, or the prepared solution is gradually poured from the bag. Two people prepare the mixture. One controls the mixer mounted on an electric drill or a special electric drive, the second evenly and continuously pours the mixture. After thoroughly stirring the solution, there should be no lumps left in it. Fiber (basalt, polymer pressed) is introduced into the solution and the briquette is allowed to disperse in water for 10-15 minutes. After this, the solution is mixed again for 5-10 minutes to evenly distribute the fibers. Sand is added last, as it is heavy and quickly sinks to the bottom.
You can also use a concrete mixer.