The desire for environmental safety is driving city dwellers closer to nature. And increasingly, wood is becoming a building material. And this is understandable. A wooden house has numerous advantages compared to a stone one or one built from artificial materials using modern technology. One of the most important parts of your home is a properly installed floor.
We make floors in a wooden house with our own hands
Why is floor quality so important?
When building a house, they care not only about its beauty, but also about making it warm and cozy. Insulating the walls is only half the battle. The house must be protected from the cold from below. Wood is a natural material that is susceptible to rotting, so reliable insulation from moisture is also important. And finally, it should look beautiful and match the interior decoration of the room. In order for all goals to be achieved, it is not enough to lay the boards on a concrete base.
The floor in the house should be smooth, warm, beautiful and durable. All these qualities are achieved by laying the floor in several layers:
- base;
- heat and vapor barrier;
- rough floor;
- fine coating.
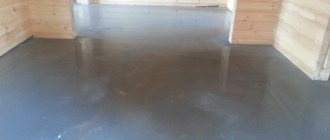
Concrete floor pie layer diagram
Concrete floor in a wooden house
Looks like a layer cake, doesn't it? That's why it's called floor pie. Its proper arrangement will help to avoid:
- high energy costs for heating the house;
- excessive moisture, which will inevitably lead to the appearance of mold and mildew;
- rotting of internal wooden structures.
Slab foundation: design, device features, installation process
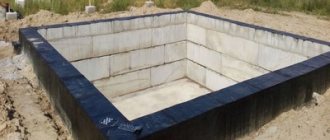
Not only its ability to withstand external loads depends on how optimal the choice of the basic support of a building is, it also greatly affects the cost of construction as a whole. The slab foundation is the most concrete and metal intensive. But when the soil at the site is subsident (peat, loess, sand), heaving (if, in addition to the loose structure, groundwater rises high), a solid foundation is the best way out of the situation.
It is this option, in such hydrogeological conditions, that is usually adopted in private construction, including the construction of houses with basement and semi-basement floors. In addition, with this design there is no need to install a subfloor, which partially compensates for the rather high costs of the foundation.
Types of floors and their features
Choosing a ceiling and making floors in a wooden house
Houses can have different designs. It must be taken into account when arranging floors. Laying the first floor floor depends on whether there is a basement or whether it will be laid directly on the foundation. Reliable thermal and steam protection is needed here.
For interfloor ceilings, sound insulation is more important, since the main load of heat conservation and protection from moisture is borne by the lower and upper floors.
The photo shows an example of a ceiling
The attic space must also be separated from the living space by an insulated floor to avoid heat loss through the ceilings of the upper floor.
Parquet flooring
Floor arrangement diagram.
Beautiful appearance, low thermal insulation and soundproofing make parquet (parquet boards, parquet panels, piece parquet) a popular material for the construction of floors. The installation of such a floor is possible on a solid plank base, fiberboard slabs, cement-sand screeds. Block parquet floors made in a herringbone pattern with or without friezes look good.
First, you need to mark the rows of coverage to reduce waste. A layer of glassine is laid on the prepared base, and the lighthouse “Christmas tree” is laid on it. Based on it, the floor covering is installed with careful connection and fastening of each parquet strip with forty nails, two driven into the side groove and one into the end groove. The caps are pressed deeper into the material using a hammer.
The installation of block parquet floors on screeds is made using a hot or cold bitumen solution in a “Christmas tree” pattern without friezes. When laying parquet, if necessary, level it using a special parquet planing machine or a hand plane; After sharpening, baseboards are installed, scraping and sanding of the floor are done. The floor is slightly moistened before scraping. The laid parquet is rubbed with mastic or varnish.
Floor options
Types of floors for a wooden house
The floor can be wooden or concrete. The choice depends on the desire of the owner and technical capabilities.
Wooden flooring - advantages and disadvantages
Wooden floors in a private house
It would seem that the answer is simple - a wooden house should have a wooden floor. It is easier, cheaper and faster to do without resorting to the services of professional builders. The structure will be light enough and any foundation will support it. Again, this is an environmentally friendly option and fits well into the interior.
Wood floors are prone to rot, especially if a protective coating has not been applied.
However, there are a few "buts". A wooden floor will last a maximum of 10 years. Wood tends to rot, no matter how much you protect it from external influences. In addition, wood-boring beetles will also do their job. For a wooden floor, constant humidity in the house is important - no more than 60%. Otherwise, the floor will begin to deform and rot. Laying a wooden floor must be done with special care so that it does not warp or creak later.
Concrete floor
Its main advantage is durability. You can put any finishing coating on it - laminate, linoleum, ceramic tile. However, this is a rather heavy structure that not every foundation will support. Concrete is used only for laying the floor of the lower floor.
Modern wooden cottages, as a rule, have a ground floor where a boiler room, workshop or other utility rooms are located. It is better to use concrete slabs for the overlap between the ground floor and the first floor. This is a more expensive option than wooden logs, but more reliable.
Requirements for floors in a wooden house
Risk of cracks
When using the traditional wet type of screed, it is very important to prevent cracks from occurring. Their appearance can lead to many negative consequences:
- It will become impossible to uniformly warm the room, which will negate the advantages of a modern heating system;
- uneven heating of floor areas will lead to overheating of individual thermal elements and their subsequent failure;
- may get hurt.
To prevent the occurrence of cracks when making screeds with your own hands, you must:
- correctly observe the proportions of the solution, as well as the drying mode;
- used to increase the elasticity of the composition;
- strengthen the structure with reinforcement or;
- install between the wall and the screed.
Damper tape or low-density foam can be used as a damper. Its main task is to compensate for the expansion and contraction of the material as a result of temperature changes.
Selection of thermal and waterproofing
You can choose several materials for thermal insulation. The most environmentally friendly is expanded clay. It is inexpensive, non-flammable, does not rot, and mold does not form on it. But its thermal insulation qualities leave much to be desired.
The photo shows expanded clay insulation
Another environmentally friendly material is sawdust. You can get them at sawmills almost free of charge. They have low thermal conductivity and are suitable for insulating attic floors. Disadvantages include their ability to decrease in volume over time, susceptibility to moisture and, as a result, the formation of fungus. These risks can be reduced by using additives - clay, cement, lime or boric acid, as an antiseptic.
Sawdust as insulation
Mineral wool (or glass wool) is also a budget option. It does not burn, retains heat well and has high sound insulation properties. But its installation requires adherence to a certain technology, in addition, it can cause allergies and skin irritation.
Appearance of mineral wool
Mineral wool mats
Polystyrene foam is one of the most convenient options in all respects. It is cheap, has good thermal insulation qualities, and is easy to install. You can use it to make a dense reinforced screed. From the same series - extruded polystyrene foam, it is more resistant to moisture.
Foam plastic for insulation
Extruded polystyrene foam
Waterproofing
This is an equally important component of the floor pie. The simplest option is plastic film.
Polyethylene film
The second option is pasting roll materials, consisting of waterproof material with a bitumen-polymer composition applied to it. Its use is justified where groundwater comes close to the surface. Most often, roofing felt is used for this purpose.
Roll waterproofing
The most technologically advanced and most expensive option is a membrane coating. It is a self-adhesive film consisting of three layers - a rigid plastic film, a bitumen-polymer layer and an anti-adhesive layer. It is convenient to use for creating waterproofing in rooms with complex configurations.
Profiled membrane waterproofing
How it was
Let me make a reservation right away that this version of the ceiling was planned at the stage of installing the foundation strip along the supports.
As a result, reinforcing bars 1.5–1.2 m long protrude horizontally from the reinforcement frame of the strip foundation. These rods were curved in the shape of the letter “P”; the curved part of the rods is rigidly connected to the metal frame of the foundation strip.
The foundation strip along the supports is filled with concrete, but the outer formwork on the foundation strip has not been removed, and the formwork wall is approximately 15 cm higher than the foundation strip made (the width of one board).
The top board of the formwork was leveled so that concrete could be poured flush with its top, and an approximately horizontal floor surface would be obtained.
This was done so that the monolithic reinforced concrete slab, which I would pour as a floor, would rest (its edges) on the foundation strip along its entire width.
Floor installation
When laying a wooden structure on the foundation, it is tightly fastened to it and to the supporting structures of the walls. The disadvantage of this method is that if the overall structure is deformed (and this is inevitable due to changes in temperature and humidity), the floor may also warp.
Laying on beams
If the house is seasonal, you can make a single-layer floor. For a residential building, a two-layer one is more suitable - rough and finishing.
The beams are leveled and fastened to the foundation. The distance between them is 2.5-3 meters. To create a double floor, logs are laid on top of the beams - bars 5-6 cm thick. The laying step is 60-70 cm. A rough flooring is made of unedged boards on them. It needs to be planed and sanded. There may be small gaps between the boards, which will be covered with hydro- and thermal insulation. The bars are again laid on the insulating layers, serving as the basis for the finishing layer. Their height should be no more than 2-3 cm, this will ensure ventilation between the layers. You can choose the finishing coating according to your taste - wood, laminate or linoleum.
What is the required distance between floor joists?
Laying on support posts
Wooden floor along joists on brick posts. Scheme
Columns for logs
It would be more acceptable to lay the floor on posts. In this case, there is no adhesion between the floor and the walls; a gap is left between them. This design is called “floating”. It is suitable for houses where there is no basement floor.
Installation of support posts and joists
Installation sequence and height of installation of columns
Work order
- Marking for posts (step 60-70 cm) and removing about half a meter of soil. Moreover, there is no need to select all the soil over the area of the house, so as not to fill it back up to a certain level later so that there is no draft under the floor.
- Filling and compacting the bottom under the posts - it must be rigid.
- The columns are made of baked bricks or filled with concrete. In the latter case, you need to make formwork. Their upper part is aligned with a level.
Evenly distributed joist supports
- Filling with a thermal insulation layer (expanded clay, sawdust), about 25 cm should remain to the top of the columns.
- After the solution has completely hardened, the beams are laid.
To level the level, use pads on the posts
It is more convenient to place the supports first around the perimeter, and only then in the middle. On top of them are laid two layers of waterproofing - roofing felt. Logs made of timber or timber are laid along the supports. Further assembly of the floor is carried out in the same order as installation on beams. The space between the added soil and the subfloor is covered with thermal insulation material, leaving 5 cm free for ventilation.
Classification
A complete analysis of the element allows us to identify several categories of floors, divided by purpose. These are industrial buildings, residential buildings, public institutions and livestock buildings.
There are several more distinguishing features, first of all, division by type: monolithic, roll and piece. Analysis of the installation site is divided depending on the location: above a heated room, floor construction on the ground, along the interfloor ceiling.
Regarding sanitary standards, there are 3 types of floor installation:
You can understand how to make a good floor while meeting numerous requirements only after fully familiarizing yourself with the standards.
Floor pie on concrete base
The concrete base can be laid on the ground. There are practically no contraindications for installing such a floor - neither the seismicity of the area, nor the height of the groundwater, nor the level of freezing matters.
The layers of the pie are arranged in the following order.
Concrete base level, marking
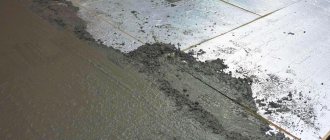
Step 1. Clearing the site of the fertile layer of soil, leveling and compacting the soil.
The photo shows soil compaction
Step 2. Backfilling - sand and crushed stone. First, sand is poured out in a layer of 8 cm; you can use any sand. The layer is also compacted. The crushed stone must have a fraction of at least 30-50 mm, the height of the bedding must be 7-10 cm. The crushed stone layer must be leveled. It doesn't have to be compacted.
Tips for improving the waterproofing performance of a concrete floor
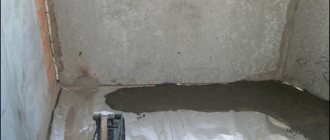
Step 3. A rough concrete screed is made on top of the poured layers. The height of the mortar layer is 5-7 cm. You can make a reinforced screed. To do this, before pouring, a reinforcing mesh is laid on the crushed stone.
Scheme of installing a concrete floor on the ground. A concrete base is poured on top of the gravel-sand mixture
Pouring a concrete floor on the ground
Step 4. Waterproofing is laid on the screed. To do this, use roofing material or film. The strips are laid overlapping and secured with construction tape. The waterproofing material should extend 20-25 cm onto the walls.
Step 5 . Thermal insulation slabs or strips are laid end-to-end; they must be pressed tightly against each other.
The photo shows the installation of insulation over an insulating film
Recommendation for insulating a concrete floor
Step 6. The film is again spread over the insulating layer. Double protection of the thermal insulation layer from moisture penetration from below and from above will prevent its premature deterioration.
Lay the film with an overlap of up to 15 cm and seal the joints with tape
Step 7. The next layer is a reinforced finishing screed. For final and perfect leveling of the floor, beacons are set. The screed mortar is made from fine - 5-10 mm - crushed stone and river sand. Reinforced with wire mesh with 3-4 mm rods, layer thickness - 7-10 cm.
Reinforced screed
Video - Penoplex screed
Step 8. A finished floor made of boards is laid on the finishing screed.
Construction of a wooden floor when laid on a concrete base
Step 9 . The floor covering can be anything.
On such a floor pie you can safely install interior walls in the house. That is why reinforcement must be done with a mesh and not with separate reinforcement.
Features of a concrete floor
- You need to start making a floor pie no earlier than the walls of the house are built.
- The concrete screed must be poured at once, otherwise the floor will be of poor quality.
- During the week after pouring, it must be constantly shed with water to avoid the formation of microcracks.
- Full operation is possible no earlier than two weeks after filling.
Video - Concrete floor on the ground
Technological requirements
The correct installation of the floor on a concrete slab is carried out in accordance with construction requirements and standards.
They characterize the design features of all elements. In addition, they must meet standard requirements specific to a given situation: be durable, moisture-resistant, wear-resistant.
Design, material selection and installation must be carried out based on the requirements presented in these documents. Compliance with the standards will allow you to create a surface that will meet all established parameters.
Among other things, it will have the following characteristics:
All documents were developed by specialists and engineers, so it is not recommended to neglect them.
Floor pie
It will not be so multi-layered; its main task is to reduce audibility between floors. On the other hand, the floor must be strong to withstand the weight of interior partitions, engineering equipment and furniture.
The most convenient would be a beam structure. By the way, it can be played in the interior of the first floor. In any case, a double floor is required - rough and finishing.
In order for the structure to be strong, the cross-section of the beam must be at least 15 cm. The length of a beam made of solid wood is from 2.5 to 3.6 m, from laminated veneer lumber – from 4.2 to 6 m.
Scheme of a finished and rough wooden floor with insulation
The pitch of the beams is important in the design. If they are spaced more than 1.5m apart, joists will need to be placed on them to prevent the floorboards from sagging.
The distance between the beams depending on their cross-section
Work order
Step 1 . Removing wood from wall beams and installing beams in them. The ends should be wrapped with roofing felt. Fastening them with anchor bolts.
Technology for constructing beams in a wooden house by cutting them into the upper crown of the house
Notch parameters for attaching floor beams to the top frame beam
Video - Calculation of interfloor beams
Video - Method of installing floor beams
Step 2. Laying the subfloor from the ceiling side.
Rough filing for beams
Step 3. Laying thermal insulation.
Laying mineral wool
Step 4. On top of the thermal insulation it is necessary to lay a layer of waterproofing - film or rolled rubber. Fastened with a construction stapler.
The gap between the insulation and waterproofing will improve the characteristics of the “pie”
Step 5. The finishing layer is laid on top, and then the floor covering.
The beam ceiling is convenient because the space between them can hide all engineering communications - cables, pipes, etc. Such floors are the best option for a wooden house.
A beautiful, smooth, warm, dry floor is not just aesthetically pleasing. This means warmth in the house and the health of its residents.
Video - Installation of an insulated ceiling with visible beams
5.10. Roof
The roof, like the foundation, determines the longevity of the house. It protects walls and foundations from precipitation and provides thermal protection for interior spaces. The roof can act as a place to place solar energy elements on it (solar collectors for heating air, water, solar panels for converting solar energy into electrical energy). A significant amount of water can be collected from the roof surface for irrigation and other technical needs.
Types of roofs: combined (used for the attic floor) and cold traditional (for an ordinary one-story and an ordinary two-story house).
The design of the combined roof is almost the same as the design of the wall. If we sequentially consider how it is structured, from the inside to the outside, then first comes the finishing, then the sheathing, beams, vapor barrier, insulation, waterproofing, sheathing and outer covering (Fig. 5.15.). It is very important to provide a ventilated space above the insulation, which will ensure continuous drying of the insulation and the entire roof structure. The roof may be provided with fastening elements on which solar collectors and solar panels are placed. In this case, it is necessary to provide holes in the roof for laying air ducts and pipelines from air and water solar collectors. The roof design provides for a system for collecting water and discharging it to a certain place on the site.
Rice. 5.15. Insulated roof structure.
Notes . The slope of the roof should be such as to avoid large accumulation of snow. Mounting of engineering equipment on the roof can be carried out in two ways: a) the equipment is built into the roof structure, b) the equipment is placed on special mounting positions provided on the roof. 5.11. Windows The house loses almost as much heat through windows as through the basement. On the other hand, the windows allow sunlight into the house, providing the necessary insolation and visual connection with the environment. During the daytime in spring and early autumn, additional solar heating of the house is provided through the windows. In summer, windows can be used for natural ventilation of the house and long-term ventilation. In addition, windows perform important decorative functions both in the interior and exterior of the house. All of the above shows how the window is an important element of the house.
On the other hand, at night in winter, the house loses a lot of energy through the windows (Fig. 5.16.). Therefore, to increase the energy efficiency of an eco-house, a window design is needed in which the energy received from the sun is greater than it is dissipated per day (during the winter months of Siberia this cannot be achieved using simple methods, but in the spring months and early autumn this can be done). For this, various methods are used (multilayer double-glazed windows, coatings that transmit visible light and reflect infrared radiation, filling the space between the glasses with various inert gases, thermal curtains, shutters, etc.).
Rice. 5.16. Radiation and heat flows in the window. The simplest way to improve the energy efficiency of a window is to eliminate the ventilation function and use thermally efficient shutters. A simple window design with an internal sliding heat-efficient shutter is shown in Fig. 5.17. The window includes one double-glazed unit inserted into the window block from the inside. Behind it there is a sliding heat-protective shutter. From the outside, a frame with single glass is inserted into the window block, protecting the window block from snow, wind, and rain. The shutter provides thermal insulation during the cold night season. It is locked from inside the house. The thermal resistance of a window block when closed (at night in winter) can be made comparable to the thermal resistance of a wall.
Notes . To make shutters, you can use extruded polystyrene or solid high-quality foam plastic or foam glass. The window block is replaceable, assembled from individual elements, mounted externally. The internal double frame (glazed window) is inserted from the inside. To simplify the design and reduce the cost, there are no vents or frames in the window. For ventilation, vents are installed in the wall.
Rice. 5.17. Triple glazed window with thermally efficient sliding shutter.
What layers of construction are there?
Installation of the structure must be carried out according to the rules. The wooden floor pie consists of:
- beams;
- binders;
- lag;
- thermal insulation;
- films for hydro- and vapor barrier;
- soundproofing.
Each element plays its role, so the floor layers are built in a certain order, and a number of requirements are imposed on them.
Beams
This is the base or support of a wooden floor. They serve as the “foundation” for the remaining layers of the “pie” and are mounted on load-bearing walls.
During the operation of the building, the beams bear the entire load. Therefore, the main attention should be paid to the calculation of floor beams.
For beams, it is recommended to use laminated or solid timber, sawn logs, or boards. The board can be single or fastened. Material – coniferous wood, characterized by high bending strength. The beam is used with a section of 100 mm x 150-200 mm.
Binder
The lining or flooring is done for the ceiling surface using OSB boards or plywood. Sometimes this layer is called a rough coating.
Lags
To avoid laying floor boards directly on the floor beams, you must first install joists along the beams. Then you can lay plank flooring on top. Installation of logs allows you to correctly perform interfloor insulation along the beams.
Insulation
Thermal insulation is also an essential part of the pie. The choice of material for the layer depends on the purpose and type of overlap.
Basic criteria for choosing insulation:
- breathability - beams must breathe;
- thermal conductivity;
- moisture resistance;
- fire safety of the material;
- lifetime
- environmental friendliness.
The insulation is laid between the joists.
On the attic floor, sometimes it is necessary to build a counter-lattice on top of the joists in order to lay the required layer of insulation.
Types of insulation for attic floors:
- bulk;
- roll;
- sprayed;
- slab.
Films for hydro- and vapor barrier
Wood is an extremely sensitive material to excess moisture.
The penetration of steam flows through the insulation negatively affects the structure of the wooden floor.
To avoid this, a layer of vapor barrier and a waterproofing film are laid. A special membrane is used.
The main parameters of the material are a low coefficient of vapor permeability and the ability to pass steam in only one direction (from the insulation to the air). In order for the structure to work correctly, an air gap must be left between the floor boards and the membrane.
The membrane should be laid on beams , and the air gap is provided by logs laid perpendicular to the beams.
Read more about steam and waterproofing of wooden floors in this article.
Soundproofing
The main requirement is an increased sound absorption coefficient.
Preference should be given to fibrous materials - ecowool, basalt and mineral wool, glass wool. Foam foam, soundproofing membranes and sound-absorbing panels are also used.
For high-quality installation of sound insulation, you should choose the size of the joists so that they do not reach the wall by 15-20 cm. Then lay them crosswise on the beams, and fill the air gaps between the wall and the beams with soundproofing material.
Read more about sound insulation for wooden floors here.
Types of screeds
There are few of them:
- Wet. It is made on the basis of cement mortar.
- Dry heated floor. This option has become used very often, as it eliminates the appearance of dirt and problems with the contacts of the electric version of the heated floor. In addition, this option allows you to lay tiles or other finishing material the very next day. Naturally, such a screed must be properly arranged.
These options have their advantages and disadvantages. However, you need to choose a screed taking into account the characteristics of the room, the design of the heated floor, as well as the time allotted for repairs. will suit your case, it's up to you to decide.