Installing concrete floors in a bathhouse is the most optimal option, thanks to which it is possible to create a strong, reliable, resistant to various influences and durable coating in a fairly humid room. Despite the fact that a concrete floor requires quite complex and time-consuming work, it is quite possible to complete the task yourself.
For rooms with high humidity levels, a wooden floor is often chosen, which requires regular maintenance, repair and replacement. At the same time, the concrete floor in the bathhouse is of high quality, warm, and can last as long as possible without any manipulation.
Types of bath floors
There are three key options for materials that are used when constructing a bathhouse floor.
- Wooden floors. They were widely used due to their ease of installation and pleasant aesthetic effect. Wooden floors allow for good water drainage. This is where the main advantages of wooden floors end, primarily due to the poor interaction of wood with water. In addition, the tree is an excellent habitat for small pests and pathogenic organisms. Owners of wooden floors in most cases are faced with the formation of mold and active growth of fungus, which can be difficult to stop.
- Clay floors. A classic version using a layer of clay and a wood coating. Once again we are faced with the basic problems of wood mentioned above. Clay floors themselves are quite warm and reliable, but have lost their relevance due to the emergence of the most convenient and practical option for concrete floors.
- Concrete floors. The undisputed favorites of this list. Moisture-resistant, durable, reliable. It is possible to create heating and thermal insulation systems. Concrete allows you to install any coating on top of the original layer.
Video description
This video describes how to create a floating screed in a bathhouse:
Pouring a concrete floor
This method of installing a floor in a washroom is not a complicated option. Although only specialists can handle the work professionally. They pour the concrete floor in stages. Moreover, their every movement is honed to the point of automaticity.
The work is often carried out when installing a rough wooden floor. It is created on the foundation and beams. The top of the rough base is often covered with clay, since it is a good thermal insulation material. Its ability to retain heat increases when straw or sawdust is added.
Specialists carry out pouring a concrete floor as follows:
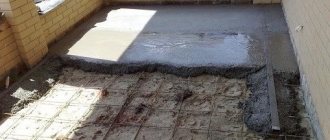
- Level the base using a semi-dry mortar, which is mixed from cement and sand in a ratio of 1:8. It is applied in an even layer. Then the solution is compacted well. After this, check the evenness of the surface using the rule.
- Cover the dried base of semi-dry cement-sand mortar with plastic film. The edges of the waterproofing are overlapped. It is 100 mm. At the same time, plastic film is also placed on the walls to a height of 300 mm.
Waterproofing of the rough base Source krainamaystriv.com
- Secure the damper tape around the perimeter of the washing room. Folgoisol strips can also be used. Typically the width of this material is from 70 to 100 mm.
On a note! Foam or penoplex slabs are suitable for additional floor insulation. They are mounted on plastic film. When using them, it is necessary to monitor the height of the screed. It should not be higher than in other rooms.
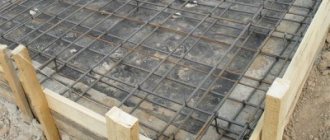
- Place cuttings of plastic pipes on the floor.
- Rolled metal in the form of rods is laid parallel to each other on the pipe scraps. Often its cross-section is 12 mm. Typically the pitch between the rods is 250 mm.
- Place the second reinforcing layer. It is laid perpendicular to the already laid rods. The reinforcement is placed with the same spacing - 250 mm. The intersections of the rods are connected using wire.
- Lay out the chain-link mesh. It is attached to the reinforcement frame also using wire.
- Prepare a solution, which is poured onto the prepared base with reinforcement. The process is performed without beacons, because they cannot be fixed evenly to the grid.
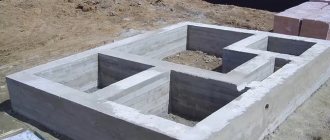
Technology of pouring a concrete floor on the ground
Having decided on the material, you need to move on to studying the installation process itself if you plan to do it yourself. The so-called “floor pie” is of great importance.
The filling is a multi-layer structure.
- The soil is compacted and covered with a layer of sand.
- A layer of gravel is placed on top.
- A polyethylene film is laid.
- Rough screed.
- Waterproofing is being installed.
- Thermal insulation is installed.
- A finishing screed is placed.
This is how installing a floor on the ground looks like. Let's consider each stage separately.
Concrete as a material allows you to install directly on the foundation. First remove a layer of soil of 50 centimeters. Place a layer of gravel, approximately 15-20 centimeters, into the resulting depression and compact it thoroughly. Next comes sand. Its layer is approximately 50-60 centimeters.
Remember the importance of leveling each layer and compacting it. The next step is to fill the screed. It makes more sense to lay two layers of screed. It is convenient to place a layer of hydro- and thermal insulation between them.
First stage
Having prepared the tool and purchased the necessary materials, we begin the preparatory work. First we dig a drainage hole. Its task is the reception and subsequent disposal of wastewater. On the outgoing sewer pipe we install a valve, the so-called drain ladder, which:
- hermetically connects the drain and waste systems;
- thanks to the installed grille, it ensures filtration of incoming water, which significantly reduces the possibility of blockages;
- prevents gases from entering the sewer pits into the room, as it is equipped with a water seal located inside the siphon.
Depending on the location of the drain hole, a drain is used with a straight line (when the pipe exits strictly vertically) or a side connection (if it is horizontal). When purchasing a drain ladder, pay attention to its height, which is fundamental when calculating the height of the coating being formed.
Having prepared the drainage pit, lay out the sewer pipes. If the drain is located in the corner of the room, the pipe is laid along the wall. When the drain is located in the center of the base, the pipes are laid diagonally, avoiding bends as much as possible, which lead to the formation of unwanted blockages. The plumbing elements are connected and brought to the cesspool. When organizing drainage from several rooms, they distribute communications throughout the room. The trenches are filled with sand and compacted tightly. To prevent pipes from becoming clogged with debris while the floor is being poured, they are covered with special plugs or thick fabric.
Installation of bath floors, usually done on the ground or logs
Pouring concrete floor along joists
Installing a floor with a ventilated space underneath will help avoid dampness and operational problems. This method helps to avoid installing auxiliary ventilation systems directly in the concrete screed.
The logs are made of wood. Their installation into the system is carried out in a system of bars representing a grid. Remember the need to treat wooden logs with impregnations and antiseptics.
- Prepare the base. The soil is removed (50-60 centimeters).
- Alignment with emphasis on the center for water outflow. A good solution would be to use a drainage pipe to carry the drainage away from the foundation.
- Compaction process. Manual compaction using logs or a vibrating plate is possible; it is more convenient to use. The concrete surface needs good compaction, do not forget about the importance of this stage. Next, add a layer of sand. The approximate thickness is 10-15 centimeters, followed by gravel in the same proportion. Tamp down thoroughly.
- Rough screed. The optimal thickness is 8 centimeters.
Septic tank installation
Expert opinion: Afanasyev E.V.
Chief editor of the Stroyday.ru project. Engineer.
Read my detailed article about the installation and installation of a septic tank.
The water is discharged through the pipe either into the ground through a drainage area in the underground, or into a septic tank. It can be made from old tires or concrete rings. To prevent the pipe from freezing in winter, it must be insulated. A septic tank made of concrete rings is a simple budget design. The rings are installed on a soil cushion; the bottom is not concreted so that the water goes into the ground.
Construction of a septic tank made of concrete rings
The optimal option for a drainage device in a bathhouse is chosen based on the structural features, type of foundation and method of further drainage of water.
Making concrete mortar
We have dealt with the technical part of the installation, which follows before pouring concrete. Now you need to follow the basic rules for preparing the composition.
Ingredients:
- Cement. Give preference to M-400. It is considered the highest quality, but not the cheapest on the market - part
- River sand - 1, 3 parts
- Gravel, crushed stone - 2.8 parts.
- Water. The amount of water is determined during the preparation of the mixture and depends on the resulting consistency. A large amount of water leads to the formation of cracks, and an insufficient amount interferes with the mixing process and leveling the finished surface.
After preparing the parts, it is necessary to mix the components. Water must be added in small portions in between, constantly stirring the resulting mixture.
Arrangement of the pillow
Diagram of the installation of an insulated concrete screed with reinforcement on the ground In order for the concrete base to retain heat better, when backfilling the mineral cushion in the ground, a depression of 0.5 m is made, of which 0.3 m will be used for backfilling coarse-grained materials:
- broken brick;
- granular gravel;
- large crushed stone.
After this, the filled materials are thoroughly compacted, and the entire perimeter of the future bathhouse is coated with a clay composition. Then you need to lay a small layer of shock absorber. For these purposes, sand with fine gravel or crushed stone is used. The height of the shock-absorbing layer should be no higher than 15-17 cm. Why is it even needed?
Floor insulation process
A polyethylene film is used, which is laid on gravel. Thickness within 200 microns. Next is the filling itself. There is an alternation between the process of pouring and constant leveling of the surface.
- Remember that the screed needs to become hard and durable.
- Wait a couple of days, do not forget to moisturize the surface.
- Quite often they resort to using a damp cloth, which is placed on top of the surface for an allotted period of several days.
Wastewater filtration system
For wastewater treatment, special underground filtration is required, which includes a distribution well, a waste pipe and a sump.
- The most common and affordable option is a filter well.
- To do this, a layer of expanded clay, brick chips and crushed stone is poured under the bathhouse building.
When interacting with water, the material eventually becomes covered with silt, which perfectly purifies wastewater before it enters the ground.
Thermal insulation
Professionals recommend using extruded polystyrene foam. It is quite durable and is not afraid of interaction with moisture and high temperatures. The appearance of cracks is eliminated using polyurethane foam.
The installation process occurs in three stages:
- Laying the pit.
- Wall covering.
- Floor installation.
What to do with the surface next?
You can lay ceramic tiles on the already dried screed. If we are talking about a washing room, then knowledgeable experts recommend using Metlakh tiles for it. If so, then dry cement should be applied to the concrete screed, approximately ½ kilogram per square meter, after which the ceramic tiles should be laid directly. We lay it down carefully, pressing it tightly. After this, we wait two days and only then cover the seams between the tiles with cement mixture.
Laying ceramic tiles as a finishing coat
There are other people who strongly recommend putting tiles in the washing area. We do not entirely agree with this, because tile, despite its hygiene and excellent external characteristics, is at the same time very dangerous in terms of traumatology. In other words, you can easily slip and fall on it.
What you should not do in a bathhouse, in particular in a washing room, is to cover the floor with synthetic material. For example, the same laminate under the influence of high temperature often releases substances harmful to our body, which we will inhale when visiting the bathhouse. They can also be absorbed by human skin.
Finishing screed
Last coating. The solution is similar to the solution of the rough screed. The standard layer is 10 centimeters. The main requirement is compliance with the angle of inclination to the drain.
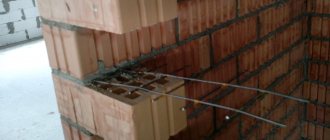
Reinforcement process
Use of steel reinforcing mesh. The cross section of the rod is 6 millimeters. The reinforcement frame is located in the center, filled with a layer of concrete from 4 centimeters on each side.
Final stage
Finish the bottom screed, make wooden formwork and fill the walls to the level of the thermal insulation layer.
- The mixture layer is 4-7 centimeters. Distribute over the entire area. Lay the reinforcing frame. Fill with a layer of solution - 4 centimeters.
- All that remains is to dry the rough screed. This process takes a couple of days. Don't forget to moisturize the layer.
The installation of the concrete floor is complete. Be careful at every step of the process. Contact a specialist if you are not completely sure of your own competence.
How to choose a sewer pipe
A properly laid floor slope is, of course, of great importance in draining water, but sewer pipes perform no less important functions. They are responsible for the rapid evacuation of water masses.
When choosing pipes, you must rely on the following characteristics:
- The smallest pipe diameter must be at least 60 mm, and the wall thickness must be 4 mm.
- PVC is considered to be the optimal material for external pipes, as it has frost-resistant properties.
- Pipes must be laid in the soil at a level below the freezing point.