How to coat concrete outdoors to protect it from destruction, what composition to strengthen the surface with: description of materials + photos and videos of their use.
How to strengthen a concrete screed on the street, an overview of special tools
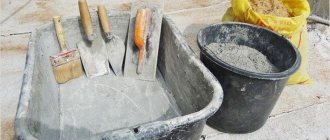
Despite the fact that concrete is a very strong material, it is susceptible to the adverse effects of the atmospheric environment. Thanks to this, a concrete screed on the street can quickly break. And to prevent this and maximize its service life, you can use special equipment. It’s good that in today’s building materials market there are a considerable number of them on display – these are impregnations and primers. Also, if during work at your dacha you need high-quality concrete trays, go to the website https://vodootvodnie-lotki.ru/catalog/betonnye-lotki/. Concrete channels are individual elements of surface water drainage systems and are usually used in areas that require high operational loads.
Purpose of impregnation
When a concrete screed is performed indoors, it is not influenced by external negative aspects. It's a different matter when it is performed on the street. In this version, on concrete
things like this work:
- very high humidity;
- high mechanical loads;
- large and severe temperature changes.
The worst thing for concrete is sudden temperature changes - due to this, the screed begins to become covered with cracks. And then water gets into the cracks that form, which leads to irreversible damage.
This is all aggravated if poor quality cement was used during the work, or the pouring technique was violated. In this option, the destruction process will go much faster.
Due to this, the use of strengthening impregnations is simply necessary for screeds poured outdoors. Thanks to its own characteristics, it is absorbed into the outer layer of concrete and strengthens it. Moreover, similar products form a protective film on the surface, which prevents moisture from entering the screed.
Impregnation for concrete
Polymer impregnations
One of the most effective types of impregnations for concrete are those made on a polymer basis. They are intended for use both indoors and outdoors.
- the composition can penetrate deep into the screed by 3-5 mm;
- at the same time, resistance to very high humidity and other atmospheric influences increases;
- the screed
becomes stronger and more resistant to wear, it will not crumble.
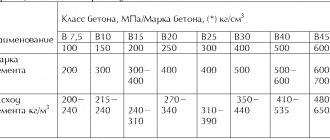
Moreover, the working life of the coverage increases. In general, if the screed was made using concrete, grade 300-350, then after processing, the product strengthens it to grade 600.
Main! When working with a reinforcing compound, it is necessary to take into account the concrete grade from which the screed
– the quantity and method of its application may depend on this.
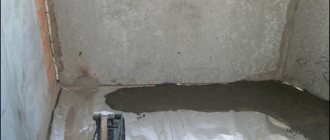
In most cases, when a solution with grade 150 was used to fill the floors, after applying the impregnation, they must be covered with polymer ethylene. This will allow it to penetrate as deeply as possible and perfectly secure the front layer.
Likewise, the use of such compositions is quite justified and is necessary when strengthening the solution. But in order to achieve the best results, you must follow the manufacturer’s instructions and not violate the technology.
The most common damage to screeds
Even if good cement was used when pouring, this does not guarantee that the screed
will not deteriorate over time. In most cases, the following destruction occurs with concrete:
- crumbling;
- cracks appear;
- the front layer peels off.
Main! Preventive measures must be taken immediately after deficiencies are found. If they are put aside, the screed may deteriorate greatly.
Naturally, to eliminate damage, it is best to use special means at the pouring step.
Cracks in the screed
A real jackpot...
You should be prepared that not every synthetic flooring option will be suitable for outdoor use. Perhaps a “fairytale” mixture of acrylic and cement, polyurethane or other materials will not be cheap. But when you purchase a frost-resistant self-leveling floor, you will be able to solve many problems.
Let's name the tasks that polymer coating will help you cope with:
- Fire protection.
- No toxic fumes.
- Smooth surface in the selected area.
- Easy to clean.
The polymer mass will harden fifteen to twenty-five hours after application to the prepared area.
Strengthening the screed with a specialized mixture
One of the methods for strengthening screeds outdoors is the use of special mixtures. They are produced in dry form and are applied on top of an already poured concrete solution.
The work methodology for fixing concrete looks similar:
- First of all, you need to understand that the strengthening mixture must be applied to a freshly poured screed. If you pour it onto hardened concrete, there will be no effect - the composition will simply be erased. Due to this, the concrete must still be wet.
- When the composition is applied to the screed, it comes into contact with it and chemical reactions begin. reaction. As a result, the front layer is hard and resistant to atmospheric influences.
Good qualities of such compositions:
- concrete strength and its resistance to wear increases;
- the working life of cement-based screed increases;
- its resistance to sun and moisture increases.
Another advantage of using such mixtures is the possibility of additional surface decoration. Because the composition may contain coloring pigments that can significantly enhance the appearance of concrete.
What causes concrete to fail?
Long periods of downtime during concreting can cause poor setting of new and old concrete.
Structures made on the basis of artificial stone are destroyed under the influence of the following factors:
- chemical reactions - occur due to an increase in the level of carbon in artificial stone. They cause a violation of the w/c ratio in the solution;
- chemical reactions that occur under the influence of chlorine ions . Chlorine is found in road salt, which affects reinforced concrete road surfaces. The structure begins to oxidize the reinforcement;
- moisture - liquid can seep into the pores of concrete. At sub-zero temperatures it crystallizes, which causes concrete destruction and cracking;
- mechanical loads - dynamic influences, impacts exceeding permissible loads work to destroy concrete;
- natural disasters, seismic activity, fires;
- Non-compliance with technological standards at the construction stage poses a serious risk . Here we can talk about the formation of cold seams, which during operation damages the strength and aesthetics of the structure.
Strengthening the screed with repair mixture
In most cases, it will be reasonable to use repair mixtures. How to do the job correctly:
- using a hammer drill, holes with a diameter of 20 mm are made in the concrete base. The distance between the holes is 20-25 cm;
- the hole is drilled to the full depth of the screed, the drill must reach the base;
- further, the top of the holes that were created are expanded using a drill with a diameter of 30 mm, the depth is within 3-4 cm;
- Now, it is necessary to clean the pits from dust; for this, it is best to use a construction vacuum cleaner;
- an expansion anchor bolt is placed in the hole and clamped;
- then, the expansion is allowed to be filled with repair mixture.
Main! In case of severe damage, it is much more rational to dismantle the outdated concrete and pour new one than to try to resurrect the old surface.
In the same way, it turns out to significantly strengthen the screed. Additionally, you can open the surface with an epoxy-based resin mixture.
Epoxy based adhesive
Concrete surface repair
In most cases, before strengthening, you need to first repair the old concrete surface. One of the common problems with cement foundations is the peeling of various layers.
The main disadvantage of this problem is that the location of damage can be difficult to determine visually. However, the issue is resolved very easily. In order to find places where there are problems, you just need to tap the surface with a blunt object. Where a dull sound will emanate from the base, the concrete has delaminated.
- Electric heated floor
Installation of ventilation systems
- Pipes for internal sewerage
Repairs are carried out in this order:
- In identified problem areas, it is necessary to drill holes. For repair work, a diameter of 15-20 mm is sufficient;
- The repair mixture is poured into them; a construction syringe is perfect for this.
Pouring the mixture must be done gradually, since you will need to wait until it fills all the voids and is absorbed into the solution. As soon as all the places where there are problems are repaired, you need to wait 2-3 days until the composition sets. Then, the surface can be opened with strengthening impregnation.
Dents in concrete floor
Pothole Repair
If there are dents on the surface, it would be better to repair them before strengthening. The sequence of work looks similar:
- the pothole itself needs to be enlarged; to do this, an indent of a couple of centimeters is made from its edges, and then the concrete is sawed through with an angle grinder;
- after this it is necessary to hollow out the concrete using a chisel or hammer drill;
- the resulting pit is perfectly cleaned, the main thing is that there is no dust in it;
- in the same way, all damaged areas are prepared;
- then the repair mixture is applied to them, but in advance, it would be better to prime these places.
After complete setting, a strengthening compound or impregnation must be applied to the surface. Then, screed
will be able to serve for a long time.
Likewise, there are several options for repair work and strengthening of concrete foundations. The most important thing is to follow the manufacturers' instructions when using a variety of impregnations and repair mixtures. This will ensure that strengthening
will go well, and the floors will not break and will serve for a long time.
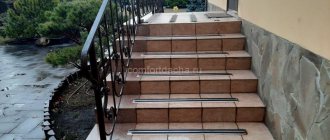
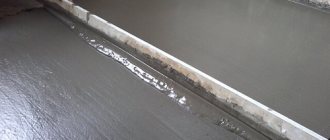
Grouting cement screed, useful tips
Beacon layout
Drywall profiles are laid at a distance of no more than 2 m, otherwise it is difficult to use the rule. To maintain the slope, use a cord sliding along the longitudinal marking cords on the pegs. The slats are placed on several piles of thick concrete mixture. The transverse cord runs along the profiles of the lighthouses and it becomes clear where to sink them and where to raise them. The same thick cement composition is placed in the gaps between the dried slides and allowed to set. The entire profile rests on a solid bed and will not bend under the rule.
Beacons corrected with a transverse cord
How to properly level a concrete floor
Before performing finishing work with your own hands at a site (in an apartment, a private house, on the street), the question usually always arises of how to level a concrete floor. Not only the appearance of the decorative coating (linoleum, laminate, etc.), but also its service life will depend on the quality of the surface.
This applies to housing and objects for various purposes, but also to cases where work is performed on the street.
- Definition of difference
- Methods and features of leveling Removing cracks
- Preparing the floor, dealing with bumps
- We remove holes
- Pouring the bulk mixture
- Cement-sand screed
- Dry screed method
Determination of differences in levels and irregularities
A special tool (different types of levels) is suitable for this task: bubble, laser, rotary, hydraulic level, as well as an optical level. Available means, namely cords, plumb lines, etc., will not ensure high geometry accuracy.
In small areas (in an apartment) you can safely use the bubble option. However, on a larger area it is better to use a hydraulic level, a laser analogue. But outdoors you should use optical devices.
There are several marks on the glass bulb itself that allow you to accurately determine how much the horizon is shifted. And the more professional the water level, the more of these risks there are.
When solving the problem of how to level a concrete block under tiles, laminate, linoleum or other covering, you must first determine as carefully as possible how significant the difference in levels is at different points. To do this you need to do the following:
- The apartment is cleaned (large and small litter, dust), as contamination can affect the measurement results
- The base level (line parallel to the floor) is transferred to the walls
- After the distance from the rough base to the base line has been measured in different areas, the highest point of the floor surface is determined
- The line must be raised above the highest point just found by a meter, after which it must be lowered to a level that is determined by subtracting the thickness of the future screed from 100.
The best results for leveling the rough surface for screed and decorative coating (linoleum, laminate, etc.) in your apartment will be obtained if you use a tool that is adjusted automatically.
Methods and features of their implementation
Regardless of where (on the street, at home) and under what coating you plan to screed (linoleum, laminate, tile), it is recommended to get rid of not only visible defects (holes, cracks), but also from invisible flaws, for example, minor level differences.
Various solutions are used for leveling: dry screed, self-leveling floors, sand screeds, etc. Each of the options is suitable for implementation in certain situations (on the street, in the house, etc.).
How to remove cracks?
To level a concrete floor, you must first prepare it. For this purpose, all leaks on the surface, as well as cracks, are removed with your own hands, regardless of the cause of their occurrence. Using a tool (levels of different types), height differences on the surface are determined. Then you need to widen the leaks with your own hands, using a chisel and a hammer. This will allow you to lay down the mixture for leveling.
Next, it is necessary to remove debris and determine whether the cracks are dynamic. In this case, you will have to additionally reinforce them by laying metal rods in several places. It is important to remove all dust from the surface, as well as from the cracks, for which the floor is filled with water. After this, you need to wait for it to dry completely.
For any type of coating (linoleum, laminate, etc.) it is necessary to make a high-quality screed, for which it is necessary to prime the rough base. For the solution you need to prepare cement (preferably M400) and water.
It is also recommended to add PVA glue/liquid nails. Considering the likelihood of shrinkage of the composition, leaks must be filled with your own hands so that the solution rises above the rough base. After the mixture has dried, the seams are smoothed using an abrasive wheel.
If there are bumps on the rough concrete base?
The floor under linoleum is not always thoroughly prepared; as a result, defects still appear over time. To avoid defects in the finishing material during installation, you need to smooth out all the bumps as much as possible.
For work, a diamond cutter and corresponding equipment (milling machine) are used. When doing such work with your own hands, you need to control the quality of the floor by level. If it is necessary to remove areas of protruding reinforcement, you should use a suitable tool, namely a grinder. Crushed stone can be knocked down with a hammer or chisel.
How to check the floor for bumps and gaps
How to remove holes?
Regardless of where the work is being done, outside or inside the house, the holes will have to be filled. In an apartment, linoleum will not hide such a defect. First of all, you need to remove the top layer of the rough base in areas with holes. For this work, a special tool is used - a grinder. Contaminants must be removed after all actions are completed.
A layer of fine crushed stone is laid at the base of the pit. Then this area is filled with solution. If you do the work yourself, you need to choose epoxy concrete. This is a two-component composition with a hardener. To mix the solution, use a special tool - a construction mixer. This composition should not completely fill the hole, since the area on top will be puttied. The final stage is sanding.
Application of self-leveling floors
To level a concrete floor, you can also use self-leveling mixtures. But such a solution is usually not used on the street. If it is necessary to remove minor differences in height under the screed, use a self-leveling floor of a certain type. To do this, the rough base is cleaned. Can be washed or dusted.
Before pouring, markings (baseline) are applied to the walls. After priming the entire floor, edge tape is attached to the walls (8 cm is enough). Then the prepared solution is poured onto the rough base; this should be done at the highest point of the surface. Now all that remains is to level the mixture using a special tool. You can get rid of air bubbles using a needle roller.
In order for the self-leveling mixture to be correctly distributed over the floor, it is necessary to select a suitable roller. If the needles are too high, the mixture does not distribute, only air is expelled.
Cement strainer
In case of significant unevenness, a new screed is made from a cement-sand mixture. On the street, such a measure is not used, since in this case the work is carried out with the existing foundation. This type of screed is suitable for linoleum, carpet, laminate, but it is important to completely dry the surface.
After removing dirt from the subfloor and marking the base line on the walls (including fastening threads throughout the room for the convenience of further work), you need to place corner profiles with perforations on the floor.
It is recommended to leave 100 cm between them, and make a distance of at least 30 cm from the walls. The profiles are mounted on the mortar without additional fasteners; no tools are required for this either. The quality of the installation is checked using a level.
Next, the mortar is laid in the direction from the window to the door. During the first 3 days, the surface of the base is wetted with water. When it dries, the profiles need to be removed, these areas should be primed, and then filled with a cement composition with the addition of a plasticizer.
Dry screed
In this case, the basis is granular material (expanded clay). First, the subfloor is prepared (significant leaks and other defects are removed, cleaned), then plastic film is laid over the entire room.
Knauf dry screed installation technology
Next, install separators - logs. After the space between them has been filled, sheets of a special material called superfloor are laid on top. For reliability, the seam joints are glued, and the coating itself is secured to the joists using self-tapping screws.
This option is suitable for different surfaces (linoleum, carpet, etc.), however, it is problematic to use it outdoors. One of the advantages of dry screed is that a simple tool is used and there is no need for more serious equipment.
Preparation of solutions
The technology of work depends on the type of mixture used. Of primary importance is the amount of mixing water and the mixing sequence.
Preparation of thixotropic solutions:
- To properly mix the working mixture, use the material in a whole container. The package is opened immediately before mixing;
- A precisely measured amount of water is poured into the concrete mixer (3.75 l for manual application, 3.9 for mechanical application);
- the mixer turns on, after which the dry mixture is continuously introduced into it. The kneading lasts 1-2 minutes;
- the equipment stops for a minute, the walls are cleaned of adhering dry mixture;
- if required, water is introduced, not more than 200 ml;
- then kneading continues for 2-3 minutes until a solution with a homogeneous consistency is produced;
- If it is impossible to provide proper moisture care for concrete, it is recommended to introduce moisture-retaining additives. The quantity is taken as 0.25 kg for every 100 kg of dry mixture;
- if you need to prepare a small amount of solution, it is permissible to mix it using a construction drill with a paddle attachment. Thixotropic mixtures are not mixed manually.
Preparation of flowable cement mortars:
- the working composition is prepared in a concrete mixer. The required amount of water is poured into the equipment bowl. To ensure medium fluidity, you will need 3.6-3.7 liters of liquid per 25 kg of dry powder; for high fluidity, take 3.8-4.0 liters per 25 kg;
- After adding water, the mixer starts, and dry powder is continuously introduced. The kneading lasts 1-2 minutes;
- the finished mixture should be liquid, without lumps;
- It is permissible to use an electric drill with an attachment. The composition is mixed manually in exceptional cases, prepared in small portions for 5-6 minutes.
Dry mixtures for repairing concrete damaged by corrosion of reinforcement, compositions with rapid strength gain are prepared in an identical way
Preparation of injection solution:
- 6-6.4 liters of water are poured into the concrete mixer and 20 kg of dry mixture is introduced. The solution is stirred for several minutes until a homogeneous fluid mass without lumps is formed.
Preparation of elastic waterproofing:
- liquid component B is poured into a clean container;
- Component A is slowly poured in and the mixture is kneaded with a low-speed construction mixer;
- the kneading lasts several minutes. Monitor the thoroughness of mixing at the bottom and walls of the container;
- waterproofing can be prepared in a concrete mixer equipped with mortar sprayers. With this method, you need to make sure that the mixture is homogeneous and without lumps. So it will calmly pour into the sediment funnel.
If it is necessary to prepare rigid waterproofing, add water to a clean container and add the dry mixture in portions. The composition is mixed with a low-speed mixer for 2-3 minutes. The material must stand for 10 minutes, after which it is remixed and put to work.
Crooked, uneven floor screed, how to fix it in 1 day?
One of the most important stages of repair and construction work is the preparation of the concrete base for finishing.
First of all, it is determined whether it is possible to use the floor directly under the finishing coating or whether leveling of the concrete floor is necessary. One way to check: using a two-meter rod (rules). The rule is set for the ceiling and the height of the clearance is measured with a tape measure. In this way, the entire area is checked, and the obtained data is plotted on the floor plan.
More accurate measurements are obtained when using a laser level. Using a level, it is easy to check the floor level at each point of the base. These measurements, just as in the previous version, are marked on the plan.
According to the marks on the diagram (see below), a decision is made whether, how and with what to level the concrete floor.
Rice. 1. The floor level at each point of the base is marked like this
Small differences (up to 5 mm) can be sanded manually or with a grinding machine. Surfaces with differences of more than 5 mm must be leveled.
Purpose
Floor leveling mixtures are plastic compositions. Such mixtures are characterized by fluidity and a tendency to quickly harden. These substances are used for leveling and leveling surfaces. The principle of operation is to fill the recesses of the base by spreading a solution of dry leveling material and water.
Used for leveling concrete and wooden surfaces. Main features of the constituent components:
- leveling is possible only in case of minor surface unevenness;
- used as a base layer.
In addition, it is possible to use leveling mixtures of this type for rough leveling work, but in this case the consistency should be much coarser.
Return to contents
Thixotropic mixtures (materials for structural repairs)
These are dry mixtures intended for the restoration of concrete and reinforced concrete structures on the street. The material is reinforced with polymer fiber and is characterized by compensated shrinkage . We can talk about a high degree of adhesion, water resistance, frost resistance, and mechanical strength.
Thixotropic mixtures are applied manually or mechanically, in a layer of 10-35 mm. Thanks to its thixotropic characteristics, the working solution works on vertical and horizontal bases, without requiring the use of permanent formwork .
Scope of application : mixtures are most often used for structural repairs (restoring load-bearing capacity) of vertical and horizontal foundations, for smoothing open reinforcing bars, filling traces of formwork, and repairing top layers.
Typical technical parameters
| Maximum aggregate size | 10 mm |
| Fiber filler | Polymeric |
| Workability | 210-260 mm |
| Expansion deformation | 0.1 mm/m |
| Compressive strength | 60 MPA |
| Ultimate tensile strength | 8 MPa |
| Adhesion strength to concrete | 2 MPa |
| Frost resistance | F300 |
| Waterproof | W16 |
Using self-leveling screeds
Self-leveling screeds are made from several components that provide good spreadability of the mixture over the base, mechanical strength, lightness and ease of use, minimal shrinkage, resistance to chemical and other influences, relatively low cost, and manufacturability.
How to level the floor - selection criteria:
- Type of base - there are mixtures for industrial reinforced concrete slab, monolithic concrete, self-leveling floor, basic cement screed, underfloor heating system and others.
- Estimated fill thickness - this indicator depends on the maximum level of unevenness and leveling method (preliminary/finish). Preliminary leveling is done under the finishing floor covering along the joists, which can be adjusted with pads and wedges (therefore there are no strict requirements for it, but the finishing needs to be made perfect).
- Type of finishing coating - the softer it is, the more accurately and rigidly the leveling is carried out and the higher quality the material should be.
Leveling concrete with a self-leveling screed is carried out in several stages. Mixtures for self-leveling floors are made from gypsum or cement as a binder, filler (usually sand), plasticizers and glue (responsible for elasticity and strength), pigments (optional). This mixture for leveling a concrete floor can eliminate both minimal and fairly serious defects.
Tools and materials for performing the work: the mixture itself, a container for the solution, an industrial vacuum cleaner, paint/needle rollers, a water or laser level, a wide stainless steel spatula, damper tape, dowels for beacons, a tape measure, a rule.
The process of filling a floor with a self-leveling mixture:
- Calculation of material consumption is based on the floor area and maximum differences in height. Use a rule or a long level along the perimeter of the room, diagonals, horizontal center. The clearance is determined with a tape measure. As the number of lines increases, the calculations become more accurate. The minimum floor thickness is 2-3 millimeters + the maximum height of defects. To save the mixture, the protrusions of the highest irregularities can simply be cut off.
- Checking the strength of the floor - check the strength of the base: to do this, you need to draw two perpendicular lines with the edge of a coin at an angle of 30 degrees to the floor. If the lines turn out without chips and are even, then the strength is sufficient, but if a deep groove or chips appear on the intersection line, then you need to fill in a new screed until it is level. The self-leveling floor must be stronger than the base by a maximum of 50 kg/m2, so as not to peel off and tear the concrete.
- Cleaning the base from dirt, dust, old pieces of concrete.
- Seal serious cracks a day before starting work - remove old material and dust, moisten, seal the solution tightly with a spatula/trowel.
- Priming the surface of concrete floors will improve adhesion and protect against moisture. Cover the base with primer using a roller and a paint brush, preferably in 2 layers (the second layer can be applied only when the first one has completely dried).
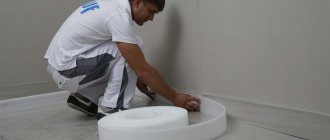
- Gluing damper tape around the perimeter of interior partitions, columns, walls to compensate for thermal expansion and avoid cracks and swelling of the new layer. In very large rooms, shrink joints are made in increments of 3 meters with parallel lines and direct intersections. You can use metal profiles before pouring or cut the seams a day after.
- Finding the horizon level on the wall - preferably with a laser level or a water level: set it in the center, project a horizontal beam onto the walls, use a tape measure to make marks at the required height, then they are connected with blue and tapping cord.
- Screwing self-tapping screws into the concrete floor (they will allow you to control the alignment) - along lines, corners, in increments of 1 meter. First, the dowels are fixed near the walls with the required height according to the marks, then a rope is pulled between the outer ones and the rest are installed along it.
- Mix the mortar that will be used to level the concrete floor according to the instructions on the package. First, pour water into the container, then add the mixture, mix with a mixer, leave for 10 minutes, mix again and use.
- Pouring the solution - from the far wall to the exit, the solution is poured from a height of up to 30 centimeters without splashing, it is advisable to move the bucket in a zigzag manner, without missing large areas. The strips are poured 40 centimeters wide, leveled with a spatula, the next strip should overlap the previous one by 5 centimeters. During the process, be sure to monitor the beacons and marks: if necessary, the mixture is dispersed over the free area or topped up to the desired thickness.
- Rolling the area with a needle roller to remove air from the thickness.
- Proper care after pouring - it is desirable that there are no direct ultraviolet rays, drafts, and a more or less stable temperature is maintained.
When the floor has hardened, you can lay any type of soft covering on it, lay ceramic tiles, install laminate, parquet, etc. It is also worth noting that leveling a concrete floor of this type with mixtures gives an error of 1.5-2 millimeters in height.
The building materials market offers concrete leveling solutions in a wide range. To understand the essence of each product, you should consider their individual characteristics in detail.
Tools, devices, materials
To concrete the yard, you will need:
- electric mixer or trough for concrete;
- vibrating plate or manual rammer;
- wide shovel, buckets;
- vibrating screed or manual surface smoothing;
- profiles for drywall;
- wooden rule 1.5-2 m;
- pegs with twine.
For the solution, use coarse river sand, medium-sized crushed stone, Portland cement grade 400 (preferably with mineral additives for resistance to water and different temperatures). You will need borders for framing.
Liquid floor for leveling concrete floors: self-leveling mixture, self-leveling floor
Liquid flooring for leveling a concrete floor is one of the most effective and popular methods of surface preparation for laying various types of coatings. It is imperative that the floors are leveled under carpet and linoleum; for stone/ceramic tiles, a load-bearing base is prepared depending on the characteristics of the defects. But the floors under the joists do not need to be leveled.
- Subtle cracks, small chips, roughness
- Large holes and sagging, bumps that are visible to the naked eye
- Chipping of the floor to any of the walls, strong differences in height
There are several methods to level a concrete floor; the choice of a specific technology depends on the characteristics and condition of the base, the types and severity of defects.
Types of self-leveling floor coverings for external use
There are a huge number of self-leveling compounds that are used for arranging outdoor floors.
Metal methacrylic self-leveling floors
It is considered resistant to sudden temperature changes. The composition includes polymers and acrylic resins, making it moisture resistant and environmentally friendly. It is possible to install designer coverings and 3D floors as well.
Self-leveling metal methacrylic coating
Important! With a layer thickness of 0.3-0.5 cm, the metal methacrylic self-leveling floor can withstand intense loads of up to 15 tons.
Another feature and at the same time advantage of the flooring is the possibility of operation two hours after pouring. But provided that the layer of material is no more than 0.5 cm.
Polyurethane liquid floors for external use
It is characterized by wear resistance, the ability to withstand significant loads and not wear out during operation. It is used outdoors because it can withstand aggressive external environments and excess moisture.
Polyurethane coating
Since the material resists chemical aggressors, it is used in chemical warehouses.
Acrylic cement coating for outdoor use
Resistant to moisture, cold and hot water. Resistance to oils and acids can be traced. This is a wear-resistant flooring that can maintain operational and technical characteristics in temperatures ranging from -60 to +120 degrees Celsius.
Important! The main area of application of such liquid flooring is the food industry. The floor is especially popular in European countries.
Acrylic-cement self-leveling floor for outdoor use
Epoxy liquid floors
Epoxy liquid floors are popular. But it is not suitable as a material for external use. Although the coating has a high level of moisture resistance and wear resistance, the material did not show any results in terms of interaction with chemical reagents. It follows that the floor will have to be repaired frequently.
Epoxy self-leveling floors are not suitable for outdoor use
Using self-leveling screeds
Self-leveling screeds are made from several components that provide good spreadability of the mixture over the base, mechanical strength, lightness and ease of use, minimal shrinkage, resistance to chemical and other influences, relatively low cost, and manufacturability.
Leveling concrete with a self-leveling screed is carried out in several stages. Mixtures for self-leveling floors are made from gypsum or cement as a binder, filler (usually sand), plasticizers and glue (responsible for elasticity and strength), pigments (optional). This mixture for leveling a concrete floor can eliminate both minimal and fairly serious defects.
Tools and materials for performing the work: the mixture itself, a container for the solution, an industrial vacuum cleaner, paint/needle rollers, a water or laser level, a wide stainless steel spatula, damper tape, dowels for beacons, a tape measure, a rule.
Types of car platforms
The area for cars in the yard is created from different materials. Let's look at the most popular types of parking.
From crushed stone
The structure of such a platform consists of several layers. First, sand 15 cm high is laid, and geotextiles are applied on top of it to prevent crushed stone from being pressed into the sand. Crushed stone 15 cm high is laid on top of the geotextile, after which the entire area is leveled and compacted. Along the perimeter of the site, you can install paving stones or bricks. This will make parking more attractive.
Using crushed stone is an inexpensive and practical solution
Concrete platform for a car
At the same time it is considered both the most reliable and the most complex. However, the strength of such a platform is worth the money and effort invested in it. The concrete base has the longest service life.
Concrete area is the optimal solution for car parking
Ecotextile
Relatively easy to make. Geotextiles are laid on a sand and gravel cushion 15 centimeters thick, which is secured on top with lawn gratings. The soil containing the seeds of the future lawn grass is poured into the honeycombs of the lattice. This parking lot has an unusual appearance and is more environmentally friendly.
Using eco-textiles, a platform for a car can be made environmentally friendly and practical
Tiled
Unlike most sites, tiled parking requires more investment and labor. But in return, the car owner will receive a durable platform with a long service life. Such a platform will look very neat and stylish. However, if you do not take care of it, then over the years, sprouts of sprouted grass will appear between the tiles, which will have a detrimental effect on its aesthetic appearance.
Paving slabs look beautiful, but require additional care
An alternative to parking lot tiles is stamped concrete. It is protected from grass germination, is applied faster and looks more attractive.
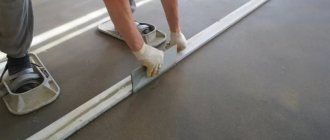
Leveling the concrete floor along the beacons
Before leveling the floor, it is worth considering this method. It guarantees a perfectly flat surface, but is more labor-intensive than the previous one. The most difficult stage is the actual creation of beacons. Necessary tools for work: laser level, large rule, narrow/wide spatulas, folding wooden meter, trowel.
The minimum thickness of the fill is 10 millimeters (the height of the metal profiles), the height of the beacons is at least a few millimeters.
- Setting up the laser level, checking the floor, selecting the desired layer thickness.
- Cleaning the surface from dust and debris (it is better to vacuum).
- Prepare the putty according to the proportions on the package.
- Installation of beacons - you can start at the wall, the rule is used as a tape measure, measuring the distance between the beacons. The first pile of putty is placed at a distance of 15-20 centimeters from the wall, and a plastic cross for ceramic tiles is placed in the center. A meter is placed on it and sunk into the solution. Excess putty is removed.
- Setting the rule on the floor, determining the step between the beacons - it should be 20 centimeters less than the length of the rule. The width between the beacon lines is also determined. Mark the entire room.
- After the point beacons have hardened, the surface of the crosses is cleaned of putty, made smooth, a rule is established between two adjacent points, and the solution is applied with a spatula into the gap that appears. At first it’s difficult to guess the thickness, but then the process will go faster.
- As a rule, the shaft is carefully leveled, putty is placed in the unfilled areas, everything is leveled, and the excess solution is removed. Then they continue like this - they pour the mass between the beacons, level it, pull the rule towards themselves, and adjust the volumes of the solution.
As a mortar for pouring, you can use a cement-sand mixture, mortar for self-leveling floors, even adhesive for ceramic tiles.
Leveling with tile adhesive according to a simplified scheme
Another method of leveling the floor that you can do yourself. Most often, this option is chosen for ceramic tiles: it is possible to reduce work time and achieve good strength. During the process of laying tiles, it is very difficult to level the floor (laying it directly on an uneven floor), so inexperienced craftsmen correct the base all in advance.
Why is alignment needed?
In any room where it is intended to cover the surface with decorative material, it is necessary to create evenness. Laying flooring will be successful if the work preceding this point is carried out efficiently and effectively.
Without a level floor, it is impossible to correctly install doorways and position the door correctly. Installing furniture in such conditions would be impractical. Cabinets can simply wobble on uneven surfaces and quickly become unusable. Any major renovation requires a procedure for leveling the floor with concrete.