- Materials and tools
- Materials and tools
- Materials and tools
- Wet screed What is needed for this
- What is needed for this
- Materials and tools
- Which method is best for heated floors and why?
One of the most important stages of repair and construction work is the preparation of the concrete base for finishing.
First of all, it is determined whether it is possible to use the floor directly under the finishing coating or whether leveling of the concrete floor is necessary. One way to check: using a two-meter rod (rules). The rule is set for the ceiling and the height of the clearance is measured with a tape measure. In this way, the entire area is checked, and the obtained data is plotted on the floor plan.
More accurate measurements are obtained when using a laser level. Using a level, it is easy to check the floor level at each point of the base. These measurements, just as in the previous version, are marked on the plan.
According to the marks on the diagram (see below), a decision is made whether, how and with what to level the concrete floor.
Rice. 1. The floor level at each point of the base is marked like this
Small differences (up to 5 mm) can be sanded manually or with a grinding machine. Surfaces with differences of more than 5 mm must be leveled.
How to measure the floor level?
The choice of floor leveling method, first of all, depends on the degree of surface unevenness , which is difficult to determine with the naked eye - special devices will be needed. for these purposes :
. If its length is not enough, then a building rule is placed under it;
normal building level- a hydraulic level allows you to more accurately and easily take measurements in large areas, but when filling the instrument with water, it is important to avoid airing its working tube;
- Laser levels are even easier to use and allow you to take measurements with maximum accuracy, and their wide functionality makes the entire measurement process much easier. The error is no more than 1-2 mm/m, and when measuring it is better to wear safety glasses;
- The level is a professional geodetic instrument, quite complex to use, it provides ideal accuracy and allows measurements to be taken over vast areas, therefore it is used mainly in large-scale construction.
When leveling the floors in the apartment, you need to bring them to zero level . After all work is completed and finishing is completed, the floor level should be the same in all rooms, which means that when leveling, the height of the finishing material used must also be taken into account. Thus, the height of the subfloor level in rooms where different coatings will be used may differ by 1-2 cm.
Base reinforcement
Any surface concreting necessarily includes reinforcement in order to give the base strength, durability, reliability, and the ability to withstand even heavy loads.
To perform reinforcement, you must use the following materials:
- metal or plastic mesh, which can have different cell sizes;
- welded mesh made of metal reinforcement with cells of 100x100x5 mm;
- a frame made of metal rods that is knitted in place using knitting wires. The diameter of the rods can be 8-18 mm.
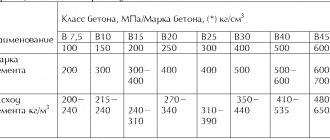
No. 1. Cement-sand screed
Cement-sand floor screed is considered one of the most popular methods of leveling the surface. It is performed using a mortar of cement and sand in proportions of 1:3 or 1:4, depending on future loads on the floor. Cement-sand screed is used in private houses and high-rise buildings with concrete floors. It is great for use in rooms with high humidity (kitchen, bathroom) and where the floor will be subject to significant load. Often this leveling method is used for future coverings of tiles, parquet and linoleum.
Advantages of cement-sand screed:
- strength and durability;
- the ability to hide some communications in the thickness of the screed;
- the ability to level very uneven surfaces - this method is used when the height difference exceeds 5 cm;
- low cost of work.
Among the main disadvantages it is worth highlighting:
- long hardening period;
- the need to have the skills to perform such work or involve professionals.
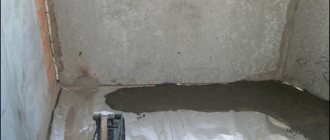
The execution of the screed begins with determining the zero level . To do this, you can use a building level, with the help of which a single line is created at a height of about 1.5 m from the floor, from which the distance to the floor level is measured. It is worth focusing on the minimum distance, which will help determine the level of the floor height, but it should be taken into account that the minimum thickness of the screed is 2 cm. You can also draw lines along the bottom of the wall for the future floor level , which will help make the screed as even as possible.
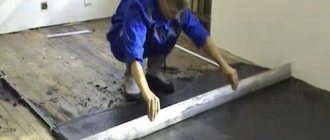
Preparing the base involves thoroughly cleaning it from dust. It is first swept out, then the remains are vacuumed, and only after that can you start priming the surface. After applying the first layer of primer, it is recommended to cover the floor with a waterproofing solution, and then apply a second layer of primer, due to which the maximum level of adhesion with the concrete solution is achieved.
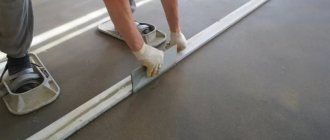
The next stage is placing beacons , which allow you to achieve the most even surface possible. They can be used as T-shaped metal guides, which are attached to the base with adjustable screws. An easier way is to install guides on slides made of thick cement-sand mortar of the required height. The evenness of the beacons is constantly checked using a building level. The first one is installed at a distance of 20 cm from the wall, the rest are mounted parallel to it in increments of 40-60 cm.
Leveling material can be prepared from ready-made dry mixtures intended for leveling the floor. They add water in the amount specified in the instructions. You can prepare the necessary mixture from sand and cement with your own hands. Mix the solution using a construction mixer or a special attachment on a drill. The consistency of the finished solution should resemble thick dough and be homogeneous. The solution should spread slightly on the surface, but not spread.
The finished solution is laid out between the beacons , starting from the far corner of the room and moving towards the door. The mixture poured between the two beacons is leveled according to their level, moving it towards you. During the installation of the screed, it is better to pierce the fresh solution in some places with a metal rod so that air voids do not form in it as the screed hardens. If you decide to carry out all the work yourself, then you still can’t do it without the help of a partner: while one is leveling the mixture into the beacons, the second must prepare a new portion of the solution, because the screed within the same room must be completed in one day.
You can walk on the finished screed after just a few days, but it will completely harden only after 2-3 weeks. During this time, it is recommended to cover its surface with plastic film to prevent the surface from becoming cracked. An alternative to film is to evenly wet the surface twice a day.
Indicators of a high-quality screed are a uniform gray color over the entire surface, the same sound when struck with a wooden block. The maximum horizontal deviation is 0.2%, which means that for a room 4 m long, the height difference should be no more than 8 mm.
Depending on what requirements are put forward for the floor, a concrete screed can be an independent leveling method or just one of the stages in creating a flat surface.
the wood-concrete screed method , which previously enjoyed great popularity, has been almost completely forgotten It differs in the composition of the solution, to which sawdust is added, which gives the concrete greater strength and allows it to breathe. The only problem is the smoothing process, because larger sawdust floats closer to the surface of the mixture and breaks it.
Installation of beacons
Scheme of an expansion joint of a concrete screed.
In order to evenly pour the concrete mixture, it is necessary to perform a number of simple preparatory work, which can significantly facilitate the pouring. Various materials can be used as beacons, including cuttings of profile pipes and wooden blocks. Often, a concrete solution is used for this, which is laid in small areas. There are ready-made special metal beacons that can be purchased at any hardware store.
First you need to mark, i.e. divide the area into segments, the length of which is 1.5-2 m. After this, using a level and a metal strip, a line is drawn, small columns of mortar are installed, on which the guides will be attached. When installing the guides, it is important to ensure that their upper edge is strictly at the zero level, in which case the floor will be poured with concrete exactly according to the markings, and the surface will be smooth.
It is recommended to pre-lubricate the guides themselves with oil so that after laying the mixture they can be easily removed. Such parts are called cards; they are used in cases where it is impossible to fill the entire room at once. Using this method allows you to easily and quickly complete work in a small room.
No. 2. Semi-dry screed
Semi-dry screed is one of the varieties of the popular cement-sand screed. It is performed in virtually the same way as in the case described above, but the changes affected the process of preparing the mixture - a minimum of water is added to it , which is necessary only to hydrate the cement. Fiber fiber is added to the solution as a reinforcing agent. , many advantages were achieved
high density of the resulting screed, as well as the absence of pores and voids, because during the hardening process there will be no evaporation of moisture characteristic of a wet screed;- minimal shrinkage, because evaporation is almost completely absent. The screed can be laid without taking into account shrinkage;
- a cleaner installation process, since the solution is less wet and produces less dirt;
- it will take less time to completely harden, again due to less moisture and a faster process of evaporation;
- the level of humidity in the room after pouring such a screed does not prohibit carrying out associated finishing operations and storing building materials in adjacent rooms, which is strictly not recommended when a regular cement-sand screed hardens.
You should also not forget about the disadvantages of the method:
- Due to the higher density, the ability to spread worsens and sometimes difficulties arise in filling corners. However, experts advise combating this drawback by introducing plasticizers into the mixture;
- You can level only small surfaces with your own hands, up to 75 m2 in area; in other cases, you can’t do without a pneumatic paving machine.
The process of laying a semi-dry screed is almost identical in principle to the installation option for cement-sand screed described above, but some features require consideration. In particular, this is the process of preparing a solution . It is recommended to mix three shovels of sand and a shovel of cement in a container until the required amount of mixture is formed. It is mixed and a little water mixed with fiber is added (approximately 80 g is used per bucket of water, unless otherwise specified by the manufacturer). Water is added until the mixture has the consistency of sandy loam, sticky clay sand. If you compress the mixture, the moisture will not be released, and the lump will retain its shape. If you still go too far with water, you can add cement and sand in the same proportions, but in smaller quantities.
It is recommended to lay the mixture in two layers : the first slightly below the intended level and with maximum tamping, the second - with pulling and grinding. You need to act very quickly, because within an hour the mixture hardens. Some experts advise applying the first layer immediately around the perimeter of the room: this can only be done if the second layer is applied within one hour. A day after installing the screed, expansion joints can be cut along the walls to a depth of up to a third of the screed itself and a width of no more than 3 mm.
general information
The essence of the slab base is a reinforced concrete slab, which is placed on a layer of soil up to 300 mm. Crushed stone or sand is mixed with the soil. The thickness of the monolithic foundation slab itself is 20 - 40 cm.
For the construction, monolithic slabs or prefabricated slabs can be used, which are poured at the construction site. Slab foundations on heaving soils, as well as slab foundations on bulk sandy soils, show themselves to be the most effective compared to other types of construction.
Despite the fact that the monolithic type of slab is considered more reliable, when choosing how to make a slab foundation, it is preferable to pour the slab on site. This is explained by the fact that the process of transporting and laying a monolithic base is quite labor-intensive and expensive, but building a pie slab is very simple.
This type of foundation is suitable not only for the construction of large industrial or residential facilities: it is also suitable for small outbuildings, for example, you can make both a slab foundation for a bathhouse and a monolithic slab foundation for a garage with your own hands.
A separate article on our website discusses all the pros and cons of a slab base. Sometimes, in addition to the slab, combined types are used, for example, a pile-slab foundation or universal ones, for example, from road slabs.
No. 3. Self-leveling mixtures
Self-leveling mixtures are otherwise called self-leveling mixtures, floor levelers and self-leveling floors. This is a fairly simple way to level the floor and get an excellent result. Suitable if the height differences are no more than 3 cm. Such mixtures can be used to level floors for finishing with tiles, cork, linoleum, carpet, etc.
The basis of the self-leveling mixture is cement, but in addition to it, the composition also includes special modifying additives that can increase the plasticity and fluidity of the solution. Some additives allow you to reinforce the solution and inhibit the appearance of microcracks in the future. Depending on the composition, self-leveling mixtures are divided into:
- high strength;
- for heated floors;
- fast-hardening;
- thin-layer.
In addition, there are self-leveling mixtures on sale, intended not only for rough finishing, but also for finishing , as well as compositions with special properties. There are also compounds for rough leveling , they are intended for surfaces with significant unevenness.
All self-leveling mixtures boast a number of advantages :
- simplicity and high speed of working with them;
- speed of hardening;
- high strength indicators, so this leveling method is quite suitable for rooms with a high degree of traffic;
- resistance to temperature changes.
disadvantages to this method of leveling the floor - these are rather its features. Large differences in the level of the floor surface cannot be leveled with a self-leveling floor. You need to work with the mixtures very quickly - if you hesitate and allow it to dry out, then it is unlikely that you will be able to achieve a smooth surface.
Working with such mixtures is really simple. They are usually used to level concrete and sandy bases. Preparation of the mixture consists of diluting the purchased powder with the required amount of water. For mixing, it is better to use a construction mixer or a drill with an attachment. The composition is prepared in portions, since its properties are lost within 20 minutes. Naturally, before starting work, you should carefully prepare the original surface: clean it from dust, seal all cracks, and treat it with a primer.
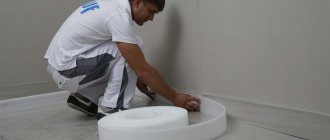
When the mixture is ready, it is immediately poured onto the floor. The principle of its operation is based on the law of gravity, so there is no need to install beacons and level the solution according to them. It is also worth remembering that this solution is self-leveling and not self-spreading, so after pouring it onto the floor it must be leveled with a wide spatula or a needle roller. It is better to immediately fill the entire floor in the room, but if the area is large, apply the solution in strips, acting very quickly and not allowing the edge of the strip to dry out. In this case, only professionals can achieve a perfectly flat surface.
The hardening speed depends on the room temperature, humidity and layer thickness. On average, after 6-12 hours you can move on the surface, and after 3-4 days you can install the finishing coating.
Advice from professionals
Which method is best for heated floors and why?
For heated floors, a wet or semi-dry screed is best suited. This is due to the design of the heated floor. In order for the surface to be heated evenly, the thickness of the screed under the heated floor should be 4-6 cm, then the finishing coating is laid. To prevent heat from the heated floor from going down, the wires are laid on foil and insulation 2 cm thick. The German standard recommends insulation from 7.8 cm to 10.8 cm. Plywood, plasterboard, and OSB are poor heat conductors, so they are not used for installing heated floors.
Which method is suitable for leveling a concrete floor in a garage?
The garage floor will be durable, resistant to aggressive environments and durable. It is best to use a wet, semi-dry screed to level the floor.
How to level a concrete floor and improve sound insulation and/or thermal insulation
Sound insulation and thermal insulation of floors is improved during the leveling stage. With a dry screed, insulation is laid between the beams; wet and semi-dry screeds are carried out over the insulation. Self-leveling floors and leveling with glue are carried out without insulation or sound insulation.
At what stage should communications be laid?
All communications are laid before the floors are poured. If the thickness of the fill allows, then the communications are laid out on the floor; if not, then they are laid in grooves.
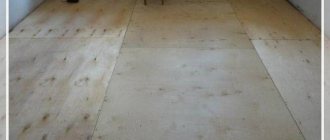
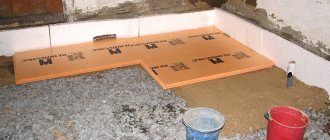
No. 4. Leveling with gypsum fiber sheets (GVL)
Leveling with GVL is called dry screed. This process is much simpler and faster, but the quality of the finished screed is inferior to a monolithic one. A layer of expanded clay is laid under the gypsum plasterboard, which plays the role of a heat insulator. The technology allows the use of other materials that have similar thermal insulation properties.
Leveling of GVL begins by cleaning the surface from dust and dirt, after which a waterproofing material, which can be a polyethylene film, is spread over it. Its strips are laid with an overlap of about 10-15 cm and overlapping the walls by 10 cm. Along the perimeter of the room, it is better to use an edge strip, which is placed between the plastic film and the expanded clay layer.
Expanded clay must be carefully compacted and leveled to the intended level. The first plate is mounted in the corner closest to the door, secured with self-tapping screws. When the first layer of gypsum plasterboard is ready, proceed to the installation of the second, which is attached with glue. It is imperative to shift the sheets by 25-30 cm relative to the first layer. For reliability, the second layer can be attached with self-tapping screws to the first. Some experts recommend installing beacons in the form of wooden blocks or metal U-shaped profiles. To move on expanded clay, sheets of plywood or gypsum fiber board are used.
At the final stage, the joints of the plates and the fastening points with self-tapping screws are primed , then the rest of the surface is primed, and the excess plastic film and edge tape are trimmed. An important advantage of this method of leveling the floor is the ability to perform it in stages, in several approaches, and not in one day, and this greatly simplifies the process when leveling the floors is done with your own hands.
Choosing the best option
| Comparison table of alignment methods | |||||||
| Types of concrete base leveling | Work completion time and drying | Cost of materials, ₽ | Cost of work, ₽ | Suitable for laminate | Suitable for linoleum | Suitable for tiles | Suitable for carpeting |
| Dry screed - plywood glue | You can immediately move on to finishing | 35,000.00 | 50,000.00 | Yes | Yes | No | Yes |
| Dry screed - plywood, OSB for joists | You can immediately move on to finishing | 55,000.00 | 65,000.00 | Yes | Yes | No | Yes |
| Wet screed | 30 days | 30,000.00 | 50,000.00 | Yes | Yes | Yes | Yes |
| Semi-dry screed | 4-5 days | 21,000.00 | 40,000.00 | Yes | Yes | Yes | Yes |
| Self-leveling floors | 5 days | 60,000.00 | 40,000.00 | Yes | Yes | Yes | No |
| Dry plasterboard screed | You can immediately move on to finishing | 65,000.00 | 35,000.00 | Yes | No | Yes | No |
As can be seen from the table, it is most advantageous to use a semi-dry screed when leveling a concrete floor. This method is faster and will then allow you to lay any finishing coating.
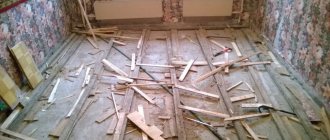
No. 5. Leveling with plywood
Another dry way to level floors is to use plywood. This method is applicable only for those rooms where there will be no significant changes in humidity during further operation. Leveling with plywood is used, as a rule, for wooden and concrete floors when the topcoat is laminate, parquet or linoleum.
Depending on the level of deformation and height differences, two main methods of leveling with plywood are used:
- installation of plywood directly on the plank floor;
- installation using lag.
The first option is applicable when the height difference is minimal, and the unevenness is caused mainly by the deformation of correctly laid floorboards. In this case, logs will not be required - their role will be played by the tubercles of the curved floorboards. The thickness of the plywood sheets, in this case, will be 8-10 mm if the width of the main floor boards does not exceed 20 cm, and they are all uniformly deformed. If the floor consists of boards more than 20 cm wide, or not every floorboard will rest against the leveling layer, then it is better to use plywood 20 mm thick.
It is better to keep plywood sheets for several days in advance in the room where the work will be carried out. They should be treated with an antiseptic . Before starting work, the sheets are laid out on the floor in the way they will later be attached. If sheets measuring 125*125 cm are used, it is better to cut them into 4 parts for ease of work. They are laid out on the floor, moving each row relative to the previous one and imitating brickwork, leaving a gap between the sheets of 1-3 mm and a gap between the sheets and the wall of 1-2 cm for the expansion of the wood. Now all that remains is to attach the sheets to the “ridges” of the plank floor with self-tapping screws.
Sometimes sheets of plywood are laid on an already leveled concrete floor. This technique helps to achieve the most even surface possible.
The second method is used when the elevation differences are significant. Concrete and old wooden floors can be leveled using joists. Work begins with preparing the base , which is cleared of debris. If the base is a wooden floor, then it must be treated with an antiseptic. Then a layer of waterproofing is laid, which can be a polyethylene film or a special membrane. Joists and plywood are pre-treated with an antiseptic.
As a lag you can use timber with a side of 40*40, 50*50 or 60*60 mm, second grade board or cut plywood. If it is undesirable to raise the floor too much, then use not timber, but cut pieces of plywood. The logs are laid across the direction of incidence of the sun's rays in increments of 40-50 cm. Now you can install transverse jumpers, which are attached using self-tapping screws.
Next comes the most crucial moment - placing the finished sheathing at the level previously marked on the wall. For this purpose, metal wedges, roofing felt, roofing felt are installed under the logs, but most often wooden spacers are used, which will resemble point supports. Some people use sand for this purpose. After leveling, the entire system is attached to the floor, for which you can use dowels three times the length of the log thickness. The space inside the sheathing can be filled with a layer of insulation (mineral wool is often used) or with a screed made of wet sawdust and PVA glue. In the latter case, the mixture is applied in 2-3 layers, waiting for hardening for 2 days, but less thick plywood can be used. Pre-prepared and processed plywood sheets are fastened with self-tapping screws, leaving a gap of several millimeters between the sheets.
If the height differences are more than 5 cm, but less than 8 cm, then a more complex mini-lag system . Wooden pads are installed under the logs and lintels, and the height of each such supporting element is calculated separately and can be different, and this is the most difficult stage.
In general, the leveling method using plywood can be called quite fast, because you don’t need to wait for it to harden. Joists and sheets of plywood do not create such a load on the floors as concrete, so in the case of old housing stock this option is irreplaceable. But in some cases, this leveling method will require a professional approach, and will cost a pretty penny.
What do they produce?
You can sand the surface with the following tools:
Professional controlled grinding machine
Used for processing large areas. The operator monitors the process by changing the position of the unit. Modern models are equipped with functions for collecting water and dust, so they can be used for both dry and wet grinding.
Grinder with grinding wheel attachment
The most popular option when it comes to domestic use. Using a grinder, it is convenient to work corners and places that are difficult to reach with professional equipment. It is more maneuverable and practical. As for the work itself, it is important to monitor the level so as not to remove extra millimeters of concrete from the surface.
If you need to grind a concrete floor with your own hands, then it is important to choose the right attachment. There are several options:
- Turtle disk attachment - used for finishing grinding, as it contains fine abrasive chips on the surface. They are attached to a sticky surface, which makes the replacement process easier and faster. The advantages also include low cost and low consumption.
- Faceplate - consists of diamond chips of various fractions, which allows you to remove denser layers of concrete. Used primarily for initial grinding.
- Cups (square, with double segment, boomerang) – grinding wheels for eliminating errors and unevenness of the coating. Remove up to 5 mm of concrete without much effort. The work is performed at low speed of the grinding device.
- Frankfurt is a finishing sanding attachment that allows you to get a perfect finish with a mirror shine.
If the work will be done using a grinder, then your arsenal should have several attachments of different abrasives. Work always begins with coarse fractions, ending with polishing attachments that give a glossy shine to the coating.
Fluorosilicate film on concrete surface
Another economical and effective means for impregnating concrete is made on the basis of fluorosilicates - magnesium, zinc and aluminum salts of hydrofluorosilicic acid. These salts enter into chemical reactions with concrete components and form compounds that are insoluble in water.
Salts are called fluates, and the impregnation of concrete with them is called fluating.
The use of fluorosilicates gives the concrete coating the following properties:
- increases strength by 35–45%;
- increases abrasion resistance by 12–15 times;
- reduces dust emissions by 10–12 times.
Fluating also allows you to significantly increase resistance to chemical influences, significantly increases the frost resistance of the surface, compacts it and reduces absorbency.
The most important property of fluting is the vapor permeability of the finished surface. Impregnation does not seal, but only strongly compacts it. Due to this, the use of fluorosilicates is extremely effective on concrete surfaces with poor waterproofing from groundwater and capillary entry of moisture.
Other advantages of using fluate-based impregnations:
- applied once during the entire service life;
- do not wash out from the surface;
- reinforcement in concrete does not corrode;
- the electrical conductivity of the coating does not change;
- abrasive films do not form on it;
- the adhesion (friction) characteristics of concrete do not change, which is important for runways;
- fluates are not organic solvents.
When working with fluorosilicates, it is necessary to take into account their disadvantages. Treatment with fluate impregnations has low efficiency on the following surfaces:
- Concrete with a low cement content and a large amount of sand;
- Very old coating with carbonated lime;
- Concrete that has not gained strength after pouring.
Fluate-based impregnations are non-flammable compounds.
Cost of work
When calculating the cost of work, many different factors are taken into account, including the cost of materials, equipment, transportation costs, etc. The price of smoothing machines depends mainly on engine power, the size of the working tool, and productivity . At the moment, single-rotor smoothing machines are sold at a price of 60-170 thousand rubles, and double-rotor ones - 270,000-1,600,000 rubles.
Cost of smoothing concrete surfaces with helicopters:
| the name of the operation | Price per square meter |
| Rough smoothing of concrete | from 180 |
| Final smoothing of concrete | from 240 |
| Adding quartz topping (including material cost) | from 220 |
| Adding corundum topping (including material cost) | from 260 |
| Adding colored topping (including material cost) | from 320 |
| Applying impregnation to freshly troweled concrete | from 180 |
Gypsum particle board
Another material that is used to install a new flat floor on top of the old one. To level an uneven concrete floor using the technology of installing gypsum particle boards, a layer of fine expanded clay chips is poured on top, which is leveled using the rule according to pre-installed beacons. In the second step, after the beacons are removed, first the first layer of slabs is laid, and then the second. Moreover, the second one is attached to the first one with self-tapping screws, and the cracks in the finishing layer are covered with putty.
You can learn more about eliminating uneven floors using gypsum particle boards from the video:
Now let's look at a couple of methods that can be useful to level an uneven wooden floor.
Preparatory stage
Considering that the floor must be perfectly level, preparing the base before applying glue is an important step.
In order for such a layer to hold firmly and not peel off, it is necessary:
- Thoroughly clean all irregularities and sagging using a spatula. If the floor was filled no more than 48 hours ago, then this will not be very difficult. If the screed has acquired final hardness, for this stage you will have to use a grinder using a grinding disc.
- Sweep the floor and then vacuum the surface very thoroughly. Neglecting this step can lead to the glue peeling off from the contaminated floor, which means that all subsequent work will be done in vain.
- Prime the base thoroughly, avoiding any gaps, using a roller (you can use a brush). It should be noted that the cement screed absorbs the primer composition well, so you will need quite a lot of it. To be sure of the quality of its application, it is better to repeat this stage of work again, and then allow it to dry for the time indicated on the package.