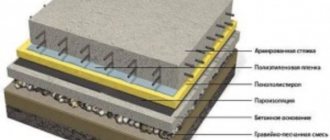
The self-leveling floor owes its name to the method of its installation - this is an option for making a screed by pouring a self-leveling mixture. A distinctive feature of cement self-leveling flooring is its thickness, which is about 3.5 mm. Sometimes cement self-leveling flooring is called liquid linoleum - in fact, its surface is perfectly smooth and even, like tiles, only there are no seams on it. This floor can be safely used in public and residential premises, it is environmentally friendly, its installation and operation are safe for people. Self-leveling, cement-based flooring is the optimal solution for creating a heated floor system.
Purpose of self-leveling floor
As a rule, the economic indicators of repair work are always at the center of all kinds of calculations. The main task of any owner, especially when there is a lack of funds, is to search for technological operations on which you can really save.
In the recent past, when self-leveling floors were just beginning to gain their position, they were used exclusively on an industrial scale. They could be found on factory floors, in public canteens and other industrial premises. Currently, there are several types of self-leveling floors. As a budget option, it makes sense to consider a cement-based or gypsum-based self-leveling floor. These are publicly available and not scarce materials, which determine the cost of such floors.
Self-leveling floors got their name due to the method of application - the pouring method. Under the influence of gravity, as well as its fluidity, the substance spreads over the surface, creating a monolithic, smooth and even surface. After obtaining such a finishing surface, it can be finished with any finishing material.
Calculation of layers
First of all, let’s calculate the thickness of the “zero” layer, i.e. one that will give a smooth horizontal surface, provided that the composition is absolutely fluid. Next, using the “zero” thickness, we will calculate the required thickness of the leveling layer itself. Thus, we will reduce the real complex relief of the base to some imaginary horizontal plane.
Why such difficulties? The fact is that any instructions for self-leveling compounds give the specific consumption of the dry mixture, in kg*sq. m, in a layer of 1 mm, based on pouring onto a flat horizontal surface. Actually, this parameter characterizes the ability of the mixture to spread, and it is difficult to calculate the true consumption on a real surface using it; you have to give an extra technological margin.
For mass construction this is not so important - there the customer will pay for a known excess or for the actual cost of completion. And the surplus will go to the next object, not without benefit for the contractor. It is almost impossible for a homemaker to sell the entire remaining bag of expensive mixture, the shelf life of which is about to expire. Half a bag is generally impossible once the packaging is opened. Therefore, consumption must be calculated accurately.
Calculation based on “zero” assumes that the work is done in stages: fill in “zero”, wait for shrinkage. Fill the level with a minimal layer. Completely frozen, but the “bricks” are still visible? It’s okay, pour at least a little more until you get a “mirror”; “zero” has already given the required strength. Sometimes this method is also used by professionals in especially critical cases or when a serious customer is ready to pay for downtime, as long as it is done perfectly.
Zero
We take the largest and smallest of the depths of local irregularities and find the average. Let's say the measurements gave 5 and 3 mm, then the average will be 4 mm. We multiply the resulting value by the apparent ratio of the pothole area to the total floor area to obtain the effective depth of the local depressions. Let’s say that the depressions apparently occupy a quarter of its area, then the effective local depth in our case will be 1 mm.
Now let's determine the effective depth of the shrinkage valley. In the vast majority of cases, it covers the entire floor area, and its configuration is similar to a segment of a sphere. Therefore, we simply multiply the depth of the hollow by 0.7. Suppose the measurements were 6 mm, then its effective depth will be 4.2 mm.
The total thickness of the zero filling layer will be equal to the sum of the effective local and general depths. In this case – 5.2 mm, but that’s not all, we have only just reached the virtual plane. The solution is not absolutely fluid and, in order to avoid the “brick-in-the-mud” effect, a covering layer must be poured onto the resulting surface. It can be either made from leveling agent or leveling, after the leveling agent has hardened. The latter is preferable not only in terms of smoothness, but also because it is cheaper: the minimum leveling layer is from 3 mm, and the leveling layer is from 1 mm.
Cover
The thickness of the covering layer is calculated quite simply. We take a completely reliable value - specific consumption according to the manufacturer; it lies in the range of 1.4-2 kg*sq.m*mm, multiply by 2 and round to a higher value. This empirical formula gives nothing more than the number of layers of minimum thickness, according to the specification for the composition, necessary for the “bricks” to be completely covered with “dirt”. Let's say we have previously selected a composition with a specific consumption of 1.8 kg*sq.m*mm, then we get 3.6 or, in round numbers, 4 layers. Since the minimum layer for leveling masses is 1 mm, we immediately received the power of the “blanket”.
Increases
However, it is too early to calculate consumption if mesh and/or base waterproofing is used. On the mesh we add a layer of leveling agent equal to its thickness (or half of it, if the reinforcing mesh is on a sand bed, see above), and on the insulation of the corners - leveling agent equal to the thickness of the foam corner tape, more on that later. Let's say we cast on a fiberglass mesh with a thickness of 0.38 mm, and put a tape 3.5 mm thick on the corners, then we need to add 3.88 mm to the leveler.
Bottom line
We summarize everything together for a single-layer filling, and for a two-layer filling - separately for the leveler and level. Let us assume that we are going to pour in 2 layers, then in the case under consideration we will get 5.2 + 3.88 = 9.08 or, rounded up, 9 mm of leveler, and then 4 mm of leveling layer. According to generally accepted calculation methods, it would be 12 mm and 6 mm, respectively.
Cement based self-leveling floor
The composition of a cement-based self-leveling floor includes cement, quartz sand of the required fractions, polymer additives, pigments and various additives that improve the technical characteristics of the mixture. The cement-based floor has water-repellent properties.
In addition, cement-based floors are considered universal, since they can be used both indoors and outdoors.
In this case, mixtures are divided into the following types:
- Mixes for thick layers . They can be used in places where height differences reach a floor value of 100 mm. They are not subject to shrinkage and deformation if the cooking technology is not violated.
- Mixtures for thin coatings . They are used in conditions where a coating thickness of no more than 30 mm is required. Before pouring such compositions, the rough coating should be carefully prepared.
Advantages and disadvantages of cement self-leveling screed
Advantages of cement screed
- used for leveling floors in dry and wet rooms;
- you can make a screed with a thickness from 2 mm to several centimeters;
- leveling the floor does not cause difficulties and can be done even if the person performing such work has no experience;
- the screed is strong and wear-resistant;
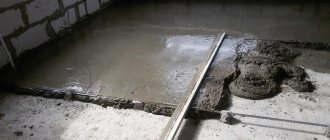
Ready-made self-leveling cement floor
- the drying time of the solution is reduced;
- When using ready-made compositions, it is enough to add the required amount of water to the mixture and the solution is ready for use.
Disadvantages of cement screed
- high price of the mixture;
- dismantling is more problematic.
Gypsum based floor
Self-leveling floors based on gypsum and polymers are less resistant to moisture, but are just as durable as those based on cement if the pouring thickness does not exceed 35 mm. At the same time, they set faster and after 3-4 days they can be used.
If the mixture is poured in layers of about 20 mm, then the material can be used for deeper pouring.
The gypsum mixture contains various additives, which makes it adhere well to the concrete base. Such mixtures are somewhat cheaper than cement ones. But, as mentioned above, self-leveling floors based on this material are afraid of moisture. In addition, ceramic tiles cannot be laid on such a base.
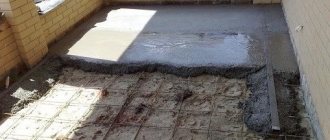
Features of filling a large room
If the room is very large, it is physically impossible to fill it in one approach. For large rooms there is a special filling technology - zebra. It looks like this: you should fill the floor in strips one at a time. We make the strip width no more than 7 meters. Technologically, the thickness of the solution in this case should not be too large.
After pouring each strip, work it with a spiked roller. Roll the surface with it to remove air bubbles and cavities. This is necessary to give the floor strength and durability. Work the strips lengthwise and crosswise, then smooth with a spatula.
Despite the fact that the solution sets in less than half an hour, the self-leveling floor dries within several days, or even weeks.
The difference in hardening speed depends on a number of factors:
– room microclimate; – thickness of the finished floor; – brand and composition of the mixture.
Until the floor hardens, you cannot walk on it. Otherwise, you may leave marks and unevenness. Also, such a load can deform the coating. Once the floor has hardened and is ready for use, it can be covered with a final coating.
Which coating is better?
Since each material was developed for specific conditions, it is quite difficult to answer the question of which self-leveling floor is better, gypsum or cement.
Despite this, they have a general purpose:
- Gypsum-based mixtures are definitely suitable for dry rooms. This could be a bedroom, living room, etc.
- For rooms such as a kitchen, bathroom or hallway, it is better to choose a cement-based mixture. As a rule, high humidity is observed in such rooms.
- In conditions where there is not enough money for a cement-polymer or gypsum-polymer mixture, it makes sense to organize a self-leveling cement floor with your own hands, adding any sand to the cement in a ratio of 1:3. Then pour a thin layer of polymer material onto the resulting screed. It will take more time, but some money will be saved. This approach can be called the most optimal.
Kneading
To properly make a self-leveling floor, kneading is the most delicate and responsible procedure. The vast majority of irreparable errors occur at this stage, so let’s take a closer look.
Temperature
Manufacturers indicate the operating temperature range for their mixtures. As a rule, it is 15-30 degrees. A floor poured in the cold will not gain the required strength (water will begin to destroy the polymers before it evaporates) and will soon begin to crumble. Neglect of temperature conditions is one of the most common reasons leading to marriage.
Pouring in the heat is even worse - the water evaporates too quickly, and the composition does not have time to spread. The mixtures are very sensitive to excess temperature. For example, even such a proven composition as ProfLine PR-1, poured at 32 degrees, hardens with a hedgehog.
Best before date
The permissible shelf life of packaged mixtures is from six months to a year. If there is no date stamp on the bag, but there is a tick in the month box, we subtract one month, because it is unknown whether it was made on the first or last day. For example, if March is ticked and the expiration date is 6 months, then from September 1 the mixture is considered unusable, no matter what the seller says.
Note: traders try to display bags with expiring dates in plain sight.
Water
The specifications for the mixture specify the amount of water for mixing with a certain tolerance, for example, 0.28 l/kg +/- 0.03 l/kg. Admission is not given for a blunder. In favorable temperature conditions (18-24 degrees), it is used to regulate the fluidity and survivability of the solution. If the temperature is near the upper/lower limit, then due to tolerance the mixture is adjusted to the temperature. In the cold they give a minimum of water, in the heat - to the maximum. But trying to fend off an unsuitable temperature by giving too little or too much water is useless - it will still end up either “cotton wool” or “hedgehog”.
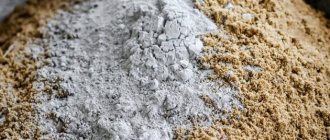
Sand
Gypsum and cement-sand mixtures are not stored, so sand for the solution will most likely have to be purchased separately. The instructions for the solution most often indicate what kind of sand is needed, and these instructions should be strictly followed. Unsuitable sand is the second most important reason that spoils the work.
If there are no such instructions, you should be guided by the following:
- You need river sand, with round granules. What is important here is the spreadability of the polymer over it; adhesion is ensured differently. The most common mistake of hacks and amateurs is buying for the sake of imaginary savings of quarry sand.
- For levelers, the sand fraction is 0.4-0.8 mm, neither smaller nor larger.
- For leveling composition – 0.25-0.35 mm.
Note: for gypsum-polyurethane mixtures, a fraction of 0.15-0.2 mm is even better, but - alas! – the cost of river sand, already expensive, rapidly increases with a decrease in fraction.
Dishes
For kneading you will need 4 containers: 2 buckets of 30 liters each or tall basins of similar volume for the actual kneading and 2 ordinary buckets for rinsing the tools, “dirty” and “clean”. It is highly desirable that the kneading utensils have rounded corners on the bottom.
Mixing nozzle for mixing self-leveling floor
Mixer
You also need more than just a mixer attachment for a drill. It should be of a spiral type, double-threaded belt and with a bumper circle at the bottom, see fig. Other attachments with extremely limited kneading time (see below) will not create a sufficiently homogeneous mixture.
Mixing technology
Knead in half-bag portions. First, water is poured into the container according to the specifications for the composition, then the dry mixture is poured. Knead with a drill at low speeds, 100-300 rpm. While kneading, move the attachment in a circle and up and down, if possible without touching the walls and bottom: vibration of the dishes sharply worsens the homogeneity of the mixture. The duration of the kneading is 3-4 minutes; it cannot be shortened or prolonged. The kneading should end just when the solution begins to ripen, see below.
Ripening
The batch must mature before use. The bottom line is that the polymer must envelop the granules of the mineral components, which, ideally, should not come into contact with each other at all, only through the polymer film. Ripening also takes 3-4 minutes. Pouring out an unripe solution is a grave mistake. In most cases, the result is, if not a “hedgehog”, then a “wave” under other favorable conditions.
Preparing the base
The quality of the final result largely depends on the quality of the preparatory operations:
- First you need to prepare a rough coating. If necessary, the old coating is removed down to the concrete, and too high places are knocked down with a chisel or hammer drill.
- The next stage involves determining the size of the differences. To do this, you need to take a building level and divide the room into sectors for ease of measurements.
- There should be no greasy stains on the rough base, and the surface should be cleaned or sanded.
- At the next stage, the surface is completely cleaned from dust using a vacuum cleaner or a damp cloth.
- All irregularities or depressions (cracks) are sealed with cement mortar. At the same time, it is necessary to achieve maximum evenness of the rough base, which will save expensive material.
- Finally, 2-3 layers of deep penetrating primer are applied to a clean surface. Each subsequent layer can be applied after the previous layer has completely dried.
Consumption
It remains to calculate the consumption per 1 m² of the selected mixture. This is where the main highlight of the method appears: we get the flow rate immediately in the dry weight of the sales material, without bothering with calculating the density of the finished solution, for which we would have to make arbitrary assumptions. We just need to multiply the calculated layer thickness by the floor area and the specific material consumption; all these values are accurate and reliable.
In our example, for a room of, say, 16 square meters. m will yield 259.2 kg of leveler and 72 kg of level. All that remains is to reduce it to bags containing 25 kg. We round them according to the rules of arithmetic, from half to more. Calculation according to our data will give 10.368 bags of leveler and 2.88 bags of level. We take 10 bags of the first and 3 of the second.
And now your homework: go to the website of any hardware store, find out the prices and calculate the savings compared to traditional estimates.
Applying the mixture
Pouring floors is an equally important technological operation:
- The mixture is poured onto the base no earlier than 12-24 hours after applying the last layer of primer.
- A damper tape is attached around the perimeter of the room. It is needed to compensate for temperature changes during the hardening process of the composition.
- The mixture is prepared strictly observing the proportions indicated on the packaging of the dry bulk mixture. If you are preparing your own recipe (sand-cement), then the thickness of the material is determined in the following way: take a ring with a diameter of 50 mm with a side height of 45 mm and fill it with the composition. After this, the ring rises, and the mixture should be evenly distributed over the surface. After about two minutes, the diameter of this puddle should be 16-18 cm, which indicates the material is ready for use.
- The finished mixture is poured in parts. The direction is selected from the far corner towards the exit.
- It is better to carry out such pouring together: one prepares the solution, and the other carries and pours it.
- The poured mixture is distributed over the surface using a notched trowel and a needle roller. Using a needle roller, air bubbles are removed from the mixture.
- After a couple of days, you can walk on the self-leveling floor, and complete hardening can occur in 3-14 days, depending on the composition.
Conclusion
Carrying out such a filling is not at all difficult even by yourself. Depending on financial capabilities, this can be a cement-polymer floor, a gypsum-polymer floor, or a regular cement-sand screed, covered with a thin layer of polymer material on top.
How to prepare the leveling mixture
You can start preparing the mixture for filling the floor only after making sure that the solution under the beacons has completely hardened. Carefully study the instructions on the packaging of the mixture. Pour the amount of water specified in the instructions into the prepared container, and carefully pour the contents of the package into it. It is not recommended to add any foreign substances to the solution.
To obtain a high-quality mixture, it is better to use a drill with an attachment or a construction mixer. After the mass reaches a homogeneous consistency, leave it for a few minutes, then stir well again. It is not recommended to set a high speed on a drill or mixer - a better mixture is obtained at low speeds.
Important points
First, and most importantly, the technology described below is intended for pouring a floor for final finishing. An ordinary, non-decorative self-leveling floor is not designed for painting or operation without a finishing coat, and the finishing levelers mentioned above, used for decorative surfaces, as well as the increasingly popular 3D floors, are the topic of a separate article.
In addition, you need to work with a partner who has an understanding of the basics of the construction business. After all, if the next portion of the mixture is not mixed by the time of pouring (and this is calculated in minutes), then the coating as a result will not be smooth, but stepped.
If you do not have sufficient experience in pouring floors, then it is extremely undesirable to take on a room whose length exceeds 8 m and area is 40 m². In this case, expansion and thermal seams cannot be avoided. Making such seams is quite simple, but only an experienced builder will be able to calculate exactly where to install them.