Beton-House.com
Website about concrete: construction, characteristics, design. We combine the experience of professionals and private craftsmen in one place
Concrete vases are becoming increasingly popular as home decorations.
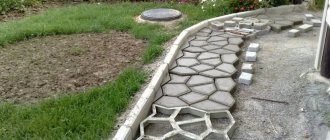
Concrete flower beds help to decorate a garden plot, design a local area, limit and set the direction of movement, and simply landscape the area. The variety of shapes and possible finishing solutions allows you to use outdoor concrete vases on any surface with an even surface.
A concrete planter will fit well into the landscape of a green lawn, will look great on paving stones, paving slabs and will decorate an ordinary asphalt path. How to make a flowerpot on your own, and what nuances need to be taken into account, we will consider in this article.
- Important nuances
- Coloring
Possibilities for arranging flower beds
Conventionally, all flower pots can be divided according to functionality and area of placement.
Flowerpots are:
- street,
- indoor,
- decorative.
A variety of materials can be used to make any flower pot, some of which can be used in all three types.
Small flowerpots made of concrete can be used outdoors in the summer, and moved into the house in the winter and decorate the hall space
Discussing the creation of a yard flowerbed, we will determine that for an outdoor flowerpot the following can be used:
- metal;
- plastic;
- a natural stone;
- wood;
- clay;
- concrete.
Of course, any of these materials has its advantages and disadvantages. What kind of flower beds to decorate the yard with is decided by each owner independently, based on financial capabilities and the territory development project.
We will focus on a flower bed made of concrete, since it is actually a universal material that can fit into any style and take any shape.
The vertical arrangement of a concrete flower garden will allow you to landscape the area while maintaining free space
Advantages of concrete flower beds
What is the difference between a concrete flower bed and flower beds made of other materials?
Concrete mortar is a very pliable material when forming a product, and at the same time the finished structure has great strength. Concrete planters can be used outdoors without fear, because properly processed concrete is not afraid of temperature changes and moisture.
The advantages of concrete compositions also include:
- A concrete flower bed can be used as a stable barrier that limits the passage area, while the flower bed does not block the view, maintaining spatial unity.
- Concrete flowerpots have a high mass, so they can become a vandal-proof barrier that is very difficult to steal.
Due to their significant weight, it is more convenient to move flower beds using transport
- Vertical concrete compositions will save yard space in case of shortage, while creating a green area.
- A properly made concrete flower bed retains its shape and aesthetics for a long time.
On a note! Outdoor concrete flower beds are budget products. The cost of a finished flowerpot is essentially equal to the cost of sand and cement spent on their production.
Some disadvantages
When making a flower bed using concrete mortar, it is necessary to use various additives to improve the properties of the material. This slightly increases the cost of finished products.
There are also very definite disadvantages to these flower beds:
- The large mass makes the flower beds stationary. Rearranging them will require significant physical effort.
- The look of untreated concrete will not fit anywhere. Concrete flower beds require decorative treatment.
Painting must be done annually. Peeling paint creates a feeling of abandonment
- Even a small concrete pot looks very massive and visually “eats up” the space.
Material advantages
Cement is a frequently used building material, which is used to seal and ensure the solidity of buildings and structures. But it can also be used for creativity, as it has valuable features for this.
Cement is made from limestone and clay, which are common sedimentary rocks found in nature. The main component of limestone is calcium carbonate (CaCo3), and clay consists of aluminum oxide (Al2O3), silicon oxide (SiO2), kaolinite mineral (Al4 (Si4O10) OH8).
Limestone and clay are mixed, heated to +1450 and clinker is obtained, the main component of cement. In other words, it is an environmentally friendly material. It can be purchased at any hardware store. Availability and low cost are an important plus. Making crafts may well become a favorite hobby, a weekend pastime for the whole family.
Advantages:
- crafts made from cement can stand in the garden for 10 years or more, without deteriorating aesthetic properties;
- visual qualities are consonant with the philosophy of many modern trends in design and landscape design;
- the product can be painted in current colors and decorated with additional materials.
Flowerbed made of concrete
Cement is a fairly economical material, and due to the plasticity of the concrete solution, any shape can be created from it. But by itself, concrete has a very unsightly gray color, and if you are not planning to create a yard in the style of post-apocalyptic urbanization, then it is better to use paints when mixing the solution.
Important nuances
It is the shape and color of the future vase that you should pay attention to. The appearance of the flowerbed should not compete with the flowers planted in it.
For this reason:
- When finishing concrete pots, you should use soft shades of colors.
- Painted pots in their ornament can combine the colors of the plants planned to be planted in them.
- If the flower bed in the flower bed is planned to change depending on the season, neutral colors should be used when decorating.
On a note! Consider the installation space of the flower bed. A large wide vase in a small area will add inconvenience, and small pots on a wide terrace can become visually lost.
In addition to the color palette, you should consider some of the physical features of the pot. Water should not stagnate inside the pots - this will have a detrimental effect on both the plants and the concrete walls of the vase.
To do this, it is necessary to make technical holes in the bottom of the flowerpot to drain water. They can be laid at the stage of pouring the mold, if the concrete vase is made by hand, or drilled into a ready-made product.
Another disadvantage of concrete is its high porosity. A pot made of sand and cement will not last long.
In order for outdoor concrete flower pots to bring joy for many years, water-repellent and frost-resistant additives should be used when mixing the solution. Detailed instructions for using such additives are always written on the original packaging.
Use complex additives in the solution that will improve several properties of the finished concrete at once
Materials for the solution
If you decide to create a concrete masterpiece yourself, then you need to prepare the material for the vase and the tools and materials for the formwork in advance. The solution for a concrete flower bed is mixed in a standard proportion: 1 part cement to 3 parts sifted fine sand. In addition, you should stock up on dye.
In a concrete vase painted in the mass, the following can be used as a dye:
| Dye | The resulting effect | Photo |
| Marble chips | The surface of the concrete flower bed will be textured. Depending on the crumb fraction, the degree of color uniformity will vary. |
|
| Coloring pigments (powder compositions) | Mixed concrete will not change color over time. | The coloring pigment added to the solution does not fade and does not require updating |
| Oil paint | When adding oil paint to a solution, do not mix it thoroughly (that is, first mix the solution and then pour in the pigment). The paint will not dissolve in concrete and will give a marble effect when poured. |
|
Formwork tools
Any durable material can be used as formwork panels. Ideally, it should not absorb water. But if you can create the required shape only using cardboard, then ordinary plastic film can be laid as a water barrier. At the same time, large flower beds can be poured into a hole dug in the ground. The main thing is to strictly define the boundaries.
For small pots, you can use plastic paint buckets or 19 and 5 liter water bottles. The photo below is an example of making a small concrete vase with formwork from plastic paint buckets.
The photo shows step-by-step instructions for making a concrete flowerpot using plastic buckets
Manufacturing technology
The process of making a concrete flower bed is quite simple:
- The outer wall of the formwork is formed in any convenient way.
- A layer of waterproofing is laid, if necessary.
- A point is arranged for a technological hole in two bowls.
- The bowl, the inner border of the formwork, is fixed.
- The solution is poured, tapped or slightly shaken to expel air bubbles.
- Open areas of the solution are covered with plastic film to prevent rapid evaporation.
On a note! The thickness of the wall of the flowerpot depends on the size of the concrete flowerbed planned for production. But it is not recommended to make a concrete partition less than 3 cm. If you are not sure of the strength of the wall, use fiber reinforcement for the solution.
After pouring, the solution must be given time to set. The first seizure will occur after a day or three. In a week or 10 days, the formwork can be removed.
After removing the formwork, the product must be refined, removing all sharp corners and unnecessary roughness
The walls of the concrete bowl will still be very “soft”, which will allow you to get rid of some unevenness or round the upper edges of the bowl. The video in this article will help you get acquainted with the technology of making a concrete flowerbed with your own hands.
Flower vase in the shape of palms
To create a beautiful cement vase, you will need disposable rubber gloves. They are placed in a bottle, fixing the base.
Then a cement solution is poured into them, the frame is immersed, and the fingers and palms are given the desired position. When the solution begins to harden, you can make it look natural and carefully outline the nail plates.
Decorating a flower bed
By creating concrete flowerpots for the street, you can make not just a vase, but a real decoration of your yard area. At the same time, you can decorate both a mold you made yourself and a purchased flowerpot. We will describe some possible design options for a flower bed and illustrate them with photos for clarity.
Flowerbed - concrete stump before painting
Coloring
The easiest way to decorate a vase is to paint the concrete surface. For this you should use paints for concrete and stone for exterior use.
Before applying paint, the surface of the flower bed should be treated at least twice with a deep penetration primer. The coloring is remarkable in that it can be changed depending on the plants planned for breeding.
Bas-relief
You can decorate a flowerbed using a bas-relief.
To obtain an interesting pattern on the surface of the vase, you can use burdocks or other plants with large, hard veins on the leaves. The leaves should be fixed on the inside of the outer part of the formwork, and then the solution should be poured. After the formwork panels are removed, the leaves can be removed with plain water.
On a note! You can enhance the effect of the openwork foliage pattern by highlighting the veins with colored tinting.
Mosaic
Concrete flower beds can be decorated with mosaic patterns.
Quick-drying construction adhesive is suitable for securing mosaic elements. You can use shells or sea pebbles brought from vacation as parts of the panel. Parts of broken tiles and any materials that are not exposed to water are perfect.
Stages of mosaic application:
- First, draw on paper what you want to depict on the vase. In this case, it is necessary to take into account the direction of the surface of the bowl. This is especially important if the mosaic is glued to a spherical flower bed.
- On the surface of the finished bowl, use chalk to mark the boundaries of the design you plan to make.
- First, the borders of the depicted elements are glued, then the voids are filled. The technique is reminiscent of a children's coloring book.
- After the entire pattern has been laid out, the surface must be opened with varnish.
The final touch and you're done!
After sanding, remove cement dust. The author paints the base of the flower bed, legs and interior with white latex paint.
The outer part of the flower bed (meaning the walls) must be coated with water-based acrylic varnish.
For more information on how to make a flower bed out of cement and polystyrene with your own hands, we recommend watching the video below.
DIY-TÉCNICA INCRÍVEL PARA FAZER VASOS DE CIMENTO E ISOPOR: já sai pronto do molde, com os pés
Andrey Vasiliev
Ask a Question
Concrete trees
In recent years, new elements have appeared among the small architectural forms (small architectural forms) installed in public parks and recreation areas - artificial trees made of concrete.
Such compositions are used to decorate the space of territories, focusing attention on certain zones. Trees are made from sculpted concrete. Today they have become an integral part of rock compositions, grottoes, suspension bridges and intricate benches. Often, a concrete tree forms the entrance to a summer cafe in a park or a children's playground. With the help of such sculptures you can create a unique, fabulous, magical world.
It is noteworthy that manufacturers make such plants hollow, which means they can be used as additional storage space. Decorative concrete can be used to make both a whole tree and its individual parts: stumps, rhizomes, branches - vines.
Preparation of cement mortar for garden crafts
The cement composition should be of medium consistency, reminiscent of thick sour cream. This will allow you to create the desired crafts without much effort by pouring cement into a mold or using other methods of using it. To do this, take into account the technology for preparing the mixture:
- Sand and then cement are poured into the preparation container. Dry ingredients are mixed.
- Next, add water at the rate of 250 ml per 1 kg of sand-cement mixture. At this stage, you can add a colored component to the composition, for example, water-dispersion coloring: this will allow you to create a colored figure and coloring will become optional.
- The substances are thoroughly mixed. If the volume is less than 5 liters, then for stirring you can use a trowel or a trowel - a steel spatula polished on both sides with a curved handle. In other cases, use a drill with a mixer attachment.
First you need to mix the dry ingredients, and only then add water
Making flowerpots
In order to make a classic concrete flowerpot for the garden, you need to do the following:
- Prepare the solution. Small fractions are chosen for filler. In this case, the amount of cement and sand should be taken in a ratio of 2:3. If desired, you can add pigment to give the mixture a tint. The density of the solution should be medium.
- Those forms that will be used for filling are pre-lubricated with oil. This is necessary so that the solution does not stick.
- If the flowerpot is supposed to have a bottom, it is worth providing drainage for the flowers. They do it like this. A layer of solution up to 2 cm is placed in the first large mold. Metal tubes are inserted vertically into this layer. When it hardens, they will create holes for the necessary drainage. Then install a second smaller container. Painstaking work is being done. It is important to align the edges of the second and first shapes. It is necessary that the walls around the perimeter of the flowerpot are the same.
- Then you should carefully pour the solution and compact it. It is important that there are no voids left. Only in this case will the walls of the flowerpot be perfectly strong. If the weight of the second mold is small, it is worth pouring sand and small stones into it. You need to knock on the walls with a hammer.
- The solution is pierced with a thin stick. This must be done to remove the air. After this, the concrete will settle. Then you will need to use some smooth object: a spatula or spoon to level the side and leave the product for 24 hours.
- After a day, you need to remove the inner mold. Next, you should sprinkle the flowerpot with water and cover it with polyethylene. This is necessary so that it grips well. Spraying is repeated several times and covered. It is important that it dries and hardens evenly. Take your time so that unwanted cracks do not appear.
- To give concrete high strength, it is covered with pre-moistened burlap or immersed in a bath filled with water. In this form, the workpiece is kept for 14 days. It should dry slowly. It is important that the sun's rays do not fall on it. The hardening process must not be accelerated.
Now you can decorate the craft. It is worth painting it with acrylic paint or decorating it with shells, glass shards, and pebbles. This will give the product a unique look. It is also good to sand the surface. After you have mastered the technology described, you need to stock up on time and enthusiasm. You will be able to create fantasy, unique containers for your summer cottage or yard using your own designs.
What is needed for a universal flowerpot
We list all the material that will be needed to create a universal flowerpot:
- Concrete. An excellent solution is to purchase the mixture ready-made in the store.
- Molds and molds. It's worth imagining. You can’t just focus on certain standards. The main requirement is that the shape must be comfortable so that the product can be easily taken out of it. You can use different containers: packs of cardboard, cups, all kinds of glass containers, basins, jugs.
- Non-stick spray. Concrete containers will be easier to remove if treated with a spray before pouring. Motor or vegetable oil is also suitable.
- Water for preparing the solution. Not hot and not cold, but always warm and in fairly large volumes.
- A rod that is identical in thickness to a pencil. It is needed to remove air bubbles.
- A special stirrer (an ordinary garden shovel will do).
- Rag for creating a fabric flower box. What you need is thick fabric.
- Buckets and various containers that can then simply be thrown away.
- Shards of ceramics and paint for decorating a flowerpot.
Complex figures with a frame
It’s more fun to decorate your country house with sculptures of animals and mythical characters. Such creations involve the preliminary production of a durable frame and layer-by-layer application of cement mortar.
Interesting flowerpots can be made using buckets from construction mixtures. At the first stage, a container of suitable size is wrapped with a plaster mesh and covered with a thick layer of cement. At the second stage, until complete hardening, decorative adjustments are made, making an imitation of an old stump with natural wrinkles on the bark.
A monolithic figure of a hippopotamus would look appropriate near artificial reservoirs. The place for it must be determined immediately and carefully aligned, since in the future the figure will be stationary.
Two elongated plastic basins, which must be fastened with wire, are suitable as a frame. Another option is also possible: a thick cement solution is covered on top of a pile of broken bricks or crushed stone.
The figure itself does not contain complex elements and is easy to perform. After hardening, the product is treated with fixing impregnation and dry pigment for concrete, rubbing the powder with a hard sponge.
More complex sculptures are made in several stages: 1) making a frame from wire and foam plastic or containers; 2) covering the workpiece with a plaster mesh; 3) applying the mixture in several layers; 4) formation of small details (facial features, special texture, folds of clothing, etc.); 5) priming and painting the finished work.
Flowerpots in the shape of swans will become an elegant decoration of the garden. The body frame is an old plastic basin, the neck is woven wire. The head, wings and imitation plumage will have to be made from a cement mixture, showing the skills of a sculptor.
Monolithic figures have a significant weight, so as an alternative there is a way to create lightweight large objects. You can decorate your garden with boulders of different sizes.
To make them, any unnecessary and lightweight material (cuts of polyurethane foam, plastic bottles, polystyrene foam) is tied into a tight lump with wire.
The resulting base is wrapped in a plaster mesh and covered with thick cement mortar. The more irregularities and protrusions there are, the more natural the “stone” will look.
Small garden figurines are made from a mixture of cement with the addition of gypsum or Portland cement.
Here you can use the manufacturing methods described above, as well as any basics: old toys, items of clothing, household utensils.