The armored belt in the house under the floor slabs is made to strengthen the building structure of the building frame, thereby increasing the strength parameters of the load-bearing walls.
This happens because the monolithic belt distributes the total load from the roof through the walls to the foundation.
What is especially important, it helps to prevent negative consequences from soil movement, the influence of external deforming stresses from wind, temperature fluctuations and atmospheric moisture.
The reinforced structure is made monolithic from reinforced concrete or in the form of masonry from ordinary bricks and combines the boxes of the house into a single load contour.
The degree of strength of such a structure and its actual ability to resist loads are determined by the thickness and height of the protective belt, the composition of the concrete, the characteristics of the reinforcement frame, the accuracy of the work technology, in compliance with all relevant norms and standards.
What is it needed for?
A reinforced belt is one of the important protective elements of a construction project for any purpose. It is created at different heights from the “0” ground level, depending on its number of floors and the interfloor distance chosen by the developer. The absence of such a protective structure reduces the strength and durability characteristics of the construction project.
In the design of a house, the armored belt performs the following important tasks :
formation of a strictly horizontal, level base for floor slabs and mauerlat;- uniform distribution of all types of loads created by the roofing system, interfloor ceilings and higher walls;
- protection against box deformation and wall cracking;
- uniform dispersion of stresses acting on the end surface of the walls of new structures;
- creating a stable building in areas with sloping terrain; maintaining the unity of the structure of the facility, built in a seismically active place;
- protecting the house from frost heaving of the soil.
The reinforced protective structure is made in the form of a monolithic concrete or brick closed strip installed along the load-bearing walls of the house.
Existing urban planning norms and rules require mandatory installation of such protection in the following cases :
- when used for the construction of load-bearing walls of buildings made of porous building materials;
- excessive weight of interfloor slabs;
- building block materials of varying strengths are used;
- during construction work in a seismically active area or on moving soils;
- installation of a truss roofing system using studs and anchors is planned;
- the floor beams are laid unevenly, which creates a point load on the weak porous wall material;
- the project provides for the construction of a prefabricated foundation or it will be shallow;
- the house box requires additional rigidity;
- for objects over one floor.
Is it possible to do without it?
The decision to erect such protective structures is made at the design stage of the house . If the calculated local wall stresses and forces cannot lead to cracks, it is allowed not to install the reinforced belt.
In addition, it is also possible not to install monolithic protection when constructing thick main walls made of brick or a foundation that is planned to be deepened below the ground frost level.
An armored belt is not required when creating monolithic wall structures or those made of timber and logs.
Ratio of the length of the support section to the thickness of the wall
When the slabs do not rest on the entire thickness of the wall, and this is what most often happens, then this should be taken into account when calculating.
If the length of the support section lп is less than 1/5÷1/3 of the wall thickness, then such a beam can be considered as a non-cantilevered single-span beam on hinged supports.
Since with such parameters, firstly, not the entire load from the overlying wall will be transferred to the slab, but only 1/3-1/5 of it. And secondly, as a result of redistribution of stresses in the wall material, plastic deformations, or even partial destruction of the wall material, this load may be even less.
Materials for construction
The main building materials for their manufacture are :
Reinforced concrete .
A reinforced concrete structure requires the preparation of wooden formwork and a frame made of reinforcement, which are connected together by pouring concrete mortar of the design grade. It is allowed to add additives to increase the strength and other characteristics of concrete.- Red brick .
For brick protective tape, such formwork is not required; the reinforcement is installed directly on the brick, the mesh thickness is over 5 mm. Such a structure can hardly be called a monolith, but its characteristics are quite sufficient to ensure the reliability of small one-story objects. - U-blocks .
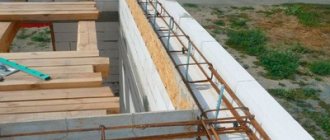
Recently, armored belts have begun to be quite widely erected from universal formwork U-blocks, which have additional thermal protection. The use of U-blocks significantly increases the speed of creating a protective structure, due to the ease of installation, the preliminary installation of a support cushion is also not required, and the low weight of the structures does not require the use of additional equipment and lifting mechanisms.
The heaviest and most reliable option is the first, the cheapest, the second, the warmest and most expensive is the third.
Most often, designers choose to install a monolithic reinforced concrete belt. For its use, concrete and reinforcement are used, which have special requirements :
- Concrete mixtures must comply with design documentation for strength characteristics, frost, water and wear resistance and cavitation resistance, and mixtures must be selected in accordance with workability requirements.
- Pouring the structure is allowed only with marked concrete with a quality certificate; it must indicate the brand, manufacturer, and quality characteristics.
- It is not permitted to use concrete purchased in separate batches from different suppliers for pouring concrete.
- The design age of concrete must be at least 28 days.
- For reinforced concrete structures with a high percentage of reinforcement
- above 1.5%, self-compacting concrete solutions are used.
- It is not allowed to lay concrete mortar in the cold season and at temperatures above +40 C.
- Additives to concrete mortar can only be carried out according to the design and do not cause corrosion of the reinforcement structure and embedded parts.
- Sewage and swampy waters cannot be used to prepare concrete mortar; the total salt content of water in terms of Na+ and K+ should not exceed 1500 mg/l.
To reduce the volume of cement when preparing the solution, it is allowed to use large gravel or crushed stone, but there are volume restrictions :
- for gravel, the sand content in the mixture is not higher than 45%, coarse aggregate -55%;
- for crushed stone, the content of sand in the mixture is not higher than 50%, coarse aggregate - 50%.
Requirements for reinforced belt
Regulatory requirements for such protective structures depend on the location of the ceiling .
- The first reinforced belt is poured together with the strip foundation. Its width cannot exceed the permissible range of 0.7-1.2 m, and its height cannot be less than 0.4 m. It is made under all load-bearing walls, both internal and external, thereby becoming a fundamental element that forms the strength of the object under construction.
- The second protective belt is the basement one, installed on top of the foundation blocks, with a width and height of at least 0.4 m. Its task is to evenly distribute the emerging loads on the base of the house building.
If the first belt is missing in the design of the house, it is absolutely futile to implement the second one; it will not work. Only the joint functioning of two belts above and below ensures the stability of the house, even in seismic zones and with moving soils. - The third belt is installed under the ceilings, and the fourth under the roof beams to secure the roof structure using anchor bolts. Thus, it will be able to absorb the total load from the roofing system and must withstand climatic loads arising from the effects of wind and snow cover.
Under slabs
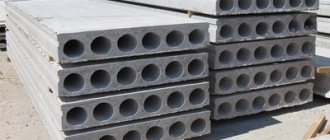
The floor slabs most often used are concrete floor panels with longitudinal round holes, with the design load :
900 kg/m2—for residential construction;- up to 2000 kg/m2 for industrial and public buildings.
To hold them, you will need a reinforced belt with the width of the wall structure or slightly less, up to 0.8 of the wall thickness, to install a heat-protective layer.
The cross-section of the reinforced frame should be rectangular with a height of 1.5 times the width.
To form the internal frame, only material that complies with GOST is used , with a minimum diameter for longitudinal elements of 12 mm and a length of 8 m, and for transverse elements - 8 mm with a pitch of 400 mm. The reinforcement structure must be continuous and installed strictly horizontally.
The frame is made of 2 rows of reinforcement, 2 rods each. Horizontal rods are laid with an overlap of at least 800 mm, which are placed as far as possible from the corners. The rods are connected with knitting wire. At a corner turn it is bent. The reinforcement frame must be filled with a concrete layer of at least 5 cm on all sides.
To prevent the reinforced structure under the floor slabs from becoming a “cold bridge” in the house, it is insulated from the outside with hard or mineral wool insulators. Otherwise, they will become sources of condensation and mold in the room.
Under beams
The protective reinforcement structure along the floor beam must have parts for securing the Mauerlat. Therefore, even at the moment of creating such a belt, studs with D = 12 mm are displayed . The height of their elevation above the finished belt must be at least 40 mm. Threads are made at the ends of the rods, and holes are made in the Mauerlat with the appropriate pitch. Waterproofing is installed on top of the armored belt.
Next, securing the monolithic structure, the Mauerlat is installed along the matching holes, the protruding studs are fixed with bolts. Only after this are the rafters fixed on it, then the rest of the roof is erected.
To prevent the structure from collapsing, concrete mortar is poured with a grade of at least M200. It is allowed to independently prepare the solution in the proportion of cement/sand/crushed stone: 1/3/5.
Armomonolith under beams can be installed in smaller dimensions than for reinforced concrete slabs , since they have a lower weight. The recommended thickness of the structure is 200 mm, and the height is from 250 mm.
Specifics of building houses from aerated concrete
Installation of gas blocks is carried out according to the general rules for piece building materials - laying in rows with ligation of blocks for better adhesion and strengthening of the masonry. However, given the characteristics of the material, its porous structure and low load resistance, several special rules must be observed.
- masonry cannot be done with ordinary sand-cement mortar, only with special glue. The thickness of aerated concrete joints should not exceed 2-4 mm, otherwise cold bridges will form and condensation will form. The material will begin to get wet and deteriorate;
- rows of gas blocks must be reinforced with horizontal reinforcing bars with a vertical step of 1 m (or every 3-4 rows). This will protect the masonry from cracks;
- Under all types of load (ceilings, window and door openings), it is necessary to install an armored belt - a strapping made of a series of U-shaped blocks filled with mortar with a reinforcement cage laid inside.
These are not all the rules, but most installation techniques are aimed at meeting precisely these requirements. In addition, the laying of blocks must be done with maximum care and precision, otherwise it will not be possible to maintain the required thickness of the joints. The rows have to be ground and their geometry adjusted to the requirements of the masonry. Aerated concrete is well processed and cut with hand tools. The blocks can be perfectly adjusted to each other, the main thing is accuracy and thoroughness.
The main problem that arises when laying walls from aerated blocks is not the material, but unskilled builders. Many developers, wanting to save money, hire unofficial teams of untrained, random people. They are not familiar with construction rules and do not have experience working with aerated concrete. The result of such savings is problems with all components of the house - from the foundation to the roof. Experienced builders recommend not to contact such “specialists”. If you need to save money, you need to build it yourself.
Support amount
The amount of support of the slabs on the monolithic belt is a very important indicator for installing the ceiling on a monolithic structure. If you increase the maximum support depth, the slab will begin to function as a lever, and under significant loads, a slight rise of the wall above the slab may even occur. Despite the fact that such a process will be invisible to the observer, it will become critical for the integrity of the house box.
In addition, additional loads that arise when installing furniture, household items and interior partitions will also contribute to the formation of cracks in wall structures.
In this regard, the maximum support value for floors is strictly standardized and should not exceed for the following types of installation:
- for wooden beams - 150 mm;
- brick armored belt - 160 mm;
- belt made of U-blocks - 200 mm;
- concrete reinforced belt - 120 mm.
The minimum indicator for supporting has also been established :
- for wooden beams - 80 mm;
- brick armored belt - 80 mm;
- belt made of U-blocks - 100 mm;
- concrete reinforced belt - 65 mm.
In what sizes are hollow core slabs produced?
The standard length of hollow core floor slabs is 3 m. This is the most common standard size, which is used in the construction of many civil buildings. For example, in most residential buildings the width of the rooms is designed to be 3 m, so 3 m slabs are used for floors. Another common size is 6 m.
In general, the dimensions of hollow core floor slabs are subject to a unified modular system in construction (EMS), which provides:
- Unification. This is the name for limiting the standard sizes of prefabricated parts and structures in order to bring them to uniformity.
- Typing. Selecting from the entire number of standardized elements the most economical for repeated use.
- Standardization. Approval of typed structures as standards (samples).
The goal of the EMC is to simplify and reduce the cost of construction. The result of typification in construction was the development of a single assortment, which is based on the module (M). The basic model is 100 mm. When designing buildings and structures for its construction, they use an enlarged module - 2M, 3M, 6M, 12M, 15M, 30M, 60M, etc.
Consumables and styling tools
Before constructing a monolithic armored belt, the developer must accurately calculate the volume of basic and auxiliary materials according to the list, which most often includes :
lumber or plywood for formwork;- insulation for thermal protection on the outside;
- M250 concrete mortar or components for its self-production;
- steel reinforcement and angle;
- knitting wire;
- waterproofing;
- high-quality mounting foam;
- fasteners.
In order for the developer to complete the entire technological process of installing the armored belt, you will need to prepare the following set of tools and equipment :
- Concrete mixer, if the concrete mixture will be prepared independently.
- Concrete pump and hoses for mechanical pouring of concrete.
- Buckets for manual concrete pouring.
- Special hook for manual assembly of reinforcement cage.
- Grinder with attachments for cutting reinforcing bars.
- Construction tools: angle, ruler, level, plumb line, for monitoring and adjusting the quality of pouring a monolithic structure.
- Profile ratchet wrench for assembling reinforced frame.
- Drill, screwdriver.
Step-by-step instructions for pouring
Before the process of pouring the reinforced belt, you will need to perform all the preparatory operations to clean the surface of the walls before, perform waterproofing, cut reinforcement for the frame and prepare lumber for the formwork.
The main stages of the technological map for the production of reinforced concrete reinforced concrete belts for floors:
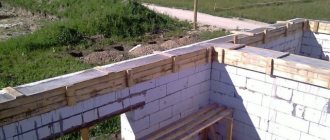
- The formwork structure is assembled from lumber, with vertical and horizontal reinforcement so that the concrete solution does not squeeze out the walls.
- The width of the formwork should be equal to the width of the wall structure minus the thickness of the insulation layer, and the height should be 400 mm. Most often, class 3 boards with a thickness of 20 mm are used as building materials, fastening the elements together with self-tapping screws and further strengthening the structure after 100 cm.
- The reinforcement is cut to specified sizes and in the required quantity.
- They are then placed on clamps/backings along the length of the formwork and tied with wire to form a low layer.
- After this, transverse reinforcement is laid and the top layer is secured.
- The frame is installed in the formwork with inserts installed so that the structure does not touch its walls, with an indentation of 50 mm.
- The frame must be installed absolutely horizontal, control is carried out with a building level.
- They deliver ready-made concrete mortar or prepare it themselves at the construction site.
- They install the concrete pump and stretch the hoses.
- Fill the formwork in one go.
- Concrete is compacted and air is removed manually by piercing its thickness with reinforcement or using vibrating equipment.
- Level the outer layer of concrete to a horizontal level and cover it with polyethylene.
- The formwork is carefully removed after at least 5 days. After which the laying of floor slabs is allowed.
- Before the concrete has completely hardened, it is wetted in hot and dry weather so that the monolithic mass does not crack.
Preparatory activities
First of all, it is necessary to analyze the structure - that is, its technical condition is established. This can be done by a specialist who has specialized equipment in his arsenal. But sometimes you can see with the naked eye that it has outlived its usefulness:
- cracks and chips appeared;
- the screed on the floor has peeled off or the plaster has fallen from the ceiling;
- dark spots appeared, indicating that the reinforcement was damaged.
After which design and estimate documentation is drawn up, on the basis of which the floor slabs will be strengthened. Calculations are carried out and the necessary building materials are purchased.
How to lay it correctly?
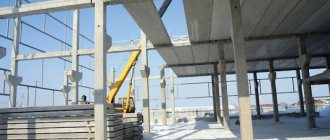
Installation of monolithic reinforced concrete floor slabs may only be carried out by trained personnel using a truck crane or other lifting equipment, subject to all safety requirements when working with heavy, bulky cargo.
The installation of beams on a monolithic protective structure can be carried out independently, but subject to the precise implementation of the technology for installing wooden structures.
Plates
Before installing the slabs in a place determined by the design, their end voids are walled up with special armored inserts or simply concrete mortar.
This increases the strength of the structure in the most vulnerable areas with maximum loads.
The work is carried out by a team of installers consisting of at least three people using special lifting equipment.
One installer is responsible for slinging and securing the slabs to the hook. The remaining workers are at the laying site, monitoring the position of the slab and disconnecting the crane fasteners.
When performing manipulations with floors, it is contraindicated to turn them over to the opposite side, otherwise they will not withstand the weight for which they are designed.
This feature is explained by the design of the lower part, which is reinforced with reinforcement, preventing tensile forces. Therefore, violation of the installation will lead to structural fractures during the operation of the house. It is not difficult to distinguish the bottom from the top - the bottom is smooth, and the top has roughness.
When installing concrete floor slabs, proper anchoring is required. This is especially necessary for houses over one floor and objects built in seismically active areas.
There are several methods for anchoring panels to each other :
- With the use of reinforcement, when it is attached to the installation loops, and the connection with the load-bearing walls is made using L-shaped reinforcement.
- In the case where there are no mounting loops, the reinforcement is welded to a plate, which is placed in the seam between adjacent slabs, after which the joints are filled with concrete mortar.
Beams
When installing wooden floors, the wall material must be taken into account. So, for aerated concrete under a reinforced belt, a formwork 250 mm high with a simple knitted reinforced frame made of A-III, which is filled with M200 concrete mortar, is sufficient.
After the reinforced belt has hardened and the formwork has been removed, wooden beams are installed, with a thickness that will depend on the thickness of the wall, but not more than 250 mm and not less than 150 mm.
The space for laying beams is determined to be 300-400 mm, and the minimum area of support on the walls is 80 mm.
At the bottom, the beams are hemmed with boards, and vapor and moisture insulation and insulation are placed in the space between the boards. The layout of the cake, the type of insulation, its thickness and the order of protective layers are established by the project.
Mineral wool group material is used as a heat-protective material , and polystyrene foam is not allowed to be used inside a residential building, since it is flammable and emits life-threatening carcinogens. After laying the heat-protective layers, a rough wooden flooring is installed, followed by a layer of finishing, for example, with OSB boards.
This floor design is quite durable, warm, soundproof and has a long service life. It is quickly installed and does not overload the walls. It is also easy to repair, update and dismantle.
Hole technology
In a reinforced concrete hollow-core slab, it is allowed to make 1-2 holes with a diameter of 15 cm in one of its voids. If there is a need to increase their number, then it is necessary to recalculate the load-bearing capacity of the floor taking into account the change in stress in the compressed zone of concrete. Catalogs of reinforced concrete products for hollow-core slabs allow the possibility of drilling out one of the ribs with the removal of reinforcement, which will reduce the load-bearing capacity of the floor slab by 15%.
Installation of holes using diamond drilling
You can make a hole in a concrete slab using drilling machines and specialized crowns of various diameters. This allows you to drill a hole of the desired shape to a given depth. You can drill not only in a horizontal plane, but also at different angles. Stages of work:
Holes for sewerage and air conditioning systems should be drilled with the designed slope, otherwise the correct operation of the system will be disrupted.
- First of all, you should select a suitable modification of the diamond drilling installation, its equipment, and the necessary tools. The decision is made based on the design documentation;
- Next, the equipment is transported to the site;
- All markings necessary for drilling are carried out on the surface of the slab: first of all, find the center of the hole;
- From this point, using a special template, find the drilling center. An anchor will be installed here, with the help of which the frame of the diamond drilling apparatus will be attached;
- Using a hammer drill or impact drill, a hole is punched for installing the anchor. Its (hole) diameter must correspond to the diameter of the anchor used in the work;
- Dust is removed from the plate and hole;
- The anchor is installed flush with the concrete floor;
- A wedging device is inserted into it, which is hit 2-3 times with a hammer, after which it becomes possible to screw in the anchor bolt;
- Next, the drilling machine frame is installed, which is centered using a special drilling center indicator;
- After which the frame is leveled and secured using special screws;
- A diamond bit of the required diameter is screwed onto the gearbox spindle.
- The cooling system of the drilling rig should be connected to a water supply from the central network;
- When a diamond bit enters concrete, its rotation speed should be low. After passing the protective layer, it should be increased.
Bugs and difficulties
An armored belt installed in accordance with the standard and the project guarantees a long service life of the object, since it increases its strength and performance characteristics.
The main difficulties in implementing such a protective structure arise for developers in the process of design calculations , which are quite complex and require special ones when choosing the volume of materials, dimensions and technical parameters.
It is recommended to entrust this part of the work to professionals so that all the necessary package of project documents is completed efficiently. Having a project in hand, you can build an armored belt yourself.
The main mistakes that developers make in the process of creating a protective belt for floors:
- During the installation of formwork: the lumber was chosen incorrectly, waterproofing was not carried out and the horizontal level was not maintained.
- After pouring concrete, the reinforcement is not filled with concrete and has air access to the frame elements, which is fraught with the appearance of corrosion processes.
- Concrete was poured in several stages and from different batches.
- Violation of the percentage composition of concrete components.
- Concrete was not wetted at high ambient air temperatures.