Beton-House.com
Website about concrete: construction, characteristics, design. We combine the experience of professionals and private craftsmen in one place
Wood flooring is an indescribable atmosphere, coziness and comfort of your home
In a country house or apartment, trying to create a cozy and environmentally friendly home, many owners come to the question of how to make a wooden floor on a concrete base? Wood is a natural, warm, absolutely harmless material for finishing such surfaces, and thanks to these properties it will never lose its relevance.
But the most common construction technologies offer us concrete interfloor slabs. We will tell you in our article how to lay a wooden floor and what technology is best to use.
- Installation with glue
- Advice from experienced people
- Laying the slab
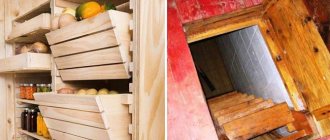
Preparation
Such floors are a very common design solution. Warm natural material creates comfort and coziness indoors. But such a move requires preparation of both components for the future surface.
No matter what kind of wood you use or what installation method you choose, the concrete base requires treatment.
Before laying, the concrete base must be put in order
Putting the concrete base in order
The fresh concrete screed must be completely dry by the time the base is laid. If you are making a wooden decorative covering on an old screed, it is necessary to carry out measures for its ongoing repair.
Concrete base required:
- level;
- get rid of cracks;
- remove dust;
- prime.
Concrete should be primed and dust free
At this stage, you should also prepare all the technological holes in the concrete for laying communications. As waterproofing, you can lay polyethylene film or penofol.
If a decision is made to use roll waterproofing, then the material should be laid overlapping, carefully gluing the seams. In this case, the film should extend onto the walls to the entire height of the future surface. It would be a good idea to tape the edges of the film with damper tape.
Important! Before laying wood flooring, check the moisture content of the concrete, it should not exceed 3%.
Experienced builders recommend constructing such floors in the spring, after the central heating system is turned off.
Choosing wood
Which floor is better: wood or concrete? The answer to this question is far from obvious. The wrong tree laid on the floor can bring quite a lot of problems in everyday life.
For flooring you should choose the following types of boards:
| Board name | Short description | Photo |
| Regular sexual | Laying is done using a tongue and groove pattern. It has a front side and a back side with vents. Width ranges from 8.5 to 10 cm, thickness from 2.5 to 3 cm. |
|
| Parquet | Consists of 3 perpendicular layers and a varnish (oil) coating. Installed using tongue-and-groove or locking joints. Width from 12 to 20 cm, thickness within 1.8 -2.5 cm. |
|
| Engineering | Three-layer glued. The top layer is made of valuable wood. Width 12 - 45 cm, thickness 1.2 -2 cm. |
|
In addition, a regular board can be planed or unplaned. Unplaned material is used as a rough coating for further finishing. For finishing, planed dry with tongue and groove is used.
Rules when buying a tree:
- The material must be dry. Overdried or wet wood becomes deformed during further processing.
- The board should be flat and smooth.
- The wood must be free of defects.
- For a single coverage area, it is better to purchase material from one batch, with a similar color and texture.
When ordering volume, always buy 10% more material than required by area. The length of the edged tongue-and-groove board should not be less than 2 m. Before starting work, the wood should be treated with antiseptic and fire-retardant impregnation.
Regardless of which material was preferred, before laying the floor, in order to adapt to the microclimate, it is better to let the wood rest for several days in the room where the work will be done.
The tree should be allowed to rest at room temperature.
Preparatory stage
Cases when the surface of the base (concrete slab) is perfectly flat (permissible difference is no more than 1 mm per m2), hard and dry, are extremely rare. Therefore, the laying of block parquet is carried out not on concrete, but on a cement-sand screed, or its equivalent - a self-leveling floor on a gypsum or cement-gypsum base.
Additionally, the subfloor is inspected for cracks and other imperfections, which are filled with putty or cement mortar.
Please note that before laying parquet, it is necessary to completely clean the surface of the base from the remains of old coatings, oil stains, construction and household waste. It must be removed from dust, carefully cleaned, and treated with a primer.
Important! A freshly poured screed should be given time to dry. If its thickness is up to 5 cm, then it will take 4–6 weeks.
Flooring methods
Installation of wooden coverings on concrete can be done in one of 3 ways:
- the boards are glued to the screed;
- laying boards along joists;
- device on a substrate made of moisture-resistant plywood.
Important! With any installation method, such a floor on a concrete slab must have a technological gap. The distance between the wall and the board covering along the entire perimeter of the room must be at least 10 mm.
Let's take a closer look at the technologies for carrying out work using each method.
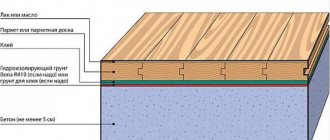
Installation with glue
This technology allows you to lay plank floors on concrete without interlayer material. In order to carry out installation, it is necessary that the screed complies with SNiP 3.04.01 - 87.
The presence of cracks in the base is unacceptable; the structure of the concrete must be dense. If the base does not meet the requirements, you should use a substrate material, or treat the base with a primer to strengthen it.
The wide board is installed using one-component polyurethane glue. Narrow or engineering is laid on a two-component composition.
Laying boards with glue
Instructions for laying boards with glue:
- The boards are cut according to the measurements taken.
- Glue is applied to the concrete using a spatula. The layer thickness should not exceed 3 mm.
- 2-3 boards are laid, which are carefully joined and pressed.
- After the adhesive has set, work continues.
- The width of the last board is adjusted to the desired size.
Installation on joists
The most popular device method. By arranging a wooden base over concrete on joists, it is possible to hide all possible communications and provide additional insulation.
A significant disadvantage is the height of such a coating is at least 10 cm, which greatly complicates its implementation in rooms with low ceilings. When laying boards on joists, the board material should be no thinner than 2 cm, otherwise the floor may sag and creak.
The video in this article will show you how to properly lay boards on joists.
There is a standard step for each board thickness:
- up to 35 mm – step 60 cm;
- 35 – 40 mm – step 80 cm;
- with a board thickness of more than 40 mm - 1 m.
Laying boards on joists
The logs are mounted perpendicular to the direction of daylight, following the following sequence of actions:
- The timber is secured into the concrete with dowels and screws, and the fastener heads are recessed into the wood a couple of millimeters.
- When fixing the beam, it is necessary to control the level. Permissible deviation in height is 2 mm per 2 m of length.
- If necessary, soundproofing material is laid around the perimeter of the walls.
- Insulation and sound insulation material is laid in the niches between the joists.
- Boards are laid and secured perpendicular to the joists.
On a note! It is better to fasten the boards to the timber with screws, and the holes for the screws are drilled in advance, at an angle to the floor. This method, firstly, will prevent cracking of the joists when attaching the board. And secondly, self-tapping screws will not creak - unlike nails.
Plywood base
You can install the floor using moisture-resistant plywood flooring. For such a layer, sheet plywood is used, usually coniferous wood with a thickness of 12 - 18 mm. The plywood is cut into identical squares measuring 40*40 cm or 80*80 cm. They are sanded before laying.
Plywood flooring
The order of further work is as follows:
- The squares are laid out with a gap of 3 - 4 mm.
- Each next row is placed with the seam shifted by half a square.
- The plywood is laid with glue.
- After laying the row, it is additionally secured with screws.
- The screw caps are recessed into the sheet a couple of millimeters.
- Upon completion of the work, the plywood flooring is cleaned of dust and debris.
- The floor boards are attached to the flooring using self-tapping screws.
These are the three main ways to install a wood floor over a concrete floor. Let's consider special cases when wood-based sheet material plays the main role in the construction of the floor.
Is parquet suitable for your apartment?
Laying parquet on a screed is an effective solution for flooring installations. However, before making it, the reasonableness of such a decision should be carefully assessed. After all, wood is a natural material, very susceptible to temperature fluctuations and high humidity. Therefore, it is reasonable to use it only in rooms with guaranteed suitable temperature and humidity conditions.
If it is too dry, the parquet dries out, loses its shape and appearance, cracks form, and if you lay it in a damp room, the parquet planks will rise when saturated with moisture. Optimal parameters:
- Humidity 40–60%;
- Temperature not less than +18°C, but not more than +24°C.
USEFUL INFORMATION: Welding linoleum at home with your own hands
We lay plywood sheets on the joists
Sometimes plywood is used not as a layer between concrete and floorboards, but as a finishing floor material. This is a fairly economical way to install a wooden floor on a concrete surface with your own hands.
This plywood floor makes it possible to level and insulate the floor, as well as hide all utility lines. The installation procedure is the same as when laying boards on joists. The only difference is that for reliability, a perpendicular beam should be mounted to increase the load-bearing coefficient.
Plywood floor arranged on joists
Laying wooden floors using sheet plywood:
- The sheets are attached to the joists with a seam shift.
- The gap between the sheets must be at least 2 mm.
- The distance between the fastening screws should be no more than 25 cm.
- For fastening, you should use self-tapping screws with flat heads, and when screwing them in, they should be recessed into the material.
On a note! If bulk thermal insulation material is used, then plywood can be laid without installing a cross beam using liquid nails.
Advice from experienced people
To prevent the plywood sheets from changing their dimensions after laying and flying like a helicopter, perform a few simple operations:
- Keep the sheets in the room planned for flooring for about 7 days.
- Store sheets horizontally only.
- If you plan to use the material in an unheated room, then it is worth impregnating the sheets several times with a polyvinyl acetate-based primer.
Plywood should be stored horizontally
Marking
Not all plywood should be used for floors. Depending on the number of layers, as well as on the composition of the glue and impregnation, the properties of the resulting material vary. What plywood of any grade has in common is the property of uniformly distributing physical load over the entire area of the slab.
When purchasing, pay attention to the markings on the sheets:
| Marking | Designation | Characteristic |
| Variety | E, I, II, III, IV | Indicates the structure of the sheet gluing, the quality of the front and back layers |
| Moisture resistance | FSF | It has an increased level of water resistance, strength and wear resistance. Not for use in residential areas, toxic. |
| FC | It is not highly resistant to moisture, but will remain intact when exposed to water for 24 hours. | |
| FKM | Highly water resistant material | |
| FBA | The most environmentally friendly material. Will not withstand prolonged high humidity. | |
| Surface quality | NSh, Sh1, Sh2 | not polished; polished on one side; polished on both sides. |
| Environmental friendliness | E1, E2, E3 | E1 - up to 10 mg, E2 - from 10 to 30 mg |
Other markings on plywood indicate that the material does not comply with GOST.
Advantages and disadvantages of the material
Wood has been one of the most popular and reliable materials for many years. It has a lot of advantages:
- The material is natural, environmentally friendly.
- Strong, durable, wear-resistant.
- Safe for humans and pets.
- Does not deform from heavy objects.
- It has high thermal insulation and sound insulation properties.
- Has an attractive appearance.
- Suitable for any interior.
- You can install the flooring yourself.
- The floor can be painted in any color or varnished.
- The surface is easy to care for and does not accumulate dust and dirt.
But as you know, a coin has two sides . Disadvantages of wood:
- High price.
- The coating is sensitive to changes in temperature and humidity.
- Wooden floors can have stubborn stains from wine, dirt, etc.
- Wood is a fire hazardous material.
- The surface gets scratched, worn out, and loses its shine over time. The floor may require restoration.
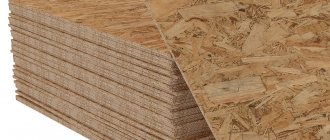
Fiberboard concrete floor covering
Fiberboard (fibreboard) is an excellent alternative to concrete flooring. This flooring is installed quickly and easily, and does not require major financial investments.
Hard fiberboard is used for floors. The concrete surface, as in all other cases, will have to be leveled and minor repairs to be made to seal cracks.
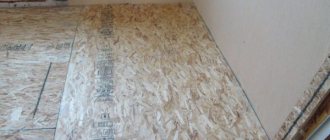
Fiberboard sheets are glued with the ribbed side to the concrete surface
Here are some simple tips:
- Before laying the slabs, markings are made.
- Try to cut out the floor in such a way as to create a minimum number of joining seams.
- Do not place seams in high traffic areas.
- It is better to hide the seams from hand cutting the slab under the baseboard.
- To avoid confusion, number the sheets and cutting angles.
- You should not level the sheets against the wall; the density of the joining seam is important.
- You should start laying with large sheets.
- After gluing, the slabs are pressed to the floor with a weight.
- The seams can be filled with casein-cement mastic.
Laying the slab
How to glue fiberboard to a concrete floor? The sheet material is laid on glue or bitumen mastic.
- When using glue, the back side of the sheet is completely covered with the composition and dried for 30 minutes.
- While the glue dries on the sheets, the surface of the base is lubricated. When laying the sheet, it is checked for evenness.
- When using mastic, do the same. In both cases, both mating surfaces are coated.
- The mastic on the surface of the slab is allowed to dry a little, and then pressed tightly onto the base, which has been previously treated with the composition.
Bituminous mastic for fiberboard flooring
Do not lay the sheets in such a way that the seams form an intersection. This place will very quickly lose strength during operation. Move the joints - this will make the coating last longer.
Waterproofing
After the base has been prepared, a special film with waterproofing properties should be laid on it. The strips are laid with an overlap of approximately 20 cm. The edges are secured using tape, and the film supply is placed on the wall for laying under the baseboard. The underlay used during the installation of laminate or parquet boards is not suitable for parquet.
The role of restrictive wedges is performed by a special self-adhesive rubber cord, which is installed around the perimeter of the room. The same element compensates for possible thermal expansion of the slats.
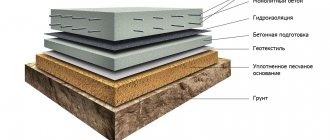
Pouring concrete
The final stage is pouring concrete, which consists of several stages:
- Preparation of concrete grade M400. It is best to order a finished product. It will be delivered in the required quantity at the specified time.
- Pouring concrete can be done in each room separately or over the entire area at once.
- Leveling the concrete surface according to the installed beacons.
- After 24 hours, the concrete will set to 30% of its strength. At this moment, you need to remove the beacons and cover up the traces of their installation.
Reinforcement
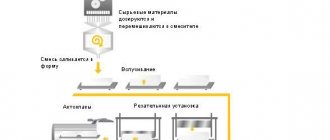
The two most popular methods of reinforcement are metal mesh and fiberglass:
- The technology for arranging the reinforcing mesh is carried out using an unconventional method. A layer of concrete without beacons is immediately poured. A break of 1 month is taken for hardening. Then the mesh is laid, beacons are installed and the second layer is poured. This technology avoids unwanted punctures of the waterproofing film.
- Fiber reinforcement differs from the above method. The strengthening material is added directly to the concrete solution at the stage of its preparation. The peculiarity of fiber fiber: its molecules are located in a chaotic order, therefore, when interacting with the molecules of the cement mixture, the material is strengthened in all directions. The use of fiberglass significantly reduces the overall weight of the concrete covering, therefore reducing the pressure on the wooden flooring.
Return to contents
Tension parquet
If we are talking about stretched parquet laid on a screed, then the procedure is as follows:
- A hole 1 cm in diameter is drilled in each plank.
- The central row is assembled, which will later become the basis for the entire canvas.
- The tenons of the parquet planks are mounted in grooves offset by a quarter or half the length, so the holes made in the body of the parquet flooring must coincide.
- After assembling the floor, it is necessary to stretch special fastening cords made of plastic, which have the necessary elasticity to withstand possible seasonal changes in the geometry of the material.
Fastening parquet to plywood
When using plywood flooring laid on a screed, the planks are attached to it using parquet glue applied with a special spatula. Next, it is recommended to shoot the parquet flooring along the edge - several pins or nails per element. This will not only make the fastening more reliable, but will also allow you to squeeze out excess glue and ensure a more uniform fit of the planks.
USEFUL INFORMATION: How to make 3D floors with your own hands (video): step-by-step instructions