The base OSB floor deserves attention for many of its characteristics:
The boards are rightly considered an improved wood and can be laid on almost any underlying substrate. Due to the large coverage area, installation time in large rooms is significantly reduced.
When finishing the floor with linoleum, which has its own base, it is not necessary to additionally lay a backing on OSB boards.
When determining the possibility of using OSB in specific conditions, it is necessary to take into account certain disadvantages that are typically characteristic of cheaper types of wood-based particle material:
- low moisture resistance in direct contact with water;
- flammability;
- inclusion of phenol-formaldehydes and other carcinogens in synthetic adhesive resins that are hazardous to health;
- susceptibility to mold and other biological damage.
Therefore, when choosing OSB for a floor under linoleum, it is necessary to clarify its characteristics and compliance with environmental standards.
Conclusion - the use of high-quality materials in compliance with installation technologies, both the slabs themselves and the laying of linoleum on them, makes this option for finishing the floor not only possible, but also in many ways preferable to others.
Expert opinion
Strebizh Viktor Fedorovich, leading construction foreman
The differences between the first two are that dowel-nails are driven into prepared channels with plastic dowel sleeves inserted into it, and dowel-screws are screwed into them. If you want to clarify something, please contact me!
What is better to put plywood or OSB on the floor?
There is no clear answer to the question of which is better OSB or plywood. OSB boards and plywood, if they are not moisture resistant, are recommended to be laid in any rooms where there is no humidity. In other cases, it is still worth giving preference to moisture-resistant plywood, since under the influence of moisture, it retains its strength.
Interesting materials:
What happened to Gurchenko? What happened to Yulia Samoilova at the closed school? What happened to Olga Pogodina? What happened to Galina's father Bob? What happened to Reyhan in the series The Oath? What happened to Sergei Ivanovich in the real boys? What happened to SpongeBob's creator? What happened to his son Dmitry Pevtsov? What happened to the Queen and Tarzan? What happened in the family of Pevtsov and Drozdova?
Padding
- After complete drying, all the roughness and unevenness of the surface will definitely appear on thin wallpaper. Interpanel seams and fastening points with self-tapping screws may also appear.
- OSB impregnation impairs adhesion, so the glue or primer will slide off the surface of the board.
- Using wallpaper glue may cause the board itself to swell.
How to treat the surface → Room decoration → How to choose the right paint → Surface treatment technologies → Leveling and finishing the walls → Selecting and applying a primer → Removal from the surface → Stretch ceilings and technologies → Reviews and testimonials
Installation tools
To install the slabs you will need a screwdriver and a jigsaw.
Before attaching OSB to the subfloor, it is necessary to place it indoors for several days so that the material gets used to operating conditions.
You need to prepare the following tools:
- a jigsaw or a wood saw with fine teeth: these devices are necessary for cutting OSB boards (you can also use a hand-held circular saw);
- screwdriver for tightening screws;
- measuring tape, building level, square;
- fasteners at least 3.5 cm long (black screws can be used).
You will also need a plane or sanding machine. There are household versions of such devices that are relatively inexpensive.
Black self-tapping screws are suitable for fastening the plates. If the base is properly prepared, they will not be exposed to too much mechanical stress.
To decorate the flooring, skirting boards are required.
In some cases, it is recommended to take not one thick slab, but several thinner ones, obtaining a reliable and durable coating. There are no special requirements for such OSB sheathing; it is only necessary to ensure the strength and stability of the base.
Laying ceramic tiles on OSB, preparing for it and assessing the chances of success of the operation. Solving the problem is quite troublesome and complicated. You cannot stick tiles directly onto the surface of particle boards, as the tiles will not stick. This means that it is necessary to provide an additional coating that will provide excellent adhesion to the surface. There are two possible solutions to the problem: instead of OSB, CSP will be laid on the floor, that is, cement-bonded particle boards with a smooth surface, or cladding made of CSP, but of a smaller thickness, will be attached to the wood boards themselves on top. When laying ceramic tiles, care must be taken to ensure that the base is as strong, rigid and immovable as possible. The layers are fastened together with PVA construction adhesive and self-tapping screws.
Despite the fact that the quality of oriented strand board exceeds the characteristics of chipboard, this structural material is not suitable as a finishing floor covering:
- It is necessary to leave a gap of 2 - 5 mm between the sheets to avoid squeaking during thermal expansion;
- the seams are sealed with sealant, reducing the aesthetics of the coating design.
Nuances of OSB installation.
Therefore, OSB is used more often as a subfloor:
- the slabs have ideal flatness, which allows them to level tongue-and-groove floorboards that have become deformed from long-term use;
- the solid surface of OSB sheets is suitable for small format claddings that cannot be laid on an unedged board without disturbing the flatness;
- the slabs have a stable geometry and self-supporting ability, so they can be used to reinforce a subfloor with a rare joist pitch or a small thickness of floorboards in order to increase its spatial rigidity and load-bearing capacity.
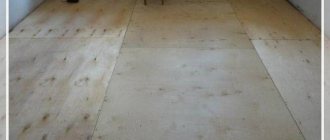
After laying OSB, the surface is smooth and has a high load-bearing capacity.
In this case, you need to know how to properly attach OSB sheets to floorboards/joists and use offset seams in adjacent rows.
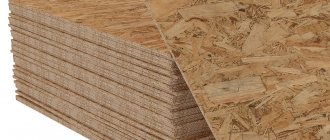
There are several types of oriented strand boards:
- OSB-2 – only for dry rooms;
- OSB-3 – can be used in rooms with high humidity;
- OSB-4 – for load-bearing structures.
Important! Since the subfloor has low maintainability, it is prohibited to use OSB-2 in it. The slabs are additionally treated with an antiseptic and waterproofing material.
The main characteristics of oriented strand boards are:
- density – 630 kg/m³;
- thermal conductivity – 0.13 W/m*K;
- linear expansion – 0.15% at a humidity of 70%;
- straightness – 0.6 mm/m;
- the perpendicularity of the opposite sides of the sheet is within 3 mm;
- thickness deviation – 0.3 – 0.8 mm (ground, untreated, respectively).
Advice! Manufacturers produce slabs of different sizes, which must be taken into account when purchasing in order to reduce cutting waste for specific dimensions and room configurations.
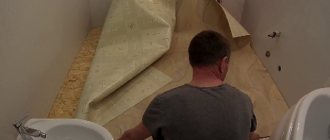
Installation technology
To properly lay sheet material over an existing plank floor, the following conditions must be met:
- revision of the base - rotten joists and boards are replaced, creaks are eliminated, the presence of insulation, a vapor barrier membrane on top of it and waterproofing under it is checked, the impregnation of floorboards with antiseptic and fire retardant is updated;
- layout - usually from a long wall, offset seams in adjacent rows by at least 30 - 40 cm;
Layout of material on the floors.
OSB fastening diagram.
Important! When laying parquet, PVC tiles, and other small-format cladding, the screw heads must be puttied.
Installation recommendations
Depending on the type of finishing floor covering, OSB boards are oriented differently on a wooden floor:
- for small-format decorative materials, it should be ensured that the seams of tiles and PVC tiles do not coincide with the joints of OSB boards;
- When choosing laminate, tongue and groove, decking or parquet boards, it is better to lay the rows of OSB across the direction of the long facings of the finishing layer or at an angle of 45 degrees for a diagonal layout (relevant in rooms with defects in the geometry of the walls).
Advice! On OSB it is allowed to apply a screed made of DSP or self-leveling floor. However, the surface of the oriented strand board must be pre-treated with a waterproofing material to avoid leaks into the lower floor and swelling of the structural material itself.
Finish flooring repair
The main problem with plank flooring is a floorboard or several boards, which develop a transverse “hump” during periodic changes in humidity or during drying. This leads to an increase in the repair budget:
- the floor surface becomes an uneven “comb”;
- OSB boards do not rest on the floorboards with their entire surface, but only in places of contact with the “humps”;
Deformation of the wooden floor.
In other words, OSB with a thickness of 22 mm or more should be used. This problem can be solved by preliminary grinding or scraping of the base:
- a grinder or sander will smooth out the “waves”;
- the contact area of the subfloor layers will sharply increase;
- You can get by with oriented strand boards of smaller thickness.
However, this is not always possible when the existing floor covering is thin.
OSB subfloor top layer
Wood-containing boards are excellent for the top layer of a subfloor, as they increase the performance characteristics of the structure:
- provide a level base for the floor covering;
- increase spatial rigidity and strength of the base;
- reduce labor and material consumption of work.
Unlike floorboards, self-tapping screws are screwed into OSB boards strictly vertically. When the hardware is tilted, a change in geometry and warping of the material over time may occur.
The main problems arise when opposite walls diverge (trapezoid instead of a rectangular room shape). In this case, it is necessary to mark the existing wooden floor in order to trim only the slabs of the first row:
- a center line is drawn along the long wall of the room;
- depending on the size of the slabs, markings are made parallel to it;
- the edge of the OSB sheet mating with the wall is trimmed with a hand saw or power tool;
- the second and subsequent rows are laid according to the markings without trimming, taking into account the displacement of the transverse seams;
- the last row is cut in a similar way to give the sheets a trapezoid shape.
Thus, the OSB structural material is suitable both for creating the top layer of a subfloor and for repairing a finished floor covering made of tongue-and-groove boards if dismantling this cladding for some reason is not practical in the room. When choosing an oriented strand board, the labor intensity of the work is reduced, and the home master makes do with the existing arsenal of tools.
Advice! If you need floor repair specialists, there is a very convenient service for selecting specialists from PROFI.RU. Just fill out the order details, the experts will respond and you can choose who to collaborate with. Each specialist in the system has a rating, reviews and examples of work, which will help with the choice. Looks like a mini tender. Placing an application is FREE and does not oblige you to anything. Works in almost all cities of Russia. Without your desire, no one will see your phone number and will not be able to call you until you yourself reveal your number to a specific specialist.
If you are a master, follow this link, register in the system and be able to accept orders.
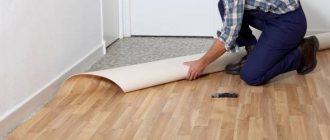
Preparing the surface of the OSB board for laying linoleum
It is clear that lining material made from wood-oriented board requires preliminary preparation. At a minimum, it is necessary to ensure that there is no damage and that the surface geometry is correct. If the material is stored incorrectly, OSB sheets are bent like a “propeller”; under the influence of air and sun, the pressed chips quickly age and begin to crumble.
A high-quality OSB board for flooring under linoleum should be absolutely flat, with smooth, sharp edges. OSB production technology is such that one side is smoother. If the linoleum panel is planned to be laid with glue, then we treat the OSB under the linoleum on a wooden floor with protective impregnation only from the back side. Otherwise, it is recommended to varnish or cover with drying oil completely.
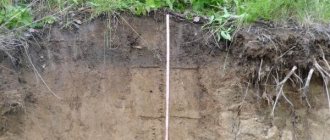
Good ventilation of the underground space guarantees reliable preservation of both joists and floorboards, as well as the OSB boards themselves. Special attention should be paid to the preparation of slab material for laying on a concrete floor without insulation. For example, if you plan to lay laminate flooring in a summer kitchen, or in a hallway, on a veranda, where there is no polystyrene foam or expanded clay laid under the screed.
Modern brands of glue allow you to glue chipboard, fiberboard and OSB directly to concrete without any problems. But a cold cement-sand surface, even with waterproofing, becomes a source of condensation. Condensed water must be dealt with, so wooden slats treated with oil or varnish are sewn onto the back of the OSB panels. The air gap will provide additional thermal insulation and at the same time allow for the effective removal of water vapor from under the rough OSB layer.
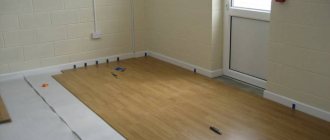
It is better to lay OSB on slats rather than on concrete
Laying slabs on a concrete surface
Often OSB slabs are mounted on a concrete screed so as not to lose the height of the floors. In this case, the base should be level, preferably new. The floor must be waterproofed to eliminate the possibility of condensation accumulating under the sheets and the appearance of fungus.
After polyethylene or roofing felt is laid on the floor surface, cleared of the remains of the old screed, then beacons are installed and secured with plaster. They need to be leveled using a tape measure, tapping cord, and transverse threads.
- Make a mark on the wall at some distance from the floor.
- Using a laser/water level, make another mark nearby.
- Rub the cord with chalk and mark a horizontal line point by point. Do the same with the rest of the walls.
- Make a mark at the height of the planned screed, and measure the distance from it to the horizontal with a tape measure. Draw dots on the remaining walls and connect them with lines.
- Self-tapping screws are screwed into the walls along the lines, the threads are pulled along them - this is how a screed plane is created along which the beacon profiles are mounted.
- Concrete is poured and leveled according to the rule (it is desirable that its width exceeds the distance between the beacons). Next, wait until the solution gains strength (at least 28 days).
What you will need to install slabs on a concrete floor: hammer drill, trowel (notched), screwdriver, dowel nails, parquet glue, hammer. If the base is level, a layer of slabs 10 millimeters thick is sufficient.
- Prepare the required number of sheets, which are cut to size. It is advisable to make a plan drawing with sheet numbering (this will make it easier to attach them later).
- Applying glue to the slabs, spreading it over the surface with a spatula.
- Laying the slabs on the screed, creating a compensation gap of 3 millimeters.
- Drilling sheets in the corners, making similar holes in concrete, installing dowels in them, fixing the slabs.
- If you want to make the floor clean, you can simply apply several layers of varnish on top.