The strip foundation is a basic type of foundation, one of the most proven and deeply studied types of supporting structures.
The history of the construction of the belt goes back many centuries, so the statistics and design features have been worked out as closely and in detail as possible.
The strip foundation is harmoniously combined with units of other types of foundation or with structural elements of the building itself, allowing them to be implemented in various ways.
One of these options is the installation of floors on the ground, a simple solution that does not require lengthy work and does not load the walls.
The technique is quite widespread and deserves a detailed description.
Floors on the ground - what is it?
Ground flooring is a technology for creating a subfloor that rests directly on the underlying layers of soil. This technique is available in the absence of a basement or basement . It is simple and economical, used mainly in auxiliary and outbuildings - garages, storage facilities, bathhouses, etc.
For residential buildings, this technology is used less frequently, as it requires high-quality insulation, waterproofing, and ideally, the installation of a “warm floor” system.
It should be taken into account that the technique of installing floors on the ground is only suitable for traditional types of strip foundation and is not suitable for combined types of supporting structures, such as pile-strip, etc.
There are different types of subfloors on the ground:
- Concrete screed supported on load-bearing walls.
- A concrete screed supported on a layer of soil backfill and serving as a supporting platform for the walls.
- Boardwalk on joists.
- Dry screed with floating floor, etc.
Different design options require their own construction methods and the composition of the floor pie on the ground. to pour a mass of concrete directly onto the backfill layer; it is necessary to create appropriate preparatory layers that provide rigidity, resistance to loads and thermal insulation.
Wood flooring is easier to install, but also requires significant preparatory work.
NOTE!
The main factor influencing the condition of ground floors is the presence and depth of groundwater. Without examining the site, you should not make a decision about creating such a floor.
Preparatory work
You can raise a house without the use of special construction equipment - in our case we will use hydraulic or any other design of jacks capable of developing sufficient force to lift a load weighing 10 tons. If they are not available, you should not think about buying equipment - you can rent it in one of the railway depots.
We will also need a steel scrap, wedges, and a sledgehammer - tools that are mostly needed to dismantle the old foundation. As temporary supports, you can use chocks, massive beams, bricks, as well as boards of different thicknesses, which will act as spacers. The jack must be installed on a strong square base with sides of at least 50 cm. As such a platform, you can use boards and beams knocked into a shield, or any other durable material. In order to evenly transfer the force from the jack rod to the lower crowns of the house, you will need to cut or find a steel plate at least 5 mm thick.
If you have to deal with a columnar foundation with a backfill, then the latter will have to be dismantled before starting work on replacing the base. It is recommended to remove all furniture and other heavy items from the house and dismantle the floors.
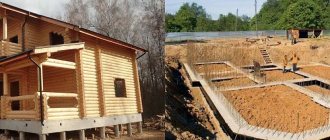
Raising a wooden house
The building is lifted using jacks, which are installed on both sides of the building at a distance of 0.5 m from its corners. The jacks are fixed on a specially prepared support platform, which, if necessary, is buried in the ground to give it maximum stability. The house is lifted, if possible, simultaneously from both sides, evenly, no more than 1.5-2 cm at a time. Immediately fix the result obtained with temporary supports.
If strong bends of the lower crowns are noticeable as a result of raising the house, install additional jacks
At this stage, it is important to control the process so that the building does not move to the side, because as it rises, its center of gravity changes
Dismantling the old foundation
When the house is raised to a sufficient height and securely secured to it with temporary supports, they begin to dismantle the old foundation. Rubble and brickwork are broken using a crowbar, chisels and any other convenient tools. Some of the materials that have retained their quality indicators can be used to form a new base.
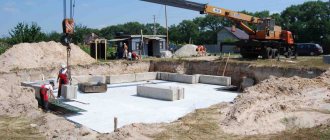
Construction of a new foundation
In our case, we will consider replacing the columnar base with MZF - an option that is best suited as a foundation for one-story houses. The construction of a new foundation begins with excavation work: a trench is dug, the depth of which must necessarily exceed the depth at which the base of the old foundation was located. The trench is dug in a U-shape - this is necessary to form a frame with reinforcement outlets to combine all sections of the foundation into a single rigid structure. If it is planned to build new structures adjacent to the house, then the trench is dug based on the design data. For example, at this stage it is best to think about the foundation for an extension to the house.
After the time has passed during which the concrete has acquired sufficient strength (about two weeks), boards are laid on the first element of the strip base, on which temporary supports are installed. In turn, temporary supports are dismantled on the opposite side of the house, and the site is developed similarly to the method described above. The same is done with the remaining elements, only straight sections of the trench are dug out for them, and reinforcement is carried out by connecting the existing reinforcement outlets to the frame of the new section of the tape.
At the final stage, the house is lowered onto a new waterproofed foundation, ensuring the uniformity of the process. If necessary, before lowering the house, you can replace the lower crowns.
Advantages and disadvantages
The advantages of flooring on the ground include:
- Simplicity and cost-effectiveness of creation.
- Ability to withstand high loads.
- Absence or low values of loads on the walls.
- Durability, high maintainability.
- Ability to combine with any type of finishing coating.
- Possibility of installing a heated floor system.
There are also disadvantages :
- The need for high-quality insulation.
- The device is not possible if the backfill layer is too thick (more than 0.6-1 m).
- Dependence on hydrogeological conditions in the region, impossibility of development in flooded areas or in regions with unstable groundwater levels.
- The need for a competent approach during construction.
All qualities of ground floors have been sufficiently well researched, which allows us to rely on technology and carry out work in strict accordance with its requirements.
Video description
To see all the work involved in preparing the site and pouring the foundation, watch the video:
Formwork
Before pouring the foundation for the house, it is necessary to form a strong, reliable formwork. To form removable formwork you can use:
- wood;
- metal;
- plywood;
- plastic.
Permanent formwork becomes part of the structure and avoids the dismantling stage. To form it use:
- expanded polystyrene;
- wood boards;
- fiberboard
Permanent formwork block for strip foundation Source ofacade.ru
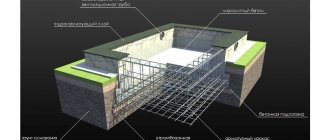
What is the device (by layers)
For wood subfloors, creating a complex pie is not necessary. A mandatory layer of sand backfill is sufficient, on top of which geotextiles are laid and insulation is laid or poured. The composition of the cake for a concrete floor on the ground is more complex.
Typically the following layers are created:
- Sand backfill.
- A layer of gravel cushion.
- A reinforcing mesh made of metal or fiberglass is laid.
- A rough layer of concrete screed 10 cm thick.
- Waterproofing layer.
- Insulation (expanded clay, polystyrene foam or, better, specialized penoplex).
- Additional layer of waterproofing.
- Clean concrete screed.
It is also recommended to reinforce the last layer to eliminate the possibility of cracks forming during drying. If necessary, water heated floor pipelines can be poured into it to obtain an effective and economical home heating system.
Basic mistakes
The main task when constructing a foundation is to make its service life as long as possible. When using a concrete foundation, its laying must begin 30-40 days before the start of construction of the walls. This time is enough for the foundation to settle. If you start building walls earlier, the foundation will settle along with the structure, and this can lead to deformation of the entire house structure.
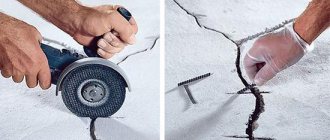
Any foundation needs waterproofing. Therefore, it is advisable to protect the formwork with waterproofing material - bitumen and rolled roofing felt.
Particular attention should be paid to high-quality fastening of the material on the formwork.
When laying a strip foundation, you need to correctly carry out the work of pouring concrete. Formworks should be poured with a maximum interval of two hours. The first pouring occurs at 2/3 of the depth, and after two hours the concrete is topped up to the edges. Only in this case will a monolithic concrete structure with excellent load characteristics be obtained.
For a pile foundation, an important point is the reinforcement of the corners. You cannot simply lay the reinforcement crosswise without fastening. Such a miscalculation can lead to the formation of cracks in the corners of the foundation and deformation of the structure of the entire house. Be sure to secure the rods with clamps or L-shaped corners.
After pouring concrete, the foundation needs constant supervision. In hot weather it must be moistened, otherwise the foundation will dry out too quickly and cracks will appear. If laying the foundation occurs in the cold season, then the optimal temperature is not lower than 0°C. At low temperatures and severe frosts, the drying process takes quite a long time and because of this the foundation becomes less durable
What you need to know before construction
Before proceeding with the construction of a floor on the ground, it is necessary to obtain sufficiently complete information about the composition of the soil layers on the site, the depth of groundwater and the extent of seasonal fluctuations in its level.
This data will allow you to decide whether it is possible to create floors on the ground with a sufficient degree of safety for the building and its inhabitants . It is recommended to create a high-quality drainage system that can ensure the removal of soil moisture if its level increases.
Then you should decide on the thickness of the preparatory layers of backfill. This issue is of particular importance since they must be thoroughly compacted. The thicker the layer, the more difficult it is to achieve sufficient compaction.
At the same time, it is impossible to achieve the natural compaction density of the backfill layer in practice. The preparatory layer will certainly give some shrinkage, the amount of which will be directly proportional to its thickness.
It is recommended to pour a layer of footing concrete (rough screed) onto a geotextile fabric. This will preserve water in the concrete mass and ensure normal crystallization of the material. If you pour directly onto the preparatory layer, moisture from the concrete will be absorbed into it and disrupt the hardening process, which will result in a weakening of the screed.
IMPORTANT!
When pouring all concrete layers, it is necessary to fully comply with the period necessary for the crystallization of the material and the development of technological strength. Otherwise, there is a risk of deformation or destruction of the underlying layers, the occurrence of defects in the geometry of the floor pie and loss of overall strength.
Before starting work, you must make sure that all communications passing under the floor level have been entered . After creating a floor pie on the ground, entering communications will be difficult and will require more complex methods for solving the issue.
How to drain water?
Diagram of a floor arrangement in a bathhouse with a drainage pit.
Features of the processes occurring in the bathhouse require the installation of a well-thought-out drainage system in the floor. To do this, it is necessary to provide a drainage system and an appropriate slope of the floor surface. There are several schemes for water drainage devices:
- The first scheme is suitable for bases made of light sandy soils. They absorb moisture well. In this case, an absorption pit is installed. It is dug under the part of the bathhouse where the washing room will be located. From it, water will be collected in a pipe and discharged into the pit. Dimensions of the pit: sides and depth of 50-100 cm. Crushed stone, broken brick, sand are placed in the pit. For ventilation, through vents are left in the base.
- If the floor in the bathhouse will be poured on dense or clayey soils, then it is better to move the pit outside the structure. In such a situation, a small pit is installed under the washing room, where water will flow and flow through the pipeline system into a pit, septic tank or drain. To protect the room from unpleasant odors, you will need to install a water seal.
- However, the first and second schemes involve the installation of a lattice wooden floor on a slight elevation from the concrete base. If you want to make a floor directly on the ground and lay tiles as the front layer, then you need to install pipes directly into the screed. In this case, the drainage system should be thought out in advance. This drainage method is considered universal.
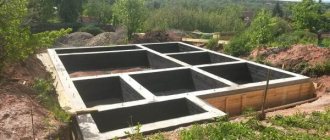
Construction technologies on strip foundations
There are several methods for creating floors on the ground, involving the use of different techniques and materials. They all have their own advantages and disadvantages, and have sufficient efficiency and load-bearing capacity.
The choice of methodology is made based on a comparison of the features of the technology and the conditions that exist in reality . In addition, the capabilities and preferences of the home owner are an important factor.
Let's consider the procedure for creating different technological options:
Concrete screed
Creating a concrete screed is the most labor-intensive and time-consuming process, requiring the use of “wet” solutions.
This feature must be taken into account in advance, since the specifics of the materials will require certain conditions:
- Air temperature not lower than +5° (optimally room temperature).
- No exposure to the scorching rays of the sun. If there is no roof, you can use a net or canopy for protection.
- Site prepared for work.
Work order:
- Creating a layer of sand cushion . Up to 0.6 m of sand is poured (optimally - about 20 cm). The layer is carefully compacted to a state of maximum density. As a guide, you need to achieve density like on a country road.
- The next layer is backfilling with crushed stone. The thickness of the layer is the same as that of the previous sand layer - about 20 cm. Tamping allows not only to increase the strength of the crushed stone layer, but also makes it possible to further compact the sand layer.
- Laying geotextile fabric . The strips of material are overlapped by about 15 cm with an overlap on the walls of the foundation strip.
- A damping tape is installed along the perimeter of the room on a tape , providing a mechanical decoupling of the floor and the foundation.
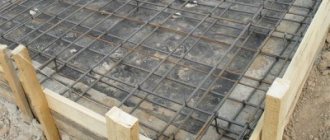
- A reinforcing mesh is laid and a rough concrete screed is poured . It is maintained for the required time according to the technology until the material completely hardens.
- Applying a waterproofing layer . Either a double layer of roofing felt coated with bitumen mastic or various impregnations are used.
- Laying insulation . The best option is penoplex for foundation work, characterized by density and resistance to external influences.
- Laying vapor-waterproofing film . The strips are laid with an overlap on the walls (over the damping tape) to a height of about 20 cm. The film is overlapped by 10-15 cm with sizing with construction tape.
- Laying reinforcing fiberglass mesh.
- Pouring finishing screed . Its thickness is usually 5-10 cm. If a heated floor system is used, then the installation and laying of pipelines, checking the strength of the connection under pressure and other operations prior to pouring concrete are carried out first.
The total thickness of the floor pie along the ground is selected in such a way that the floor level is as convenient as possible for installing doorways and other building elements. to carry out work in the warm season, when the conditions for hardening the concrete layers allow you to get the best results.
Dry screed
The technology for creating a dry screed makes it much easier and faster to get a high-quality result. The initial stages of work are the same as in the previous version - creating layers of sand backfill and rough concrete screed.
After this the following steps are performed:
- Laying waterproofing film using conventional technology - creating a sealed sheet of film strips folded in rows with a 10 cm overlap with the joints taped with adhesive tape. The edges of the canvas are placed on the wall to the approximate height of the dry screed.
- Installation of beacons. The recommended option is plaster profiles. They will serve as guides for creating a horizontal and level plane.
- Filling a layer of expanded clay. The material is aligned along the beacons, forming a horizontal plane.
- Subfloor slabs - plasterboard, plywood, etc. - are laid on top of the expanded clay. The most recommended option is tongue-and-groove plasterboard, which has a special profile along the side edges for connection.
- After this, the final finishing coating is laid.
Wood flooring
This option is considered the most budget-friendly. The simplest and most reliable design rests on pillars of bricks stacked in a well . The columns are placed in such a way that a support system is formed for installing the logs.
The columns are filled with expanded clay or, alternatively, an air gap is left to ensure dryness of the wood, which requires the creation of ventilation holes.
The joist system is carefully leveled horizontally and forms an even supporting plane . Then a wooden subfloor is laid. A layer of waterproofing film is installed on top, a standard substrate is laid and a finishing coating is laid - linoleum, laminate or other material to the owner’s taste.
Dry screed
The organization of a dry screed involves the installation of guide profiles. The first one is installed near the wall, and the rest are installed at a distance of 1.5 m from each other. The profiles must be secured parallel to each other. If they are higher, you will need to place planks or pieces of slab under them. The supports under the profiles are placed at a distance of 70 cm.
When starting to lay sheets, you first need to pay attention to the space near the door. During the hardening stage of the screed, it is better not to walk on it, but to move around the perimeter, you should place sections from the slabs.
The sequence of actions when arranging a dry screed includes the following steps:
- To place the first sheets evenly, you will need to trim the folds.
- The role of a waterproofing material can be performed by polyethylene film or moisture-resistant plywood.
- After completing the installation of the dry screed, the beacons must be removed. Otherwise, they will harden firmly in the cement composition.
Which construction technology is best to choose?
The choice of technology is a matter of preference and capabilities of the home owner. Concrete screed allows you to get a durable and strong floor, but its maintainability will be extremely low . Failure of, for example, a heated floor system will create a serious problem with a very complex and costly solution.
Dry screed is much simpler and allows repairs to be made without much expense or problems, but this option is only suitable for people who are not afraid of repair work.
NOTE!
A wooden floor is a traditional solution, but the specifics of wood as a material have too many undesirable aspects, so this option is increasingly being abandoned in favor of other methods.
Pouring concrete preparation
The footing itself is not taken into account when calculating the load-bearing loads of the floor, so it is not reinforced and is made of lean concrete, in which the percentage of cement is less than usual due to a doubling of the proportion of one of the fillers (usually crushed stone). The thickness of the footing is in the range of 7–8 cm, and its main advantages are workability and the ability to create an even and durable base for the insulation.
After the rough screed has been poured and leveled, it is given time to reach 70% of its design strength (as for ordinary concrete). To prevent the surface from drying out, it is covered with burlap, which is periodically moistened.
Without the use of hardening accelerators, this takes a week, with the use - three days.
Then they begin to arrange the top layer - the screed.
Nature of house destruction
A screed for a building structure is necessary if the degree of its destruction can lead to further destruction of the integrity of this structure.
Typical types of destruction include:
- Collapse.
- Blockage.
- Separation of parts of a building.
Collapse of the structure
The collapse of a structure occurs as a result of the appearance of cracks in the upper part of the building, while the deformation of the walls occurs in the form of waves or can be observed over the entire surface.
This type of destruction can be partial or complete, when it is necessary to restore the integrity of all load-bearing elements of the structure. Partial destruction requires restoration of the functions of only some partitions.
Important point! In any case, it is necessary to resort to a technological operation - screeding the walls in order to get rid of the destruction processes.
Damage to buildings can be light, medium, or severe.
Easy house collapse
Light damage is characterized by the appearance of cracks in half the corners of the openings with deformation of the wall heads by 1/3 of their height, while the condition of the foundation is normal.
Such destruction occurs due to the excessive weight of the roof, due to the construction of another floor, and also due to the lack of a reinforced upper chord. To eliminate this problem, it is necessary to mount a steel cage, tying the building structure at the corners.
The connection of the clip is carried out on the external walls. To carry out such repairs, it is necessary to prepare materials such as steel angles, pipes, studs, nuts, and steel rods. The work consists of connecting all elements using electric welding.
Average camber
The average type of camber is characterized by the presence of the same destruction as in the case of light camber, but their total mass is about 80 percent.
Such types of destruction may occur in the absence of a reinforcing belt, as well as in cases of loads exceeding the design ones.
In this case, you will have to tighten the walls of the house along the entire perimeter, laying tightening belts in 3 levels. It is permissible to replace steel reinforcement with a steel strip, and the quality of the welds must be high.
Strong collapse
A severe degree of collapse is characterized by the appearance of noticeable cracks both in the walls of the building and in its foundation, including all the characteristics inherent in light and medium destruction. As a rule, severe collapse is a consequence of the destruction of the foundation of the building.
It is important to know ! You can avoid complete destruction of the building if you use continuous support and corner supports, including strengthening the foundation.
The foundation is strengthened by laying a reinforced frame around the entire perimeter of the foundation.
Use of fittings
Construction reinforcement is strong enough to hold together the walls of a building, preventing further cracks from occurring. Despite this, such a technical operation will require certain skills, as well as the ability to use an electric welding machine. In addition, you will have to find the necessary information to correctly calculate the amount of reinforcement and its diameter. Calculations depend on the size of the building, as well as the nature of its damage.
Naturally, you can try and find all the necessary information, although it is better to involve an experienced construction organization. In this case, you will have to invest some money, but the calculations will correspond to a high professional level.
If the walls do not have serious damage, then in places where cracks appear, the brickwork can be replaced, and in cases of a high degree of destruction, it is better to use reinforcement, either reinforced or conventional.