Wooden floors on joists are one of the oldest methods of flooring and the only one used in the northern regions of our country. Modern materials have only improved ancient technologies, due to which the scope of applications has significantly expanded and performance indicators have improved. Before proceeding directly to the consideration of various options, you should familiarize yourself a little with the engineering requirements for calculations.
Installation of wooden floors on joists
Reasons for the popularity of log structures
Methods for attaching the board
Before installation, it is useful to consider a number of factors that may appear later:
- Even special treatment does not exclude the possibility of moisture affecting the floorboard. If the room is constantly damp, the material will become saturated with water. Periodic changes lead to constant fluctuations in the structure of the structure, which causes curvature and warping;
- Shrinkage is a natural process that takes a long period of time. The flooring will show it in any case, so it is useful to keep some of the structural components unfixed. Only the first and last boards, as well as every fourth between them, need to be pulled to the supporting elements;
- The final installation of the floor is carried out no earlier than six months to a year after the completion of the first stage of work. In this case, the screws are unscrewed and the flooring parts are tapped together if there are gaps in the tongue-and-groove area. Warped and severely deformed ones are removed and replaced with new ones;
- Lumber must be treated with fire retardants and antiseptics before installation. When sawing, it is necessary to process the resulting cuts and ends. It is convenient to work with substances that have colors and bright shades. In this case, the uncoated areas are clearly visible.
Fastening with glue
If the base is solid, then the flooring elements can be secured using good glue.
A number of features are taken into account:
- Regular PVA is suitable for the job;
- The ends of the boards on the groove side are coated, and a thin layer (1-2 mm thick) is applied every half meter. This will allow the connecting composition not to be squeezed out onto the surface when docking with the tenon;
- It is necessary to lubricate well for a reliable connection.
A permanent connection is considered inconvenient, since in case of repair it is more difficult to disassemble the flooring. There are two common mistakes: either the adhesive is too weak or the adhesive is too strong. In the first case, the connection can easily break; in the second, it will be impossible to separate the boards and will have to be broken. The best option is to use glue with average characteristics.
Typically, this method is not used as an independent method, but only in addition to other options.
Fastening with a nail
The second permanent fixation method is nails. Despite a history of more than 3 thousand years, this type of fastener continues to develop (up to 5 new types are patented every year).
Features of connecting boards with a nail:
- When raising the floor, you will have to dismantle the entire flooring. For this, a nail puller or similar tool is usually used; when pulled, the board itself is damaged;
- In addition to the floor elements, the nail itself is deformed; it is almost impossible to pull it out intact after nailing it;
- Each fastening pushes the fibers apart, increasing the risk of future cracks;
- The smooth surface of the fastener does not eliminate the risk of turning lumber already in a fixed state. Therefore there must be at least 2 points.
With this method, metal caps will be visible against the background of the array. To disguise them, it is wise to use putty. Hammering it into the groove will help; you need to fix the nail so that it does not interfere with the connection with the adjacent board.
Fastening boards with self-tapping screws
The most popular, convenient and at the same time affordable option. First of all, the method allows you to create a good detachable connection, which can be dismantled using a regular screwdriver. If necessary, you can reuse each hardware, since it is difficult to break the screws when unscrewing them.
Hardware of this type for wood differs from components for metal. The thread pitch is increased to move the fibers apart less and eliminate the risk of cracks. The decorative advantage of the products is important, since the thread does not reach the cap and it itself has the shape of a cone at the bottom, which allows it to be recessed flush with the floor plane.
Aesthetics can be achieved in several ways:
- Use special twisting methods, when the hardware is screwed at an angle into the tenon and remains invisible during assembly;
- Buy special caps that are inserted into the cap after screwing. They can be matched to any type of wood, but form a protrusion;
- Covering with a mixture of glue and wood flour. When sawing a board, small shavings are formed; they can be mixed and covered with screwed fasteners on top. In this case, you will have to deepen them further so that there is room for caulking flush with the floor.
Depending on the thickness of the fastening, you need to select the appropriate screws. Typically used sizes range from 3.5X35 to 3.5X50 mm.
When laying a board, you need to screw at least 2 fasteners into even the smallest components. Otherwise, 1 fixation point will become an axis around which the board will tend to rotate under load. A squeak will quickly appear in this area and the decking component may begin to wobble.
When twisting, you need to install the elements at a distance of 25-30 cm from each other, and you need to retreat 5-10 cm from the edge. This will create a reliable connection, but avoid the appearance of areas of tension along which cracks may develop under load. The only way to completely eliminate the appearance of cracks is by drilling holes for each self-tapping screw; for this you will need a screwdriver and a drill, as thick as the stem of the hardware, but less than the diameter of the thread that should be fixed in the material.
Fastening boards to joists
You can attach it to the joists using any of the described methods, the point is that over a certain space (above the basement, floor) support components are formed in the form of powerful boards, 100X100 or 150X100 are often used. Such a support will be very reliable, suitable, for example, in a garage where a car is supposed to be stored.
For home use, more modest lumber, from 70x40 mm, is sufficient. They are placed at an equal distance, on average 50-100 cm, depending on the thickness of the joists and the flooring itself. This is how supporting elements appear into which nails will be driven or screws will be screwed.
General recommendations
Make sure the wood is dried and treated with antiseptic or bitumen.
This will significantly extend the service life of the structure. When the humidity is more than 20%, the tree can become warped, compromising the integrity of the structure. Boards brought from a warehouse should lie at room temperature for several days. This is especially true during the winter season. It is not recommended to lay the floor when the air humidity is less than 60%. You should not saw or plane boards in the room where the floor is being installed. Sawdust can cause rot.
Use the rule after installation. Lay it across the beams, remove gaps, leveling the height. This is easy to do with the help of special modern adjustable fasteners that have appeared on the construction market. The floor is laid only after all leveling procedures.
The smaller the pitch, the longer the floor will last. However, the main indicator of durability is the material of the coating and base. The most durable wood is larch.
The installation of beams is usually carried out along the window, i.e. across the room. The floor boards are then placed along the length of the room, i.e. from the window. However, this is just a recommendation and a matter of taste.
A board is attached to each beam. Holes for screws should be drilled in advance to avoid delamination.
The most common option for the space between the joists is from 50 to 56 cm. As a rule, it does not exceed a distance of 69 cm.
Removing joists and wooden floors is quite simple. It is necessary to remove all the furniture from the room, remove the baseboards, and open the boards or sheets of chipboard. After inspection, the old boards are replaced with new ones. The logs themselves can be partially replaced. Simply cut out a piece of rotten wood and install a new one.
Don't forget to use a protective impregnation on new boards. Check the ends of the beams for rot, and inspect the base insulation, if any. Repairing the floor can be a reason to insulate your home.
Board installation
Installation of floorboards must be carried out using proven methods. Unreliable fixation will lead to loosening of the flooring and creaks. Gradually, the destruction of hardware begins, the holes for them deteriorate, and the risk of cracking increases.
Another important point is to obtain an aesthetic flooring that will not develop rusty drops or protruding caps over time.
Several methods can achieve this:
- Putty on nail heads. If you drive nails at floor level, rust may appear over time (if the nails are uncoated). Galvanized and galvanized fasteners are not subject to corrosion indoors. To cover the head, the nail, after being completely immersed in the wood, is driven slightly deeper than the level of the board. This creates a small groove in which the putty or mixture with sawdust is fixed;
- If you use clamps, you can get a perfect flooring without visible fasteners. In this case, small metal brackets are used, which are screwed to the joists and hold the boards by the groove;
- Method for ordinary self-tapping screws: if you screw them at an angle of about 45 degrees into the tongue. You will have to screw it in deeply so that the caps do not interfere with the joining of the projections of subsequent lumber;
- Nails with decorative heads. They differ from classic fasteners in a thinner and taller head, which is immersed in the wood at a level with the floor plane. The metal “dot” on the boards will be smaller, almost invisible from the outside.
Section and dimensions of the logs
The reliability of the structure will depend not only on the choice of material, but also on how to choose floor joists, calculating them correctly. Even before purchasing a timber, you need to calculate its length and cross-section:
- The length of the floor joists must correspond to the dimensions of the room in which the floor will be installed, but at the same time be 20-30 mm less in order to prevent deformation from temperature changes.
- For the logs, rectangular beams with an aspect ratio of 1.5 x 2 are used. If the floor rests on wooden floor beams, then the cross-section of the logs will depend on the length of the span between adjacent elements on which the logs will rest.
When insulating the floor
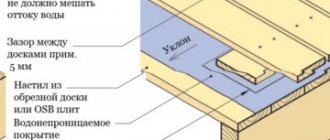
In the case of insulating the floor with heat-insulating material, it is necessary to leave a ventilation gap between the insulation and the finishing coating, which has a thickness of at least 2 cm, and even better - 3-4 cm. Therefore, the timber in this case must be taken taking into account this addition to the ventilation gap.
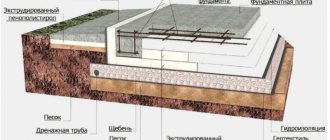
When installing joists on the ground
And if the logs rest directly on the ground, then you will need to additionally take into account the thickness of the knurling, which is laid on the cranial bars attached to the logs. It is best to buy timber whose cross-section has some margin.
If the floor is laid over an earthen base, then you can save on expensive large-section timber. It can be replaced with thinner timber, laid over shorter spans, and supported on brick pillars dug into the ground. The distance between the pillars should be 120 cm, and they themselves are made of red brick, since silicate brick can only be used in cases where the aquifer is deeper than two meters.
Of course, reinforced concrete or metal floor joists will have a smaller cross-section, because they are much stronger than wood and bend less.
General rules for flooring
There are a number of recommendations for various work options:
- Fastening on a prepared base when using hardware is carried out in increments of 250-300 mm;
- There is no need to adjust each section of the flooring to the width of the room; you need to retreat at least 10 mm from the walls. This gap will act as a compensatory gap, which will allow the boards to take their place during drying without harm. Otherwise, the risk of deformation and warping increases;
- When assembling with self-tapping screws, you can disguise the fasteners even when screwing them vertically. To do this, they need to be recessed by 3-4 mm, and then plug the resulting hole with a plug made of the same wood as the floor. On the market you can find options for all common breeds.
Adjustable joists
You can also find ready-made adjustable logs on sale, which already have holes for plastic bushings. Such materials cost more than traditional ones, but the speed of their installation is much higher.
Experienced craftsmen do not recommend rigidly attaching either traditional or adjustable joists to the base of the floor. In this case, the noise level in the room increases significantly, and the structure quickly loses its performance characteristics. But it’s also not worth laying them on insulating material. The best option is to lay it on a hard surface without securing it. In this case, the insulation layer should be located in the gaps between the joists. This will significantly increase the strength and durability of the subfloor and the final floor covering.
How to tighten floor boards
The components of the structure must be tightened after drying, which takes up to 6-12 months. If board classes AB and B are used, they may be slightly deformed.
When laying such lumber, the smoothest ones should be fixed first. They are leveled as much as possible and secured. Next, the flooring components are alternated so that the curved and concave sections coincide.
In this case, it is impossible to simultaneously apply force for alignment and screw in the hardware, so several options for tightening tools are used:
- Wedges. You need to take two wedges (triangles made of wood with a long acute angle), secure the support and tamp the flooring with them. In its simplest form, a piece of board is used as a stop, which is screwed to the joists at the required distance for each leveled component;
- Clamps. Quite an expensive pleasure, especially considering the suitable sizes;
- You can assemble your own leveling machine, which is easily screwed to the joists and is equipped with a lever to easily and quickly press even several boards at a time.
What are they needed for?
Properly installed beams and the distance between them ensure sufficient ventilation of the underground space of the house.
Laying wooden beams as lathing under the future floor allows you to strengthen the entire floor structure as a whole. In addition, noise and heat insulation materials are placed in the distance between the joists, which greatly improves the characteristics of the floor.
What methods are there for joining floor boards together?
Properly installed beams and the distance between them ensure sufficient ventilation of the underground space of the house, which means that the wood will not rot over time. Especially if the building is located on an area with high groundwater. How to properly install logs and calculate the optimal distance between the sheathing beams is discussed below.
Stages of laying the board
There are general steps required to create a quality floor:
- Analysis and selection of installation method. You need to proceed from the financial capabilities and skills you have;
- In accordance with the selected method, the necessary materials are calculated. These are logs, the flooring boards themselves, hardware and fastenings for fixing, paint and varnish coatings, impregnations. It is worth considering consumables, such as jigsaw files, gloves, protective equipment;
- Preparation of the base;
- Laying boards;
- Final finishing.
Successful work begins with preparing the base, which can be of two types: plywood or in the form of sheathing made of logs. The second method is preferable, but may not be suitable in some cases, for example, with low ceilings, since the installation of load-bearing components will reduce the height. Support beams are also not used if the old floor is preserved.
The floor is guaranteed to be damaged if the boards are laid on a screed or surface that retains moisture. To make sure it has dried, you need to put polyethylene on the floor and glue it in the corners; if after a day there are no drops of condensation on the inside, then you can start working.
Features of installation using glue
Glue is the main plus and minus in the method of fixing the flooring itself. It simplifies the work, but does not make it possible to assemble a coating that can be reused after dismantling.
It is important to remember that adhesive for interior living areas will work without water resistance. For the kitchen, it is wiser to take a waterproof one, so that an accidentally spilled drink does not spoil the junction of the components.
On what basis to lay the board
Before you begin assembling the flooring, you need to remember that the surface must be flat. A slope of no more than 0.2% of the length of the room is allowed; you can check it with a level.
For concrete foundations in case of deviations, it is worth using self-leveling compounds.
Next you need to create a waterproofing layer:
- Roofing felt, glassine or polyethylene sheets are purchased;
- The parts of the waterproofing layer are laid with an overlap of up to 20 cm; the overlap on the walls is up to 15 cm. All elements are glued together to create a continuous sheet; tape is suitable for this;
- You can apply a special waterproofing mastic to the concrete base.
Step-by-step instructions for attaching joists to a concrete base with your own hands
The simplest solution for installing a wooden covering over joists is to fasten the profile using dowels.
To carry out the work you will need the following materials:
- Beam 50 x 70 mm.
- Dowel-nail 8 x 120 mm.
- Fiberboard sheet.
- Polyethylene film.
- Insulation mats.
Installation work:
- We clear the room of unnecessary objects and debris.
- We cut out spacers 100 x 100 mm from fiberboard.
- Using a water level, we level the floor and mark the locations of the joists on the walls (it is better to mark a solid line along the contour).
- We prime the surface.
- We lay plastic film on the base. Each subsequent layer of material should overlap the previous one by 3-5 cm. We seal the joints with tape.
- We lay out the timber according to the marks on the wall parallel to the window opening. We splice the logs using angles or perforated plates.
- We begin installation of the structure. To do this, we make through holes in the log furthest from the window, the diameter of which should be equal to the size of the plastic plug of the dowel. The drill must pass right through the body of the wooden profile and also capture 50-70 mm of the concrete base.
- We press the part tightly to the floor. We check the coincidence of the holes and install the dowel-nail.
- Use spacers to level the horizontal level according to the marks on the wall and secure the profile with a hammer on the nail head. Using the same scheme, we install the next lag at the doorway. We stretch the cord between them on both sides and continue installation.
- When all the profiles are laid in place, the gap formed as a result of level adjustment between the base and the joists is sealed with polyurethane foam.
- We lay insulation mats in the gap between the beams and pre-fix the structure with transverse slats.
Installing a board over an existing floor
If the old floor is satisfactory and has a flat surface, then you can install fresh flooring on top. If there are damaged boards, you can replace them with inexpensive pine lumber. Fasteners that are not trustworthy or are loose, rusty, or broken are duplicated.
When laying on an old floor, be sure to lay the new parts perpendicularly to strengthen the structure and avoid squeaking immediately after installation.
It is useful to grind the old surface; this will improve adhesion when using glue and level the surface.
Floor screed tools
For work you need several basic tools:
- Cordless screwdriver (corded drill) and wood drills. Allows you to prepare holes for self-tapping screws to reduce stress in the wood structure. Convenient for tightening self-tapping screws, but you will need a cue ball of the appropriate configuration (usually a “cross”);
- Hammer and nail puller, if nails are supposed to be used;
- A pair of gloves, a protective mask, goggles;
- Jigsaw and file for it. Essential for quickly sawing deck components;
- Glue and brush. The brush is also suitable for applying paintwork, if provided;
- Level, square, tape measure. A level will do;
- Pencil for marking. The most convenient thing is an ordinary pencil, since it can always be erased from the board, removing unwanted marks after marking.
Where to order floorboards
We suggest starting construction with the purchase of high-quality lumber. Larch has certified products and the ability to deliver throughout Moscow and the region using its own vehicles. We offer significant savings through self-pickup - in this case, we will load your car for free! Also, it is possible to send an order throughout Russia through a transport company.
Finally, watch an interesting and useful video on the topic of laying floorboards:
We invite you to familiarize yourself with our range of materials
Floorboard - Extra grade
Wood Larch Width 120 mm Thickness 27 mm Length 3 m Qty.
in pack 4 things. 3400 rub/m2Floorboard – Prima grade
Wood Larch Width 120 mm Thickness 27 mm Length 3 m Qty.
in pack 4 things. 3000 rub/m2