Foam block material is one of the most popular materials used in the construction of low-rise buildings. The block successfully combines reasonable cost, excellent heat-insulating qualities, and high strength. For this reason, it is used not only for the construction of partitions, but also load-bearing walls. For obvious reasons, sooner or later the question arises - how to make a doorway in a wall made of foam blocks.
Making the right doorway in a foam block wall
Foam block material is one of the most popular materials used in the construction of low-rise buildings. The block successfully combines reasonable cost, excellent heat-insulating qualities, and high strength. For this reason, it is used not only for the construction of partitions, but also load-bearing walls. For obvious reasons, sooner or later the question arises - how to make a doorway in a wall made of foam blocks.
What is the material
The advantages of foam block are:
- ease of processing;
- light weight;
- excellent thermal conductivity;
- good noise and vapor barrier;
- resistance to chemical and biological processes, corrosive formations.
The main difference is that during the construction process there is no need to spend additional money on thermal insulation; costs associated with heating the room are reduced by three times.
The material does not create a large load on the foundation and is easy to work with. A comfortable microclimate is maintained indoors.
There is only one drawback - fragility. Houses made of foam block material are necessarily reinforced on several levels.
Types of openings
Before cutting an opening, it is important to select the optimal types of construction. This point may not seem so significant, but in fact there can be many options. The following types of door openings can be distinguished:
- Portal. This is a standard opening made in the form of a rectangle.
- For double doors . Extended version of the portal. In this case, the height may remain unchanged, but the width of the opening increases and averages 120-150 cm.
- Arch . Basically this means a cutout with corners rounded at the top. Installing the door in the future is not at all necessary, since the curved shape creates difficulties in selecting the door, but at the same time it looks very impressive.
- Complex designs. These are non-standard solutions that may differ in unusual shape, ratio of elements, etc. They are mainly suitable for plasterboard partitions. But installation under an opening in a brick wall is best done according to the basic plan.
Types of doorways in the wall
When designing a building with your own hands, a prerequisite is to draw up a plan and mark all doorways on the drawings. In the diagram they look like an interrupted section of the wall with a line deviated to the side - this indicates the direction of plowing the canvas. This line in the drawings is connected to the wall line with an arc.
Necessity of work
First, you need to determine for what purpose it is necessary to close the doorway; the list of works and the choice of materials that will be used instead of the door will largely depend on this. Several options are possible:
- redevelopment - involves the complete elimination of the opening, the entrance will be located in another place, and this area will become a simple wall;
- creating a niche is an alternative to the previous option, in this case you can create a convenient place to store things;
- decorative replacement of a door - the opening essentially remains untouched, but instead of a door it will be closed by other devices, leaving the passage free.
If you want to avoid wall deformation, use materials similar to those from which the primary structure was built.
How to lay foam blocks
Foam blocks are a new material only in form, but not in content. The masonry of foam blocks differs very little from the masonry of any other wall materials, such as standard types of blocks or bricks. The basis of the masonry is to overlap the seams or bandage.
The idea is to start each even row with half a block. In this case, all seams will be blocked. If this is not done, then no wall will work, it will just be free-standing columns. Needless to say, the strength of the partition will be very, very doubtful.
As for the unique features of masonry with foam blocks, only two factors need to be mentioned here: non-standard glue for the blocks and grinding of the block to the base. And now a little more detail.
Adhesive for foam blocks. Of course, foam blocks can be laid on traditional cement. You can even purchase cement separately, sand and additives separately. And then mix everything 1 to 3 and use it for masonry. But this approach is outdated. The consumption of professional glue for foam blocks is very small (3 mm maximum), so this material will not be expensive.
But the quality and speed of work when using special glue will increase with the inevitability of gravity. Firstly, a thin layer of mortar is easier to control, secondly, a thin layer is easier to work with, and thirdly, the special composition is better suited in structure and properties to foam blocks than a traditional mortar, which means the quality will be excellent.
Grinding in blocks. When laying foam blocks, you need to grind them to the base, that is, to the underlying block. This is done as follows. After the adhesive has been applied to the surface, a new block is placed. Then they begin to move this block a little back and forth along the masonry and try to press it as tightly as possible to the base. At the end, the block is finally positioned, aligned and left in this form, after which it moves on to a new block. This achieves unsurpassed strength of the masonry.
Law first
Remodeling an apartment is, of course, an interesting thing, but the law does not always allow you to do what you would like. This is primarily due to safety, since almost every element of the design of a residential building has its own purpose. For example, you cannot move a bathroom into a living space, and vice versa. Also, openings cannot be made in load-bearing walls. If you recklessly make any changes to structural elements, you can significantly reduce the strength.
Please note that you must coordinate any redevelopment actions with the relevant services before work begins. This way you will avoid problems. But if you do make a redevelopment, then still try to arrange everything correctly. Otherwise, over time, when you want to sell your apartment, you will have to urgently resolve this issue, which cannot always be done quickly.
In order to correctly complete all approvals, you must first go to the district administration and receive there an order to develop an architectural planning task and technical conditions. Next, we go to an organization that operates under a license and order the development of the project. Having received the project, we coordinate it with the district architect and, if all is well, we receive an order to begin work.
If we are talking about sealing an opening, then verbal approval from the architecture will be sufficient. After all, you are not destroying the structure of the house, but on the contrary, you are sealing the opening. However, everything here will depend on exactly how you decide to seal the opening. If you are drilling into a load-bearing wall, these actions may be unsafe.
With what? Choosing material
Before you start work, you need to decide on the material with which you will seal the doorway. If you want to seal it once and for all, then use one of these materials:
- Brick;
- foam block;
- drywall.
Each of these materials has its own characteristics, which we will discuss below. However, remember that if you can dismantle a plasterboard structure if necessary, then removing brickwork or blocks will not be so easy. We will also look at how you can decorate the opening without completely sealing it - such a temporary solution will allow you to avoid major repairs and approval from the authorities.
Brick
Brick can be considered the most reliable building material that can be used to seal a doorway. You can use brick to make a strong wall, which will also have good soundproofing qualities. If you have to seal an opening in a load-bearing wall, then brick will be the most preferred material.
When working with brick, it is necessary to remove the floor covering right down to the concrete panel. The walls also need to be prepared so that they can be securely connected to the new masonry. To do this, you can pull out several bricks from each side. During the process of laying bricks, it is necessary to check the masonry from time to time using a level to avoid the appearance of the so-called “belly”. Once you are done with the bricks, you can move on to the plaster.
Foam block
It is more convenient to work with foam blocks than with bricks - they are larger in size, which means the work can be completed much faster. In addition, foam blocks have excellent strength, which allows them to be successfully used when working with permanent walls. Foam block also provides excellent sound insulation.
To lay the blocks, gypsum glue is used, which is diluted at the work site. If the block needs to be sawed, then use a regular hacksaw. In order for the block to lie tightly, it is necessary to additionally tap the laid block with a rubber hammer.
Please note that a partition made of foam blocks will not withstand hanging heavy objects without additional reinforcement. Take this into account when choosing material for work.
Drywall
It’s easier to work with this material - you don’t need to fuss with mortar or glue, and all the work can be done in a matter of hours. If necessary, you can use mineral wool, with which you can make good sound insulation. This sealing option is suitable for non-load-bearing walls, which are usually much thinner.
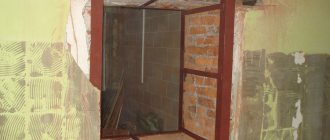
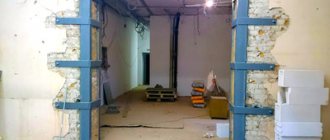
Partition with corner and doorway made of blocks
Often it is necessary to make an interior partition that would be located in an L-shape, in which two walls would form an angle of 90 degrees and would be joined to the outer walls. Such a partition is equipped with a doorway, and often also a window into the living space of the room.
Such an interior partition can be easily made from aerated concrete blocks laid on glue. It will be simpler and cheaper than plasterboard. But the soundproofing qualities of an aerated concrete wall are mediocre.
However, in most cases, solid sound insulation is not required here - it is only important to separate the space. How to make a corner partition with an opening in the most simple and cheap way...
Materials and tools
It is necessary to stock up on structural aerated concrete blocks with a density of 500 kg/m3 with a thickness of 10 or 12 cm, with a standard length and width of 20 (30) x 60 cm. The materials you will need are aerated concrete adhesive, for example, Ceresit ST21, corner plates with anchors and nails for concrete for fastening blocks to load-bearing walls, as well as polyurethane foam and plastering and finishing materials - gypsum starting and finishing putty.
To strengthen door and window openings, reinforcing bars with a diameter of 14 mm and a length of 20 cm greater than the width of the opening are used (for a narrow door 70 cm - 98 cm long, for example). And also the door is included, with platbands on one side. If there is a window, a wooden frame with one glass...
Installation Rules
Foam block material is soft and porous, and a metal door is installed in it in several ways:
- they use anchors, which is great for narrow openings;
- use chemical anchors for aerated concrete;
- weld a metal frame base;
- arrange a timber frame;
- Additionally, a wall of brick material is laid out.
Many people are interested in how to secure a door frame in an opening made of foam blocks to a wooden frame?
When inserting a door into a wall made of aerated concrete, it is necessary to ensure that it stands on a foundation base, as a more reliable element.
A massive door creates significant loads, which cause the fastenings to become loose over time. To prevent such deformation manifestations, experts recommend installing the box in such a way that the load forces are distributed over a larger area. To do this, use a wooden frame with an embedded beam. The wood is first treated with an antiseptic composition.
It is recommended to use larch as it is more resistant to moisture.
If a small door is planned for installation, then embedded beams are buried in the aerated concrete, or overhead panels corresponding to the wall thickness are placed in the openings. Such panels can be solid or installed as separate elements. Upon completion of installation, the free space between the wall and the door frame must be foamed. This will allow the frame to lock more firmly.
Under a large door, a frame is made of wood material; the installation of the frame is more durable. The anchors are installed every sixty centimeters, to a depth of at least fifteen.
To strengthen the openings, frames are made from metal angles or profile thick-walled pipes. They are installed from floor to ceiling, the ceilings are fixed with anchors. Pipes are allowed to be buried in foam blocks, but for this you will have to prepare grooves. After this, holes are drilled in the frame to secure it to the aerated concrete.
Maximum reliability of fixation is provided by metal mortgages installed during the construction of the wall. These elements are plates with welded reinforcing bars, which are embedded into the walls during masonry work. The frame is fixed using a welding machine or bolted connections.
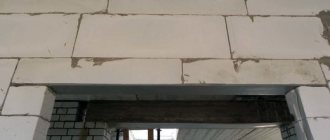
Breaking through a brick wall
First, the brick wall is cleaned of wallpaper and plaster. Then, using a tape measure and a pencil, markings are made. After this, a reinforcing jumper is installed on top. This is necessary to ensure that the wall does not burst or collapse. The jumper is made from a corner measuring at least 35 mm. Two blanks are cut 30 - 40 cm longer than the opening.
Using a grinder with a diamond blade, the top is cut on both sides of the wall. They cut 15 - 20 cm more than the width of the future doorway, cutting depth = the size of the corner (shelf). After this, the corners are inserted into the cut made, securing them with anchor pins and filling the cracks with cement mortar.
Now you can begin dismantling the brick wall. You can quickly and efficiently remove an unwanted area using a diamond saw. However, not everyone can afford such pleasure. Therefore, a grinder, a hammer drill or a sledgehammer with a chisel is most often used.
Using a grinder, a cut is made along the marked lines of the doorway as far as the diameter of the diamond blade allows. Then, using a hammer drill or a sledgehammer with a chisel, the brick is gradually removed. After removing all unnecessary bricks, you need to finish the lintel. To do this, both corners need to be welded together from the bottom.
Dismantling of building structures
- The minimum order for diamond drilling within the Moscow Ring Road is 5,000 rubles.
- The minimum order for diamond drilling outside the Moscow Ring Road is 6,000 rubles.
- The minimum price for a hole is from 800 rubles.
| Name of service | Price |
| Dismantling a brick wall | from 5000 rub. |
| Dismantling of concrete/monolithic/reinforced concrete walls | from 5000 rub. |
| Dismantling a wall made of foam blocks | from 5000 rub. |
| Dismantling a wall made of aerated concrete | from 5000 rub. |
For exact prices per m2 please call
We have discounts!
master with 10 years of experience
Video - we are at work!
Making an opening in a plasterboard partition
To create a doorway in the interior partition made of plasterboard, a frame is first installed. The steel profile structure gives the shape of the wall and also serves as the basis for fixing the gypsum board sheets. Strength is provided by wooden beams installed along the entire perimeter of the passage. The timber is connected to the metal frame posts.
The work begins with the installation of the guide profile on the floor and ceiling. The additional element is attached to the adjacent wall. A rubber band is placed under each profile for shock absorption. Vertical profile posts are fixed to the guides at a distance of up to 40 cm, forming the frame of the wall. The outer posts form the outline of the passage. They are connected to vertical timber beams. A wooden plank is attached to the top.
To strengthen the overall frame of the wall, vertical posts from the profile are connected by horizontal jumpers. Sheathing starts from the corner. Drywall sheets are screwed with self-tapping screws in increments of up to 20 cm, slightly recessing the caps inside. The edges of each gypsum board fragment should be adjacent to the middle of the profile.
How to choose a door for a non-standard opening?
Installing a door in a non-standard opening requires non-standard solutions. Each case is considered individually. Sometimes a doorway can be expanded or, conversely, narrowed. Then it will be possible not to match the door to the opening, but to “adjust” the opening to the dimensions of the door frame.
In this case, doors must be selected in such a way that their dimensions are as close as possible to the dimensions of a suitable opening. For example, if the opening width is 80 cm, and the size range of doors is from 86 to 100 cm, then the doors should be selected with a minimum width of 86 cm, and if possible, widen the opening. But it is worth noting that this possibility is not always available. And each case must be considered individually. However, there are general recommendations.
Installing doors in a narrow opening
If the opening allows, you can modify it. It is worth considering that according to building codes, the load-bearing beam above the opening must rest on the wall by at least 15 cm. The opening can be modified if this value is greater, so that as a result it is 15 cm or more.
To expand the opening you will need a special construction tool: a hammer drill, an angle grinder, a diamond disc, etc.
Installing an entrance door in a wide opening
According to the rules, the platband must cover the gap between the door frame and the wall. If the gap is wider, it needs to be modified - narrowed to the desired size. You can lay it with bricks or install metal supports - a special square pipe.
If the opening is too low
As a rule, it is impossible to increase the height of the opening, because in this case the load-bearing elements of the building would have to be demolished. If the wall is made of brick or foam block, a load-bearing lintel or a metal corner is placed above the opening, which is laid with brick. If some of this brick is removed, the top of the opening may collapse.
If the opening is made of a concrete slab, there is metal reinforcement inside it, which is also a load-bearing element. By cutting it, we violate the structure of the wall. This requires special permission.
If the opening is too high
Its upper part can be covered with bricks - in the same way as the width of the opening is completed.
Strengthening a doorway in a cinder wall
Hello. I am making repairs to a cinder-cast outbuilding. It came time to replace the front door. To install a new one, you need to increase the size of the doorway. I took it off, cashed the door frame, and there was quiet horror, the slag was falling apart. Tell me how to strengthen the new frame for the door and the opening wall. Thanks in advance for the advice.
Alexander, Krasnodar.
Hello, Alexander from Krasnodar!
The first step is to use your wits and don’t panic.
First prepare a new door frame. With all the necessary precautions, install it in the proper place according to the building level.
It is advisable to secure the top and bottom of the frame with 4 boards or bars so that they not only hold the frame in the desired position, but also temporarily rest on the surface of the walls along their exterior and interior with a projection of half a meter to a meter on both sides of the opening. With the condition - that it would be possible to pass through the opening and that this entire structure would not fall apart for the time being.
Take a masonry metal mesh in the amount of two cards and with dimensions approximately equal to the gap formed (in width and height), install it in place according to the thickness of the wall and fasten it together with pieces of wire. The grid cells are about 4 - 5 centimeters.
Then you make formwork and use it to close the cracks formed after the old door trim, leaving holes on top for pouring sand-cement mixture into the cavity. The solution is made from cement grade 400 or even M500 based on one part of cement - about 4 parts of sifted sand. The consistency of the solution is somewhere between sour cream and runny cottage cheese. That is, water in moderation and no more and no less.
Interior door
Installing an interior door is not as difficult a task as it seems at first glance. True, it requires time, accuracy and skills in working with construction tools - a drill, a level, a chisel.
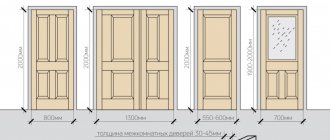
Choose
In housing, two door sizes are most often installed in height (2.1 and 2.4 m) and four in width : 0.7 m for the toilet, bathtub and shower; 0.8 m for kitchen and bedrooms; 0.9 or 1.3 m for the living room and family room.
If the gap is more than 50 mm, the opening must be adjusted using a mounting board.
Factories specializing in carpentry produce doors in kits, which include:
- box
- door leaf
- accessories
- set of fasteners
The additional elements necessary for framing the opening (platbands, glazing beads) and locking fittings (handles, locks) are purchased separately.
Preparing the tools
For a quality installation you need:
- Drill
- Clamp
- Screws, for example 80×5
- Hammer
- Hacksaw
- Chisel
- Screwdrivers straight and Phillips
- Spacers and wedges (wood or plastic)
- Right angle square
- Square 45 degrees
- Level or plumb
- Roulette
- Pencil
- Scotch tape or masking tape
If the purchased door has snap-on trim, then a drill and chisel will not be required.
We mount
Let's consider the sequence of installing a swing door in a partition made of gas silicate blocks.
When laying brick walls, mounting plugs (at least two on each side of the opening) are placed in the slopes of the openings - wooden blocks, to which the box is then attached.
It is impossible to install plugs in walls made of large-sized blocks, and the frames are secured to the slopes with mounting foam or dowel screws . Due to the fragility of gas silicate, impact tools cannot be used.
We begin installation by assembling the frame (if the door is equipped with a frame of universal size):
- We measure the lintel (the upper element of the frame) according to the width of the door leaf plus 7 mm and the upper edge of the correct jambs, saw off with a hacksaw at an angle of 45°;
- Alternately, we join the top and side elements of the box, clamp them with a clamp, drill holes with a diameter of 2.5 mm, remove the jamb from the clamp and drill the hole to 4.5 mm;
- We connect the jambs and the lintel with screws;
- if necessary, add a threshold:
- saw off to the width of the blade plus 7 mm;
- in the racks we cut out quarters from the side of the vestibule;
- we assemble the box, mark and drill holes for screws;
- remove the threshold, drill the hole to 4.5 mm;
- We put the threshold in place and tighten it with self-tapping screws.
Before installing the frame, unpack the door leaf and check compliance with the door frame , check the opening direction, and install the fittings if necessary:
- mark on the canvas and box the installation location of the hinges, handles and, if necessary, lock;
- We mark the contours of the loops on the canvas and the box;
- we select the recesses with a chisel, fasten the fittings;
- we try on the hinges and mark the attachment points in place;
- Drill holes for screws at the fastening points;
- screw the hinges and install the handles.
Install the door frame in the opening:
- Check the direction the door opens.
- We insert the prepared spacers into the box. We insert the box into the opening, securing it with wedges located opposite the spacers.
- We align the box with a plumb line or level, and tap the wedges. Repeat installation and positioning of the door at least twice.
- The box framed with platbands is enough to be fixed into the partition with polyurethane foam. After hardening, cut off excess foam with a knife. We install extensions and platbands.
If the door is equipped with a threshold and is installed in a room where water leaks are possible (bathroom, shower, laundry), the threshold must be protected from moisture: the installation gap is filled with silicone sealant.
We hang the door leaf. Work is done!