The internal staircase is an integral part of the home interior composition. But its finish should not only be beautiful, but also resistant to wear and tear. Among the materials used to decorate stairs, the most practical option is laminate. Externally, it is practically indistinguishable from natural wood, but provides a lower noise level when walking. Its main advantages are its low cost, ease of processing and the ability to easily replace worn elements. You can finish the stairs with laminate yourself, based on a fairly modest budget. All that is needed for this is to become more familiar with the basic properties of the material and carefully study some of the subtleties of handling it during installation and during operation.
About laminate and stairs
Before laying laminate flooring
Wooden staircase repair
- Since you have decided to lay laminate flooring on the stairs, you should firmly remember that laminated panels, firstly, cannot strengthen rickety steps and, secondly, they themselves need a rigid base. Even if the steps are strong enough, but the structure itself has play, the panels will simply move apart, and if they are glued, they may crack.
- So, laminate for stairs can only serve as a finishing material and nothing more, because it is not even a wooden plate, but a collection of heterogeneous layers. The thickness of the panels ranges from 6 to 12 mm and only one layer is made of wood, or rather high-density fiberboard, along the perimeter of which there is a lock. Two more layers consist of different papers, and one of acrylic or melamine resin.
Replace treads and risers as necessary
First of all, if you are repairing a staircase with your own hands, secure all the treads and risers with self-tapping screws so that they have no play. If there is a need to replace some structural elements, it is better to do this immediately, before you start laying the laminate. Also, before finishing, you need to carry out all the paintwork and let the coating dry thoroughly.
Laying laminate
Dimensions of laminated panels
- First of all, you should take into account that finishing stairs with laminate will be of the highest quality if only one laminated panel is used on one step, without locking joints. In this case we are talking only about treads and risers - one panel per tread and one panel per riser. If there are landings between flights of stairs, then the laminate is laid there in the usual way, lock to lock.
- Considering that now the manufacturer is focused on the consumer, laminate for stairs can always be chosen in accordance with the width of the tread, since its range is quite large. To calculate the amount of material, you do not have to measure the entire staircase - just know how many panels will be used for the riser-tread, and then multiply by the number of steps. And if you select the panels according to the width of the treads, then counting them will be even easier.
It is better to cover the edges of the laminate on the steps with a metal corner
The main load on the laminate with which the stair steps are finished falls on the edge of the panel, so wear will progress in this place, as well as on any other staircase. To avoid uneven abrasion, and maybe even breaking the panel, it is best to fix a metal corner at its edges, as can be seen in the photo, which will serve as a reliable fuse.
The best way to cut laminate is with an electric jigsaw.
In any case, when you make steps for laminate stairs, you will have to fit the panels under the treads and risers. The best tool for cutting laminate is an electric jigsaw with a wood file, although if you need to cut a shape, for example, under a stair baluster, then it is better to use a narrower metal file. To cut panels, you can also use hacksaws for wood or metal, a hand-held electric circular saw, and even a grinder with a cutting disc, although this will produce a lot of smoke.
Polyethylene foam laminate backing
- Each package of laminate flooring contains instructions that state that before installation you need to lay a substrate under the laminate. Indeed, such a measure serves not only to insulate the floor, but also to reduce noise, and the staircase is precisely a rather resonant object. For sound insulation, a thin (2 mm) polyethylene foam backing is sufficient - it’s cheap and dampens the sound.
- Laminated panels can be attached to the stairs with self-tapping screws, but it is better to choose these screws from non-ferrous metals so that they do not rust. It will be quite enough to screw in one self-tapping screw from each edge of the tread or riser, since in addition the panel will be pressed with a metal corner. To reinforce knowledge of installing laminate flooring, there is a video clip on the page.
https://youtube.com/watch?v=UKH3qvGo2Vc
Tool
Let's look at the main tools for installing laminate flooring; in fact, the list is small:
❶ Jigsaw. This is the most necessary and important tool. You can, of course, use a wood saw with a fine tooth, but it will be quite difficult to make longitudinal cuts. Therefore, we will still focus on the jigsaw. In addition, you cannot cut out round holes for pipes with a hacksaw; you will have to select a drill for wood with a large diameter.
Such a file does not “tug” the tool, unlike a reverse tooth. Chips on the workpiece are minimal.
You should purchase several fine-tooth files for your jigsaw. Many panels cut just fine with regular saws, but it is best to have saws with the tooth pointing downwards. Then the risk of chipping the laminated coating will be minimized. Files with neutral (straight) teeth have also proven themselves to be good - the teeth on such a file are directed perpendicularly, neither up nor down.
❷ Hammer. There is nothing to discuss here, everyone knows what he looks like.
❸ Plastic wedges. These items are sold with a laminate installation kit or separately. In general, it is not important to use them; you can get by with pieces of the laminate itself. 20-30 pieces will be enough for work.
I would like to pay special attention to the boss (found in installation kits) - a block for padding the laminate. The thing is completely useless, due to the fact that the locks are completely different
If you purchased such a block with a set, I advise you to throw it away; using it will only damage the locks.
A clamp - a special bracket, which is also included in the set - is a more useful thing and can come in handy. However, it is not an indispensable tool - in 9 out of 10 cases it can be perfectly replaced with a pry bar or chisel. Therefore, if it is not available, we will make do.
❹ Tape measure 3-5 meters, pencil.
❺ A small square, with sides 20-30 cm. An important and necessary tool.
❻ Minor installation, pulling out. Can be replaced with a large chisel, but it's best to have both.
Which laminate is better?
The flight of stairs is a place with a high level of traffic and is subject to regular heavy loads
Therefore, when choosing a laminate for covering stairs, you should pay attention to commercial samples intended for areas experiencing intense loads. It is best to choose laminates with a strength class of at least 31-34. The coating surface must have good strength and wear resistance characteristics
Also pay attention to the width of the dies. Ideally, it should match the dimensions of the step and riser
If the width is insufficient, the coating will be composite. In this case, its safety margin will be much smaller. Joints and interlocking connections between panels, of course, cannot be avoided when finishing intermediate areas. In these places the laminate is laid in the usual way.
Laminate flooring for stairs should be non-slip. The characteristics of environmental friendliness and harmlessness of the material are also important. An excellent option would be samples that correspond to class E1 and have a European certificate of conformity EN 13329.
Choose laminate flooring that has a long warranty period for finishing the stairs. The color and texture of the material should fit harmoniously into the overall interior.
Preparing laminate for finishing concrete stairs
To finish a concrete staircase with laminate, it is necessary to properly prepare the boards. Let's start with the fact that it is better to install panels with a locking system in a direct way. In certain parts of such a design, the slats will wear out differently, and if any of the elements become unusable, due to the interlocking connection it can be quickly and easily replaced. In this case, the integrity will not be compromised.
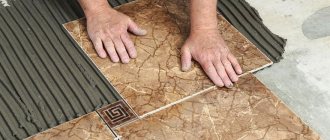
So how do you prepare the boards? Cut them apart and cut protective pieces to length for risers, treads and trim. Place two boards across one step so that they lie tightly from left to right. Sometimes it is necessary to trim the edges so that they match the surface. Misdemeanors are generally not so broad as to cover all the bases. Then you can simply cut off another lamella and fill the rest of the surface:
- First, cut the two boards into equal pieces so that one width completely covers the overhang. You can also take a whole board and just attach a small strip to it to fill the entire space. Remember that the slips do not have to cover the entire piece because you need to leave room for the top facing;
- cut the slat pieces down to the risers and make sure they fit snugly and are level with the top of the surface. Imperfect edges can be trimmed.
Now prepare the material for cladding. To do this, measure the length of the open surface and the length of the risers. They should match the corners of the stairs.
! Number each of the cut pieces. This way you will know which one should be placed where.
Features of finishing staircase steps with laminate
The popularity of laminar flooring does not mean that the method of cladding a flight of stairs will be simple. In essence, this is painstaking work comparable to the work of a cabinetmaker. It is not just necessary to lay a board or tile, it is necessary to correctly adjust the lamella so that the design of the steps looks like a single whole.
In addition, it is necessary to take into account some specific requirements for planning finishing work using laminate:
- To cover steps with laminate, you need to choose lamellas 1-2 cm wider than the transverse size of the step. There should be no joints or cracks in the laid covering. Otherwise, the locks will open under load, moisture and dirt will get inside the joint, and accordingly, the cladding will quickly lose its appearance. Not to mention the fact that the lock may simply not withstand the load;
- The laminate itself must be strong and wear-resistant enough to withstand a load much higher than that to which the flooring is exposed when laid on the floor of an apartment or house;
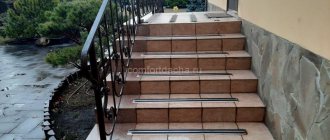
- If you plan to climb stairs in street shoes, then the front edge or overhang of the laminate-lined step support will need to be protected with an additional metal trim. Otherwise, the end of the tread will quickly wear down to the chip base.
Of course, covering the stairs with a laminate based on pressed cellulose fiber makes sense only for structures located indoors and reliably protected from rain and snow. For external flights of stairs, you can use vinyl laminate, in which case it will have to be glued with waterproof glue.
For your information! Unlike the classic method of laying laminate flooring, an adhesive fit is used to finish the stairs.
If you choose the option of cladding the stairs using wood-look slats, you will need to think about how to decorate the sides and risers
It is important that the sides and bottom are also made of laminate. Only then will you get a single composition of a flight of stairs made of wood
If you use a laminate with imitation stone, you can limit yourself to laying vinyl covering on the treads of the stairs.
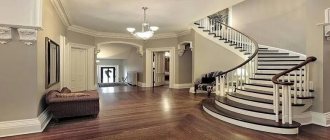
The perfect combination of white and chestnut shades
Laying schemes
In which direction should I lay the laminate with my own hands? There are no strict rules, but there are recommendations. To make the joints along the boards less visible, the direction of the light should go along the board. It turns out beautifully if you lay the coating at an angle. But this method is more complicated and produces more waste. You can also lay it across the light - this is also practiced, and does not threaten anything other than more visible seams.
Laying laminate relative to the window: arrangement of elements
The basic rule that must be observed when laying laminate flooring is the offset of the seams. The minimum transverse seam should be at a distance of 40 cm from the other. This way the strength of the floor covering will be greater: the boards will not come apart under load.
The minimum distance between seams in adjacent rows is 40 cm
The laying scheme of the laminate should be developed taking into account this rule. The easiest one to do on your own is shifting by half the board. Then each odd row begins with a whole, and each even row begins with a half (or vice versa).
If the length of one element exceeds 1.2 m, then the second row can be shifted by 1/3, the third by 2/3 of the length (as in the photo above). It turns out to be a kind of “ladder”. In some types of laminate (expensive), the minimum offset of the rows is much less - maybe 15 cm. This is indicated on the packaging or in the accompanying instructions.
You can lay the laminate with a “ladder”, but you need to observe the minimum permissible seam displacement. On the right is a laying diagram for a long board length and small displacement
You may be interested in reading about the technical features of decorating the inside of a wooden house or about the design of rooms in wooden houses.
Criterias of choice
When choosing a material for finishing a flight of stairs in a house, you should pay attention to the technical purpose of the product and its class. At the same time, the class indicator indicates the wear resistance of the material.
The second number in the product class marking indicates the thickness of the top laminating layer.
By purpose, laminate is divided into:
- Domestic. Class marking begins with the number 2. They have low impact resistance;
- Commercial. Class markings begin with the number 3. Products marked 32 and 33 have medium and high impact resistance, respectively.
Laminate class 23
Laminated boards marked 21 and 31 have low wear resistance. They can be used to finish stairs that are rarely used. The average service life of the material is 2-3 years. Products with strength classes 22 and 32 have an average level of wear resistance. They are designed for frequent use by a small number of people. This coating will last about 4-5 years. Material with classes 23 and 33 are among the most wear-resistant products. They are able to withstand constant active use of the surface by a large number of people. The service life of such material is 5-6 years.
When choosing a finish for a staircase, you should also pay attention to the appearance of the products and the texture of their surface. The material can have different colors
The color scheme of the laminate should be selected in accordance with the style and colors of the room in which the staircase is installed
It is important that the material does not merge with the flooring and wall decoration
The slabs can be smooth or textured. Textured products imitate the relief of wood or other material and look very aesthetically pleasing. However, during operation, debris may accumulate in the recesses. Therefore, smooth slabs are more convenient to maintain.
Another important criterion when choosing a laminate is the slipperiness of its surface. To ensure safe use of the stairs, it is advisable to choose products with the lowest slip rates for finishing the steps.
Important points when using backing material
If you decide to finish the staircase space, you should know that laying the underlay is required first. It is necessary to reduce the noise level when walking, i.e. works as a damper.
Basic functions of the backing material:
- good elasticity;
- high-quality depreciation;
- ability to eliminate noise.
Raw materials most often used for the substrate:
- cork (roll or sheet format);
- coniferous;
- expanded polystyrene;
- polyethylene foam.
Cork raw materials are environmentally friendly, are easy to use, and have the ability to restore their original shape. The only disadvantage is the high cost.
Coniferous backing material is considered an expensive option; it is made from natural raw materials and has good strength characteristics.
The most economical options are considered to be substrates made of polystyrene foam and polyethylene foam; in addition, they have the ability to absorb noise and isolate the coating from moisture that can be released by the base.
To prepare the staircase space for finishing, all of the above types of substrates are suitable.
Substrates made of polystyrene foam and polyethylene foam are considered cheaper, but cork and coniferous substrates are considered more expensive.
The thickness of the underlay material will depend on the condition of the steps. If it leaves much to be desired, then you will have to use a thick substrate:
- 2-3 mm if the treads are leveled and have no defects;
- 4-5 mm if the surface is uneven.
It is necessary to take into account the fact that laying out the underlay material helps to increase the height and reduce the width of the steps. The difference with the original parameters will be small, however, if the cladding tactics are not adjusted, gaps may appear
The use of counterfeit material is not necessary if two conditions are met:
- the laminated coating has sufficient noise-absorbing properties;
- cladding will be carried out using adhesive or liquid nails.
If the surface of the stairs has uneven surfaces, you need to take a slightly thicker underlay - 4-5 mm
Recommendations
Laminate flooring should be laid in compliance with the following simple rules:
- Before installation, the lamellas must lie in the room in a horizontal position for at least a day to cool down or warm up to room temperature.
- Laying laminate flooring is only permitted on dry substrates. If a concrete screed was originally made, then laying the coating is permissible only after it has completely dried.
- Before starting work, the rough foundation must be thoroughly swept so that there are no pebbles or other debris left on it. If you leave them under the laminate, sooner or later the substrate will tear first, and then the coating itself will be damaged.
- To identify differences in the subfloor, you should use a long rule or level - the slightest deflections will be visible in the gaps that appear.
- It is best to lay the planks away from the window so that the seams along the locks are less visible in daylight.
- Compensation gaps 8–10 mm wide should remain between the walls and the laminate. Without them, the laminated coating, during thermal expansion, will rest against the wall surface and rise like a mound in the middle of the room.
- To prevent the slats from moving during installation and closing the gaps along the walls, spacer wedges should be placed. Then they clean up.
- Compensation gaps must also be made in the middle of the room if the coating is more than 10 meters long. Afterwards, these seams must be closed with decorative thresholds made of plastic or metal.
- The substrate and waterproofing should be glued with tape at the junction of their individual strips. At the same time, you cannot nail this sublayer to the rough base with nails or screw it with self-tapping screws. Gaps are not allowed here.
- The first row is laid against the wall with a tenon, for which it is pre-cut so as not to interfere.
If the walls are uneven, then special attention should be paid to placing spacer wedges and laying the first row. The smoother the first slats are laid out, the more reliable the connection of all the remaining slats will be.
If you strictly follow the given step-by-step instructions and recommendations, the laid laminated coating will last for many years. There is nothing particularly difficult about its installation. In order to figure out how to choose the entrance door to an apartment and then install it, you will have to use your head completely. With the floor finish in question, things are not so scary.
Step-by-step instruction
Preparing to finish the stairs with laminate with your own hands
Preparing a flat surface:
- Sand all structural elements and apply a layer of varnish and primer to them;
- additionally fasten the risers and steps using small screws. This will help avoid unpleasant squeaking in the future. Also cover the holes that appear from the screws with putty and varnish;
- measure all the lengths of the front part of the steps;
- cut the profile that will be responsible for protecting the edge into two parts and secure the treads on its edge;
- After the profiles are attached to each individual part, level the transitions between them and the treads using putty.
! Installation on such a surface must be carried out directly. We advise you to use slats on separate secure locking connections. This will ensure the necessary strength of the flooring.
Preparing the stairs for finishing
Concrete staircase covered with laminate
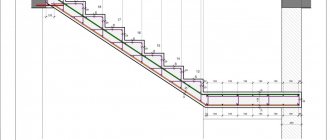
Even before purchasing a laminated covering for staircase steps, you should calculate the required quantity. To do this, you need to take measurements from the widest tread and multiply the resulting area value by the total number of steps. The same should be done with the risers.
Calculation of laminate for covering a flight of stairs
Having calculated how much laminate you need, all that remains is to buy it. Before using the material, it must be allowed to acclimatize. Leave the closed packages of laminate for at least two days in a room with a stable temperature (above 18°C) and a relative humidity of 70%.
Laminate acclimatization mode
In the meantime, you should prepare the ladder for work. For this you will need:
- Check the reliability of the steps and replace or restore areas that have become unusable
If the staircase is wooden, you should check the reliability of the installation of its elements, and if necessary, fasten them with self-tapping screws. Worn or damaged steps must be replaced and brought to a uniform height using a special mixture or plywood.
Leveling concrete stairs
- Remove remnants of old finish
All surfaces to be finished must be cleaned of peeling paint and anything else that could negatively affect the quality of the laminate installation.
- Treat the stairs with a strengthening and antifungal compound, then varnish
- Paint or varnish bowstrings and railings
- Align the tread projections flush with the risers (sawing off the excess or filling the space under the steps with plywood).
- Clean work surfaces from dust and dirt.
- Prepare a template for cutting
The template is made of cardboard or other material in the shape of a standard step and/or for non-standard steps.
Making a template for steps under laminate
Preparatory work
Particular attention should be paid to the careful preparation of the supporting structure of the march, since a reliable foundation will be the key to trouble-free installation of the lamellas.
Laminate flooring is laid on a leveled base, and therefore the surface must be prepared before starting work. The steps that are planned to be covered with laminate must not only have a flat surface, but also a strong structure. If it bends under load and changes its shape, the finishing material will quickly lose its appearance: cracks, chips and other deformations will appear. Therefore, before finishing work begins, play should be checked and eliminated at each step.
Also, before covering the stairs with laminate, the entire flight of stairs is restored and strengthened. The restoration process depends on the material from which the staircase is made.
To finish a concrete staircase with laminate, in some cases it is necessary to level the surface of the steps. To do this, formwork is used to achieve the same height and width of the steps, after which a leveling mixture is applied and allowed to sit for the time necessary to gain strength.
At the final stage of preparing the concrete surface, it is ground and treated with primers, which eliminate excess fines that interfere with the laying of the finishing material.
To prepare wooden surfaces, it is recommended to perform the following work:
- replace worn or defective steps and risers;
- to obtain the same size steps, level them using plywood;
- check the reliability of fasteners and joints, if necessary, strengthen questionable connections of parts of a flight of stairs with self-tapping screws or bolts;
- clean the surface of steps, risers and stringers from old finishing materials (varnish, paint);
- the protruding parts of the steps are compared with the riser flush, so that later the parts of the laminate can be joined;
- the cleaned wooden surface is treated with antiseptic and antifungal impregnations and then varnished;
- All elements that cannot be covered with laminate are painted completely.
For metal surfaces, it is necessary to treat them with special primers that protect the material from rust.
Before starting work, the surface is cleaned of dirt and dust.
If necessary, a template is prepared for cutting the laminate flooring for the steps. It can be made from thin plywood or thick cardboard. This need arises when the winder steps of a complex shape or the steps of a spiral staircase are to be faced.
Before purchasing a laminate board, you should calculate the amount of material, taking into account the trimming of part of the product when fitting on site. If the staircase is of a standard marching type, calculate the material required to finish one step and riser, and multiply it by the total number of steps.
Important! Before you start working with laminate, it needs to “acclimatize”. After the material has been delivered and placed at the work site, it needs to lie indoors for two days. It is desirable that the air temperature in this room be from 18 to 25 o C, and the humidity within 70%.
Which laminate is better?
The flight of stairs is a place with a high level of traffic and is subject to regular heavy loads
Therefore, when choosing a laminate for covering stairs, you should pay attention to commercial samples intended for areas experiencing intense loads. It is best to choose laminates with a strength class of at least 31-34. The coating surface must have good strength and wear resistance characteristics
Also pay attention to the width of the dies. Ideally, it should match the dimensions of the step and riser
If the width is insufficient, the coating will be composite. In this case, its safety margin will be much smaller. Joints and interlocking connections between panels, of course, cannot be avoided when finishing intermediate areas. In these places the laminate is laid in the usual way.
Laminate flooring for stairs should be non-slip. The characteristics of environmental friendliness and harmlessness of the material are also important. An excellent option would be samples that correspond to class E1 and have a European certificate of conformity EN 13329.
Choose laminate flooring that has a long warranty period for finishing the stairs. The color and texture of the material should fit harmoniously into the overall interior.
Cutting
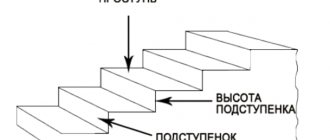
This is an important point that, with the right approach, will help to significantly save material. The fact is that the sizes of the treads and risers (the vertical sections connecting the lower and upper treads) are quite different and do not correspond to the sizes of the laminate panels.
Therefore, cutting the material should be done in such a way that there is as little unused scrap as possible.
It is necessary to calculate the width of both elements and use the panels as efficiently as possible. If the width does not allow for adequate savings, you can try an option in which the risers are designed not with horizontal, but with short vertical stripes.
This method makes it possible to almost completely use the panels, the size of the scraps is minimal. The only drawback of this method is the presence of multiple joints, which some users find unsightly.
However, this design technique is quite common; the appearance of the staircase practically does not suffer from it.
Finishing process: steps
Do-it-yourself work starts from the top step. This method is also used by craftsmen, since this way they can guarantee high quality cladding. When finishing the steps in stages, you will not have to stand on the bottom step, which will prevent unwanted load on the newly fixed laminate. The main actions are carried out according to the following plan. To begin with, special supports are installed at the junctions of the tread and risers.
This is done so that the applied coating can, if necessary, be securely pushed under the edge of the riser lining. Then, glue intended for parquet is carefully applied to the riser, which is processed by hand, after which the panel is immediately pressed against it. Additional fixation is carried out using spacer wedges.
It is best to apply the glue evenly directly onto the tread being treated. It is very easy to spread using a notched spatula. Then the laminate is laid directly on the pre-glued tread. If the work is carried out on the upper step, then the panel is connected to the floor covering using the “lock to lock” technology. Step-by-step finishing of stairs with laminate
Fastening technique
The technology for covering concrete walls in the hallway and toilet is quite simple, easy to do with your own hands, but has several features. There are two methods of fastening.
- The first option requires the presence of an ideal flat surface, which rarely happens. The walls need additional preparation so that unevenness does not turn out to be unpleasant moments later. Laminate flooring is glued to concrete either with liquid nails or with special glue. Then they press it against the wall, and for better strength they coat the clutch lock with glue. This method is suitable for decorating internal wooden partitions.
- The second option involves laying it on a lathing made of wooden or metal slats. This installation is not afraid of small uneven walls, plus you can additionally insulate and soundproof the room. Many manufacturers on the market, focusing on the popularity of the technology, produce special fastening systems for sheathing.
Which classes to choose
The specifics of using laminate flooring on stairs do not imply exposure to large amounts of water or the use of heavy furniture on wheels. In this regard, stairs have better conditions than the floors in the rooms they connect.
Therefore, the choice of laminate class can only be determined by the magnitude of the load on the surface.
- If the movement of people is infrequent, episodic, then you can get by with the cheapest class 31, which has poor abrasion resistance compared to other types of material.
- A load of medium size corresponds to strength class 32, the most common among all coating samples. It has the widest selection of color, texture, gloss level and other coating parameters.
- The constant walking up the stairs of people in street shoes, women in heels, high mechanical loads on the coating determine the choice of the highest classes - 33 or 34. This laminate is able to withstand the constant flow of people, its degree of resistance to mechanical stress on the surface is the highest, but also the price is appropriate.
NOTE! The choice of laminate class may be dictated by considerations of uniformity in the decoration of the premises - if the highest class is laid on the floor, then the same material will have to be laid on the stairs in order to maintain a uniform decorative style.
How to decorate a staircase with laminate yourself
Cladding a flight of stairs with lamellas is not limited to fixing the material on the surface of the steps, side posts and bowstrings, and risers. First of all, you need to find an acceptable design option so that laminate stairs in the interior, photo, look as organic as possible and at the same time are easy to use.
Unlike wood, laminated coating is practically not subject to abrasion
How to finish a concrete staircase with laminate
Laminate can be glued or mechanically fixed to concrete
Concrete facing begins with the installation of steel reinforcement, to which railings with fencing and fixing strips that hold the laminate on the surface of the steps will be attached.
For curved surfaces and adjacent areas, you can use vinyl laminate
The simplest cladding option is to stick laminate boards onto the treads, risers and side surfaces of the staircase. It is known from practice that the concrete base turns out to be too rigid, and over time the adhesive fit of the laminate peels off from the surface of the steps. Therefore, it is necessary to use polyurethane adhesives, silicones and other expensive chemicals.
While the glue is setting, the material must be secured with tape.
The second option involves dry laying the laminate, as is done when laying slats on the floor of an apartment. In this case, a cork or coniferous lining is glued to the concrete, and the facing material is laid on top without any bond.
Advice! Use underlayment material for stairs if there are small children in the house. For them, the height of the steps turns out to be too high, so the backing made of pressed pine needles seriously softens and cushions every step.
Fastening with metal profile
To prevent the slats from moving when walking, they are fixed with metal plates in the area of the overhang and riser. After sealing the side parts of the staircase with laminate, the metal fasteners remain hidden.
Adhesive-based finishing of steps
How to finish a metal staircase with laminate
The method of facing metal steps, depending on the design of the span, can be open or closed. The first option is used for stairs in which the steps are already formed from a metal sheet or rod; all that remains is to lay the supporting surface of wood and laminate.
In this case, a lining of two or three layers of plywood glued together is laid on the metal step. You can use a board, but plywood turns out to be more durable and hardy. After installing such a package on the metal frame, the step and riser are glued to the laminate panels, and the overhang is covered with a decorative overlay. To prevent the step from moving off the frame, it is fixed on the back side with self-tapping screws.
Cladding the frame with laminate boards
In the second case, the sheets are simply laid on a metal frame and secured with mechanical fasteners. The joint along the eaves line is closed with a decorative metal corner.
How to finish a wooden staircase with laminate
Unlike concrete and metal, wood is best suited for attaching slats. It is not without reason that the laminate manufacturer strongly recommends using wooden slabs and surfaces as the basis for laminate flooring.
Finishing a wooden staircase with laminate consists of the following operations:
- Initially, the surface of the step is cleaned and adjusted to size so that the laminate sheet does not “flap” under load. If necessary, small strips of geotextile can be placed under the edges;
- A slab cut to size is laid on the base, marks are applied to the lamellas to allow the most correct position of the cladding to be fixed on the wooden frame;
- Polyurethane glue is applied, after which the lamella is laid, aligned to the marks and pressed to the staircase frame using a pad.
Making the joint line with an overhead corner.
Risers can be installed a few days after the glue has completely set. This part of the cladding is installed with support on top of the horizontal plane of the step. There should be a gap of 1-2 mm between the riser and the overhang of the lamella; it cannot be sealed or filled with putties.
Instructions
After completing the preparatory work, the process of assembling the coating begins. The laminate installation technology consists of several main stages:
- Laying the underlayment.
- Preparing boards to size.
- Surface cladding of steps.
- Surface cladding of risers.
- Installation of the corner.
The use of a substrate is justified when equipping large areas. It is laid with a single carpet on a monolithic base, which allows for additional sound insulation and silent movement on the surface of the laminate. In addition, it prevents unwanted contact between the inside of the laminate board and a poorly prepared substrate surface.
For stairs, the underlay is also laid as a single carpet, covering both steps and risers, but it should be noted that for stairs that are often used, the use of underlay can play a negative role. In places where the main load on the step appears, bedsores will appear over time, while the side parts of the step will retain their original thickness.
Cladding steps with laminate
The finished boards are laid on the surface of the step, pre-treated with an adhesive composition. If a profile is used, then first fix it, and the board for facing the steps is installed after fixing the riser. Laminate can be attached to wooden surfaces using self-tapping screws, followed by masking the caps with an overlay metal profile.
Assembly of steps from Incizo profile.
Finishing of risers
The next step is to install the risers. If the laminate is installed using a profile, the risers are installed up to the steps. They are attached to adhesive mastic, placing special rubber gaskets with a thickness equal to the thickness of the board, so that after the glue has dried, it is possible to place the step board under the riser lining.
Which laminate is suitable for finishing stairs?
The steps of the stairs experience heavy loads during operation. Therefore, household material with a thin protective layer is not used for stairs. Laminate classes recommended by experts for covering stairs are 31, 32, 33, 34. These are commercial laminates intended for surfaces with heavy loads. The first number in the marking (3) means that the laminate belongs to the commercial class. The second number (1,2,3,4) determines the thickness of the protective top layer.
The second characteristic important for finishing stairs is the width of the laminated slats. Ideally, one laminate board in width should cover the entire plane of the tread or riser. Otherwise, if the step is wider, for finishing you will have to use several slats and connect them with locks. The surface finished in this way is less durable than a completely monolithic one. If the stairs have flights (platforms), lock connections cannot be avoided. In these areas, the laminate is laid in the usual way, that is, lock to lock.
Balcony cladding
The availability and low cost of floor panels compared to natural wood makes it possible to elevate such unpretentious rooms as a balcony and a loggia. Finishing a balcony with laminated material is possible if it is insulated and glazed.
Also, high humidity negatively affects the condition of the lamellas. To ensure that finishing a balcony with laminate pleases the eye for a long time, choose a waterproof product of at least class 32. Keep in mind that the panels are fastened not too rigidly so as not to deform the material
It is important to leave gaps around the edges, covering them with silicone or corners
Combined fixation of boards to sheathing is recommended. Glue is applied to the strips and carefully inserted into the grooves, tapping with a hammer.
A balcony lined with laminate looks noble
Installation recommendations
Laminate can be capricious to temperature changes
This is important when carrying out work. So the best solution would be to give him the opportunity to lie down for 1-2 days in the room where the styling will take place.
Due to the fact that the bottom step, as a rule, is slightly different from the rest due to the protrusion of the bowstring, it is best to prepare a template from cardboard, according to which it will be possible to cut the plates. This will avoid waste of material.
Templates will be indispensable for spiral staircases. Moreover, there should be as many such templates as there are steps on the staircase. This will eliminate defects if the laminate is cut incorrectly.
Laminate installation
The strength of the coating will be higher if you cover not only the treads, but also the rest of the staircase structure. This must be done because laminate is not only a decorative finishing material, but also a protective material.
Preparing for work:
Preparing the surface for laying laminate
Before starting work, you need to make sure that the quality of the base allows you to lay laminate on it. It must be reliable and durable, without any play. They do this to prevent the panels from moving apart.
- Laminate cannot be glued. This will lead to the formation of cracks in the material.
- It is best to secure the steps using self-tapping screws. This will prevent the formation of squeaking.
- And to prevent the formation of rust on the screw heads, it is worth providing waterproofing. To do this, you can use a wooden chopper or wood putty.
- Weak structural elements should be replaced.
- It is best to sand all the elements of the staircase, and then cover them with a layer of varnish and primer.
- The ladder should not be wet during operation. If you covered the product with paint, then you should give it the opportunity to dry thoroughly.
- Before laying the laminate, it is worth laying a 2-millimeter plastic film on the steps. You can use a cork backing. This will have a positive effect on the quality of shock absorption and sound insulation.
Sometimes the surface has a difference in height. To make the staircase look more aesthetically pleasing after finishing, these shortcomings should be corrected before starting work. For this:
- After all surfaces have been measured, you need to select the highest one.
- Using it as a guide, you need to align all the others. Special self-leveling mixtures are suitable for this.
- You must first prepare the surface by clearing it of debris. To ensure better adhesion, surfaces can be primed. Before starting work with pouring the solution, the primer must be allowed to dry thoroughly.
- If the height difference is significant, then formwork is first installed from sheets of four-millimeter plywood. It is secured with dowels in such a way as to ensure that the top edge coincides with the required level. Laying is done according to the level. After this, it is also worth applying a primer.
Carrying out work:
- Start work from the top step. When you move from top to bottom, the possibility of damage to the coating during installation is eliminated.
- First, install the tread (the horizontal part of the step), then the riser (the vertical part of the step). Only after this the facing of the joints is installed.
- If it is not possible to arrange flights of stairs from one piece of laminate, you can use a lock-to-lock fastening.
- According to the instructions for the laminate, the presence of a backing is mandatory. The simplest and cheapest material is polyethylene. The joints between its sheets are taped.
Profile
- To connect surfaces located at different levels, profiles are used that are specifically designed to decorate joints and distribute the load.
- To cut the laminate, use an electric jigsaw, which is equipped with a wood file. If you need to cut out a shaped part, it is best to use a metal file. It is narrow and durable, which will allow you to do the job accurately. It is worth noting that hacksaws for metal or wood, a hand-held circular saw or a grinder with a cutting disc are also suitable for cutting panels.
- Screws for fastening laminate flooring should be chosen from non-ferrous metal - copper, brass or zinc. This fact will prevent the formation of rust, although they are more expensive. Self-tapping screws are used to secure each edge. The connection itself will be provided with metal corners.
Fastening the laminate
Types of edge profile (molding)
In addition to the laminate, the most important element of the staircase trim is the edge profile or molding. This is the name given to the overlay convex strip that is used to decorate the edge corner of the step. What is the function of molding? Everything is very simple. When finishing the stairs, two laminate strips laid on the tread and riser are joined together. An unaesthetic corner is formed, exposing the cross-section of two lamellas. To cover this joint and at the same time strengthen the strength of the laminate, edge profiles are used. They are placed on top of the joint and secured with glue or self-tapping screws.
Ordinary metal L-shaped metal thresholds are often used as an edge profile. They are also called staircases. These thresholds can be made of aluminum, steel, brass. Paintings like gold, bronze, steel or wood are popular.
Metal moldings have more than just a decorative effect. They protect the edges of the steps from wear. In addition, the surface of such a profile is often corrugated and this gives the surface of the steps an additional anti-slip effect.
Plastic thresholds - have the form of corners of different shades. You can easily match the color to your existing laminate flooring. Plastic thresholds ideally protect the edges of steps, form an even angle, and hide unevenness. They differ from other stair thresholds at a low price. They are attached primarily with glue, so when installing plastic thresholds, special attention should be paid to choosing high-quality, durable glue.
Wooden sills are another option. Such thresholds go well with laminate flooring and have a long shelf life (in addition, they can be easily repaired - sanded, puttyed, painted). The disadvantage of wooden moldings is their high price. Fastening is done either with glue or with self-tapping screws (bolts).
In addition to the usual corner thresholds, there are also special laminated profiles attached to the steps using metal guides. For example, similar Incizo profiles from Quick Step (Belgium) are widely known. To install such a profile, a special L-shaped aluminum strip is used, available in several standard sizes (the height of the strip from Quick Step is 7, 8 and 9.5 cm).
To install this type of edge profile, a metal guide strip is attached to the surface of the step using screws. And then, a laminated profile is inserted into its grooves (with glue). In this way, the fixation of the profile is as strong as possible, while it is possible to do without metal fastening elements visible on the surface.
What you need to know about laminate flooring and stairs
If you have already decided that laminate will be the finishing material for the stairs, then you need to know the following:
Laminate flooring is always laid on a rigid base. The staircase must be made of concrete and similar materials
If the staircase has a slight play in the future, its coating will corrode and crack; It is important to remember that laminate is used only as a finishing material, and not as a base. This is not a solid and durable board, but a set of several layers
In addition to the durable fiberboard, there are also layers of paper and resin; To prevent waste of material, a pattern must be made in advance for the first stage. The first step, as a rule, has some differences from all the others. The template is made of cardboard and panels are cut out from it; Templates also need to be completed when it comes to a spiral staircase. In this case, a template is needed for each step. This is very painstaking work, but you can’t do without it; The laminate must completely cover each step of the staircase. This will allow you to achieve the required quality of coating, which is extremely necessary during operation; For stairs, it is best to use laminate with a key joint. This is due to the fact that the material will wear unevenly on each step. Therefore, it is the key connection that will allow you to easily remove the worn panel and install a new one in its place.
When preparing, you must take the above seriously. This will help you avoid troubles in the future.