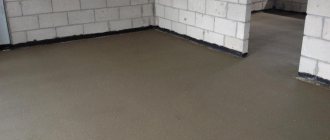
The base of floors is almost never ideal. You can always find various kinds of cracks and depressions, pits and sagging. In order to level the floor surface with the subsequent laying of any covering on it, special landmarks are needed. They are the ones who determine the height of the screed that is going to be made in the room.
Leveling the floor according to beacons
With the help of beacons it is easy to create such a plane, thanks to which the thickness of the fill will be controlled in any place. They help the master to direct the rule in the right direction and correctly distribute the backfill or poured mixture. In many ways, the installation of beacons depends on the quality and properties of the base and leveling materials, on the expected thickness and professional qualities of the work performer. In order to begin installing the beacons, you need to prepare the work surface.
It is ready if:
- all significant gaps are filled with mortar;
- no dust;
- priming has been carried out;
- peelings have been cleaned;
- Waterproofing and sound insulation have been completed.
Surface preparation
After preparing the base, work begins on placing beacons to level the surface.
Calculation of the number of beacons
To purchase the required number of beacons, you need to calculate the required number for the floor. The calculations are easy to do.
Installation of beacons is carried out from the door to the opposite side of the room, guides are placed parallel to each other. The floor screed along the beacons is done with a certain step; it should be 10 centimeters less in length than the rule used. If the length of the room is 6.4 meters, and the rule is 1.5 meters long.
Then the calculations will look like this:
- 6.4-(1.3 * 2)= 3.8. 0.8 is the length of the rule minus the part of its length that goes to the adjacent section when aligned;
- 3.8 / 1.3 = 2.9, the result is the number of beacons that are needed for installation without taking into account the outer guides taking up 0.3 m;
- (6-0.6)/5= 1.08 m. At this distance, parallel profiles will have to be installed, placed after the first guides installed from the wall in increments of 30 centimeters. The number five means the required number of all beacons, including guides.
Installation of beacons is carried out from the door to the opposite side of the room, guides are placed parallel to each other.
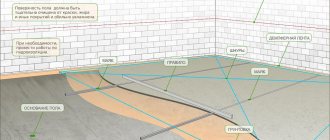
Sequence of work for pouring a concrete floor
Before pouring the floor on the ground, it is necessary to complete all the rough work of assembling the frame of the house, erecting the walls and roof, and also marking for future doorways (for more details: “How to pour a floor screed - preparation and pouring”). If this condition is met, there is no doubt that the poured screed will be strong and durable.
The sequence of steps for pouring the floor is as follows:
- on the erected walls of the house, the level of the future floor should be marked;
- the soil is carefully leveled and compacted;
- the next layer is crushed stone or fine gravel, which is also compacted;
- then the sand layer is filled in, after which repeated compaction is carried out;
- at the next stage, waterproofing material is laid;
- after this, insulation is laid;
- then the floor is reinforced on the ground;
- then the formwork is assembled and guides are installed;
- at the end, a layer of concrete is poured and the floor is left to harden;
- The finishing leveling screed is performed under the finishing coating.
Before the floor screed is done, you need to delve into all the details of this work. We will tell you in more detail about how to fill the floor on the ground below.
Preparing the floor for installation of beacons
Pouring floors on lighthouses with your own hands begins with preparatory work. First, the condition of the floor covering is assessed. If there is an old screed on the floor, it should be removed. The old coating can ruin the new one over time.
If the floors of the house are made of concrete material, then all holes and joints are covered and covered with a cement composition. A good option for this purpose would be to use tile adhesive, whose adhesion to different materials is high.
It is necessary to get rid of any flaws, all cracks are sealed. And also skirting boards and other structures that may interfere with the floor screed are removed. Next, the surface is cleaned from all types of contaminants. If necessary, insulation and reinforcement of the surface can be carried out.
For better adhesion, the floor surface should be coated with a primer layer.
For better adhesion, the floor surface should be coated with a primer layer.
How to find the highest point on the surface of the base?
The normal level breaks through the horizontal. Markers are made on the walls of the room at a suitable height. A noticeable line is drawn along the points. You can use regular dyeing thread for this. Then there is the lowest and highest point of the genital surface. It's easy enough to do. From the marked horizontal line with a level and a tape measure, you need to measure the distance to the floor in many places. In the place where it is smallest there is the highest point, so here the thickness of the screed should be minimal (3 cm). Using methodical measurements, the required level of screed is determined.
The normal level breaks through the horizontal
The highest current point can also be located in the central part of the floor of the room. This can be checked just as easily using a paint cord. It is enough to stretch it across the width of the room and view it along the length of the stretch. If a new maximum high place is found, another zero level is drawn. If the area of the detected point is small, it is better to simply remove the protruding area. A hammer drill will be just right here.
In order for the floor to become as level as possible, beacons are necessary for anyone who is involved in leveling work, regardless of whether an experienced master takes up the task or an amateur.
We place beacons
Set to the zero level, they guide the rule and serve as a kind of guideline. Such work may seem tedious and drawn-out, but the final result will depend on the correctness of its implementation.
Installation of beacons
Installation of beacons
Even the most knowledgeable craftsman, in order to obtain a surface without flaws, requires pointers, which are actually guides set at the initial (0) level. By advancing the rule along these peculiar signs, you can level the entire solution to an ideal surface.
It is much more convenient to move the rule according to beacons
Required tools and materials
To carry out the work you will need a number of tools and materials, in order to successfully cope with this task you need to prepare:
- The solution with which the coating will be poured;
- Construction level or laser;
- Rule;
- Graters, graters;
- Drill with mixing attachment;
- Knife;
- Chalk or pencil;
- Roulette and ruler;
- Containers for mixing the solution.
To carry out the work you will need a number of tools and materials.
Applying level markings
When marking the level of a concrete floor, it is worth considering that the finishing floor covering must exactly coincide with the doorway, without any differences. Therefore, it is necessary to put subfloor level marks on the walls, and do this along the entire perimeter of the room.
For convenience, you can drive nails into the walls according to the markings and tighten the cord.
Next, based on the thickness of all layers of the floor, it is necessary to find the zero level from which work on pouring concrete will begin. In this case, it is worth relying on the readings of the building level.
Selection and installation of beacons for semi-dry and wet screeds
To fill the floor screed using beacons, you can choose several types of these products. Beacons can use those used for drywall. They are laid with the sides facing down and secured with the applied mortar.
Special metal profiles are also attached to the solution itself; it is convenient to cut them into the required sizes. It is better to choose gypsum as a solution; it dries much faster than the cement-lime composition. Also, profiles can be attached to self-tapping screws; their level can be easily adjusted by screwing in and out. They are twisted into dowels, which are installed at intervals of 20-30 centimeters.
You can combine two methods: several self-tapping screws are screwed in, and a mortar composition is carefully applied between them. The self-tapping screws should be screwed in at a distance of about a meter; their caps will indicate how high the mortar fixer should be.
Beacons can be made from the mortar itself, then a rope is pulled along the measured level under the screed onto self-tapping screws. Cement is laid along its height in the form of a lighthouse. The distance between such profiles is also approximately 100-120 cm. With a semi-dry screed, the mixture is poured out in two places and evenly distributed along the pouring level. The room is divided into small zones in order to gradually cover these areas with the mixture.
The step of the platforms is no longer than the rule.
Special metal profiles are also attached to the solution itself; it is convenient to cut them into the required sizes.
Self-tapping screws as beacons
When creating a self-leveling floor, self-tapping screws can be used instead of guides. The technology consists of screwing screws into the base, they are connected using a thread and serve as a guide when pouring the self-leveling solution. When the work is completely completed, the screws are simply unscrewed from the base.
When creating a self-leveling floor, self-tapping screws can be used instead of guides.
Types of concrete floor screeds
concrete floor screeds with your own hands , but you must first select their type. Structures can be classified as follows:
- On a related basis. In this case, concrete is poured onto a prepared, cleaned base. Before laying the solution, the surface is primed. The quality of the screed and the duration of its operation depend on the level of humidity in the room. It should be installed exclusively on dry floor slabs.
- On a dividing basis. Before pouring the concrete screed, a waterproofing layer is laid on the floor. The material can be coated, painted or rolled. The height of the screed in this case is at least 3 cm. Despite the good insulating qualities, this design does not have the same strength as the previous option. It is suitable for technical and utility structures.
- On an insulating base. It is used when planning heated floors, where not only hydro-, but also thermal protection is required. The thickness of the screed varies between 4.8-5.5 cm. The strength of the layer can be increased using reinforcement.
- On a reinforced base. When pouring concrete onto the floor, the screed is additionally reinforced with fiberglass or metal mesh. If the latter option is used, it is important to place the material at a slight elevation from the base so that the mixture completely covers the material.
Depending on the number of layers, the screed can be single-layer or multi-layer. The first option is suitable for technical structures, as well as industrial facilities. Multilayer screed is used in residential buildings.
How to fill the screed with beacons yourself
Before pouring the floor screed along the beacons, you need to prepare the solution itself, and only then proceed to introducing it onto the surface.
Preparing the solution manually
This process includes the following steps:
- First, cement and sand are mixed in the selected proportions; it is difficult to do this mixing manually; you need to ensure that the components are thoroughly mixed. You can use a drill or mixer for this purpose.
- In another container, the plasticizer is mixed with water, in the instructions for the plasticizer you can see the required ratio, you can add reinforcing fiber there.
- The dry mixture is added to the liquid components and they are gradually mixed together. Water cannot be added directly to the dry mixture.
The dry mixture is added to the liquid components and they are gradually mixed together.
Pouring technology
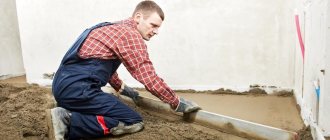
You need to start pouring the screed from the corner opposite the door. The solution is poured between the beacons, the filling is done just above them, the rule is kept at a slight slope, moving in a zigzag manner, leveling is done, and the excess is removed. A solution is added to the existing unevenness. This works over the entire surface.
The screed must be carried out in one room of the apartment in one day, then the formation of cracks and joints can be avoided.
You need to start pouring the screed from the corner opposite the door.
Types of screeds
Floor screed in an apartment can be of two types:
- Monolithic is cement-sand, gypsum (anhydride), self-leveling, etc.
- Dry or prefabricated from building boards.
The screed must be selected depending on the room. In rooms with high humidity (bathrooms and kitchens), gypsum and prefabricated screeds should not be used.
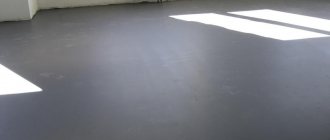
Floor screed care
On average, it takes 4 weeks for the surface to dry completely. The surface should be covered with film for about 7 days. For the first 4-5 days, it is necessary to moisten the screed, but you should not add too much water.
After a week, the surface should dry naturally, the temperature should not be lower than +5 degrees.
You can walk on the floor after 24 hours, but the weight is above 100 kg. can create a load only after 5 days.
On average, it takes 4 weeks for the surface to dry completely.
Carrying out this type of work is suitable for beginners as well. It is important to carefully prepare the solution and monitor the level so that the surface is smooth. If the beacons are installed correctly, then filling will be easy.
Laying bulk materials
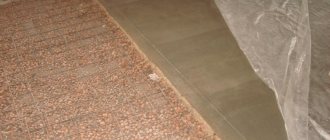
Screeding a floor on the ground is impossible without laying several layers of bulk materials.
First, gravel is poured onto the prepared soil in a layer of 5-10 cm, which is thoroughly compacted and watered. To ensure that the pillow level is the same, you can use pegs with markings (they need to be removed later).
Sand is poured into the next layer, 10 cm thick. Filling is also done using pegs, and compaction is carried out with watering.
The last layer is poured with fine crushed stone with a fraction of 4-5 cm, leveled and sprinkled with a thin layer of sand on top. After this, final watering and compaction of the base is carried out. The result should be a smooth and level area.
Don’t forget to check the level when laying each subsequent layer of flooring.
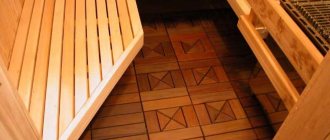
Benchmarks
These are professional-type pin beacons that are used when installing self-leveling floors. They are small structures with three “legs” and a metal rod in the center. Thus, they resemble a tripod. The height of the central pin can be adjusted as needed.
Benchmark
Installation of such beacons is carried out in 1 m increments in a checkerboard pattern. They are not as easy to use as they seem and are professional type equipment. They are recommended for use only by experienced craftsmen. As a rule, such beacons are removed as soon as the base has been leveled to the desired level.
The benchmark is considered an original and professional beacon, which is used under self-leveling floors
Construction thread can serve well when installing benchmarks. It is stretched along the wall - this creates a special guideline that will help set the desired height of the beacons. The thread will help to achieve a perfectly even finished base, since it will not cause errors caused by micro-irregularities of the rough base, because it is in a suspended state.
Preparation of the solution
Now you can start preparing the solution for pouring the floor screed.
Sand, cement and water are used to prepare the mixture. To mix the components, it is better to use a concrete mixer or drill with a special attachment.
Use cement grade M400 or M500.
The required proportions of the screed mortar are 1 part cement, 1 part water and 4 parts sand. First mix cement with sand and then add water.
To increase the strength of the solution, add plasticizers. They prevent cracks from appearing on the screed.
Do-it-yourself concrete screed installation technology
Let's start the analysis with the simplest type of tie - tied, but in addition, this instruction will show steps for installing other types of tie.
Preparing the surface for pouring screed
Let's assume that floor slabs or pre-filled subfloors on the ground are used as the base, on which the concrete screed will be installed. For a bonded base, it is important to ensure good adhesion, that is, a good bond between the base and the poured layer. To do this, the floor surface is primed. In addition to adhesion, the primer will bind all the dust on the surface of the concrete.
The next step is to fill all the cracks and defects in the rough coating with cement mortar, so as not to leave any places for leaks in the future mixture. After repair and priming of the surface, an edge damper tape is glued around the perimeter of the room. The tape serves to compensate for the thermal expansion of concrete. Without the use of damping material between the screed and the wall, cracks are likely to appear on the surface of the screed.
Waterproofing the floor under the screed
Waterproofing the floor surface, as mentioned above, is used only for floating screeds or for screeds on a separating layer. There are two types of waterproofing of cement bases - coating and roll. When using coating waterproofing, its installation is carried out after priming and drying the surface, before installing the edge tape. This is done in order to apply a layer of waterproofing with an overlap of at least 10 cm on the walls.
As a roll waterproofing, as a rule, polyethylene greenhouse film is used, the strips of which are laid overlapping each other by 10-15 cm, as well as overlapping by 10 cm on the walls.
The joints of the waterproofing are glued with mounting double-sided tape or glue. Waterproofing the floor under the screed is mandatory for wet areas - the kitchen, bathroom and toilet, as well as rooms located on the ground floor, to prevent moisture from entering them from the basement.
Insulation of concrete floor screed
Like waterproofing, thermal insulation of the screed is not carried out for the simplest connected screed. The use of insulation is justified if a heated floor system is installed in the floor. In this case, the insulation layer will create a protective screen that prevents heat from escaping downwards. Otherwise, the heat from the underfloor heating pipes will heat not only the air in the room, but also the floor slabs, creating an excessive consumption of thermal energy.
The use of a layer of insulation is also justified to create sound insulation, which is important for the upper floors of private homes, or for apartments in apartment buildings.
For insulation, as a rule, dense sheets of expanded polystyrene or expanded clay are used. The latter has lower sound and heat insulation parameters, but is durable. If the screed is installed on the floor slabs above the basement floor, then the insulation can be laid as desired. If you do not plan to use a heated floor, then the cost of insulation will be recouped in the future by savings on heating.
Floor screed reinforcement
Reinforcement of a cement floor screed is most often carried out when installing a floating screed with heated floor pipes located inside it.
The modern market offers a new material for reinforcement - synthetic fiber. Adding it when mixing into the solution can significantly increase the mechanical properties of the screed, thanks to the creation of strong local bonds. However, this method of reinforcement is more suitable for monolithic screeds without the use of underfloor heating systems. For bases with heated floors, it will be more reliable to use traditional reinforcement methods.
For reinforcement, a special steel mesh is used or it is made from welded reinforcement, creating a mesh with a cell size of 50 to 100 mm. As a rule, ready-made mesh is not expensive, so making a reinforcement frame manually does not make sense.
The most important point when reinforcing a cement screed is the location of the reinforcement. Many people make the mistake at this stage of simply laying the reinforcement on the floor. With this arrangement, the fittings will not work. In order for the steel mesh to function as reinforcement, it must be located in the thickness of the concrete. To do this, you need to use special spacers that allow you to raise the reinforcement frame a couple of centimeters above the ground.
After installing the reinforcement frame, the heated floor system is laid out over it. Reinforcing mesh cells are convenient to use for fastening water pipes. It is important to remember even at the design stage that the use of a heated floor inside the screed increases its thickness, so the height of the room can be significantly reduced.
Installation of beacons for floor screed
To ensure that the surface of the concrete screed is smooth and its installation is easy and quick, a system of beacons is installed, the upper surface of which determines the surface of the future screed. Beacons are installed by level, dividing the room into several zones. Thus, they serve as guides for leveling the cement mortar as a rule.
The distance between the beacon profiles is not regulated and is selected based on the length of the rule with a small margin in order to carry out alternating translational movements to the sides. However, the distance between the wall and the first beacon should be no more than 20-30 cm, because Due to the inconvenience of leveling the mixture in such areas, significant unevenness and subsidence can form there.
Before installing the guides, it is necessary to determine the zero level of the screed, that is, the upper level of the beacon profiles along which the alignment will be carried out. This can be done in many ways, both ancient and modern. Let's consider one of the most modern and simplest methods available to almost everyone - determining the zero level using a laser level.
To begin with, the laser level is turned on and installed in the center of the room at an arbitrary height. Let's call the line that the laser casts on the wall the base line. Before determining the zero level, it is necessary to determine the highest point on the surface of the base. To do this, you need a regular tape measure, which measures the distance from the base line to the floor at several points in the room near the wall. In the place where the value is minimal, the height will be greatest.
At the highest point of the room, a segment is laid down from the base line minus the thickness of the future screed. For example, if a regular screed without insulation, 5 cm thick, is assumed, and the base line is marked at a height of 30 cm, then the segment is set aside at 25 cm. This will be the zero level of the future screed.
The same distance from the base line is laid out along the entire perimeter of the room, and then the points are connected into one line, forming the level of the future subfloor.
Next, they begin to install beacons. To determine the required zero level in the center of the room, the easiest way is to use lacing, which is attached to the wall at the places where the zero level is applied and is pulled in several places perpendicular to the direction of the beacons.
Regardless of the type of future screed, it is easiest to install beacons using a quick-drying solution. To do this, the mixture is applied in several places in small piles along the entire length of the beacon profile, which is recessed into these piles until it touches the previously tensioned lacing.
When installing a tied screed without using waterproofing, self-tapping screws with special beacon profile clamps can be used to install beacons. To do this, self-tapping screws are mounted directly into the floor slabs at a distance of 70-80 cm from each other, and the height of the lighthouse is leveled by unscrewing or tightening the self-tapping screw.
Before pouring the screed, you must wait until the solution in which the beacons are embedded has completely dried. Otherwise, when working as a rule, the horizontal level of their installation may be violated, which will lead to unevenness in the finished screed. When installing beacons on self-tapping screws, you can fill them immediately.
Preparation of cement mortar for pouring screed
Preparing the solution is one of the most important stages, because the strength and integrity of the future coating will depend on its quality. According to current building codes, the mortar for pouring screed must have a grade of at least M-150. For this, either a home-made solution, mixed directly on site, or a ready-made solution, delivered to the site with a mixer from the nearest concrete plant, is suitable.
When mixing the solution yourself, you can use ready-made purchased mixtures, available in a large variety on the market, or use the classic combination of cement, sand and water. To make your own cement-sand mortar, the ratio of these components should be 1:3 (1 part cement and 3 parts sand). The choice of sand must be approached with special attention. As a rule, preference is given to fine quarry sand, sifted through a sieve and cleared of impurities in the form of stones and clay. This sand binds best to cement and gives the best mortar consistency.
In both the first and second cases, it is important to choose the right amount of water for mixing. If there is excess moisture, the screed will shrink too much, and the strength properties of the cement will also be lost. On the contrary, if there is a lack of moisture, the solution will certainly crack, compromising the integrity of the screed. The ideal consistency of the solution should resemble thick sour cream.
Pouring the floor screed
Directly pouring the cement mixture is not particularly difficult, however, all conditions for temperature and humidity in the room necessary for better maturation of the solution must be met. Ideally, the entire pouring process should occur in one go. This will ensure a uniform surface without breaks or joints. It should be taken into account that the setting time of the solution is about an hour, after which it will be impossible to level it.
Filling begins from the corner located in the far part of the room. To do this, the mixture is placed in the space between two beacons just above the zero level. After laying the mortar, the rule is installed on the beacons and it is moved to the sides and towards itself, evenly distributing the cement mortar. If a shortage of mortar is detected, it is added to the voids with a trowel, after which the leveling rule is repeated until a smooth surface without voids is obtained.
After pouring and leveling the cement mortar, the screed is covered with plastic film. This is done in order to avoid the rapid release of moisture from the screed. It is also not recommended to create drafts in the room. For better maturation of the screed, you need to create a room temperature of 15 to 25 degrees Celsius.
After 7-8 hours, or better yet after a day, when the solution has hardened, you need to remove the beacons from the screed and fill these places with the solution. Leaving beacons in the screed can lead to uneven shrinkage of the mortar, which may require an increased amount of finishing leveling mixture.
This simple pouring technology scares many novice craftsmen who are not confident in their abilities. Proper mixing of the solution and even installation of the beacons will give you excellent results, no worse than those of the professionals. To consolidate the material, we suggest watching a video where the screed is poured from start to finish.
Source
Laying insulating materials
To protect concrete from water, a layer of polyethylene 200 microns thick or a special waterproofing membrane is laid. The film is laid overlapping the adjacent canvases by 10-15 cm, and the seams are sealed with construction tape (read: “How to make expansion joints in concrete floors and why they are needed”). The film is also applied to the walls 5-10 cm above the final floor level.
You can choose any of the commercially available insulation for a concrete floor on the ground, for example:
- bulk materials – perlite, expanded clay;
- basalt wool;
- mineral wool;
- Styrofoam;
- polyurethane foam;
- expanded polystyrene.