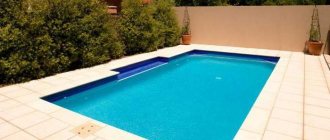
A country house is a great place for rest and relaxation, family and friendly meetings. An outdoor pool will perfectly complement the design of any summer cottage. Big or small, it will make guests comfortable on a hot summer evening. Making a concrete pool with your own hands is not an easy task, however, if you have a great desire and patience, it is quite doable.
A country house is a great place to relax and unwind
DIY concrete pool construction
This article will help you understand the question: “How to make a pool with your own hands from concrete?” Before starting construction, calculate all the little details and nuances in advance. Construction will take some time, but will help avoid further mistakes. Concrete pools have the following advantages:
- long service life;
- installed both indoors and outdoors;
- can have any shape and configuration;
- Various finishing options are possible.
Despite the fact that a concrete pool is a costly and complex type of work, it is highly durable and reliable.
DIY concrete pool construction
Advantages and disadvantages of stationary pools
The design of stationary pools is fundamentally different from prefabricated types; it has its own characteristics:
- strength and durability;
- the ability to create any complex and multi-level shapes, small or huge dimensions and volumes;
- placement both indoors and in open areas, use in winter;
- a large selection of construction and finishing materials and decor allows you to realize your wildest design fantasies;
- the ability to connect communications and additional options and devices: hydromassage areas, fountains and waterfalls, slides, lighting, water purification and filtration systems, drainage and automatic heating;
- such an object is built once and for all, its dismantling is impossible without destruction and will require significant financial and labor costs;
- in winter, the bathhouse must be preserved so that frost does not damage the walls;
- Unlike lightweight inflatable and frame low-budget models that are quickly installed, stationary reservoirs are built in compliance with all construction standards, drying times for materials; errors and shortcomings are unacceptable here and can lead to serious problems.
Stationary structures have both advantages and disadvantages
Construction technologies
To correctly complete the process of building a concrete pool, it is necessary to understand the order and importance of each stage. The technology for constructing a concrete pool includes:
- pool design;
- preparation of the base;
- installation of equipment and embedded elements;
- pouring the bottom and walls with concrete;
- plastering;
- waterproofing and thermal insulation;
- backfill.
All stages of the technology for constructing a concrete pool are important; the correct execution of them will affect the final result of the work.
Preparing the pool base
Pool finishing options
After installing the filters, finishing work begins. Their goal is not only to give surfaces special functionality, but also decorativeness. To perform the work, use a ladder and appropriate tools.
Finishing methods:
- Plastering and painting. This is the simplest and least presentable option.
- Ceramic tile. It looks more attractive than a painted surface. Porcelain tiles look no less beautiful.
- Mosaic. The most interesting finishing option. Mosaic surfaces reflect light, playing with it as the water oscillates.
- PVC film. A simple and inexpensive option. It is used only in small pools. The downside is fragility and fragility.
Preparatory stage
Create your own estimate for the construction of a country pool. Before calculations you need to determine:
- Pool size. Based on the budget and the number of people who will swim in it.
- Depth and its shape. If you have no experience in construction, it is better to choose a regular rectangular shape. Convenient bowl depth – from 1.5 meters.
- The thickness of the structure. The deeper the pool, the more reliable its base should be; the thickness should not be less than 15 cm.
- Geology of the site. It is better to order a geodetic study of the land plot, which will determine the density of the soil and groundwater level, and will help you choose the best place for installation.
- Pool equipment. Proper selection of equipment and embedded elements will allow you to use the pool comfortably and reliably.
- The proximity of the pool to other buildings. Neighboring foundations will put a load on the foundation pit, so all buildings must be completely autonomous.
- Materials. Construction must be carried out with high-quality and proven materials.
The preparatory stage in the construction of a concrete pool is very important; the accuracy of subsequent processes and the overall result of the work depend on it.
Need to buy swimming pool equipment
The first stage of construction is the construction of a pit
So, if you decide to build a pool buried in the ground, construction begins with the construction of a pit. Groundwater may be a negative factor at this stage of construction. As mentioned above, at a high level, the installation of a drainage system will become a protection. If the groundwater level is low, it is sufficient to use external waterproofing. The following materials are used: cement-polymer mixtures, hydroglass insulation, mastics, waterproofing mixtures, polymer-based materials. When the pit is dug, it is necessary to backfill the sand and gravel cushion, followed by the arrangement of a thin screed.
Excavation
After all the initial work, we begin digging a pit for the concrete pool bowl. We draw out the width and length of the pit on the ground, mark the required distances with electrodes or rods using a rope. It is also necessary to leave additional depth for drainage and reinforcement, taking into account that you will need space for formwork spacers. The depth of the pit should exceed the pool bowl by 50-70 cm in width, depth and length. After determining the location of the drainage and filling paths, we begin to dig a pit.
An excavator will dig a pit faster, but this method requires extra costs. If the future pool is small, you can dig the pit yourself. During the work, we take into account the digging angle, and to prevent the soil from shedding, we make the walls of the pit with small slopes. On one side of the pit we make a special recess for the necessary equipment and pipe outlet.
Features of the pool on the ground floor
The room, half buried in the ground, is ideal for placing a temporary or permanent pool. The latter are easier and more profitable to construct at the stage of building a house, since later the process becomes more difficult and requires significant investments.
Advantages (they also apply to basements):
- The covered structure can be used in any weather and season.
- The area of the suburban area is saved. The space that the pool would occupy would be enough to accommodate a small decorative pond, gazebo, flower bed, play area and several trees.
- The pool on the ground floor is a backup water storage facility that increases the fire safety of the house.
- An artificial reservoir is several tons of water, which gives the foundation additional stability and prevents the heaving effect.
Flaws:
- We have to build a variety of communications. For example, ventilation, which an outdoor pool does not need. You will also need containers for overflow, drainage, etc.
- In a room where open water is constantly present, humidity increases. To prevent the appearance of mold and mildew, install high-quality waterproofing.
- If the pool is placed asymmetrically, the foundation is unnecessarily loaded. Concrete slabs can simply collapse.
- If the ground breaks below the level of the slabs, the foundation of the building may lose stability. The pool should not be part of the foundation, it should have its own foundation.
- When digging a pit, you can damage the walls of the house. There have been cases when houses simply “folded”.
The disadvantages are so serious that not every building with a basement will be safe and advisable to place a home pool.
Backfill under the bottom slab
After digging the pit, we proceed to the following stages of work:
- We lay out the equipment. We dig trenches for bottom water drainage pipes. In the left recess we place the necessary equipment (filter, heater, etc.). We arrange the pipes and connect the drain to the sewer. We lay the drain pipes at a slight angle to the equipment pit for easy drainage of water.
We install equipment for the pool
- We lay geotextiles. We compact the earth well with a slight slope towards the drains. We install geotextiles with a slight overlap to avoid gaps in the ground. This creates a protective layer between the soil and the drainage pad and prevents water erosion.
- We create reliable drainage. Crushed stone and river sand were used as drainage materials. We fill the bottom of the pit with crushed stone and river sand with a fraction of up to 8 cm. The average layer of crushed stone and sand is 15-20 cm.
- We are setting up roofing felt. For reliability, we arrange the rolls in two layers with an overlap. Roofing felt rolls are a high-quality and affordable method of waterproofing.
It is very important to take care of high-quality strengthening of the concrete bowl of the pool, since after completion of the work the bottom of the pool will experience enormous pressure from the water.
Introduction
The best solution for equipping a bathhouse and a pond in the basement would be to plan such structures at the stage of developing a country house project. Since the construction of such facilities requires the presence of serious engineering communications - power supply, ventilation, sewerage.
Sauna
And if to install a bathhouse, in a modern configuration, you can get by with a powerful electrical cable and equipping a place for a shower stall (drain), then a swimming pool in the basement of a private house is a serious hydraulic structure that requires sufficient knowledge in this area, and most importantly - skill use this knowledge correctly in practice.
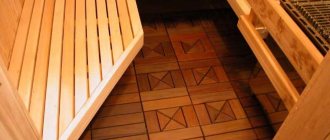
Construction of a bathhouse in a country house is the topic of the next article, and in this one, as you already understood from the title, the construction of a swimming pool in the basement will be discussed in detail. But since the construction of a steam room was mentioned above, I would like to offer developers one of the most profitable options - prefabricated panel structures (see photo).
Prefabricated bath model
The presented room (see photo) is equipped with an electric heater and automatic equipment for turning on and regulating the heating temperature. In addition to this design, you can install a shower cabin, equip it with a special pump (sololift) for forced drainage of waste water to the level of the central sewer system, and the bathhouse is ready.
Shower cabin
Reinforcement of the bottom plate
Before pouring the structure with concrete, we perform reinforcement work on the bottom of the pool. We use reinforcement measuring 8-12 cm. We treat it with a special anti-corrosion agent twice. We lay the rods horizontally and vertically to obtain reinforcement in the form of a 20*20 cm cage. We make two levels of reinforced mesh, and tie the intersections of the frame with special wire or plastic clips.
Reinforcement of the bottom plate
The frame rods cannot be connected with a welding machine, as they will be subject to rapid corrosion. We install the necessary embedded elements at the bottom of the pit and secure them with wire; if necessary, protect them with formwork. In order for the concrete pool bowl to be strong and reinforced, it is important to place the frame on special supports or bricks, so that the reinforcement will be inside the concrete screed. We bend the rods upward along the perimeter of the bottom (later we will secure them with the reinforcement rods of the pool walls).
Alternative options for constructing a bowl
When figuring out how to build a concrete pool, you should not forget about alternative options for constructing a bowl.
For its construction you can use:
- concrete or expanded clay blocks;
- expanded polystyrene blocks;
- steel sheet;
- finished structure made of fiberglass or plastic.
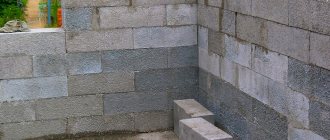
When using concrete blocks, the bottom of the pool is first poured, but the walls of the bowl are laid out from these same blocks. Every third row of masonry should be reinforced to give the structure additional strength. You can also make a stationary ladder from the blocks, instead of a stepladder, which is not so convenient.
The walls of the pool can be made of concrete blocks. Every third row of masonry should be reinforced. The surface of the bowl must be treated with waterproofing, and then finishing work must be carried out
Next, the bowl is processed in the same way as a monolithic structure: waterproofing and finishing work is carried out. A special PVC film can be used as a decorative covering.
It looks very attractive, costs much less than ceramic tiles, and is much easier to install. But the service life of this material is only 5-7 years, then the finish will have to be updated.
PVC film is a convenient material for finishing swimming pools. It is easy to install and looks attractive, but only lasts a few years
Large format polystyrene foam blocks are also laid on a concrete base. They are connected using grooves and ridges provided by the design.
The material is very convenient to work with because it weighs little. If necessary, the blocks are trimmed with a regular hacksaw.
It is not difficult to make a pool with walls made of polystyrene foam blocks. The structure should be reinforced, and then the concrete solution should be poured into special holes
After the masonry is completed, the pool equipment and fittings should be installed. It is placed inside the cavities existing in the blocks.
The space between the communication pipes and polystyrene foam is filled with polyurethane foam. After this, liquid concrete is pumped into the cavity with reinforcement. When the structure is dry, you can begin finishing the finished bowl.
A pool made of steel sheets can be made either on a concrete base or on carefully compacted soil, although the latter option is not as reliable as a screed. Since the steel sheet is supplied in a roll, it is most convenient to make a bowl from it in the form of a circle, oval or figure eight.
A pool made of steel sheet can be given a round or oval shape. Such structures can be recessed into the ground or located on the surface
The edges of the sheet are connected with a special profile, which avoids welding. After installing the bowl, it is covered with PVC film and filled with water so that the finishing material is pressed tightly against the walls of the bowl. To fix the film along the top of the side, use a fastening profile. After this, the technical equipment of the pool is installed.
A finished bowl made of fiberglass, plastic or modern composite materials is not a cheap pleasure, even if you choose a standard design rather than a custom-made one.
To deliver and install the bowl, you will have to use a crane and other special equipment. First you should dig a pit of a suitable configuration. Then its bottom is leveled, covered with a layer of crushed stone or gravel and compacted.
The finished pool bowl is not easy to deliver and install in the pit, but its further installation is relatively simple, since waterproofing and finishing are not needed
After this, you can lower the bowl to the bottom of the pit. The space between the walls of the pit and the bowl is filled with soil and compacted. Such structures usually do not require additional waterproofing and finishing. All that remains is to install the equipment and begin operating the pool.
The weight of such pools is usually relatively low, so owners of areas with high levels of soil freezing should exercise caution. In winter, frozen groundwater can simply push the bowl to the surface.
Filling the bottom with concrete
Self-prepared concrete will cost less, but then you need to have several assistants for the work, so that one person prepares the concrete, another pours the solution, and a third levels it. Formwork for the bottom of the pool will help to carry out the pouring process more smoothly and accurately. To prepare concrete you will need:
- concrete mixer;
- vibration installation;
- cement M500;
- sand;
- water-repellent additives;
- water.
We need M500 cement.
The quality of concrete greatly depends on the purity of its components. To preserve all the properties of the substance, we buy bags of cement no earlier than a month before pouring. We use crushed stone of a fraction from 10 to 20 mm; it should not contain foreign impurities. The preferred sand granule size should be up to 2mm. On average, a bucket of M500 cement will require 5 buckets of sand and 7 buckets of crushed stone. For good mixing of materials, it is better to use a concrete mixer. To get a high-quality solution, add the components in the following order:
- Mix sand and cement.
- Add water and stir until it reaches the consistency of sour cream.
- Add crushed stone.
- Before pouring, add a hydraulic additive to the solution.
Fill the solution with a slight slope towards draining the water. The minimum thickness of the pool bottom is 15 cm. The larger its size, the thicker the bowl is needed. During the pouring process, you should focus on the maximum density of concrete and the absence of air voids in its thickness. For this we use a vibration machine. The reinforcement must be inside the concrete solution. Leave the filled bottom to dry completely for 10-12 days.
Pouring the bottom of the pool with concrete
The second stage of construction - installation of formwork and reinforcement
This stage is performed in the following order: installation of external formwork, reinforcement, installation of internal formwork.
Installation of formwork and reinforcement are very important operations in the construction process that must be performed by highly qualified specialists. After all, the strength and quality of the future pool depends on this. When constructing pool bowls, the following types of formwork are used: wood, plywood, or unified metal. If the pool has a complex configuration, then plywood formwork is used. All types of formwork must withstand the pressure of the concrete solution to avoid deformation and buckling. When constructing a pool bowl, steel reinforcement and special knitting wire are used. Under no circumstances should welding be used, as this will reduce the corrosion resistance of the reinforcement. In accordance with technological standards during construction, it is necessary to maintain the distance between the reinforcement bars and use the appropriate diameter.
Construction of walls
At the joints of the bottom and walls of the pool bowl, we lay a water-expanding cord to waterproof the seams. Such a cord will close any possible gaps and will not allow water to pass through. Vertical formwork will help build the walls of a concrete pool. The correct shape and durability of the pool bowl depends on its quality. You can use formwork made of wood, metal, plywood or corrugated board. The main thing is to ensure maximum strength of the formwork.
We place reinforcement in the center of the formwork and connect it with specially left vertical rods when filling the bottom of the bowl. We allocate space in the wall for embedded elements (skimmers, nozzles). It is important to take into account the water purification system in advance, since its absence will cause considerable discomfort. A skimmer filtration system for water purification is more accessible and cheaper than an overflow one.
To reduce the number of voids when pouring a wall, we use a reinforcement rod to simulate vibration. The thickness of the wall is at least 20 cm. After the concrete hardens, we remove the support elements. Since we receive a bowl with unevenness and roughness, we begin the plastering process.
Construction of pool walls
Types of concrete pools
In general terms, pools differ in shape, size, design, and installation location. Depending on their purpose, concrete bathtubs can be used for household or public use, swimming, for teenagers, for children, for all age categories. However, all types of pools have one main difference related to water purification:
- Concrete bathtubs with skimmer water purification differ in their filling level. The mirror does not reach the edges of the sides. The water in the bowl is at the level of the skimmer, where it is drained and immediately sent for treatment.
- For concrete bathtubs with an overflow system, the mirror is flush with the sides. Water flows over the edges into drainage trays, travels a complex path and only then is supplied to the treatment plant.
The skimmer system is considered the most convenient and easiest to operate. When making concrete pools, it is preferred.
Plastering
To ensure reliable adhesion of the plaster to the concrete, before plastering the walls we prepare them:
- Manually make the surface of the bowl more rough.
- Using dowels, we attach the mesh to the pool bowl.
- Before fixing, we treat the mesh with a special anti-corrosion agent.
After fixing the mesh, apply moisture-resistant plaster to it, level the pool bowl as much as possible and leave it to dry completely. After drying, we install the embedded parts of the pool.
Video description
The video shows the sequence of operations to construct a concrete pool:
Internal waterproofing
An important stage that determines whether the pool bowl will leak. Firstly, all the internal planes of the bowl are plastered, leveling them. To do this, use conventional plaster mixtures with moisture-resistant characteristics.
Then continuous waterproofing is carried out, for which a polymer composition is used. It is blue. Apply with a roller, brush or spatula. Optimally, apply two layers.
The next stage is finishing. There is a huge variety of offers here. The simplest one is PVC film of different colors. You can use ceramic tiles, mosaics, etc.
PVC film for finishing a concrete pool Source stroi-remontirui.ru
Plastic pools
Choosing a swimming pool for a summer residence often confronts consumers with the question of whether it is worth building an expensive and complex concrete structure if there are offers of ready-made bowls on the market. The question is posed correctly. In principle, this is what manufacturers used as a starting point, in order to make the process of constructing pools simple and quick.
So, what are stationary plastic pools? This is a structure made of sheet polypropylene with a thickness of 0.6-1.5 mm. The thicker, the more expensive.
The plastic has a very smooth surface, hence its performance in terms of proper cleaning of the tank. Dirt does not collect on the walls of the bowl and algae does not grow. In this case, you can use any reagents for cleaning, because the polymer is a chemical-neutral material.
This pool can easily withstand temperatures from -50C to +80C. That is, he will survive the winter without problems. The structure itself is airtight, so there is no need to do any additional waterproofing. By the way, a smooth surface under water does not become slippery.
Round plastic pool Source idei-landshafta.ru
As you can see, stationary plastic pools have a decent list of advantages. But there are also disadvantages:
- Manufacturers do not accept these products to order, so there are restrictions in terms of size and shape;
- Compared to concrete models, they have a shorter service life .
Waterproofing
Waterproofing a pool is an important stage that should protect the structure from moisture as much as possible. Liquid products based on latex and silicone will be effective and reliable. We apply them to the plastered surface with a regular brush or roller, filling all the pores and cracks as much as possible, applying in two layers.
After a strong film has formed, we check the pool for leaks. Fill it with water, note the liquid level and leave to sit for 10-15 days.
Waterproofing a pool is an important step
Common mistakes
Construction of a swimming pool seems to be a simple process only at first glance. In fact, errors are possible at any stage, each of which can become an obstacle to the normal operation of the structure.
Mistakes when constructing a swimming pool on the ground floor:
- There are no openings for bookmarks. If you do not make holes for the embedded parts in advance, you will have to drill or chisel the concrete later. This can lead to cracks and weakening of the entire structure. The pipes are laid during reinforcement, immediately after the first layer has been laid. The openings must fully correspond to the dimensions of the mortgages.
- Concrete poured incorrectly. You cannot use concrete less durable than M350. Before pouring the mixture, check its quality, otherwise the bowl will simply fall apart. The bottom and sides are filled in one go.
- Cracks appeared after the formwork was removed. If the integrity of the hardened mixture is compromised, it means that the strength calculation was made incorrectly and the wrong diameter of the reinforcement was selected. If groundwater and surface water are not drained, cracking may also occur.
- There is no overflow tank. It should be positioned below the bowl to allow water to drain. Therefore, the house must have a basement. When designing a pool, it is presented as a technical room. Plastic containers for 2-5 tons of water help solve the problem.
The construction of a monolithic structure in the basement is a responsible undertaking that requires calculations and compliance with building codes. Any violation of the requirements for building structures and SNiP lead to serious consequences - from musty air to structural destruction.
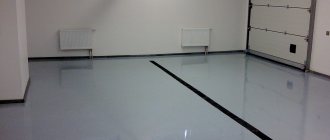
Thermal insulation
Thermal insulation is used to better retain heat and save energy when heating. It is produced by a spraying process and often hired specialists are called in. The modern market provides kits for self-insulation by spraying polyurethane foam. However, such disposable kits are expensive and not available to everyone.
Thermal insulation of the pool can be done using polystyrene foam sheets. They are laid in a double layer with a total thickness of 5-8 cm so as to cover the seams of the first layer. At the end, water-repellent mastic is applied.
How to choose sites for construction.
First of all, think about the space that you can allocate on your site. The area should be open to adequate sunlight and free of trees. What harm can trees do if they provide much-needed shade on a hot day? But the problem is that, firstly, leaves or even small twigs will fall from the trees, and if the tree is a fruit tree, even more so, fruits or bugs.
It is believed that the best soil for a pool is clay. Since clay itself serves as a good barrier to ground moisture. Therefore, those who have a choice should better give preference to such a place with clay soil.
If you are going to build a pool and you have the opportunity to do this work with an excavator or use other construction equipment: a concrete mixer, a dump truck, then think about a place where these machines can drive up easily and without problems.
Also keep in mind that if the groundwater in your area lies close to the surface of the earth, namely at a depth of less than one meter, then you should not build a pool in a pit.
A low-lying area would not be the best location, because in this case the water in the pool will be polluted by rainwater.
backfilling
Backfilling is carried out manually and evenly so that the bowl does not move or tilt. We install insulation sheets at a distance of 25 cm from the outer edge of the pool. We fill the space between it and the bowl with a mixture of sand and cement (for 1 bucket of cement we use 3 buckets of sand). We slightly moisten the cement-sand mixture with water. We fill the distance between the insulation and the foundation pit with sand, this will improve the tightness and density of the backfill. Backfilling is carried out in several stages over 3-5 days for better sand shrinkage.
Pool backfill
Types of pool designs
Today, monolithic, frame and inflatable pools are installed in basements. The last option should only be considered if you do not plan to swim often. But for regular use, it’s worth taking a closer look at the other two types.
Monolithic
Constructions of this type are the most solid and durable. But, setting up such an option will not be cheap. Such structures cannot be erected with one’s own hands, without proper preparation. Since this is a very heavy structure, there is a high risk of making a mistake that will lead to damage to the entire house.
Healthy! Monolithic pools seriously increase the pressure on the ground. If you install a 4-ton pool in a house that weighs 300 tons, the changes will not be significant. But if the weight of an artificial reservoir reaches 90 tons, then this is actually dangerous.
You will have to not only calculate the load-bearing capacity of the existing foundation (taking into account how long it has already been in use and under what conditions), but also purchase hydraulic concrete. It's not cheap.
Therefore, of course, it is possible to build such a pool, but it is better to give preference to the next option.
Frame
In this case, we are talking about a factory design, which consists of metal pipes, film, fittings and everything necessary. These are lighter structures that are much easier to install yourself. And most importantly, a frame pool can be installed on the surface. That is, the need to dig a pit is eliminated. However, in this case it is also worth making sure that the foundation can withstand the increased loads.
Among the advantages of frame pools it is worth highlighting:
- A huge variety of shapes and volumes of bowls. If you have doubts about the strength of the foundation, you can always choose a more compact pool.
- If the need arises or the structure was installed in the wrong place, it can be moved without any problems.
- Prefabricated pools are much cheaper.
- Constructions of this type last for quite a long time, since we are talking about a metal structure and a durable film that is located inside.
Healthy! Since we are talking about film elements, they can be damaged by sharp objects. Therefore, such structures must be used carefully.
If we talk about the disadvantages, then a significant disadvantage of frame pools is that they do not provide additional equipment.
Recommendations
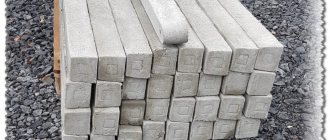
What types of building blocks are there?
- Reinforced concrete blocks. Durable blocks will withstand any load and effectively protect against noise.
- Expanded clay concrete blocks. They have high strength and good thermal insulation characteristics.
- Cinder blocks. The budget type of blocks, however, requires additional insulation and cladding. They will have low sound insulation and environmental friendliness.
- Foam concrete blocks. Fragile and short-lived. They have high fire safety and sound insulation.
- Gas silicate blocks. Lightweight, not subject to fire, but fragile and subject to significant shrinkage.
- Arbolite blocks. Fire-resistant and economical material, retains heat well, but requires waterproofing, nondescript in appearance.
Reinforced concrete blocks
How to start building a house on a plot?
- Buy a plot. Pay attention to its location, size, proximity to communications.
- Order a geological survey of the site. It is important to hire experienced professionals to conduct soil and water laboratory tests. They will establish the groundwater level so that they can begin building the house in the safest location.
- Prepare a project. Order experienced specialists to create a high-quality project that will take into account all the nuances.
- Purchase the necessary materials. When choosing materials, rely on their quality, manufacturability and cost-effectiveness.
- Order a team of builders who will be competent in the issues and conscientious in completing the assigned tasks.
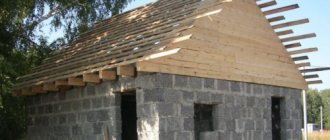
How to build a bathhouse from foam blocks?
- Build the bathhouse on solid soil.
- Calculate the number of foam blocks in advance to avoid leftover material at the end.
- Before pouring concrete, fill the foundation with crushed stone, expanded clay and lay down reinforcing mesh.
- After pouring the concrete, waterproof it.
Bathhouse made of foam blocks
- Fasten the first row of blocks using a mixture of cement and sand.
- For better strength, arrange the mesh every 2-3 rows of blocks.
When constructing houses from expanded clay concrete blocks, consider:
- Without long-term external finishing, the blocks begin to collapse.
- Pay enough attention to external waterproofing of walls, as such blocks absorb moisture well.
- The blocks require additional insulation.
- They are not suitable for foundations due to their increased ability to absorb moisture.
Building a foundation using TISE technology is the most budget-friendly and affordable option for building a foundation with your own hands.
- This foundation laying involves the combination of two technologies - columnar and strip. To implement this technology, a special drill has been developed, which allows drilling piles with a lower expansion at a budget cost. Such piles have better load-bearing capacity, and the grillage allows you to evenly distribute the load and not experience it during heaving of the earth.
- TISE technology allows you to independently make a high-quality and reliable foundation for any building at an affordable price.
How to build a swimming pool in a private house
It is difficult to find the owner of a country house who has not at least once thought about building a swimming pool or a plunge pool in the house. This desire is understandable. The opportunity to swim regardless of the time of year and weather conditions, to always be in good shape and the incomparable pleasure of taking water procedures is captivating.
Many novice developers believe that making them is not very difficult. Enough desire, free funds, and the dream came true. The many pitfalls and features hidden in the “wet” area arranged inside the house are overlooked. This is exactly what we will talk about in today’s material, from which you will learn:
- How does a swimming pool in a private house differ from an ordinary plunge pool?
- Is it worth building a “wet” zone in the house;
- What nuances should you learn about before starting construction of a swimming pool in your home?
- How to build a swimming pool in a house;
- How much will it cost to build a “wet zone” inside the cottage?
Swimming pool and plunge pool: similarities and differences.
If you look at the results of our survey, you can see that the majority of FORUMHOUSE users were in favor of the “wet” zone.
But, before moving on to the specifics of arranging a font or swimming pool in a private house, you need to understand these concepts, because Already at this initial stage, confusion arises, because a font is often called a pool, and vice versa.
A swimming pool is a complex engineering and hydraulic structure that includes a bowl, filtration equipment intended for water treatment, pumping equipment necessary for recirculation (changing and, if necessary, draining water), and a water heating system.
A classic font is a relatively small container (sometimes mobile, made of wood) filled with cold water, intended for contrasting water procedures. Traditionally, a font is an attribute of a bathhouse, and a small pool is an attribute of a sauna. In the font there is a more frequent change of water.
An indoor pool is primarily intended for entertainment and swimming, and equipped with attractions - waterfalls, geysers, hydromassage, countercurrent (artificial current) - it becomes a center of attraction for the whole family.
Few people can afford to build a full-fledged swimming pool in their home for several people, “with three lanes of 25 meters each.” Therefore, developers choose a different type of pool: a therapeutic and recreational pool, small (sometimes also called a font), equipped with SPA equipment with a water volume in the bowl of 1-3 m3.
The second option - sanitary and health facilities with a volume of 3 to 8 m3, just like the first type of home “reservoir”, are used as an addition to a sauna, hammam or bath complex.
To swim, they build a larger structure - 15-50 m3, 1.5 meters deep (which is enough for swimming). Accordingly, the requirements for such structures, as well as their price, increase in direct proportion to their size.
But even if you want to build a relatively small pool in your house, with a bowl size of 3x5 meters, you should prepare in advance for large expenses. Therefore, before you begin its construction and make an informed decision, you need to understand what requirements are imposed on the room within which the “wet” zone is located.
Construction of a wet zone: pros and cons
The advantages are obvious - the pool is in the house itself, you can use it whenever you want. This, as follows from the comments of our users, becomes the main driver of the desire to build it.
LutsenkoFORUMHOUSE user
For me, this will be a place of cultural relaxation, where you can splash around and sing karaoke.
BarnauleichikFORUMHOUSE user
I planned to build a big house for the whole family, as they say, “for centuries.” I want a pool in the cottage that is 5 meters long. I will equip it with a countercurrent and will “swim” against the current.
The participants of our portal are echoed by a user with the nickname Sintetik, who planned to build a house measuring 11x16 meters with a swimming pool and a sauna. In his opinion, the main idea of such construction is to get all the water activities without leaving the building.
The advantages are obvious, but there is a second side to this issue. The disadvantages become real “underwater reefs”, on which the desire to build a “wet zone” can be broken.
First, here are the results of our second survey:
As you can see, most of the users of our portal chose the option of placing it on the site, in an extension to the house. This is due to the fact that the pool in the house is not just a large “bathtub” filled with water, but, as mentioned above, it is a real water complex equipped with expensive engineering equipment. There are special requirements for its design, premises and building, which should be known in advance.
How to build a swimming pool at home
Already from the name “wet” zone it is clear that this room must meet a number of specific characteristics. This includes reliable waterproofing, the use of waterproof materials and compounds for finishing the “wet” area, the provision of all necessary communications, and a well-designed ventilation system.
In addition, a swimming pool or plunge pool in a house always means additional and heavy weight. The stone bowl, the construction of which took tens of cubic meters of concrete, plus the water in it, puts a significant load on the underlying structures or soil layers.
There are projects of private houses where the pool is located in the basement, on the first floor, or on the second floor (in this case, additional load is placed on the ceilings and walls).
Based on this, we remember this rule - the pool is designed together with the house. The main mistake is to erect a building and then think about how to place a swimming pool in it, or try to place a large plunge pool in the basement. In this case, the base plate may simply not withstand the load and crack.
The pool and the house should be two structures independent of each other. The pool bowl must not be connected to the walls of the house; building ceilings or walls cannot be supported on the bowl.
[email protected] FORUMHOUSE user
The principle of construction is the following - first we make a general design and coordinate it with the organization that will build your pool. According to the technology, first a bowl is built, and then a building is erected around it. The depth of the building's foundation in the place where it runs next to the pool is determined by the authors of the project.
TimidjarFORUMHOUSE user
The foundation of the house should not be connected to the foundation of the pool.
During construction, special attention should be paid to the strength and tightness of the bowl, as well as reliable waterproofing of the “wet” area. Reinforcement, grade of concrete, additives that give the mixture increased water resistance, waterproofing, additional equipment that is planned to be equipped with an individual pool, the presence of all necessary utilities - all this is taken into account in advance, and not after.
The waterproofing of the bowl must be continuous over the entire surface. When casting a concrete bowl (if this is the construction option chosen), it is undesirable to make cold seams - in the future they may become a possible source of leakage. Hence, the walls of the bowl are filled in one go.
In addition, if you plan to build a swimming pool in a house, you need to find out whether the soil can withstand the combined weight of the building and the bowl filled with water, or whether the soil may settle unevenly over time, which will lead to an emergency: the walls of the building or the bowl will crack, and water will flow out of it will begin to flow out, washing away the foundation. In this case, expensive repairs will be required.
It is impossible to understand how to build a swimming pool at home without solving a number of engineering and design problems. Moreover, building a bowl is not always one of the most difficult tasks.
How to build a swimming pool at home - problems and solutions
The organization of premises for a swimming pool or plunge pool and the availability of free space are one of the main factors influencing the final decision on their construction. Those. — an additional room is added to the area of residential and non-residential premises of the house where a swimming pool or plunge pool will be located.
Considering that people don’t swim in the pool every day, we come to the conclusion that there will be a room in the cottage that will actually be idle for a large amount of time. And the cottage itself will have to be built with an increased area, and all its engineering systems will have to be designed and tied to servicing the pool.
Full-fledged indoor pools are built in cottages with an area of 300-400 square meters. m or more.
But even having decided to build a huge house (which still needs to be maintained and heated), you need to ask the opinion of the household - how often will they use the pool, and whether it will eventually turn into an expensive and useless toy that requires constant investment.
Many developers miss such an important point in arranging a “wet” area as ventilation. In one of our previous articles, we already talked about the features of ventilation in “wet” rooms, but we repeat - a large volume of water constantly present in the house is a source of increased humidity.
From 1 sq. m of pool, approximately 0.25 (the figure is given as a guide) liters of liquid evaporates per day. Without installing supply and exhaust ventilation (which is calculated in relation to the area of the water surface in the pool bowl or font and the temperature of the water and air in the room), the pool in the house will turn into a constant headache.
In the absence of ventilation, the evaporated water will condense and fall out in the form of droplets on the surfaces of the “wet” area. Over time, this will lead to deterioration of the finish, dampness, the appearance of fungi and an unpleasant odor.
And this is just one of many factors that complicate the arrangement of the “wet” area of the house. Let's add the need to install engineering and filtration equipment, heat water, and arrange mortgages in the premises for additional communications.
You also need to think in advance about where to drain the water. A septic tank or storm drain may not be able to handle large volumes of discharge. That is, all systems in the house and the pool area must be calculated with a reserve for its long-term operation. Don’t forget to add in the costs of laying additional routes for electrical cables in the “wet” room, installing another electrical panel, the cost of purchasing waterproof switches and switches, pumps and electricity costs. After all, for a swimming pool to function, it is necessary to equip it with appropriate equipment powered by electricity. We calculate whether the allocated power is enough for the normal operation of the “wet” zone in the house. For reference, we will resort to the following approximate figures given by a user with the nickname Besrom:
- Filtration system - 0.55 kW;
- Backlight: two LED lamps 12 volts - 100 W;
- Control system, valve - 0.50 kW;
- Counterflow - 3.5 kW;
- Waterfall - 2 kW.
Moreover, it is best to use a three-phase network of 380V. It is not surprising that the monetary component becomes a decisive factor when answering the question “to be or not to be in a “wet” zone in the house.”
Make a pool in your house: cost of construction and maintenance
NahNahFORUMHOUSE user
I planned to build a swimming pool 15x5x3 meters. Now I’m wondering how much it will cost me to maintain it for 1 year and for 10 years, taking into account all the necessary planned activities and major repairs.
The “wet” area in the house can become a significant expense item, because the pool or plunge pool must be filled with water and its level maintained (the water constantly evaporates; to reduce the level of evaporation, the pool is covered with a special blanket or blinds). It’s not enough to understand how to make a swimming pool in a country house, and what budget to set aside for construction - you’ll also have to spend money on “chemistry” to disinfect the water and, most importantly, maintain acceptable conditions and above-zero temperatures in winter. Those. the water will have to be heated, and the home’s heating system may not be able to cope with this. Considering that the climate in our country is harsh, and the heating season, depending on the region of residence, will last 6-8 months, the pleasure of water treatments can cost a pretty penny.
BeutifletFORUMHOUSE user
Due to ventilation for moisture removal, the heating of the pool room will be approximately the same as when heating a room of a similar area and design. Although pools are usually not drained (except in cases of emergency or planned repairs to the bowl), about 0.5 kW will be spent on circulation and filtering around the clock. So consider it.
[email protected] FORUMHOUSE user, Moscow.
From my experience, I will say that it cost 1.7 million rubles to build a building with a bathhouse, shower, toilet and relaxation room that accommodates a 3x6 meter pool. Swimming pool with a concrete bowl and all heated equipment, countercurrent, waterfall - 1.2 million rubles.
According to user Step48, owning a house with a wet zone can be compared to owning a car. The more complex and expensive the machine, the more expensive its maintenance. It’s the same here: you have to spend money on water treatment, water heating, maintenance (not everything can be done with your own hands), monitoring the operation of equipment, performing scheduled maintenance, etc.
SintetikFORUMHOUSE user
I built a swimming pool in my house with my own hands. Bowl 3x4x1.5 meters. It took about 10 cubic meters of concrete. Construction cost 100 thousand rubles. Equipment + another 400 thousand rubles. Mosaic finishing – 200 thousand rubles. The total is already 700 thousand rubles.
Based on these figures, the construction of a home “wet” area with a swimming pool measuring 15x5x3 will cost 10 times more expensive, because a heavy bowl will pull down a serious foundation; it is necessary to make engineering equipment, pumps, etc. In fact, in terms of costs and further maintenance, this is not the construction of a room for a “wet” zone, but the construction of a second house, not even a house, but a full-fledged house.
Summarizing
Undoubtedly, having a swimming pool in a private home is both prestigious and useful, but only if there are sufficient funds for its construction and, importantly, constant operation and maintenance. In other cases, you need to think ten times before deciding to build it. Therefore, when arranging a “wet” area or room for taking water procedures, first of all, you need to use common sense and, as an option, build a small pool or plunge pool. Moreover, our portal has accumulated extensive experience in the construction of such home structures.
In the topics on FORUMHOUSE you can see a detailed photo report on the construction of a swimming pool in a house and the stages of building a house from a KBB with a swimming pool. You can ask a question to experts in the topic: “Swimming pool according to the rules. Design and equipment".
We recommend reading articles that tell you how to properly decorate rooms with high humidity, and how to glue tiles in the bathroom so that they do not fall off.
Our video features a bath and laundry complex with a plunge pool, built with your own hands. We also recommend that you watch the video, which shows the details of the construction of the shower and font of the chopped bathhouse called “Fairy Tale”.